Google Chrome is an advanced internet browser with an array of tip-top features and tools to accommodate its bustling user base. One is toggling live captions and receiving transcribed audio on the fly without seeking alternative measures. This feature wasn’t always a part of the Chrome browser and has risen to popularity only relatively recently.
It’s safe to say that live captions work seamlessly on Google Chrome, but you still need to know how to toggle them. The guide will attempt to convey this, exhibiting an easy-to-follow tutorial to swiftly approach the function in question. When you’re done reading this write-up and feel ready to go to the next step, check out these high-quality accessibility extensions for Google Chrome to get the very best out of the Chrome Web Store.
For now, though, let’s discuss the live caption feature in Google Chrome.
What is the live captions feature in Google Chrome?
Being one of the major constituents of the overall accessibility feature set of Google Chrome, live captions allow people to visualize auditory content in written form. The best part about these is that they occur on the go, alongside a video, an audio file, or any other media, allowing you to enjoy generated captions in real-time, so you don’t miss a word about what’s being discussed.
Live captions can painlessly be toggled on from your Chrome browser’s “Settings” section. In addition, you can customize their appearance to a fair extent as per your preference so they surface on your screen comprehensibly. There’s also the possibility to keep live captions toggled on for multiple videos if you have the “Autoplay” functionality switched on the relevant video platform.
It’s worth noting that the live captions feature in Chrome is available on Windows PCs. If you’re a Chromebook user, log into your ChromeOS settings and check the tool at hand accordingly. Here’s a detailed guide on how to do that. With that said, let’s get into using live captions the easy way using the Chrome browser.
An easy way to use live captions in the Chrome browser
Chrome makes it easy for users to navigate the browser and use its ingrained tools. The same story holds true for the live captions functionality as well. To start with it, navigate to the “Settings” portion of the Chrome browser by clicking the “Customize and control Google Chrome” button. The latter can be seen in the top-right corner of net surfer’s interface.
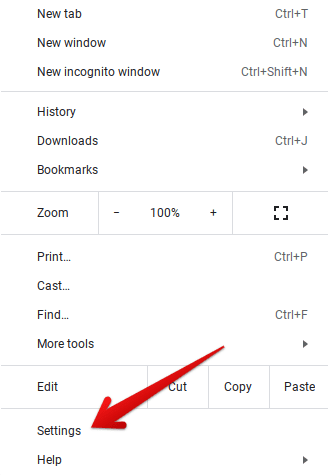
Clicking on Google Chrome’s “Settings”
You should now be taken to the “Settings” page of the Chrome browser in a new tab. The next step is to select the “Accessibility” tab on the side panel to the left. Doing so will reveal the proper tools and features available at your disposal.
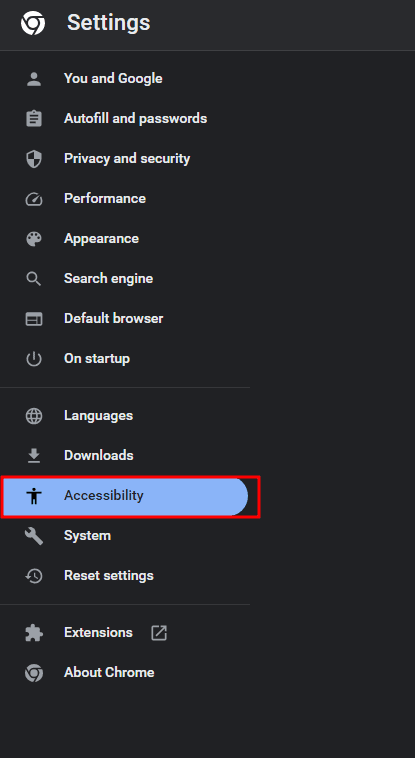
Clicking the “Accessibility” section
It will be simple enough to enable the “Live Caption” feature in this step. The tool’s toggle will be right beneath the “Accessibility” subheading. Click the toggle to switch on live captions on your Chrome browser.
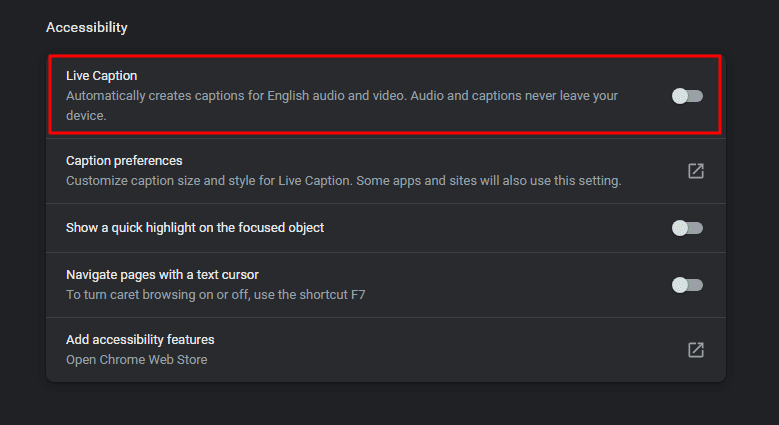
Enabling the “Live Caption” feature
Good job so far! You’ve successfully learned how to enable live captions on your Chrome browser. Time to put it to good use by heading over to any media source with audio and letting the functionality kick in automatically. You’ll observe that the feature works in real time, and there’s also an option to pin the “Live Caption” window so it stays in focus. Moreover, you can change the window’s position by clicking and dragging its borders seamlessly.
Last but not least, whenever you’d like the feature to go away, all you have to do is click the “X” icon. Doing so should shut the tool down right there and then. This is the gist of the tool that gets you ready enough to utilize “Live Caption” day in and day out. However, we’re yet to explore the preferences associated with the live captions tool within Google Chrome.

The “Live Caption” feature in Google Chrome in action
Customizing live captions in Chrome for enhanced readability
You don’t have to live with a barebones “Live Caption” experience on your Chrome browser. We recommend tweaking the preferences of the tool in question, so you can modify the size, style, and other metrics to enjoy Chrome’s live captions at their best. To begin, you must go to the same “Accessibility” section in Chrome browser’s “Settings.” From there, click on “Caption preferences,” and you can proceed to the next step.
- The guidelines outlined ahead of this step pertain to the Windows operating system. Although similar intrinsically, the steps can differ slightly if you’re using another operating system.
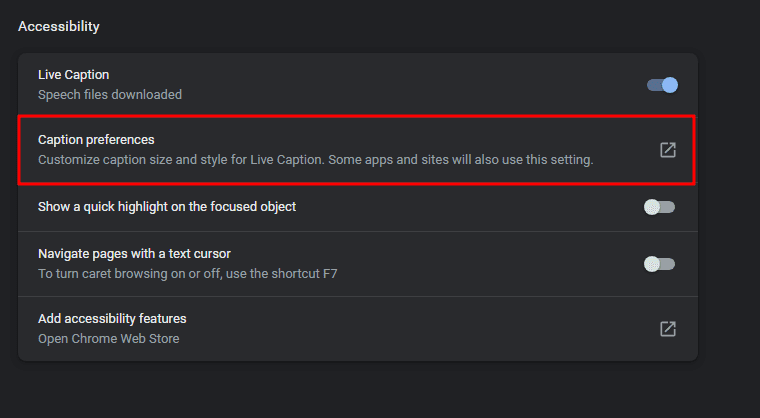
Exploring “Caption preferences”
You should now be taken straight to the caption preferences section on your Windows PC. From here, it becomes possible to customize how your captions look whenever they pop up in the Chrome browser during media playback. For us, the Windows side of things sports various options for you, such as changing the font of captions and their background.
On the color front, it is also possible to tweak advanced caption-related parameters, such as caption transparency, style, size, and several effects. The latter includes “Raised,” “Depressed,” “Uniform,” and “Drop shadow,” and all of these can be changed back and forth in a couple of clicks. The best part is that after making all of these edits, you can catch a glance at your changes on the spot under the “Preview” section that says, “Use the dropdown menu to change how closed captions appear in Windows.”
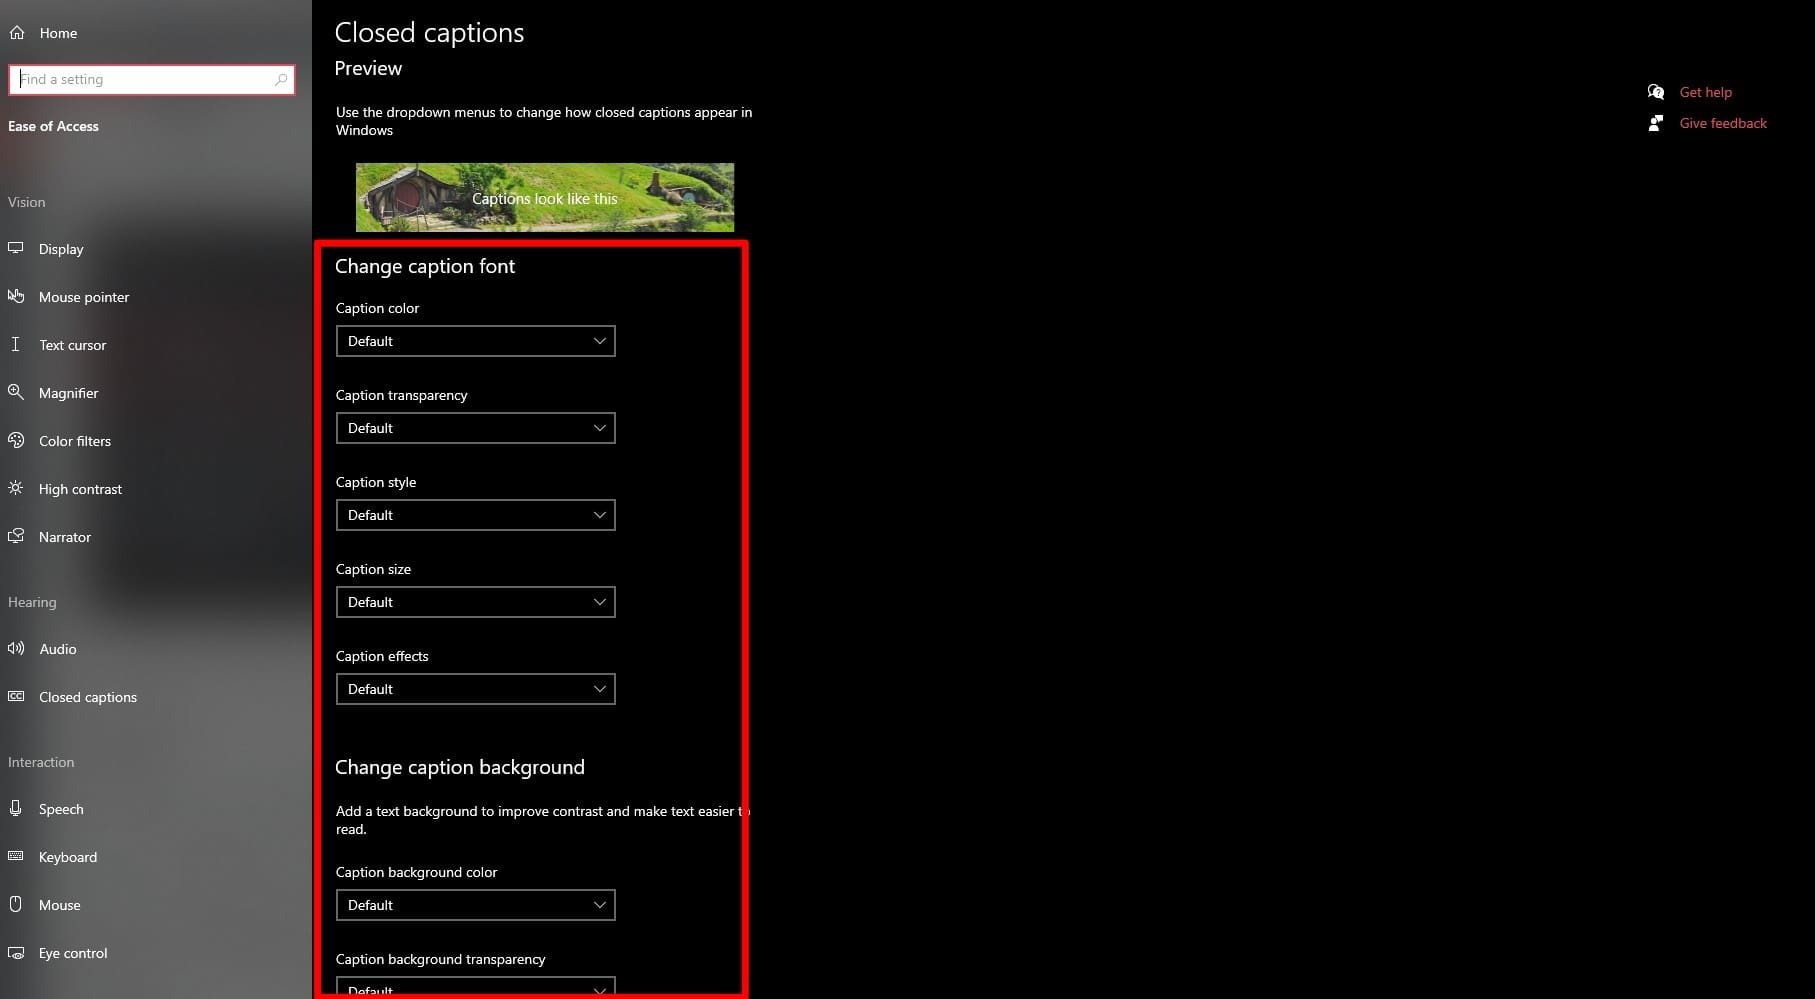
Live caption settings for Google Chrome on Windows
While you’re at all that, don’t forget to quickly test out the background-centric changes that can elevate your live caption experience with Google Chrome, your available options range from changing the background transparency and color. Furthermore, the “Dim window content” lets you add some semblance of background to your text to create a contrast and improve readability.
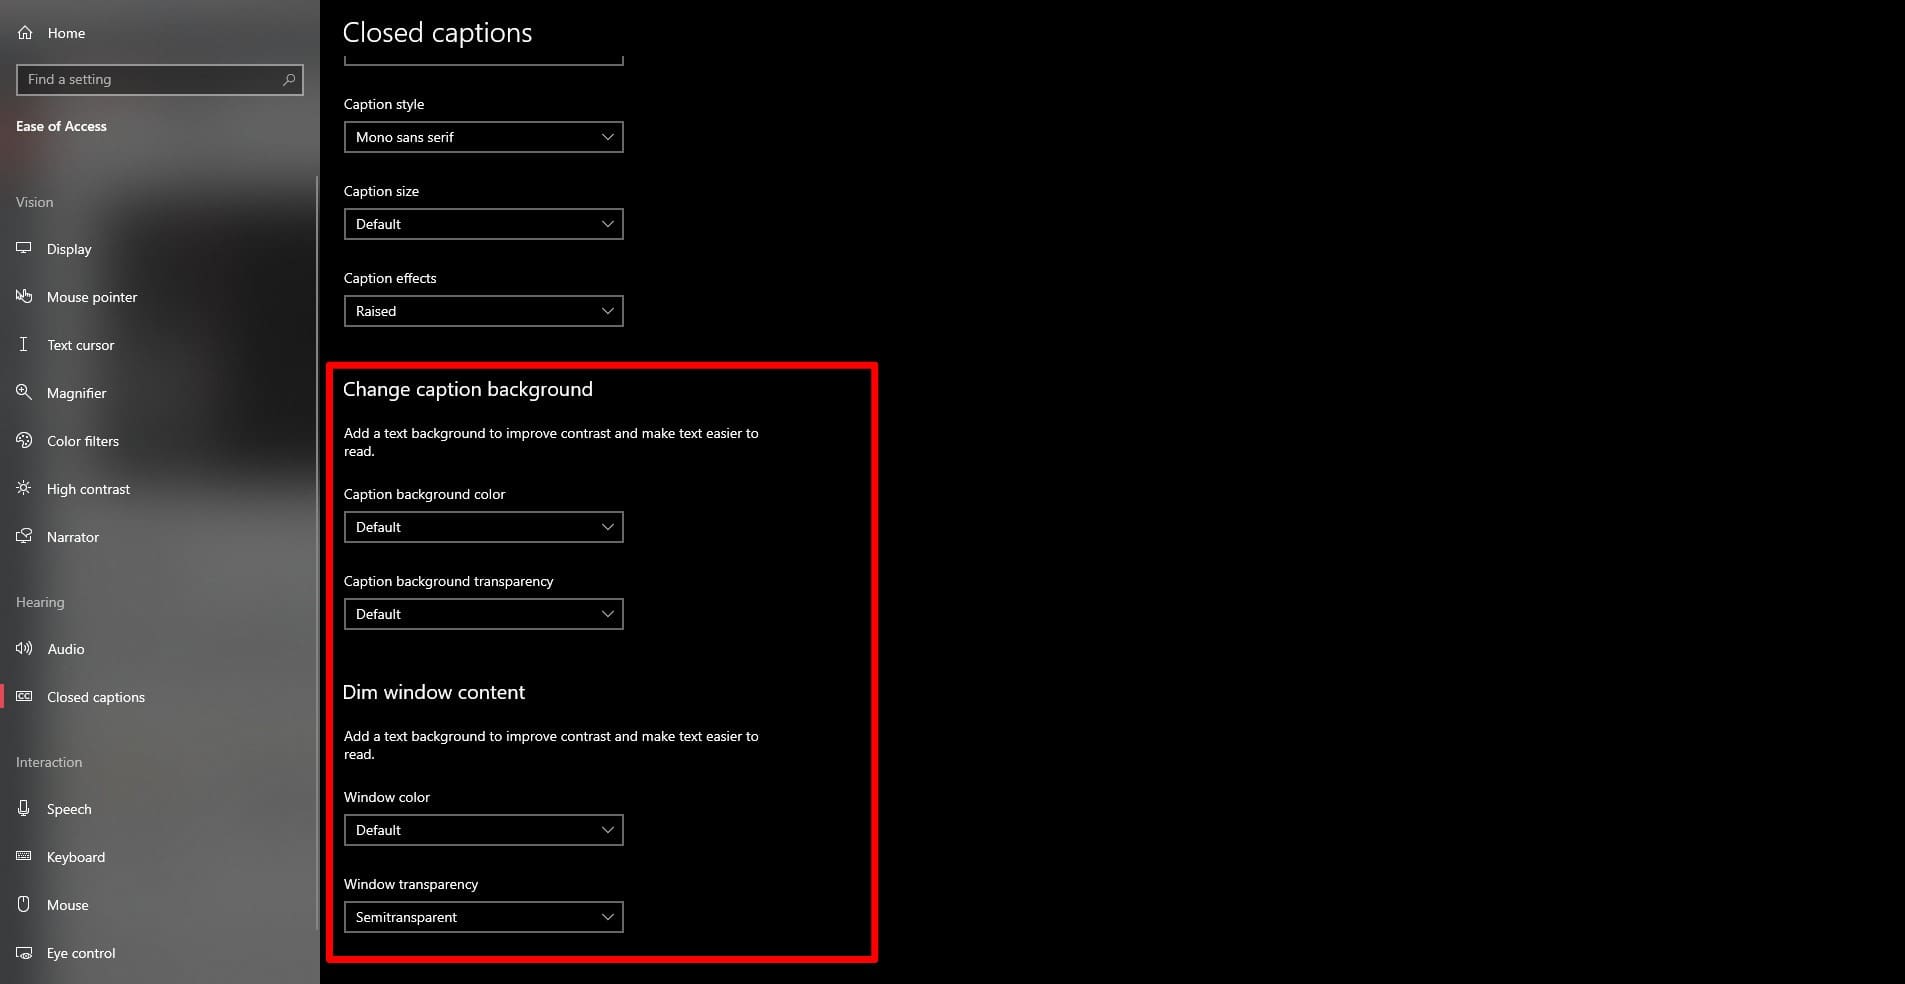
Other possible modifications to Google Chrome’s live captions
Conclusion
From creating custom Google Chrome themes to unlocking the power of Chrome’s Omnibox, the browser remains highly approachable in 2023 and entirely loaded with tools to pick up and facilitate your user experience. Google hasn’t backed out on making Chrome as accessible as ever in recent times, either through incorporating the voice search feature or the availability of the in-built screenshot tool and screen recorder.
In this guide, we’ve shed some light on Chrome’s live captions feature, what it is, and how you can effectively utilize it daily. The browser also lets you customize your captions on several metrics, such as caption font, opacity, size, color, and even background color, so you can enjoy an experience that aligns with your preferences. Let us know whether the write-up helped you out.
Thanks for reading!
