Google Workspace offers some of the most robust tools for desktop productivity, one being the highly renowned Google Docs word processor. Little do many know that Docs can serve as an effective platform for writing an entire book that authors can get published moving forward. Whether you’re a beginner or an expert-class writer, there is a way to weak this platform to your book-writing preference.
That’s simply because the platform has the right tools to make that happen, such as various font options, formatting techniques, and other features to accommodate prolific writers. In this guide, we will learn the ins and outs of writing a book using Google Docs and explain how to carry out the whole process. Read ahead to get started.
Writing a book with Google Docs
Drafting and prepping an entire book for future publishing is already a daunting mission, so why choose a platform that is not precisely recognized for book writing? Well, that’s where most people are misconceived. Over time, Google Docs has established itself as a versatile platform that can accommodate users with different use cases. Thankfully, writing a book is now one of them, but you need the proper prior knowledge to proceed successfully.
For starters, one of the best features of Docs that make it fit to act as a robust platform for book writing is that it’s cloud-based, meaning that you can use it on any device, whether a laptop, PC, or smartphone. In addition, Docs is free and has no word count limit. It’s also possible to download Docs files in other formats, such as the one Microsoft Word works with for your convenience. Last but not least, collaboration features are great with Docs.
Now, let’s get into some of the practical tips we have for writing a book or novel with the word processor. Begin with the following and continue until the end for the best results.
Determine what your book has to be about
This is undoubtedly the most crucial facet of writing a book—you must decide what it will be about. Picking the right niche to put yourself out into the world will only do well if you start things off with a robust formula. If not, results may dwindle, leading to a loss of motivation and a semi-permanent hiatus from moving forward with your craft.
No writer wants that, so it’s ideal for you to take as much time as you need to find that one perfect thing to write on. Doing so will make many other things painless to deal with, especially from now on, when you’ve dived deep into the thick of your book, and you’re brainstorming for more ideas. That is why the tools can come after, and first, you have to dedicate yourself to the core goal of your book.
With that out of the way, let’s shift our focus to Docs’ side and talk about the practicality of writing a book with Google’s front-running word processor.
Start with the basic structure of your book
According to experts, writing a book takes multiple small steps that ultimately come together to paint a successful picture. Therefore, you must be diligent in outlining the steps you’ll be taking to make things easier for yourself. Besides, you cannot write a whole book in one go. Ideas come and go at different times. Sometimes, you’re sitting on the toilet, and a fantastic idea piece comes to mind out of nowhere.
That is why making a basic structure of your book is the first thing you should take care of. Thankfully, adding headings and subheadings is a walk in the park for Google Docs. Head to the official Docs site and sign into your account to continue. If you’d like to go there even faster, type “docs.new” in the address bar of your browser, and that will pop open a new Docs document right away.
Once the editor interface of Docs is on your screen, click where it says “Normal text,” and you should be able to tweak the various subheading sizes of your text. Choose the relevant size and lay it all across the face of your book’s initial draft. That will be a step in the right direction. You can start naming your subheadings in a specific pattern, such as “Chapter 1: How It All Began” and “Chapter 2: What Made The Exchange Irrefutable.”
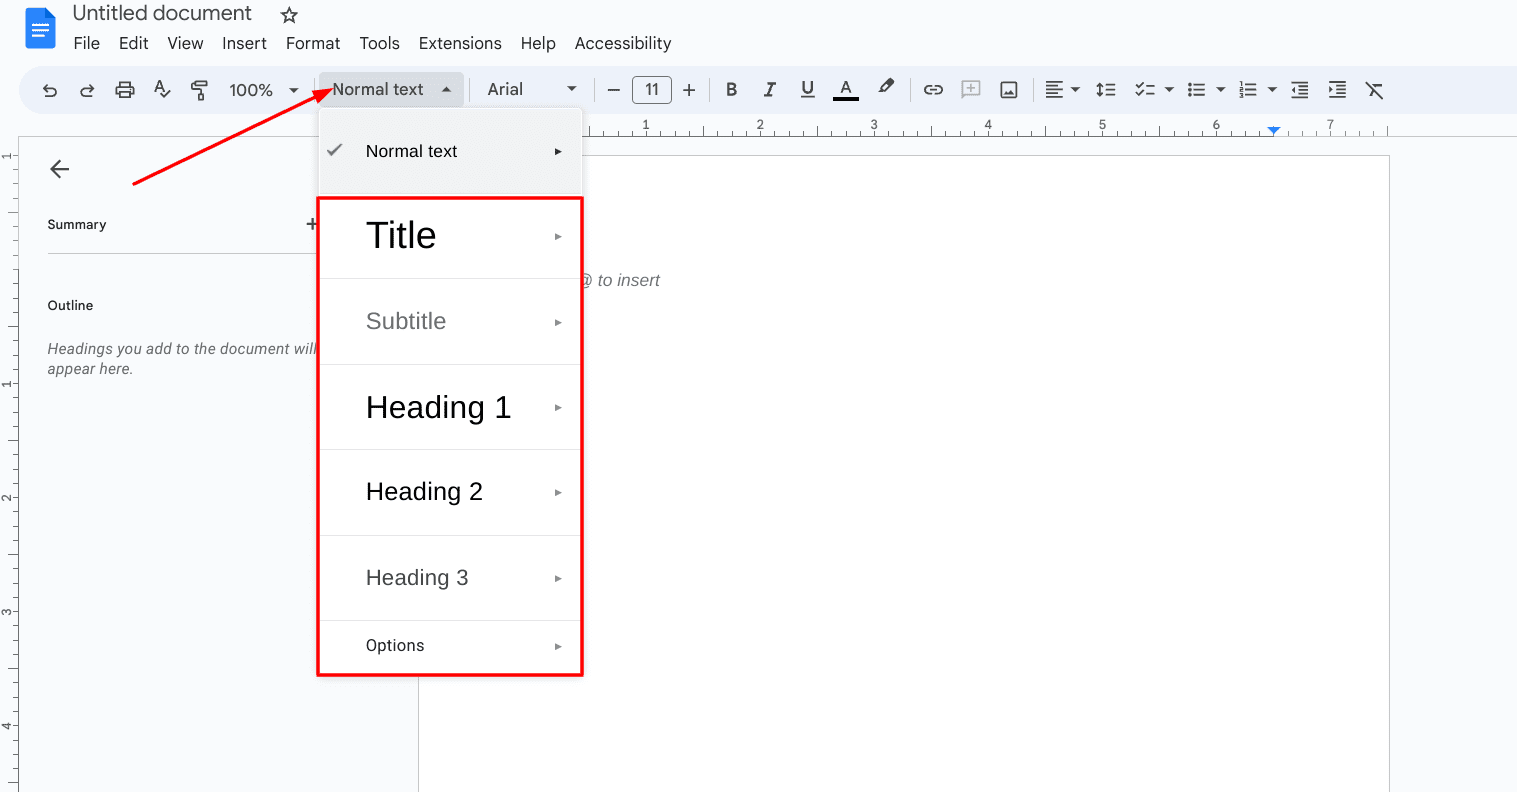
Choosing a style type in Docs
Another important thing to learn here is the “Page break” tool. By pressing “Ctrl” and “Space” together, you can skip to the next page in the Docs editor interface. Doing so “breaks” the page and gives you the freedom to optimize pages to your heart’s content. Now, whether you’re writing an ebook or targeting more of a hard copy release, do make sure to divide your copy into subsections for the best results.
This will be done through numbered or bulleted point lists, H2s, and H3s. Docs let you switch up the way you create point lists, so it’s worth getting into all that with the provided toolbar.
Choose the style and font
Another major part of Google Docs contributing to book writing is the style and font options. First, you need your text to have a font that exactly represents what you want to express. Docs has loads of those to choose from, and if you click where it says “Arial” or any other font name, you can bring up a list of usable options. Fonts such as Georgia and Ubuntu are more forthright, while options like Comic Sans MS and Lobster are more amusing.
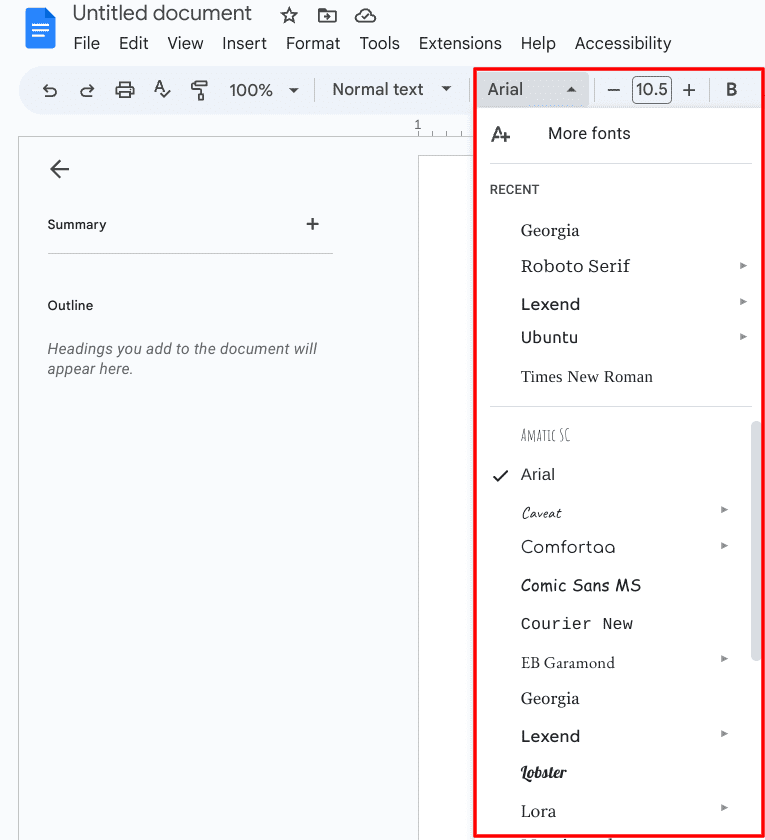
Choosing the right font for the job
And remember, the “Style” option concerns subheadings. You can start things off with H1, the primary heading you can use to outline the main chapters of your books, but anything below that hierarchy should pertain to “Subtitle,” H2, and H3.
Create a title page
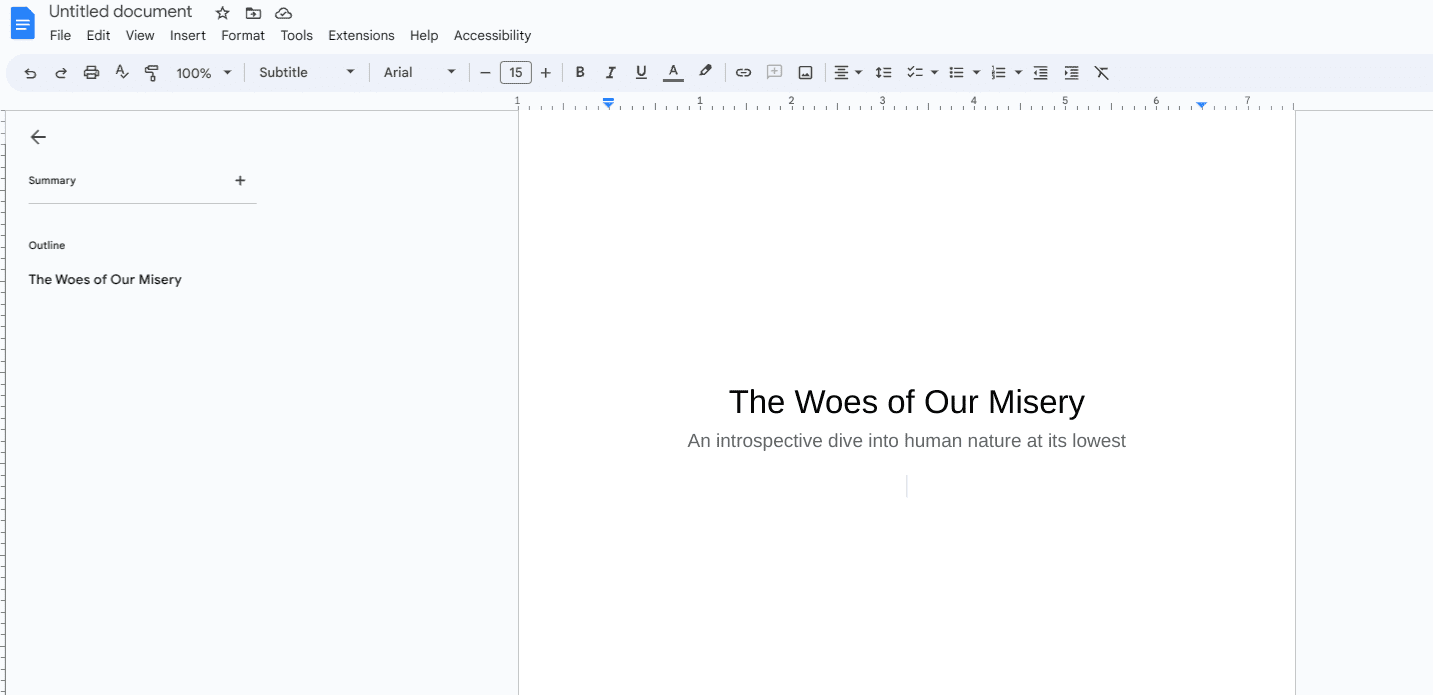
Creating a title in Docs
A title page is a must-have for any book properly published by an author. You introduce your book’s name, add a relevant subtitle, and other details, such as a key location if needed. To do this, you can employ a page break to separate the rest of your content from the title page in case you didn’t take leave room for it already. Use the “Title” style in Docs to write a suitable title for the book; follow up with the “Subtitle” as well.
Now, there are a couple of pointers to be wary of here. First, you can take the title of your book to the center by pressing the “Enter” key repeatedly after using the “H1” format. Next, it’s possible to use the word processor’s alignment features to make the text stand out and look professional. Click the “Align” tool in the toolbar at the top of the interface and choose the alignment you want to wrap it up. For the title page, using “Center align” would be ideal.
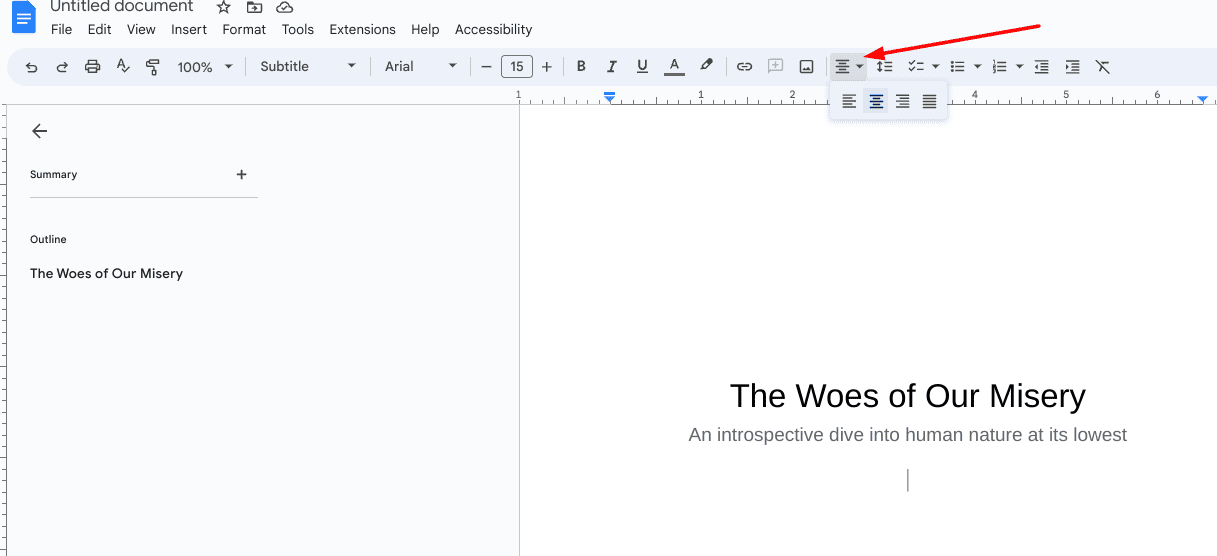
Aligning text in Docs
You might as well rename your Docs file to distinguish it from the other documents you have stored up on your end. Click where it says “Untitled document” in the top-left corner of the editor interface of Docs and type in what you’d like to name your book. That’ll do the trick.
Fill in the subheadings with research material
This tip is in accordance with what we told you above regarding creating a basic structure for your book. After you lay out the subheadings, you need to fill each section with the preliminary research material or at least research sources. At the same time, they’re fresh in your mind to avoid future inconveniences. Whether fiction or non-fiction, subheadings need to be dealt with sooner or later, depending on the type of book you’re writing. Better plan ahead for favorable results.
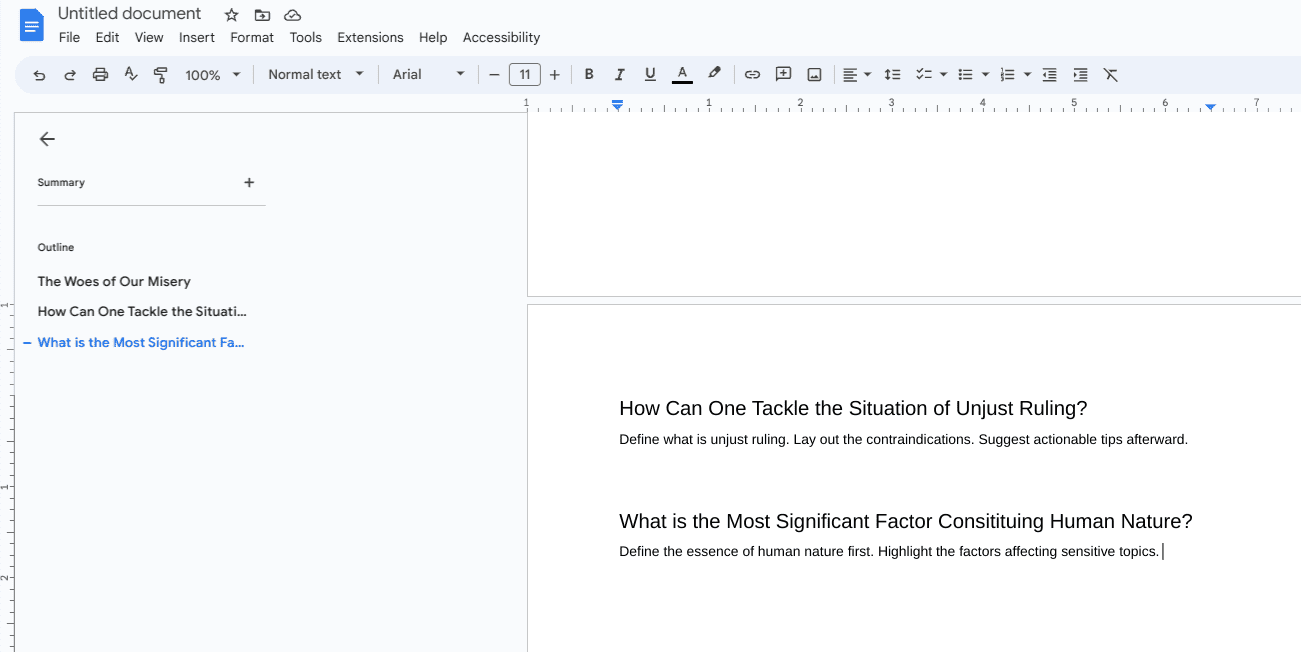
Filling in subheadings with research material
Incorporate images to make your book stand out
A picture is worth a thousand words, and there’s no truer saying out there. One of the finest ways to enrich your Google Docs file from start to end is by implementing accurate, resource-centric, and applicable photos. Google, the world-famous search engine, can act as your best friend in this regard, letting you fetch quality photos from the wide interweb and insert them into your text without breaking a sweat.
The best part is that the overall user interface of Docs makes it relatively painless to follow through with image insertion. All you have to do is click the “Image insertion” button beside the “Align and indent” tool. Clicking on it will reveal multiple options for using images in Docs. You can search the web and pull pictures directly from the internet or upload relevant ones from your PC’s local storage. Other measures include turning to Drive, Photos, or your camera app.
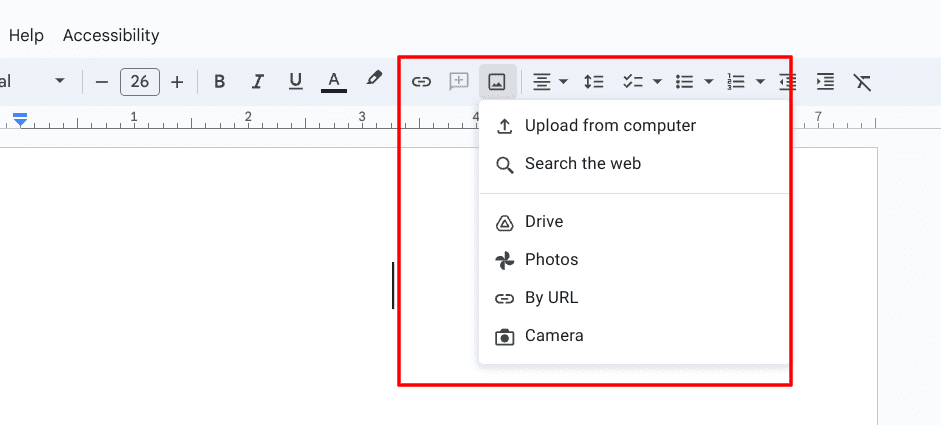
Image insertion options in Docs
Number your pages
Dedicating page numbers for your ebook is a crucial step you must consider. Doing so will create depth for your writing and tangibly organize things. Again, Docs doesn’t make it challenging to number the pages on your document. Click the “Insert” button on your toolbar at the top, followed by choosing the “Page numbers” option. You’ll then visualize four-page number layout options, which will be the basic ones.
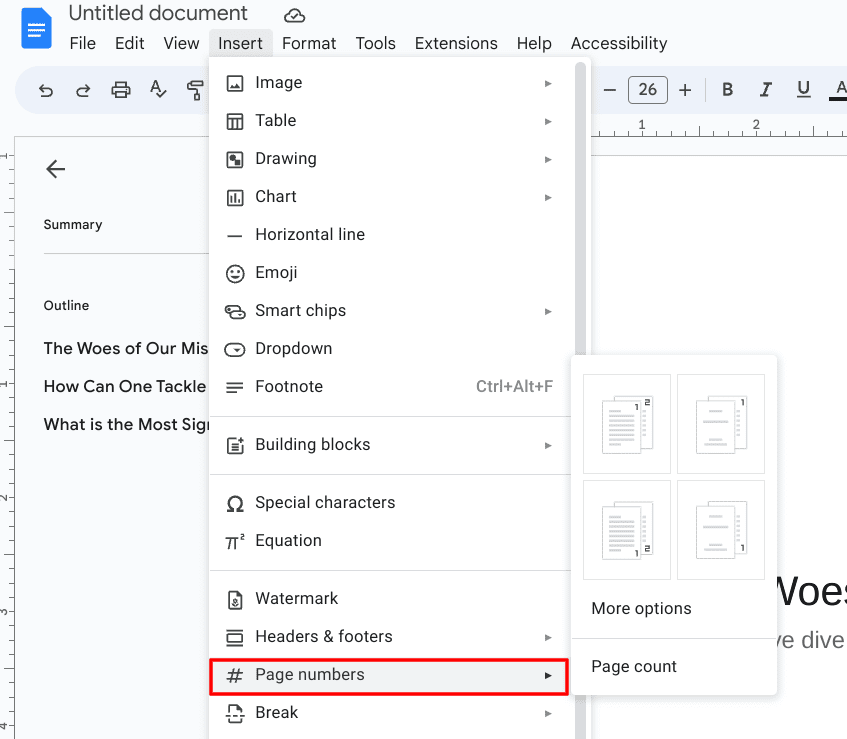
Page numbers on Google Docs
If you select “More options,” it’ll be possible to customize the appearance of the page numbers yourself, starting with their position on the Docs file. Also, it’s probably better to toggle off the “Show on the first page” feature since that probably goes to your title page, and title pages are not numbered. You can skip that and start your numbering from the pages that follow ahead. Do click on “Apply” to save your changes.
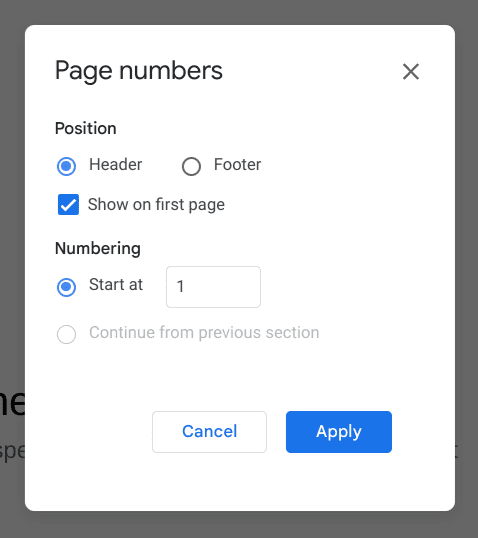
The “More options” section of page numbers
This is all that the basic formatting tips and helpful information for writing a book on Google Docs entail, but we’re not entirely done with the additional tricks and hacks yet. Keep reading for other ways to alleviate your writing experience with Google’s text editor.
Additional tips and tricks for writing a book with Docs
Now that we have the fundamentals of writing a book on Google Docs out of the way, such as understanding the principal formatting and added outline techniques, let’s talk about several other pointers to be wary of during this literary journey of yours.
Keep track of your word count
Unlike other document editors, Google Docs do not have its word counter flipped on by default. To view the number of words you’ve written so far in your draft, you need to go to the “Tools” tab within the text editor’s interface and choose “Word count.” You can also implement a shortcut key combination of “Ctrl,” “Shift,” and “C” to go straight to the relevant section.
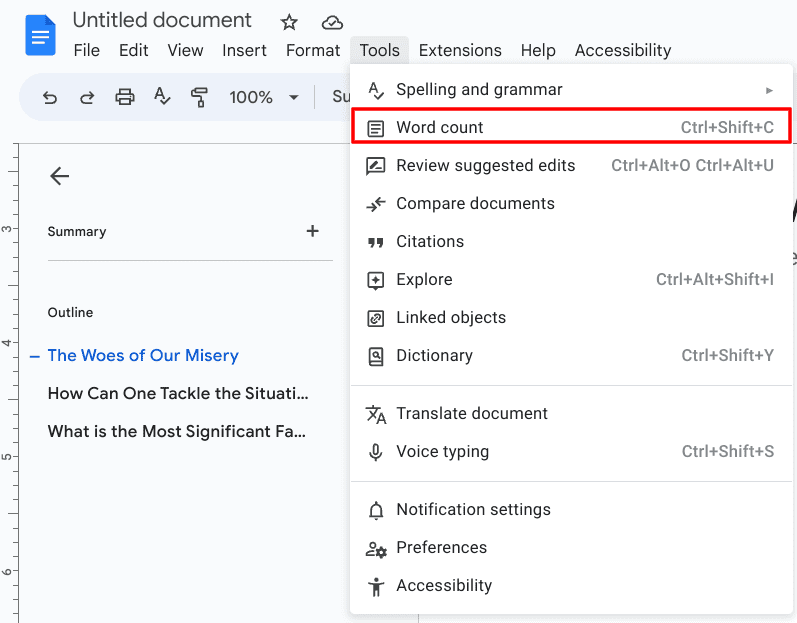
Entering the “Word count” section
After completing the previous step, a prompt will appear on your screen, allowing you to click the “Display word count while typing” option. This is also where you can review the detailed statistics of your overall word count in Docs, including the number of pages you’ve created, characters, and characters without spaces.
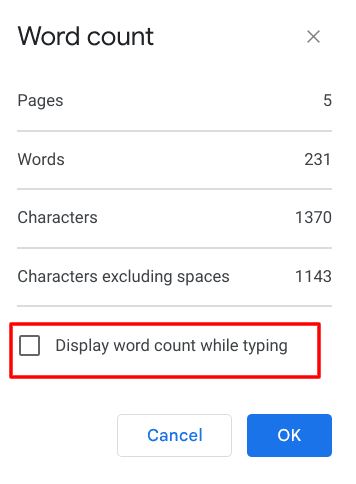
Toggling “Display word count” while typing
Enable offline functionality in Docs
Writing is no less than an art form that demands one to be at the level best of their creativity. Now, ideas in the brain can pop up in the most regular of scenarios, whether you’re strolling in a park, looking around and contemplating about life, or sitting down at your desk and trying to push your brain to come up with novel findings. For this purpose, offline functionality is a must-have, and if you toggle it on for your Docs files, it becomes possible to write anywhere and anytime.
Fortunately, Docs lets you enable offline access pretty quickly. All you have to do is click the “File” button in the toolbar at the top and select the “Make available offline” option. Right after that, a prompt will appear in the screen’s bottom-left corner, affirming that the document has been made available offline. Prepare to fire open your book draft on any occasion now, with or without the internet.
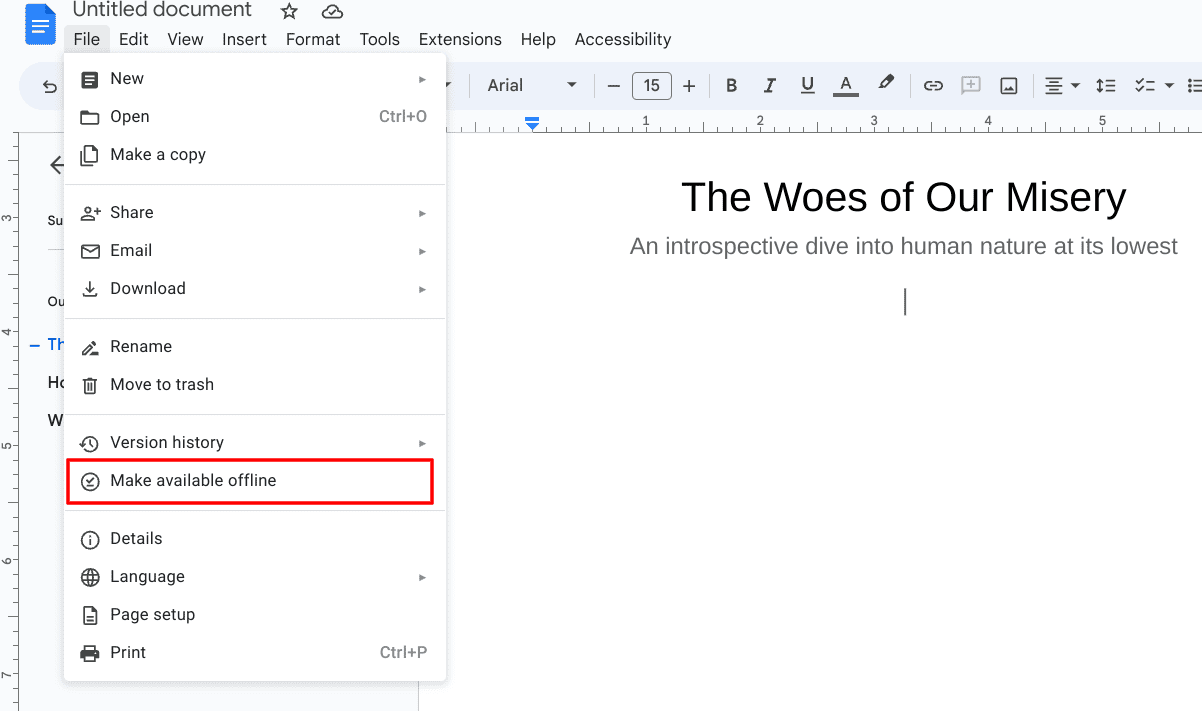
Making the Docs file available for offline use
Utilize Google Tasks on Docs
One of the most well-reputed traits of Google Workspace is how each of its constituents integrates in one way or the other. In this manner, no individual software is left on its own, and a bundle of other additional programs facilitates what you’re using for work. This is the case with Google Docs, which readily works with Meet immediately, and another application that can help you in your book-writing ventures—Google Tasks.
Tasks is your personal to-do list handyman that can help you structurally organize your responsibilities. This makes it easier to stay ahead of your game and get stuff done accordingly. To utilize the feature, focus on the right-hand side panel and select the “Tasks” tool. Once done, a dedicated section will load in that area, allowing you to enter Google Tasks.
Creating a task in Google Do
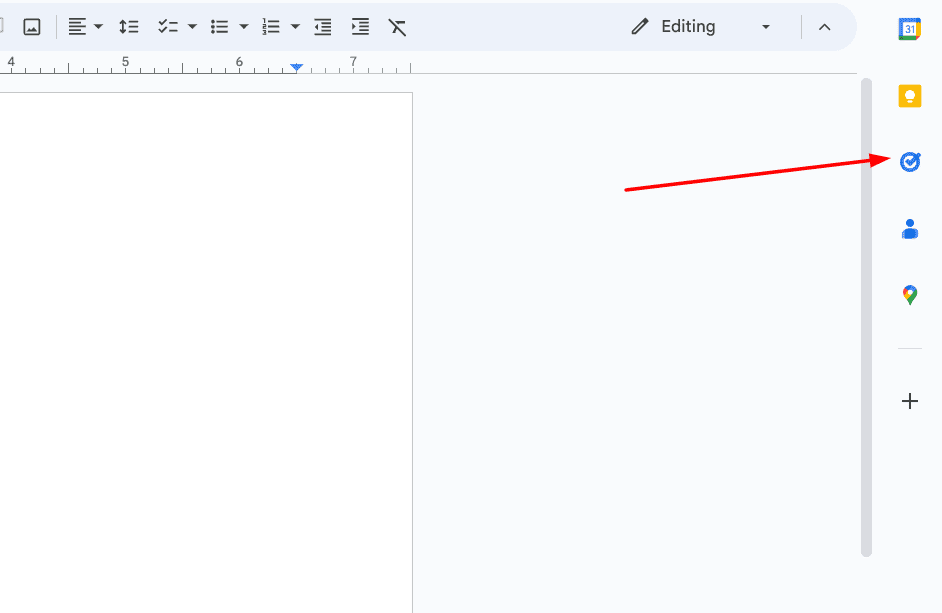
Integrating Docs with Tasks
You should now be able to go ahead and add as many tasks as you want. Tap the “Add a task” button, write the objective, and specify the date and time. You can then create subtasks for your main tasks if the job requires you to complete specific steps. Such a Tasks application feature can undoubtedly help in multiple scenarios.
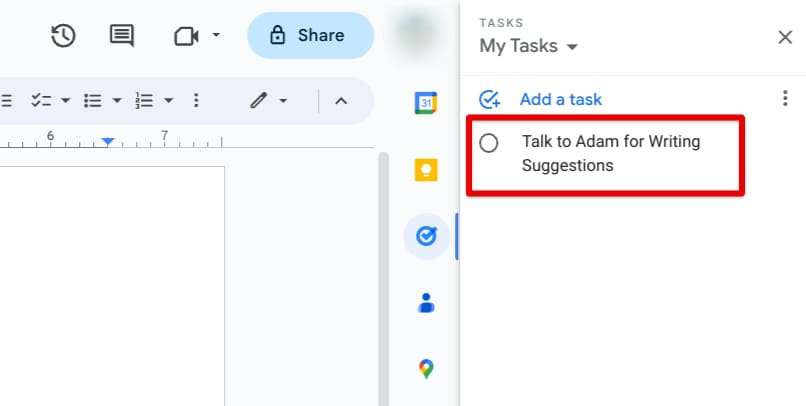
Creating a task in Google Docs
Share your work with others for valuable feedback
Why use Docs for book writing if you won’t bring in experts to help you proofread and suggest curated writing tips? All Google Workspace applications, not just Google Docs, arrive with their fair share of collaboration features allowing users to get their work around, offer people a space to express their critique, and gather teams for cooperative workflows. The same is recommended for book writers on Google Docs. After all, this art of yours can benefit from second opinions.
To share your file with someone in Docs, click the “Share” button in the top-right corner of the screen. Once done, a small-scale window will appear on your screen now, allowing you to share your Docs file easily with others. The gist is that you can easily copy the link to the document and get it done with. However, there are specific access permissions to look into before proceeding.
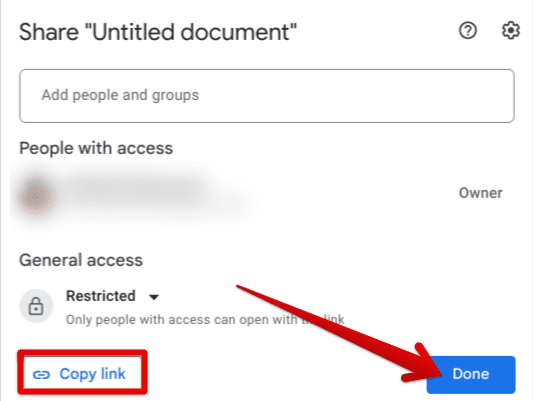
Sharing the Docs document
If you want someone to suggest edits to your writing while you hash out your book, it’s best to provide editorial access to the people you plan to share the document with. Under the “General access” area on the “Share” window, select “Anyone with the link” and proceeds to set their access as “Editor” right beside the latter. This will get the job done for you. With that said, if you don’t want to set the general access setting to “Anyone with the link,” invite individuals manually.
You can then designate separate privileges for everyone who gains access to your sheet. That is a much more privacy-centric approach to the scenario, should you choose to get into it.
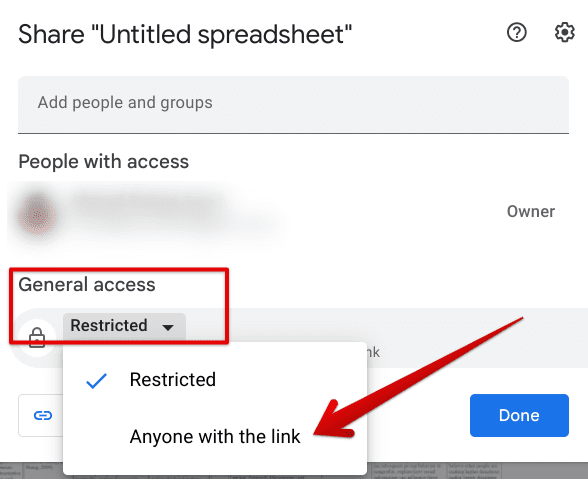
Allowing access to the file to anyone with the link
Store a print of your writing
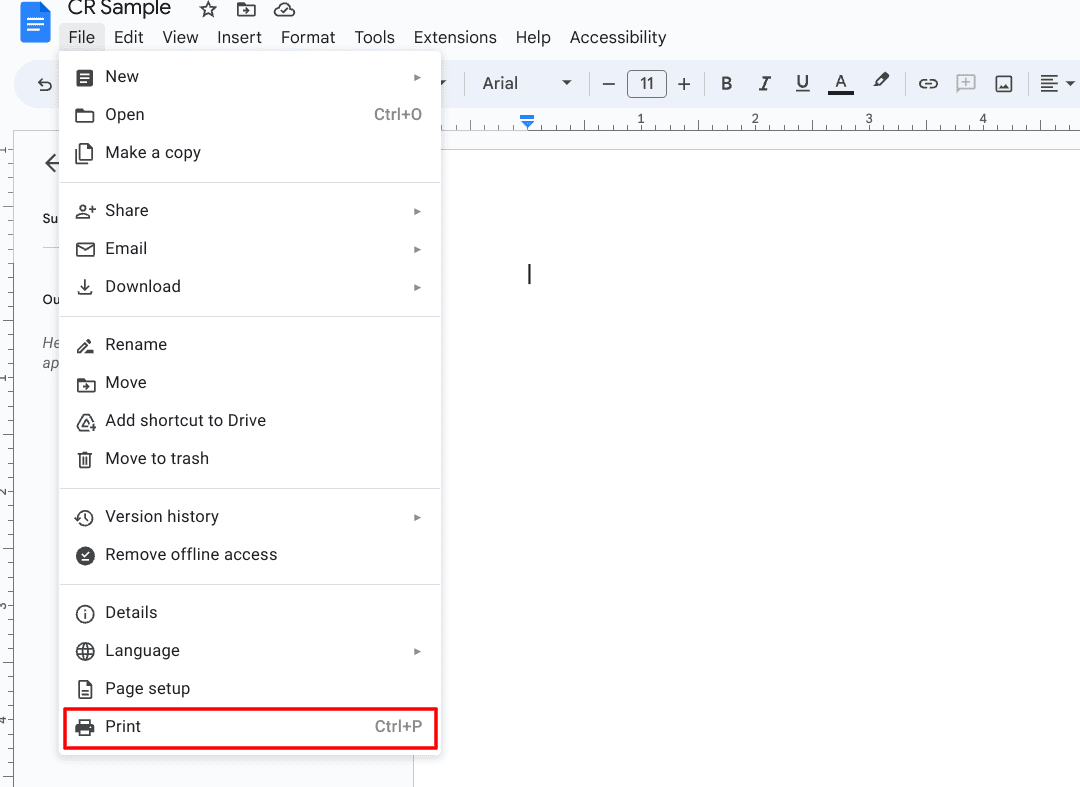
Printing a Docs file
By clicking the “File” button in the toolbar at the top, you can choose the “Print” button to get a hard copy of your Docs document. If you have a printer in your home or office, you can easily print out various pages of your book to read aloud and determine how another regular reader would feel. More often than not, this can help you readjust your focus and align your writing differently. Perspective is essential in the craft of book writing.
Conclusion
Google Docs have seldom disappointed with its vast word processing ability, considering how it’s loaded from top to bottom with tools and features. In this guide, we’ve learned the intricacy of writing a book with Google Docs, showcasing the different measures involved for one to achieve success on this particular front. Do let us know in the comments ahead whether you found this guide helpful for your cause.
We would love to read your feedback!
