Google Workspace applications are pretty secure on their own. Still, if you want that sense of insurmountable security, there are specific measures that you can take to buff up your Google Docs document’s security. Apart from using a safe PC and employing antivirus software to operate diligently on your device, you can encrypt your Docs file with a password to make yourself breathe more comfortably in the context of securing your Google Docs files.
This guide will go over the process of password-protecting Google Docs documents in a step-by-step manner so that you can replicate the instructions diligently on your end. Docs is a high-profile word processor with several different in-built features and functionalities. Thankfully, the developers also decided to implement a security-based tool in Docs for situations that warrant a little extra tight protection.
Let’s get into the tutorial without any further delay.
Securing a Google Docs document – Explained
On a side note, though, Google claims that every file uploaded to Drive or the ones you create in Docs, Sheets, or Slides are encrypted during transit. In addition, when the files are stationary, expect AES256-bit encryption to consolidate your stuff. Therefore, you’re in safe hands right from the get-go, but if you feel the situation can be even safer for you, continue reading ahead.
It turns out that there are multiple ways to secure your Google Docs document, both with the help of the editor and an online-based tool for password protection. We’ll be walking you through all that you need to do to achieve maximum security on this front in different subsections, starting with a simple access tweak, so make sure to read carefully until the end for the best results.
Method 1. Setting the Docs file’s access to “Restricted”
The first way to tighten your Docs file’s security is to tweak its access settings. If you’ve adjusted your document to be shared with everyone using the link, there is a chance for things to go wrong, albeit a small one potentially. Still, we’re not taking any risks here, so it’s worth clearing out this initial step to avoid future issues. The shared access of your important files shouldn’t ever be set to “Anyone with the link.”
That’s because links can often go around and mistakenly end up in the wrong hands. Who knows what’ll happen from there on out? Start with the measure by opening the Docs document you wish to secure and clicking the “Share” button in the top-right corner. Once done, a prompt will appear on your screen.
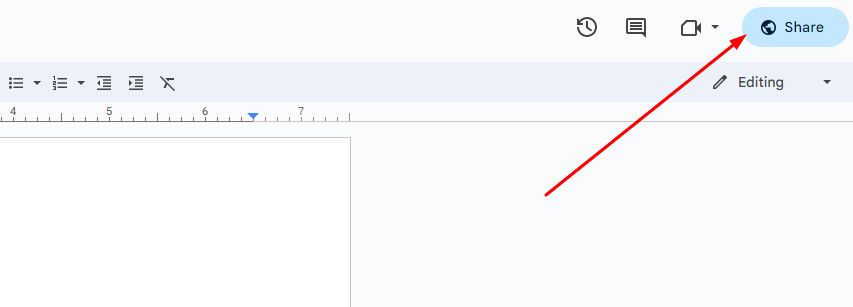
Clicking the “Share” button
As the prompt appears on your screen, you can now tweak the “General access” setting of the Docs document. Click the drop-down arrow beside the current setting, and the section will expand afterward.
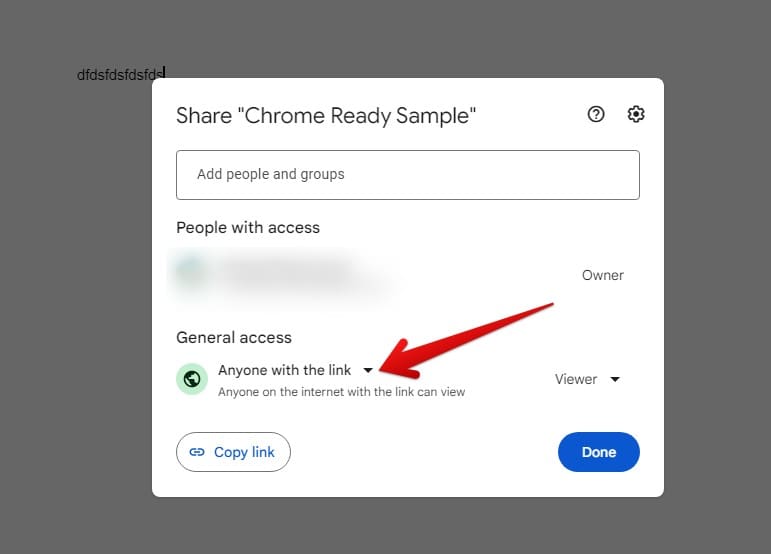
Clicking the access section
Choose the “Restricted” option next and click the “Done” button to finalize the process. By taking this measure, You have made your Docs file significantly more secure. Let’s move on to some of the other techniques to follow.
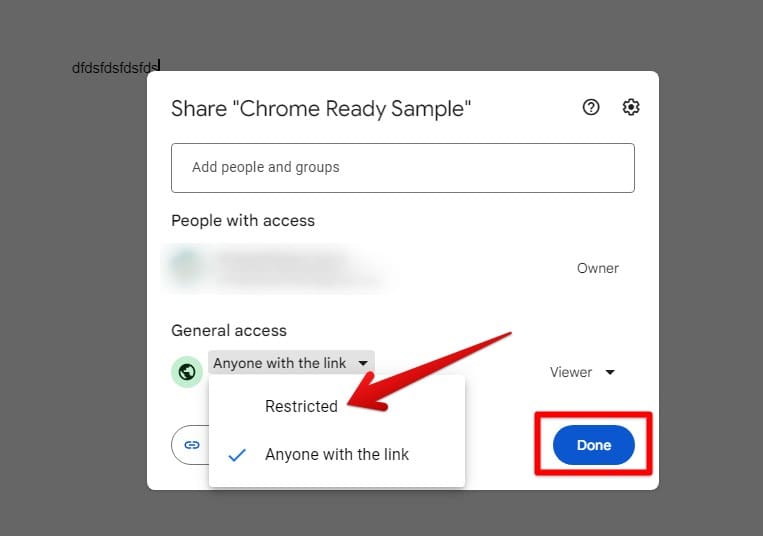
Changing the access
Method 2. Putting a lock on your content in the Docs file
Another way to protect your Google Docs file is to secure it with a password. Luckily, the word processor at hand lets us do this. It turns out that Google Docs has a storefront created exclusively for users to download dedicated add-ons and revamp their Docs experience. One of these add-ons is called DocSecret, and instead of protecting the whole document, it lets you select the content inside the file for password protection.
To install the extension, open a Docs file and land on its main editor interface. Once done, tap the “Extensions” button in the toolbar at the top and select “Add-ons,” followed by choosing “Get add-ons.” Doing that will open a section on your screen.
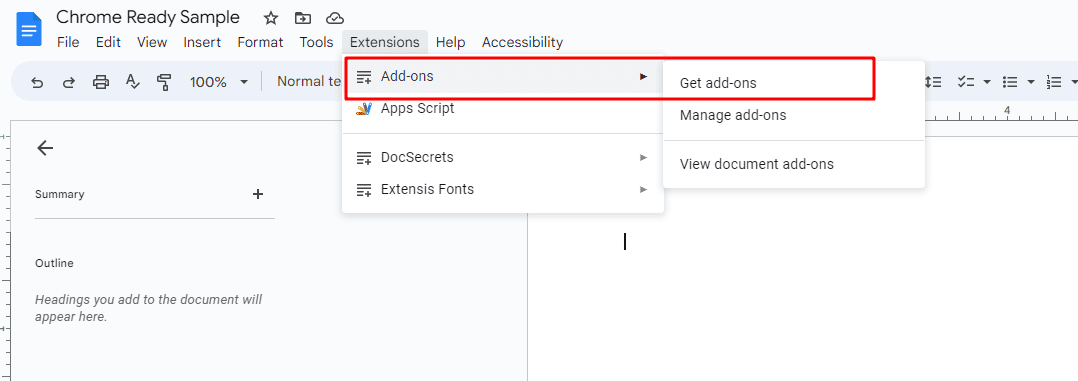
Entering the add-ons marketplace
When a new window pops up, the idea is to look for the “DocSecrets” add-on. Look for this application with the help of the provided search bar, and that’ll be it. Select the relevant tile of the app after the latter. The add-on will appear for you to install in the next step.
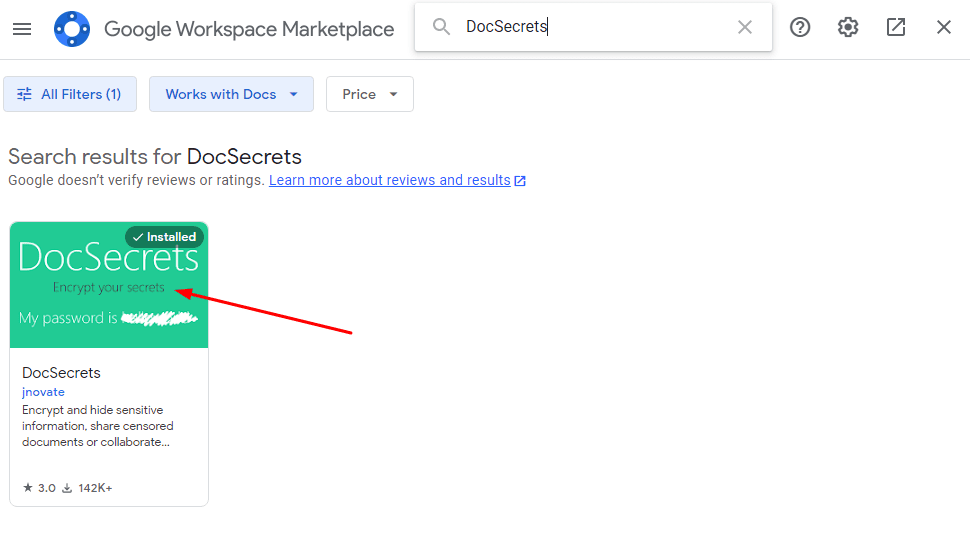
Accessing the DocSecrets add-on
You can now perceive a vividly apparent “Install” button for the DocSecrets add-on. After clicking on it, another page will load, affirming your account’s authenticity and prompting you to sign in again. Do that, and the installation of the program should begin right away.
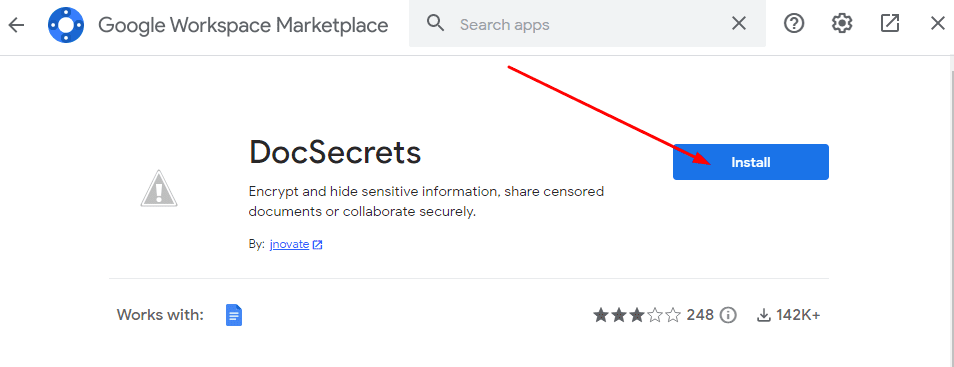
Installing the DocSecrets add-on
As soon as you’re notified that the add-on’s installation has been taken care of, you’ll next need to open op DocSecrets. Click the “Extensions” button in the toolbar and choose “DocSecrets.” Click the “Open” button next, and that’ll instantly launch the add-on.
You should now see the DocSecrets extension pop up on the right side of the Docs editor interface, prompting you to set the passphrase before moving forward. Please set the passphrase to something that you can remember clearly or, perhaps, use something of a more complex nature but write it down somewhere and save it before you continue. Click on “Start” when you’re done to begin.
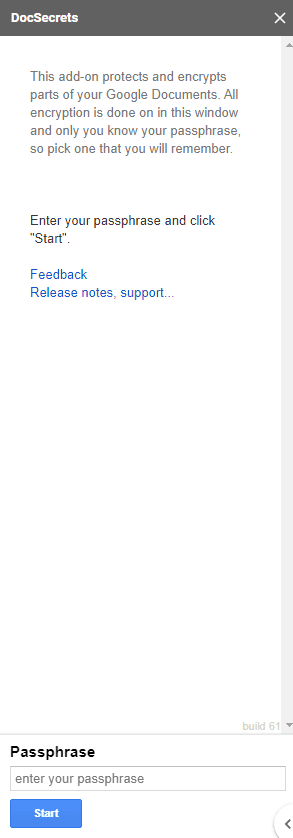
Setting a passphrase for DocSecrets
You can now start hiding parts of your Docs file with the ever-available option of blacking out all of the document’s content. Highlight what you wish to conceal with your cursor and click the “Insert text” button in the sidebar to apply the changes effectively. That’s all there is to know about how to use the DocSecrets add-on properly to secure your Docs file in a sense. We’ll now move ahead with more methods to accomplish the task at hand.
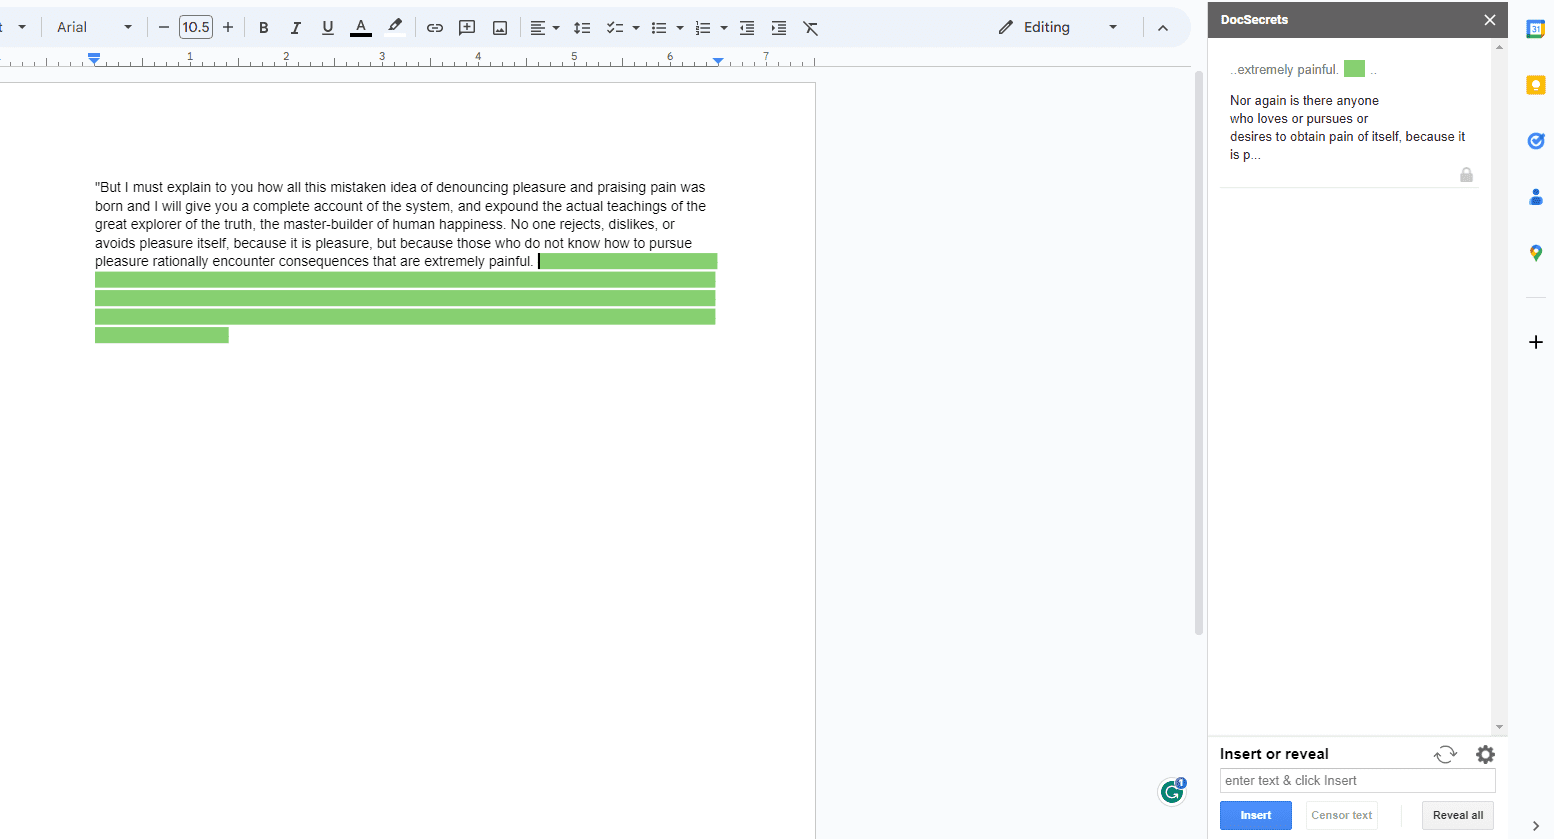
DocSecrets working in the flesh
Method 3. Using Microsoft Office to password-protect Docs files
Microsoft Office, Google Workspace’s rival and competitor, can password-protect Google Docs files without a sweat. It sounds ironic, but the process is doable and has been utilized by many ahead of time. First, download your Docs file into Microsoft Word format, either .docx or simply .doc. Do this easily by clicking the “File” button and hovering over the “Download” section. Click “Microsoft Word” to get to the next step.
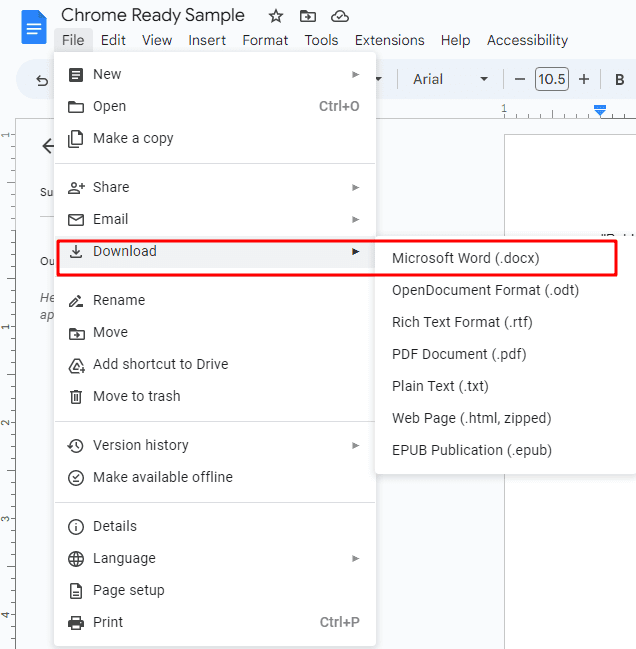
Downloading a Docs file into the Word file format
With the file downloaded and ready to go, the next step is to fire up Microsoft Word on your end. To get going, visit this direct link and sign in with your Microsoft account. You may need to register for a new account if you haven’t already done so. As soon as you’re taken to the main Microsoft Office home page, use your downloaded document and load it into Word.
As you’re taken into the editor interface of the file, the idea now is to click the “File” button followed by choosing the “Info” option. You’ll soon come across an option that says “Protect Document.” Click on it to get to the next step.
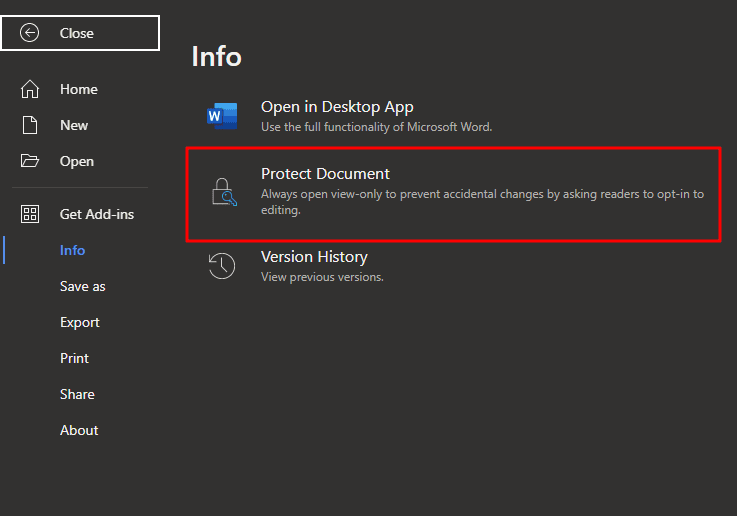
Protecting the document in MS Word
This takes care of the protection part. All you have to do now is set a unique password for the file, as Microsoft Word tries to protect your file. Choose something solid and distinct for the best results, and make sure that you write it down whatever you choose to go with to avoid problems in the future. That’s yet another method all wrapped up to help your case. Let’s move on to the fourth and final one.
Method 4. Using Adobe Acrobat
Adobe Acrobat is a software of many talents, and we’re happy to report that it can also secure your Docs file. However, we have a premium functionality primarily employed in the wake of a person having paid access to Acrobat’s diversified services. The good news is that the free version of the web-based functionality can help you accomplish the task at hand just like that. Get started by heading over to Adobe Acrobat using this direct link.
You can easily password-protect any PDF or Google Docs file by clicking “Select a file” and uploading it to Acrobat. As your PC’s local storage pops up, following this step, maneuver to the correct file and press the “Enter” key to begin the upload. This shouldn’t take any longer.
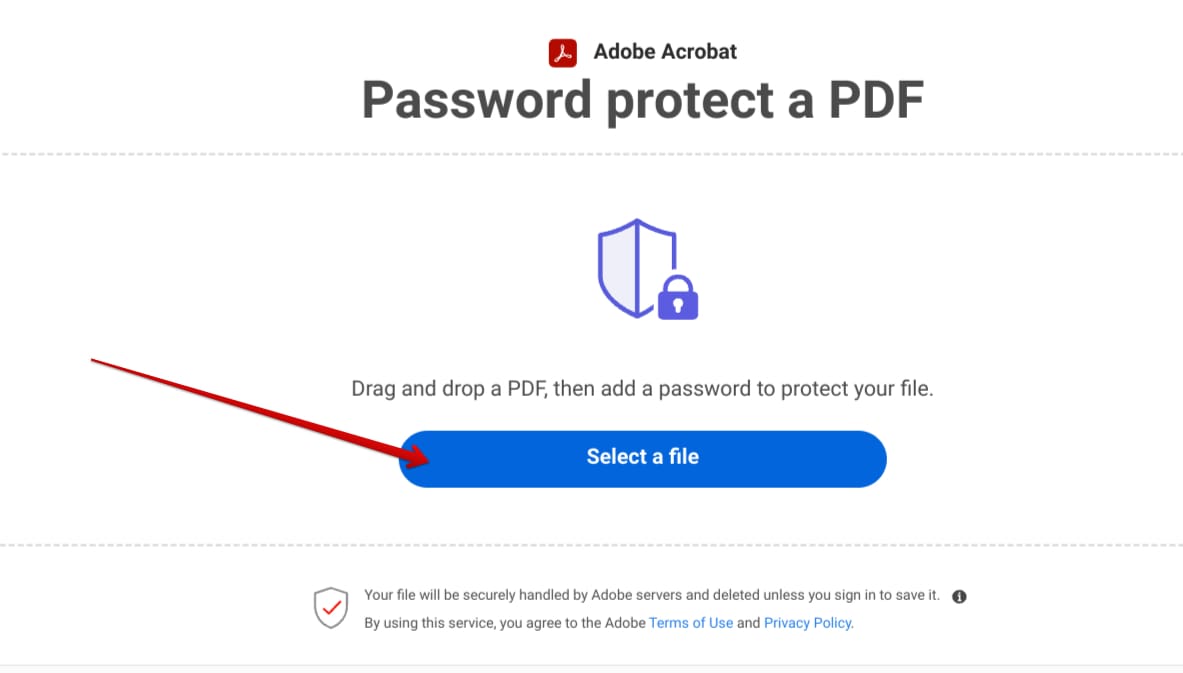
Uploading the file to Acrobat
Finally, as soon as the file gets uploaded to Acrobat, the page will take you to the next step. Now, choose a solid password for the file. You will need to reconfirm the password by entering it again. Once finished, click the “Set password” button to wrap things up.
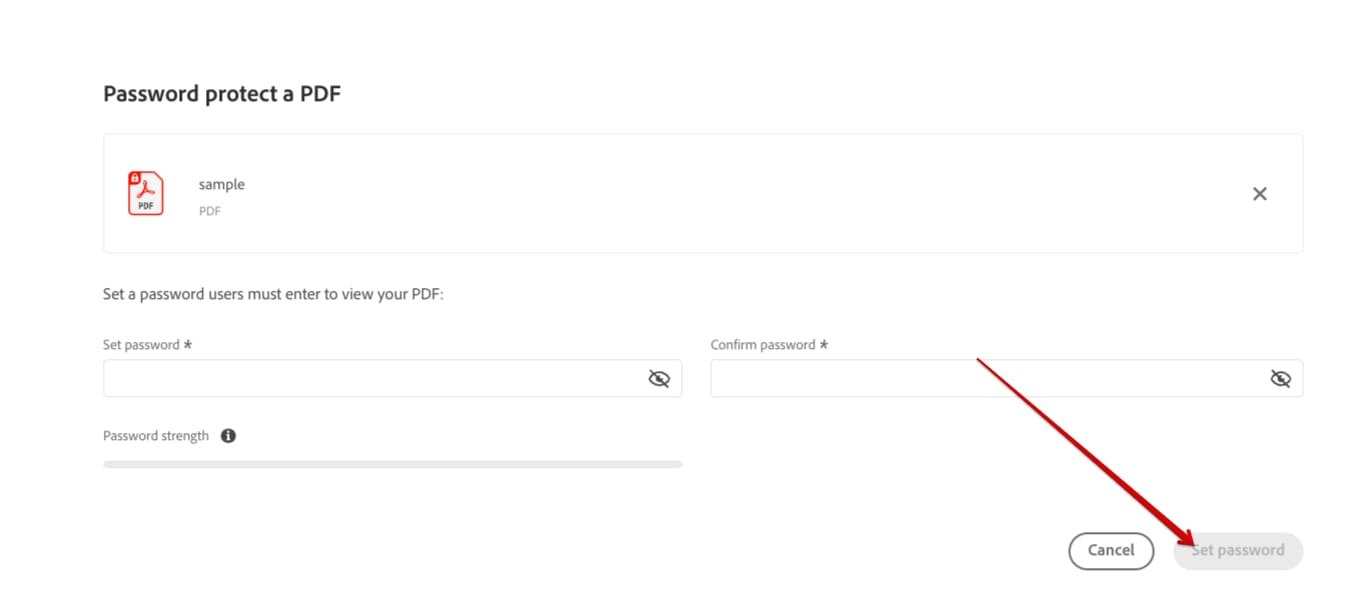
Setting a password for a Docs file with Adobe Acrobat
After you’ve set the password, Adobe Acrobat will prepare the file for you to download again, and this time, the Docs document will be password-protected. In this manner, you’ve just upgraded the security of your Docs files by a reasonable margin. Click on “Download” after setting the password to complete the procedure. Make sure not to lose the password you create for the Docs file’s encryption, and you’ll be ready.
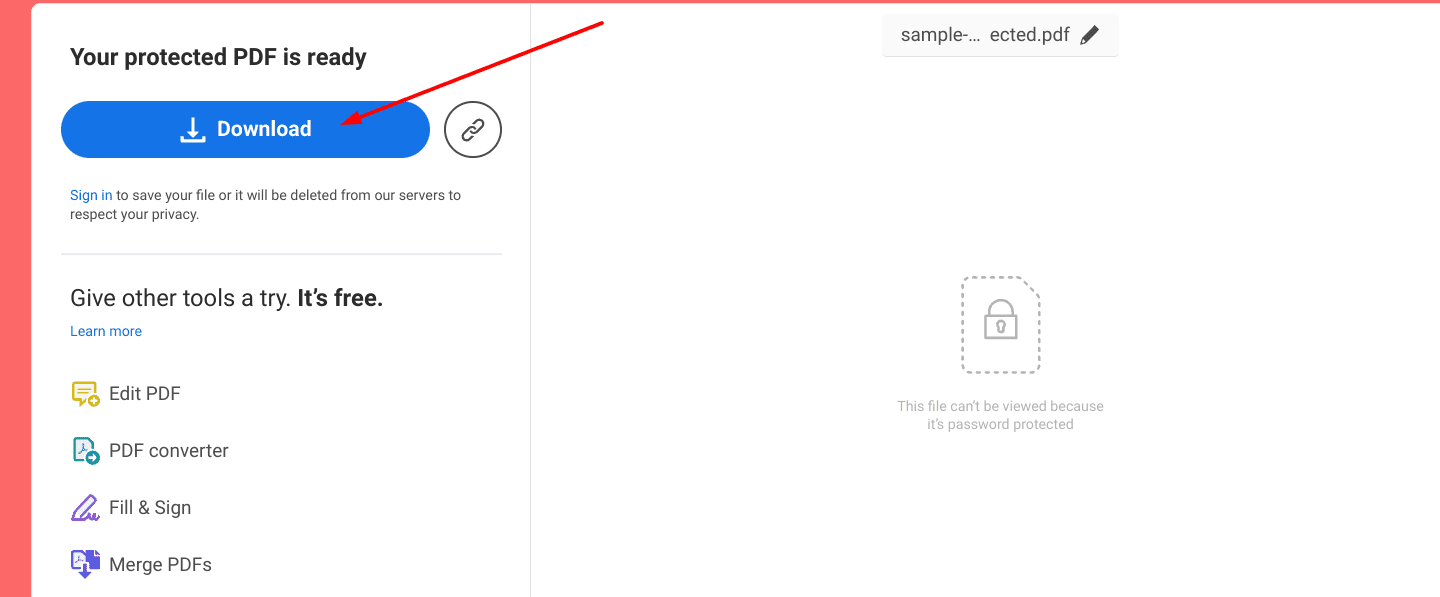
Downloading the password-protected PDF
Conclusion
Google Docs, one of the world’s most popular word processors, is chock-full of features that can help you get your work done professionally and on time. However, the process is simple for those who have concerns regarding the overall security of the affair. All you have to do is either change the access setting of the file or dive into some of the other alternatives we’ve prepared for you in this guide.
These include inclining toward Adobe Acrobat and Microsoft Word and even downloading a Docs extension. The possibilities are numerous, should you choose to entertain them appropriately. Comment below and tell us whether you found the write-up helpful. We would love to read your feedback!
