Google Docs is one of the fastest-growing names in word processors, celebrated worldwide for its seamless integration with other Google desktop-grade productivity apps. However, those new to Docs may find it rather hard to tap into the full potential of the document editor right off the bat since the program at hand comprises an array of hidden features that users can significantly benefit from.
Therefore, this guide will walk you through the working interface of Google Docs, explain the basics, and then shed some light on the advanced tips and hacks to boost your working experience with the program immediately. The key here is to take your time with your surroundings and tweak every little mechanic here and there to get into the know-how of things. Just make sure to read until the end for the best results.
Using Google Docs – An extensive guide
Google Docs has seen a myriad of improvements over time, and using this software in 2023, reflects how far Docs has come across over time following its initial inception in 2006. First off, you should know that there is no need (no way either) to download or install Docs on your device. It runs on the web and is heavily focused on the cloud, so expect it to be constantly on the go for your various use cases.
In addition, Google Docs is available for Android and iOS, and this guide will cover the program’s desktop version. Don’t fret, though, since once you note down the basics, getting the hang of Docs on mobile platforms becomes as easy as pie. To get started, head over to the official Google Docs handle and click the “Go to Docs” button. If you haven’t done that already, you will need to sign in with your Google account.
- Note that this method pertains to Google Docs for personal use. You can approach the “Try Docs for Work” section to affiliate Docs with Workspace for professional organizations.
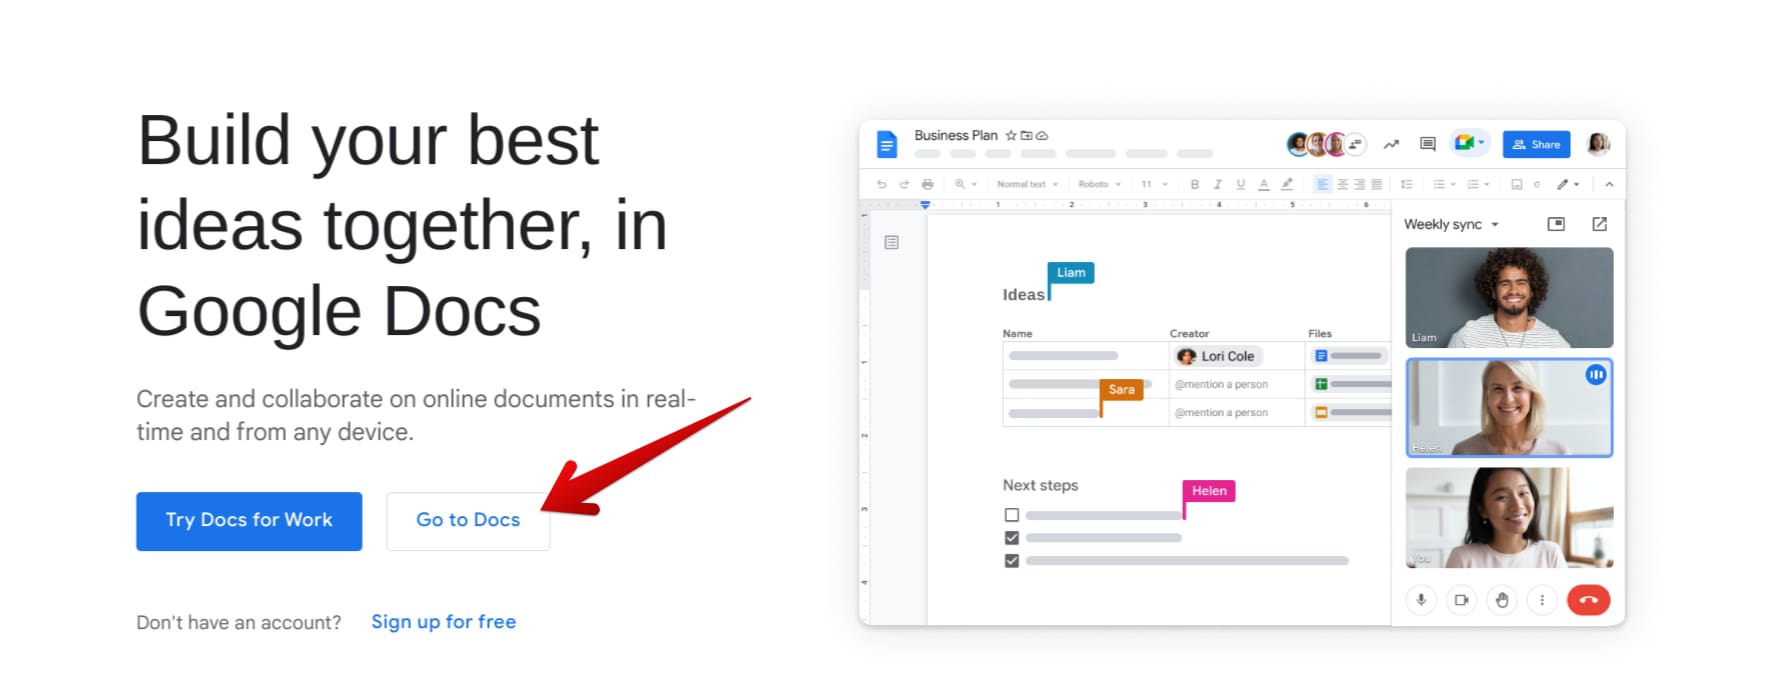
Getting started with Google Docs
From here on out, the Docs home page interface will welcome you, allowing you to look into your existing documents and create new ones. Move forward by clicking the large-sized “+” button that says “Blank” to approach the Docs editor interface. Writing, editing, and collaborating without breaking a sweat now be made possible. Let’s explore these metrics in a little more detail ahead.

Starting a new document in Docs
How to write on Google Docs
Docs is a specialized writing tool, so it’s only natural to expect the involvement of a high-quality receiving standard for the craft. However, the fact that the editor interface is easy to use makes the overall work experience quite feasible. For instance, you can tap anywhere on the blank page, which is the middle section of the Docs editor, and start typing with your keyboard. It’s as easy as that to get the rudimentary use case of the program in motion.
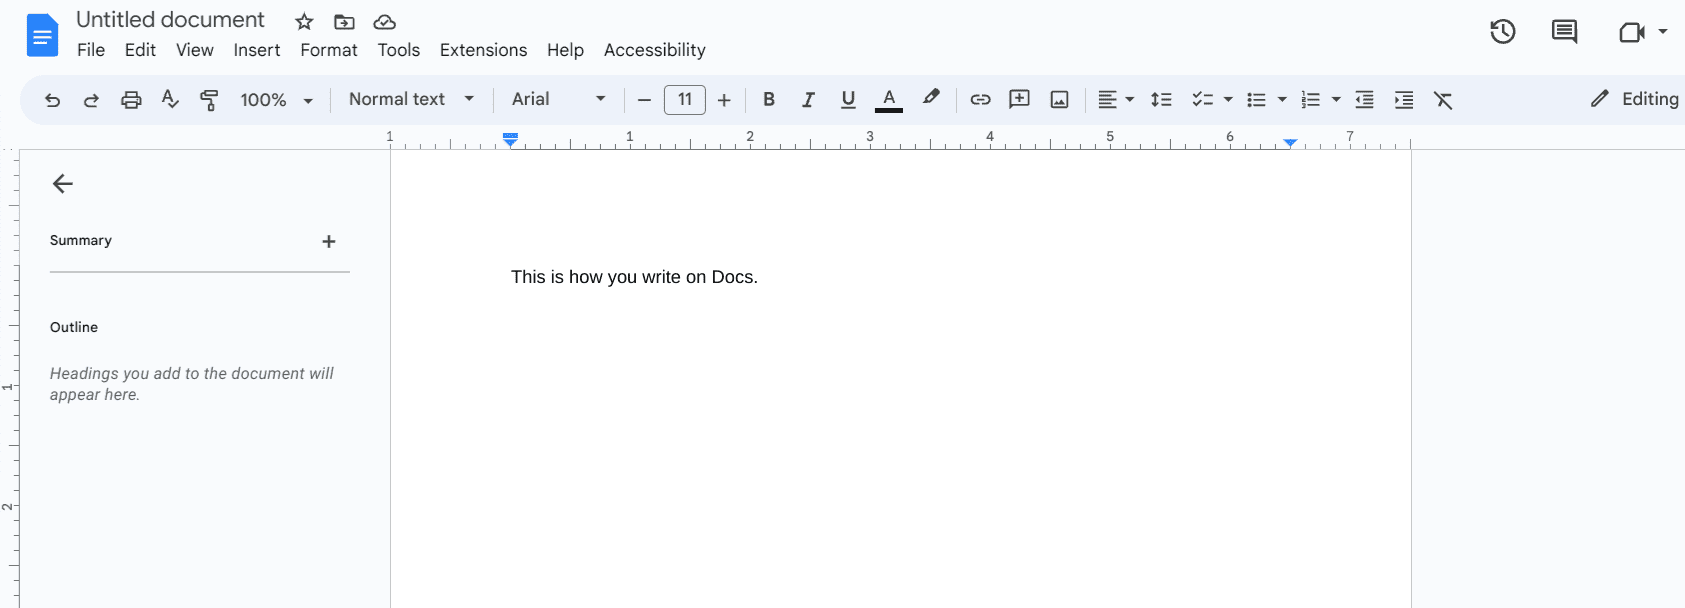
Writing in Google Docs
But, of course, leaving things that way isn’t something that will turn people’s heads toward your document. Writing in such a manner is what you shouldn’t be doing with Docs, as there are many different formatting options to get into that can make your text appear fuller and enriched. Formatting is when you structure your text in an organized manner so it’s easier to read for others and you.
The best formatting tools that you should use in Docs right off the bat pertain to “Styles,” “Font,” and “Font size.” Additional formatting features such as “Bold,” “Italic,” “Underline,” and “Align and indent,” along with “Bulleted list” and “Numbered list” may also be utilized. Usually, a collection of these tools will help you create the most perfect draft possible. However, it will take some time to acquaint yourselves with the ins and outs of the editor if you’re a new Docs user.
First, click where it says “Normal” text beside the “Zoom” level, and a dropdown section of options will appear. From there, you can choose between the “Title,” “Subtitle,” and the rest of the H1s, H2s, and H3s. It would be best if you began writing in Docs with a title. Use the relevant style and title your draft accordingly.
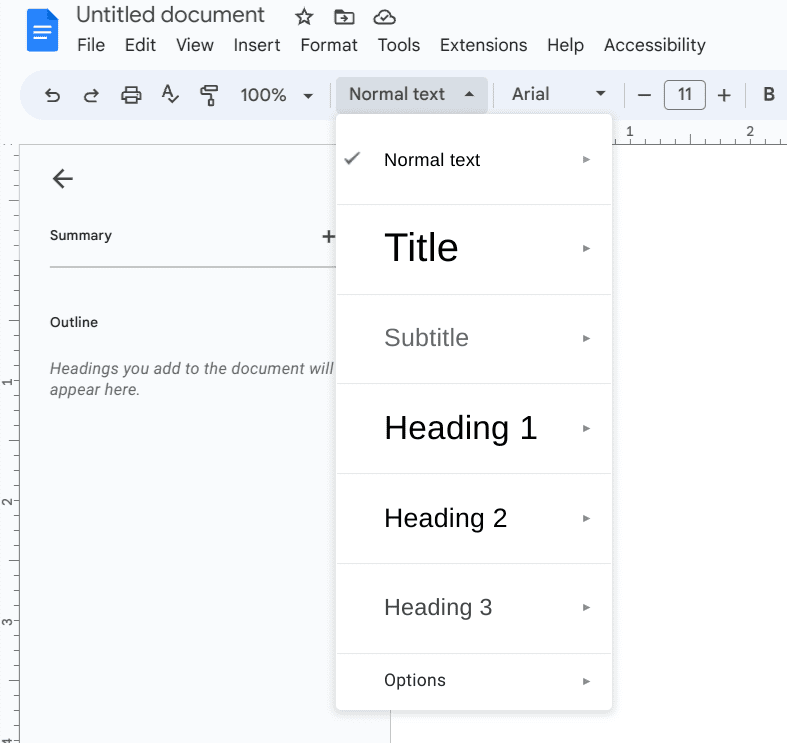
The “Styles” feature in Docs
This is the initial part of writing in Google Docs, and no draft is complete and well-informed without the relevant edits. Let’s look at how you can make your writing stand out more with Google Docs by editing it accordingly.
How to edit on Google Docs
Google Docs has an exhaustive array of editing features that can help you turn the tide of how your document appears. When your initial draft is ready, you can painlessly run a scan for grammar, spell check, and other problems potentially preventing your writing from looking flawless. Other than that, there are several tools to implement in Docs that can help you edit your drafts to a great extent. Let’s look into these in more detail below.
Check the word count
Knowing the number of words you’ve written so far can be essential in multiple cases, especially when reaching a certain threshold of words in your writing. Although Docs does not have the word checker functionality toggled on by default, it does not take long to kick it into motion, regardless. Click the “Tools” button in the toolbar at the top, then choose the “Word count” option. You can also use the “Ctrl,” “Shift,” and “C” shortcut key combo to do this.
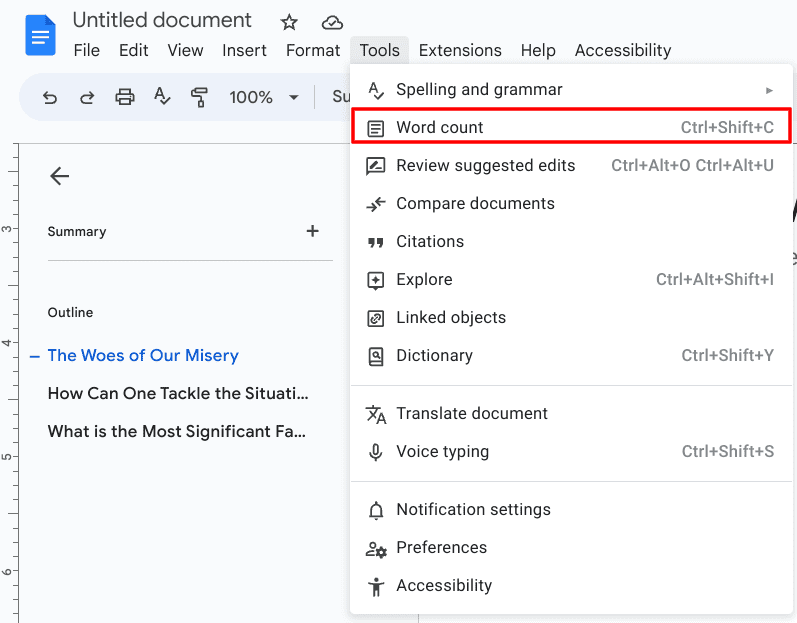
Entering the “Word count” section
After the “Word count” section opens up, you can visualize the words and characters you’ve written so far and enable the word counter to pop up when you’re writing using the provided toggle.
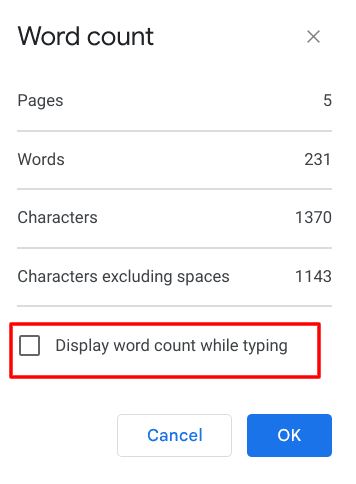
Toggling “Display word count” while typing
Scan the document for spelling mistakes, grammatical errors, and other issues
Google Docs comprises an in-built functionality that can assist you in improving your writing. The tool is powered by AI and is created to pluck out obvious spelling and grammatical errors in your copy. It’s beneficial when you have written a long-form article and cannot bother to re-read every word and line due to time constraints. In such situations, the utility at hand can be easily relied upon.
You can toggle on the functionality by clicking the “Spelling and grammar check” button in the top-left corner of the Docs interface. An alternative here would be to press the “Ctrl,” “Alt,” and “X” keys together, and that’ll do the trick as well. Once done, a prompt will appear on the right side of the screen, feeding you suggestions on what doesn’t look quite right and what you can do to improve your text. Go through the suggestions one by one to make all the changes needed.

The “Spelling and grammar check” feature of Google Docs
Use bulleted or numbered lists wherever possible
Another way you can make a corrective edit to your document is to use bulleted or numbered lists for repetitive text that is better off visualized at first glance in list form. Read through your text and see if it can benefit from this functionality somewhere. To implement this feature, tap on either the “Bulleted list” or “Numbered list” buttons in the toolbar, depending on the type of list you want to go for. Using the given shortcut keys to toggle them in the text is also possible.

Using the “Bulleted” and “Numbered list” features
You’ll also find additional menus alongside each list type that can help you change the appearance of the way the bulleted and numbered lists appear for you. For starters, if you click on the down-facing arrow beside the “Bulleted list” tool, the following menu lets you tweak the display icons of the bullets in question. A similar menu will appear if you click the same arrow for the “Numbered list” functionality.
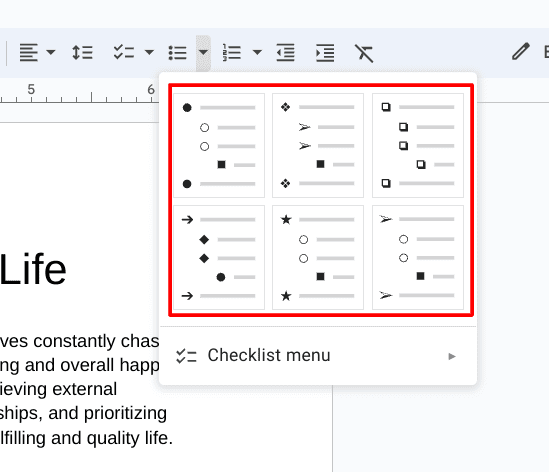
Bulleted list options in Google Docs
Insert images and links
No piece of writing is ever 100% complete without a facilitative image to accompany it. Google also recommends inserting high-quality images in your writing so that it can get picked up by the algorithm better. To do this as part of the editing process in Docs, click the “Insert image” button right beside the “Align” tool, and you’ll quickly be able to get photos into your Docs document in a variety of different ways.
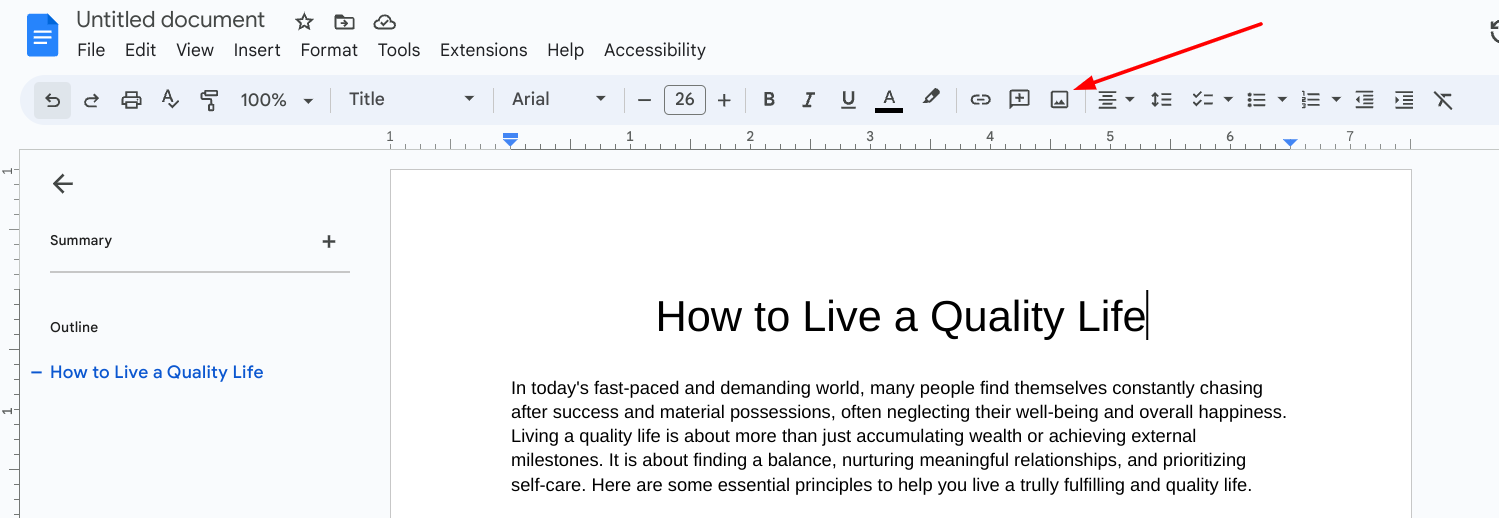
Inserting images in Docs
Your primary option is to upload images from your device’s local storage, but that’s not where Google Docs draws the line. The word processor lets you search for images on the web on the fly while making other options, such as Google Drive and Google Photos, available at a single tap. You can also fetch photos by their URL and insert them in Docs in real time. If not even that does the trick for you, go ahead and snap a photo from your camera and upload it right away.
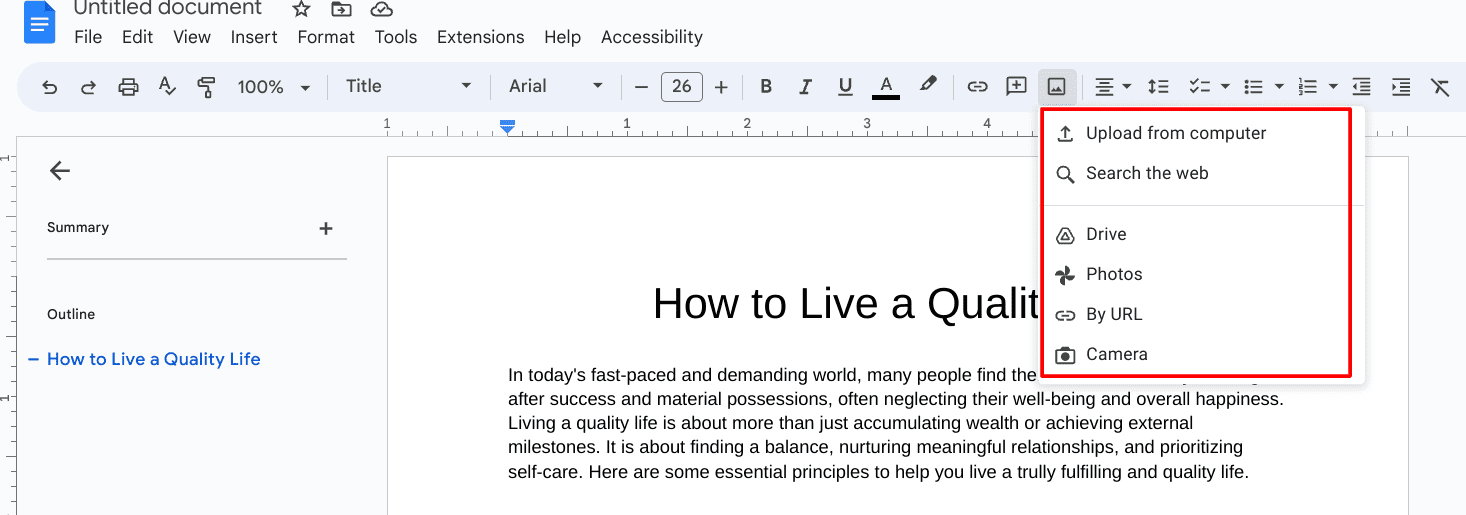
Different options for uploading images to Docs
Implement headers and footers
Headers and footers are two essential components that can provide a lot of depth to your writing as you create a long-form document. Headers come at the top of every page in Docs, while footers rest at the bottom extremities. A header provides users with information about the document on each page as they go about the document, so it’s impossible for them to get lost during their reading experience.
Footers are slightly different but are oriented around adding more content for your reader’s convenience. Usually, these comprise external links to social links, certifications, and other information about copyrights. To implement them, click the “Insert” button in the toolbar and hover your cursor over the “Headers and footers” area. This will follow up with additional options, mainly “Header” and “Footer,” both with their shortcut keys present too.
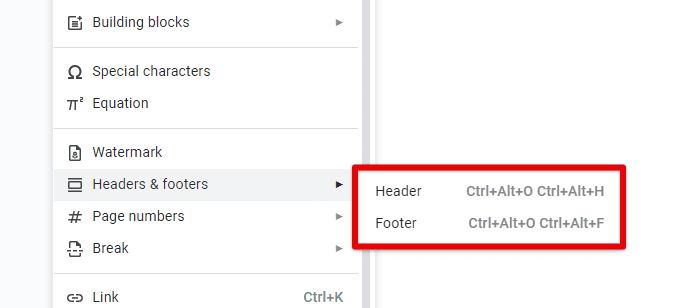
Headers and footers in Google Docs
Bold, italicize, and underline your text
As someone who writes on Google Docs, your best bet is to avoid making your text look dull and monotonous. While using different subtitles and headlines is ideally a great way to prevent that from happening, there’s another measure you can take in Docs to create high-quality drafts and copies. Take out the essential bits of your writing and either bold, italicize, or underline them, depending on their contextual value.
The “Bold” tool is usually for words or sentences you wish to emphasize heavily. These are the terms that you do not want the reader to miss out on in any case. Apply the tool easily by selecting the text with either your keyboard keys or cursor and pressing “Ctrl” and “B” together. That should sort it out for you. As for italicizing text, this is simply another way to shed light on a distinct part of your writing that you don’t wish for it to go unnoticed.
Another use case for italicizing text—preferably with the shortcut key combo of “Ctrl” and “I”—is for highlighting names of books, movies, television series, and others. Lastly, the underlining text helps the reader concentrate on specific areas where you wish to advertise a lens. The feature can be toggled quickly with the help of “Ctrl” and “U.”

An example of using the “Bold,” “Italicize,” and “Underline” tools in Docs
How to collaborate on Docs
One of the critical features of all major Google Workspace constituents is collaboration. Whether it’s Docs, Sheets, or Slides, you can easily share your document with others and get them to work alongside you, feeding you curated suggestions on improving particular bits of your project and whatnot. To begin collaborating, click the vividly apparent “Share” button in the top-right corner of the Docs interface.
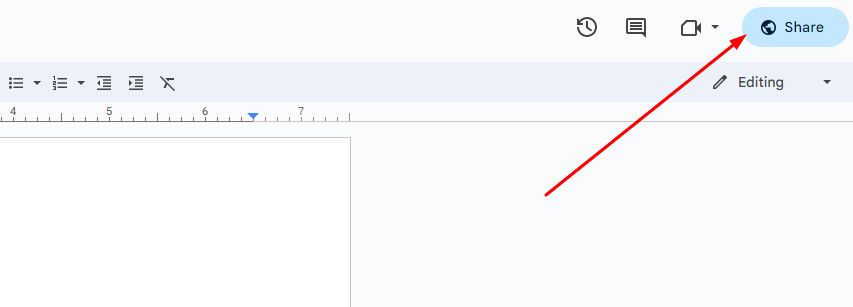
Clicking the “Share” button
Once done, a menu will appear on the screen, allowing you to do two things—you can now invite people to your document by typing in their email address or tweak the general access settings of the Docs file and set it to “Anyone with the link” if you don’t want to bother yourself with handing out personal invites.
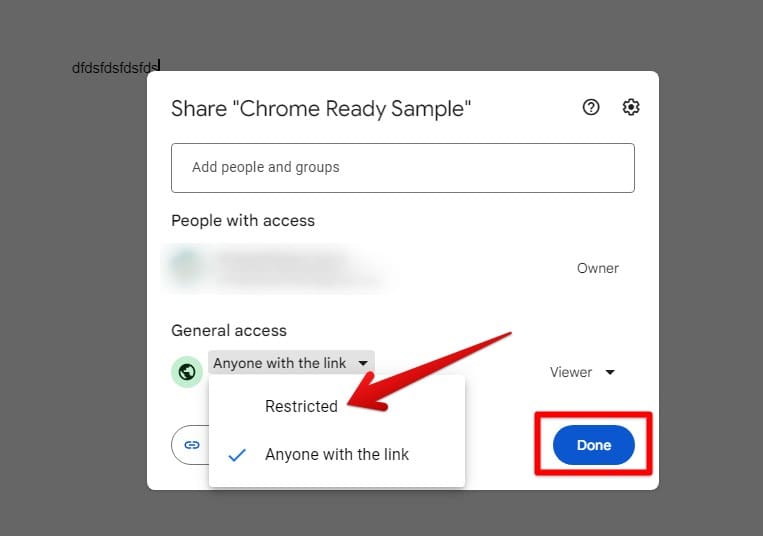
Changing the access
Alongside that, you need to ensure that you’re specifying the role of the people accessing your document. You can leave it in as “Viewer,” which will only let participants view your document, or you can provide them with editorial access with the “Editor” access. A middle option called “Commenter” is also available, allowing folks to suggest changes to your draft without making any changes.
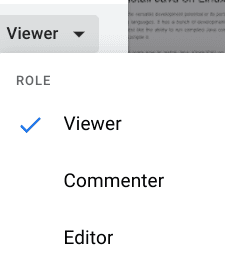
Setting the access level as per the requirement
Once you’re finished tweaking the document’s access settings, copy the link to it for seamless sharing. This is a straightforward way to collaborate on Google Docs, made possible thanks to the beginner-friendly user interface of the word processor.

Copying the link to the Docs file
Advanced Google Docs tips and tricks
Before we top things off, there are certain features and tools of Google Docs that may not be so readily apparent, but once you start getting into them daily, your life becomes a lot easier working with the text editor. For starters, you can import and export files in Google Docs in a few clicks, not to mention the added availability to convert Word documents into Docs files.
In addition, those with a keen eye out for privacy can password-protect their Docs documents in several different ways. If you’d like to take your writing to the next level, you can always customize autocorrect and text replacement. It would be best if you also didn’t forget that it’s as easy as ABC to create a table of contents section for your work in Docs and that margins can be easily adjusted. The same goes for changing the color of your pages in Google Docs.
We highly recommend creating a custom template in Docs to create documents that outclass any other. While you do that, test your hand at editing documents hands-free with voice typing to learn whether this smart functionality can boost your efficiency. All of these tips can change the pace with which you work and provide you with a deeper understanding of Docs’ inner mechanics.
Conclusion
While Microsoft has not been taking it slow with its age-old desktop suite of productivity applications, Google has brought up quite the competition for the tech industry giant, launching an array of Office-competitive applications that bring the Google ecosystem closer to the company’s massive user base. To talk about one of the most front-running components of Google Workspace, we have at our disposal Google Docs, a highly renowned and universally compatible word processor.
In this comprehensive guide, we’ve talked about Docs’ functionality as a whole, what are some of its basic tools, and how one can utilize them effectively in the times to come. We’ve also left some valuable tips and tricks in there for your convenience, so you can immediately forget about being a beginner and readily involve yourself with the program’s pros. Do let us know in the comments section whether the guide helped you. Thanks for reading!
