Google Chrome is known for its personalization features, allowing one to switch up the appearance of the internet browser in several ways. However, the default methods, although incredible, do not offer any flexibility in making a customized theme with differing colors. If you’ve been meaning to create a unique Google Chrome theme loaded from top to bottom with your own design choices, this guide will teach you how step-by-step.
It’s no secret that the Chrome browser is an industry leader globally, recognized globally for its broad compatibility and ease of use. In addition, one of the greatest strengths of this web crawler is the Chrome Web Store that integrates swiftly with it, making it possible for users to enjoy a world of capability-enhancing extensions and other apps. So how we’ll learn how to create custom Google Chrome themes also concerns the Web Store.
Without any further delay, let’s jump into this guide right away.
Creating custom Google Chrome themes
As iterated earlier, the default Google Chrome personalization center presents the user with various options for changing the wallpaper and the browser colors. You may also tweak the availability of the shortcuts section, along with a couple of more options relating to the background, but that’s about it. If you wish to customize your theme creation, the only far-fetched thing you can pull off is upload a background image to Chrome from your PC’s local storage.
We will rely on a Chrome Web Store application called Theme Creator to generate a custom theme. Although the program is pretty dated now, given how it was last updated in 2015, it still works like a charm for Google Chrome and quickly gets the job done. The app also comes from a verified developer, but you may as well keep your antivirus toggled just to be safe.
Installing Theme Creator on Google Chrome
First, we must install the Theme Creator app on the browser to get started. To do that, head to the official page of the application and click the apparent “Add to Chrome” button. This is so a shortcut can be added to your PC, and you can visit the Theme Creator domain quickly next time.

Installing Theme Creator for Chrome
Clicking “Add to Chrome” will make a prompt appear at the top of the page, asking you whether you’d like to continue with the download. Select “Add app” here again to move forward with the process. The application should now be installed on your end in no more than a couple of seconds.

Confirming the app’s installation
Click the “Visit Website” button on the extension page, and you’ll quickly be taken to Chrome’s custom theme creator. Continue reading from the following section to learn what to do next.

Launching the Theme Creator app on Chrome
Creating a customizing theme with Theme Creator for Chrome
Now that you’ve arrived at the Theme Creator website, the idea is to develop a custom theme for Google Chrome. Thankfully, the application at hand makes it pretty painless, warranting you to go through many steps to complete the procedure. The first thing you need to do is upload an image. Remember that this image will sit in the background of the “New Tab” page in Chrome and supply the browser with accompanying colors in the next step.
After setting a name for your theme using the provided field, click on the “Upload an image” button to open your device’s local storage. That way, you can choose what app to pick as part of your background in Chrome. Select a fitting photo because the constituent will later fuel pertinent browser colors.
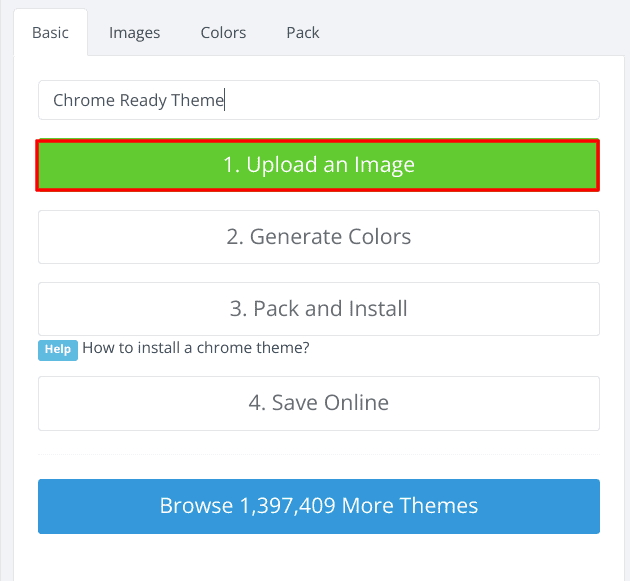
Uploading an image for the custom theme
Now, uploading the image won’t do much apart from inserting a photo into the background of the Chrome browser. We must optimize this photo to appear fully in Chrome because the default setting is unworkable. For this purpose, you will need to turn to the bar of options right below the preview area of the application. That is where you can tweak multiple settings concerning the background image, including its positioning and scaling.
You have to click the field where it says “normal size” and choose the “fill screen” button. Ensure you use a high-quality photo as your Chrome background for viable results. The photo resolution has to be at least 1080p for the image not to appear blurred. Moreover, the “Scale” setting can help you modify the image’s dimensions at will, providing complete flexibility regarding its fitting.
If you want to switch things up, click the “no repeat” field and choose “repeat XY.” Doing that will create many copies of your background and duplicate it within the section to make it look multiplied. It’s a cheeky addition that you can look into. The photo’s positioning and alignment do not matter if you’ve set the size of it to “fill screen.” Those options are for cases where the scaling is minimal, and the photo has room in the background to move around.
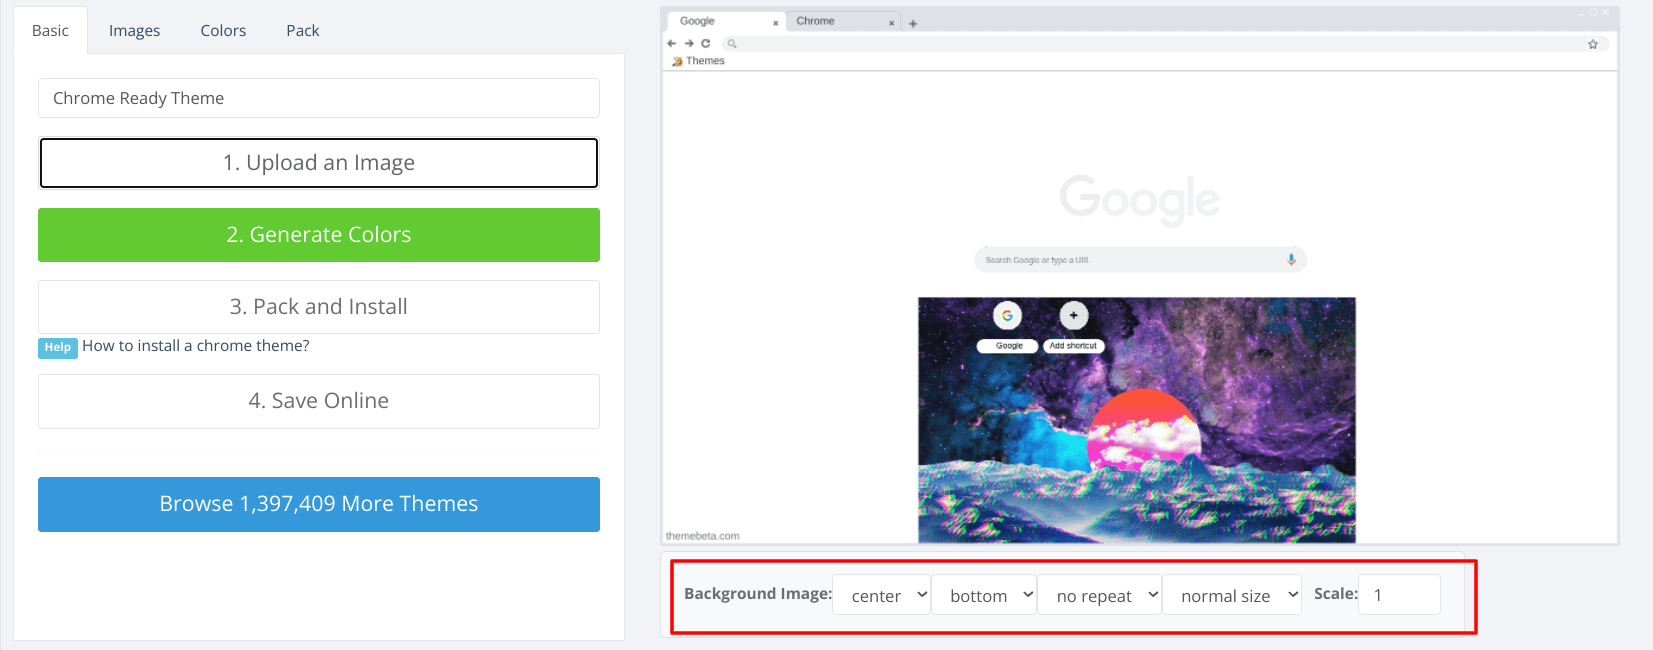
Customizing the background image
Once you’re done customizing the photo’s background appearance, you must get into the “Generate Colors” functionality. Tap on the green-lit button and watch how the application spreads your background image’s color(s) across the browser, stretching them to the toolbar, extension bar, top bar, and even the tabs. If you’re unhappy with some of the color choices that the AI of the program will make, don’t worry. All fields are customizable.
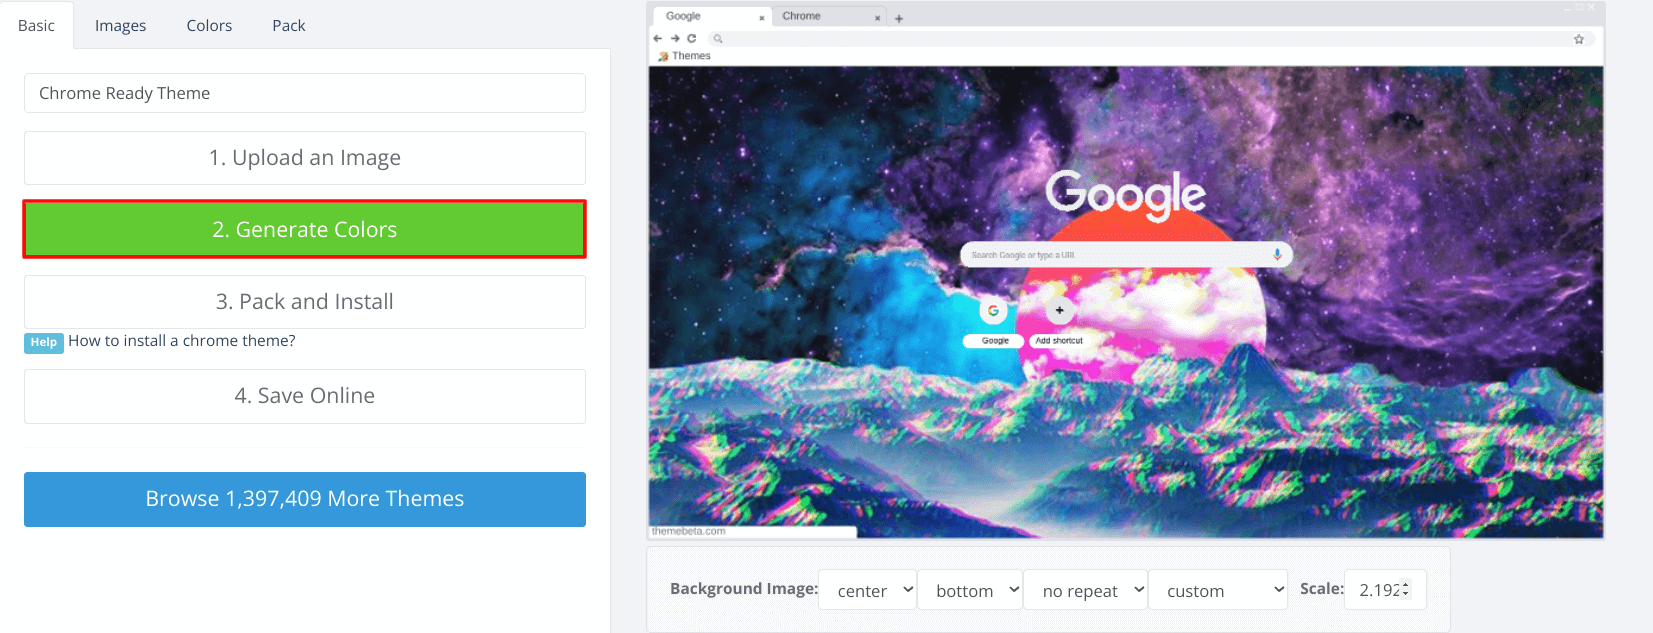
Generating colors for the theme
Before you “Pack and Install,” it’s worth getting into the “Images” and “Colors” tabs of the app, which are present right beside the “Basic” section for more advanced settings to adjust. Begin by entering the “Images” area to see what it offers you as part of the customization.
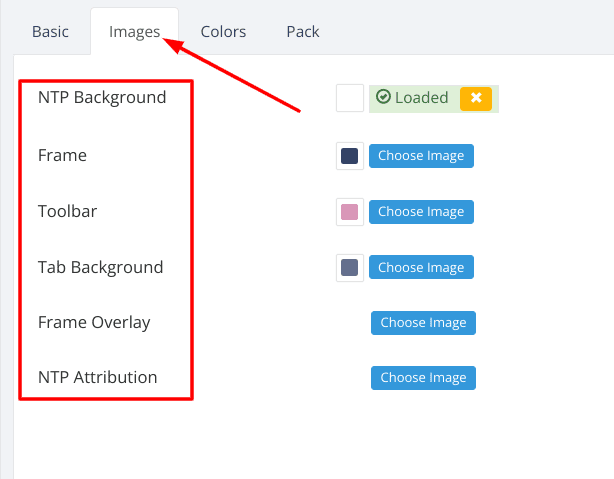
Personalizing the image’s colors
Since the NTP—shorthand for New Tab Page—Background has already been sorted in one of the earlier stages, you can go ahead and adjust the “Frame,” “Toolbar,” “Tab Background,” “Frame Overlay,” and “NTP Attribution” for your custom theme. Each field has a “Choose Image” beside it, allowing you to upload additional images to modify the colors of the relevant section. This opens one up to terrific customization potential, and we advise testing different color combinations to boot.
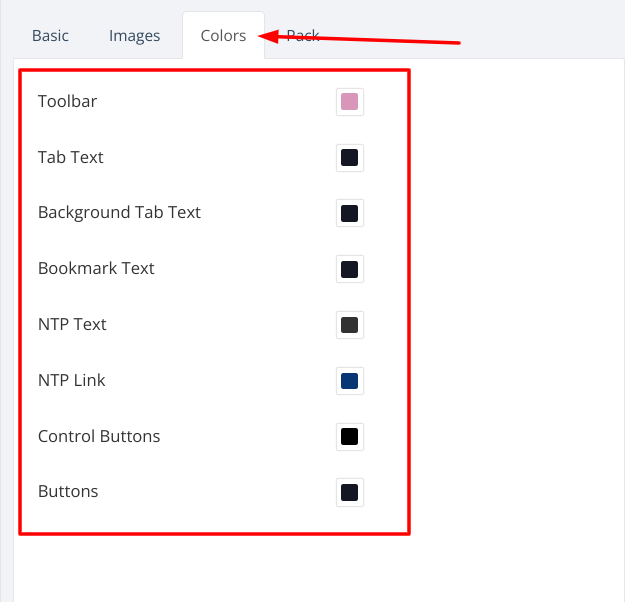
The “Colors” section of the Theme Creator
Additionally, the “Colors” tab of the Theme Creator furthers the personalization of your theme by allowing you to change the colors of different types of text in Google Chrome. It even lets users modify the color of the toolbar, which Theme Creator here refers to as the status bar that appears at the bottom-left corner of the page whenever you’re loading a page in Chrome. Apart from that, all the types of text you observe in the browser can have their colors switched up.
These include “Tab Text,” “Background Tab Text,” “Bookmark Text,” “NTP Text,” “NTP Link,” Control Buttons,” and even “Buttons.” You cannot upload custom images in this section, however, and rightfully so, because it doesn’t make a lot of sense to do that for just colors. Make sure to experiment with your different options since there’s no time constraint and multiple choices to get into.
This brings us to a close as far as the customization of the theme in Chrome is concerned. It’s time to download and upload this custom extension to the Chrome browser.
Uploading the custom theme to Chrome
The final part of this tutorial is a simple application of the custom theme you’ve just made. To do that with the help of the Theme Creator app, click the “Basic” tab again to go back to the front page and select “Pack and Install.” Doing that will prepare the application to bundle your custom theme and download it locally on your PC.
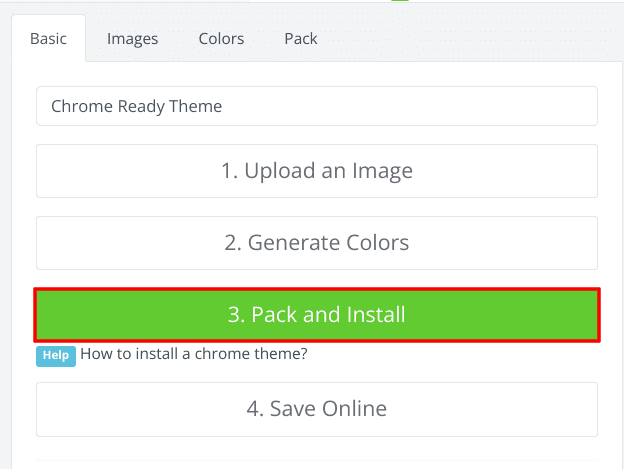
Packing and installing the custom theme
The rest of the process is pretty simple as well. It would be best if you headed to the “Extensions” section in Google Chrome to load the custom theme into the browser. To do that, click the “More actions” button in Chrome in the top-right corner of the screen, hover over “More tools” next, and select “Extensions” afterward. Alternatively, you can type “chrome://extensions” in the address bar and press the “Enter” key.
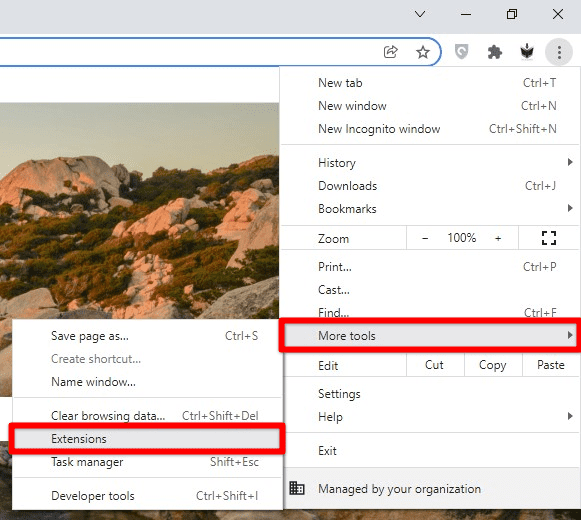
Accessing the “Extensions” section in Chrome
Now, all you have to do is enable the “Developer mode” in the “Extensions” section first and then proceed to upload the custom theme. The developer mode will allow you to add to the Chrome browser independently. The browser creators have added this feature as a fail-safe to prevent malicious modifications to Google Chrome. However, when you have to add something constructive to the web crawler, the “Developer mode” can be toggled on.
After that, the next step is to click the “Load unpacked” extension and have your local storage surfacing on the screen in a couple of seconds. From there, choose the unpacked extension you downloaded in the previous step and select it to begin the upload. Once cleared, a prompt will appear on your end, confirming whether you’d prefer to make this change to Chrome. Reply with “Add a theme,” You should be ready in a few moments.

Loading an extension in Chrome
There you have it! You’ve successfully learned how to create a custom theme in Google Chrome add apply it to the browser. If you ever wish to change your theme, you can head to the New Tab page on Chrome, click the pencil icon in the lower-right section of the screen, and choose to “revert to classic Chrome” or pick another color or background to go with. On the same side, creating a new custom theme will also be possible, similar to the steps outlined above.
Conclusion
From harnessing the effectiveness of the omnibox in Google Chrome to utilizing the in-built screenshot tool of the browser at hand, Chrome hasn’t acquired a world-renowned reputation for no good reason. The web crawler is fast, optimized for performance on various sites, and integrates eloquently with the Chrome Web Store. In doing so, users can usually pump the browser full of added functionality with high-quality browser extensions.
In this guide, we’ve looked at the custom personalization of Google Chrome, where a neat application called Theme Creator offers its very best in terms of allowing you to create a customized theme. There are numerous options to tweak and adjust on that front, such as the color of the fonts and the scaling of the background image, but given the ease of use, getting through shouldn’t be an issue. Let us know in the comments section whether you ended up successful.
We would love to read your feedback!
