Google Chrome is one of the speediest internet browsers in the world, known for its universal compatibility with sites on the internet and swift integration with the Chrome Web Store that makes it stand out from the rest of its competition. However, all that glim and glam do not come without a catch, or at least, things have been a certain way up until now. Chrome is notorious for consuming heaps of system resources and rendering PCs slow in the wake of it.
However, thanks to recent developments, Chrome is not the same way anymore. Apart from the measures you can take yourself to optimize Google Chrome for energy efficiency and battery life, the developers have incorporated native features as well on that front. In this guide, we’ll explain how to optimize Google Chrome for energy efficiency and battery life, so you can focus on the stuff that matters instead of having to put up with performance issues.
Let’s get started without any further delay.
Optimizing the Chrome browser to be more energy-efficient
Google Chrome has been out for the world since 2008, but it was only as timely as 2022 that the developers finally launched dedicated tools for the browser that helps it be more energy-efficient. With a new section on the “Settings” page now called “Performance,” Google has released “New Chrome features to save battery and make browsing smoother.” The announcement was made in a blog post published on Dec 8, 2022.
The developers say that in the wake of the arrival of these latest functionalities, namely Memory Saver and Energy Saver. Thanks to the former, Chrome will utilize 40% less memory than its previous standing. It will get that done by taking a close, hard look at the tabs you have opened on Chrome but are not actively using. By freeing up memory from these tabs, the hogged resources will be used where they are required.
As for the tabs you were not using will have to be reloaded again, so make sure not to leave any important tab idle for too long, or Chrome will do its job and immobilize it for the sake of boosting device performance. But that’s not all. Those of us who work on our Windows laptops and Chromebooks are due to observe a considerable bump in battery runtime as well.
That’s due to the courtesy of the “Energy Saver” tool, which will inhibit background activity from running and even size down visual effects. “Smooth scrolling” is one of Chrome’s visual features, but enabling “Energy Saver” will get rid of that temporarily. To access both this feature and “Battery Saver,” head to Chrome’s “Settings” by clicking the “Customize and control button” in the top-right corner of the screen and then selecting “Settings.”
- Tip: To open the “Settings” page quickly, you can employ two shortcuts—either type in “chrome://settings” in the address bar and press the “Enter” key or press “Alt” and “E” together, followed by pressing “S” on your keyboard.
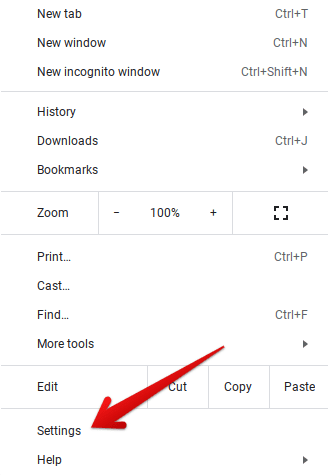
Clicking on Google Chrome’s “Settings”
As you’re taken to the “Settings” page on Google Chrome, the next step is to click the “Performance” tab on the screen’s left side to get to the next step. After that, the two new performance-related features, “Memory Saver” and “Energy Saver,” will pop up. To begin with, the former, “Memory Saver,” will have a toggle beside it. Click it to enable the feature. From now on, Chrome will be sped up for those who have more than 20-30 tabs open on their end all the time.
In addition, a supplementary setting in the area can prevent inactive tabs from going out of service that you purposely like to keep idle. Right beside the “Always keep these sites active” area, click the “Add” button and proceed by entering the URLs of websites that you wish to keep active. This is a highly thoughtful feature in addition to an excellent feature.

Accessing the Memory Saver feature in the Performance section
The moment you’re done with the “Memory Saver” area, presumably for both desktop PCs and laptops, continue by focusing on the section right below it, titled “Power.” Here you’ll find the “Energy Saver” tool geared toward lesser power consumption. This is a laptop-only functionality and does not apply to desktop PCs. Now, there are two options to go about here after you’ve enabled the primary toggle for the tool.
You can set it to “Turn on only when my battery is 20% or lower” or “Turn on when my computer is unplugged.” Both ways offer pros and cons, so it ultimately boils down to your preference for the route you’d like to tread on. If your laptop struggles with maintaining an appreciable battery runtime, we suggest tuning the feature to the latter. That way, you will observe a decrease in Chrome’s overall visual quality, which will be worth it.

The “Energy Saver” feature in Google Chrome
These are the two new features that Chrome users have been endowed with recently. Both can optimize Chrome to be more energy-efficient and power-smart, but it’s up to you to decide precisely how you want to employ their working mechanism. Now, that takes care of the initial part of the article, but there are still multiple ways to go that can speed up Chrome’s performance even more and save you battery life. Let’s take a look at these stratagems ahead.
How to make Chrome smarter about battery consumption
There is a bucket list of things that Chrome users can follow to make their web crawler stand out in terms of performance and energy consumption. However, some of these measures are to be taken into account diligently. Consistently routinely following them will yield the best results.
Keep the browser on the latest release; restart every once in a while
One of the best ways to keep your Chrome browser running great in all departments, even for gaming, is to keep it up to date. Chrome benefits from automatic update downloads, so you don’t have to bother yourself with that. However, applying the downloaded update is still required, which can only happen if you restart Google Chrome.
People often neglect that and use Chrome on dated versions for long sequences until they observe a significant dent in performance and start looking up what’s wrong with their browser. Stay ahead of the curve on that front and promptly take care of Chrome updates. To check for recent updates, head over to the “About Chrome” page within Chrome’s “Setting” and see if there’s a “Check for updates” button there.
Click on it to determine whether anything has been awaiting your attention in the pipeline. Wait a couple of moments and wait for the download to begin automatically. If nothing like that happens, you’ll see “Chrome is up to date” with a blue-colored tick icon. That means you don’t have anything to worry about yet. For more details and instructions, learn how to check the Google Chrome version and update it to the latest in a separate article.

Google Chrome downloading the latest updates
There’s another thing we recommend you do, and that’s restart the Chrome browser at least twice a week. Doing so gives the browser some breathing room and possibly installs downloaded updates. Keeping Chrome active for too long can negatively affect hefty system resource consumption.
Shut down tabs and windows you no longer need
Although the newly introduced “Memory Saver” feature is programmed to free up RAM from unused tabs, we still recommend keeping open tabs to a minimum for maximum efficiency. An open tab still consumes precious resources, and even if it has been rendered inactive, accidentally switching to it will prompt the tab to reload all the same. You can avoid scenarios like this immediately by opening only the required tabs and nothing beyond.
A shortcut key combination that can be employed here is “Ctrl” and “W.” Pressing these two keys will close a tab instantly, making things even quicker for you. Not just the device’s overall performance, but if you’re on a laptop, your battery runtime gets hit too with an excessive amount of opened Chrome tabs, such as 20 or 30. Best not to get into all that and keep your multitasking approach more focused so you don’t have to keep any tab or window idle.
Delete unwanted extensions
This is another performance-boosting tip that can help you optimize your Chrome browser. Provided that the Chrome Web Store is a massive storefront for hundreds of enticing extensions that facilitate our working experiences, it can often be tempting to load up Chrome with tons of different add-ons, including the ones that we don’t need or need at some point but have no use of now.
To evaluate the situation from a much clearer viewpoint, head to the “Extensions” section in Chrome. You can do that by opening the “More actions” area and hovering over “More tools.” That will lead you to click “Extensions” as more options are revealed.
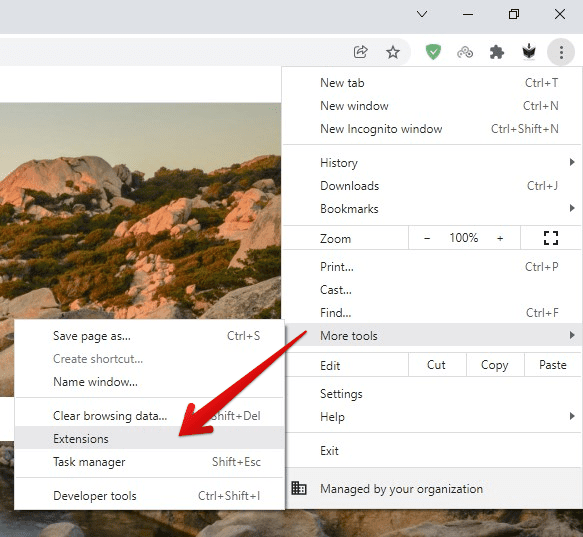
Accessing the “Extensions” section
As soon as you arrive at the “Extensions” area, you’ll observe that all of your installed extensions are bundled up here, making it easy to further assess them by removing, disabling, or checking out their details. Take a good look at the extensions you need and the ones you don’t. Get rid of the latter by clicking the “Remove” button. Remember: If you delete a required extension, you can always get it back from the Chrome Web Store.
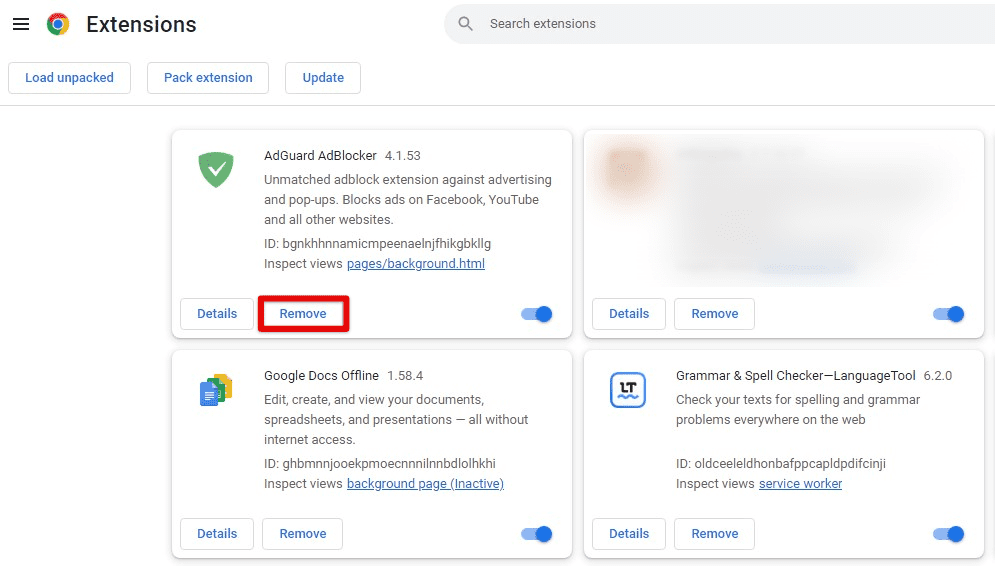
Removing an extension
Toggle off Google Drive offline functionality
Although Google Drive can be a great utility that houses our private files and data on the cloud, the part where it attempts to integrate offline functionality with our devices can be troublesome. Some devices may have that feature enabled by default, but it’s useless unless you wish to use Drive offline and edit or view your documents without internet connectivity. Apart from that, there’s no solid reason to keep the feature enabled.
We recommend switching it right off as enabling it prompts the web app to keep background pages ready on the fly, leading to wasteful system resource consumption. To disable it, sign in with your account to the official Google Drive website.
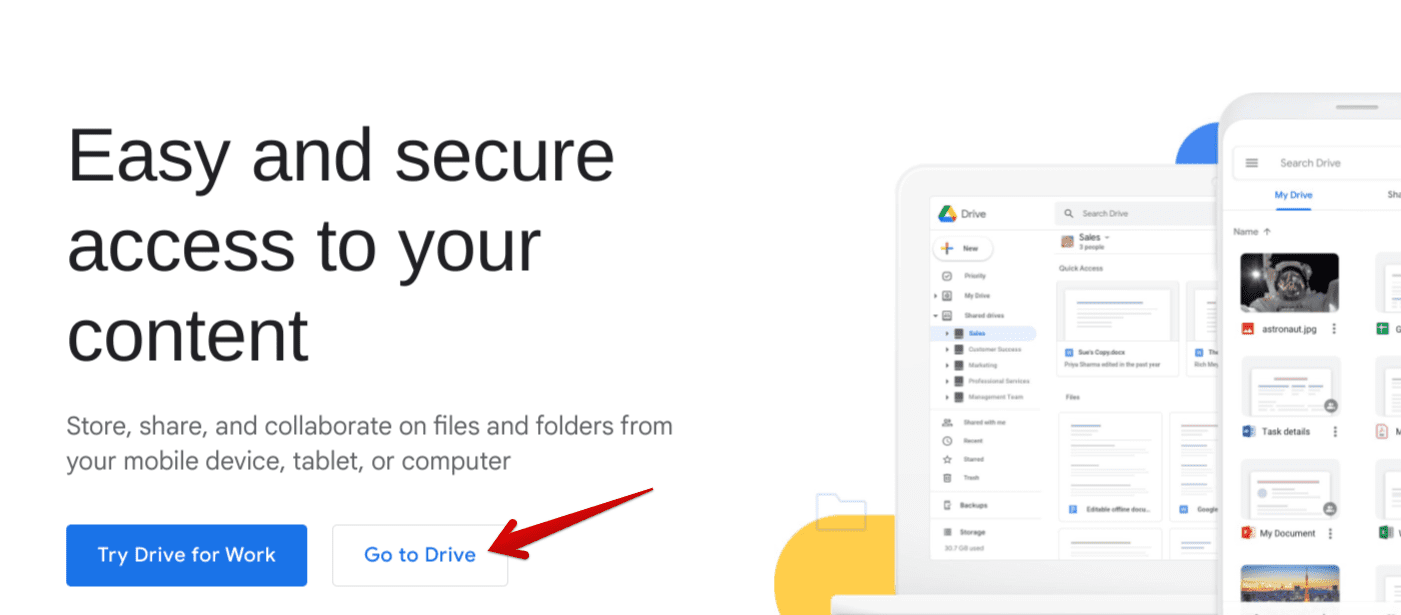
Signing into Google Drive
You should then be taken to the main “My Drive’ area, where your account’s belongings are stored. Here, press the cog-shaped “Settings” icon in the upper-right section of the screen and click “Settings.”
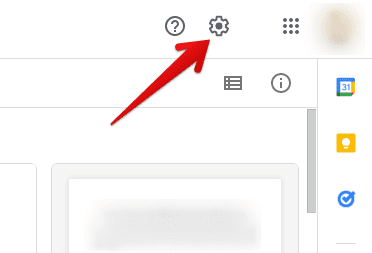
Opening Google Drive’s settings
You should now be taken to the “Settings” page of Google Drive. The next step is to remain in the “General” tab from the side panel to the left and scroll down until you find the “Offline” section. There, untick the checkbox, and Drive will no longer allow you to work files offline on the device that you’re using. On the positive side, some of your system resources will also be spared.
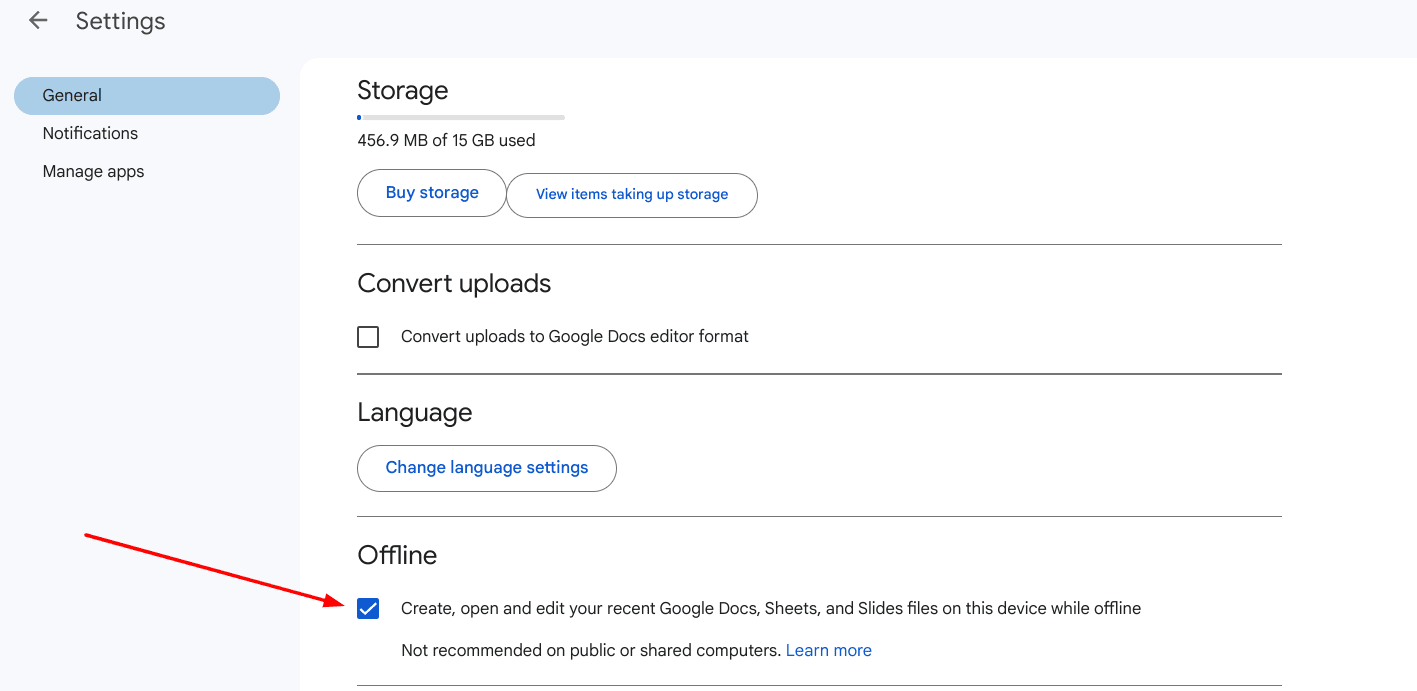
Disabling offline access to Google Drive
But, of course, if offline editing is a thing you regularly get into, keep the functionality enabled by all means. Setting up and using Google Drive’s offline access can often be highly productive, but be sure to block persistent spam and clear out your account to free up storage along with it. On a side note, you can also create download links from Drive for easy shareability with friends and family.
Disable hardware acceleration
You might be wondering why we are telling you to disable something known to increase Chrome performance levels but hear us out first. In some configurations, enabling GPU acceleration can often do more harm than good, decreasing your device’s workability. Whether the reason is spurted from driver incompatibility or an issue with the GPU, it’s worth toggling this feature off and observing if Chrome runs better afterward.
Go to the “Settings” page in Chrome, then click the “System” tab on the left side of the screen. Once done, you should be able to spot the “Use hardware acceleration when available” feature. Disable it from the available toggle, which should handle the matter. Restart the Chrome browser and try running it through its paces to observe the difference from a before-and-after perspective.

Disabling hardware acceleration in Chrome
Use Chrome’s “Task manager” to evaluate hefty processes
The “Task manager” in Google Chrome is separate from the Task Manager of Windows PCs. The former focuses only on processes that concern the Chrome browser. In cases where the internet surfer starts lagging heavily, and you can’t put your finger on any single source of that, the “Task manager” utility can help you find the culprit immediately. To fire it up, click Chrome’s “More actions” button, then float your cursor over the “More tools” area.
As more buttons pop up on the screen afterward, choose “Task manager” next to open up its dedicated window, sift through the currently running processes, and observe their system resource usage. The major parameters in the utility you must concern yourself with are “Memory footprint” and “CPU.” If a process takes up too much of these metrics, you need to get rid of it to calm things down.
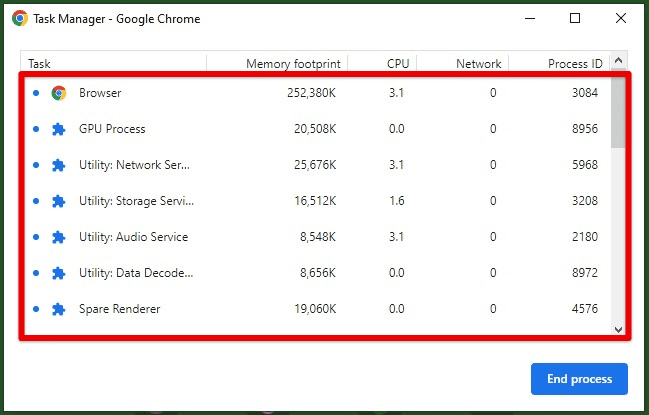
Google Chrome’s “Task manager”
That can be done painlessly by clicking the process and choosing “End process” immediately. Doing so will “kill” the issue and potentially return Chrome to optimal performance.
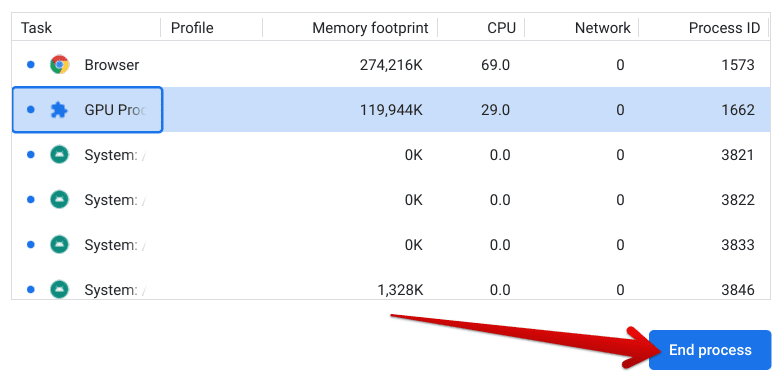
Ending the process in the Chrome “Task manager”
Enable the “Preload” feature
Last but not least, a specific tool in Chrome can help you enjoy a visual boost in overall browsing speeds. It’s called “Preload,” and it is all about predicting your actions on a specific page, so the browser can automatically load the following link that you’ll click on ahead of time, leading to slower on-page loading times. It’s an intuitive functionality and can be enabled easily in a handful of steps.
Begin by heading over to the “Settings” page on Chrome and clicking the “Privacy and security” tab on the left column. Right after that, select the “Cookies and other site data” option to proceed.
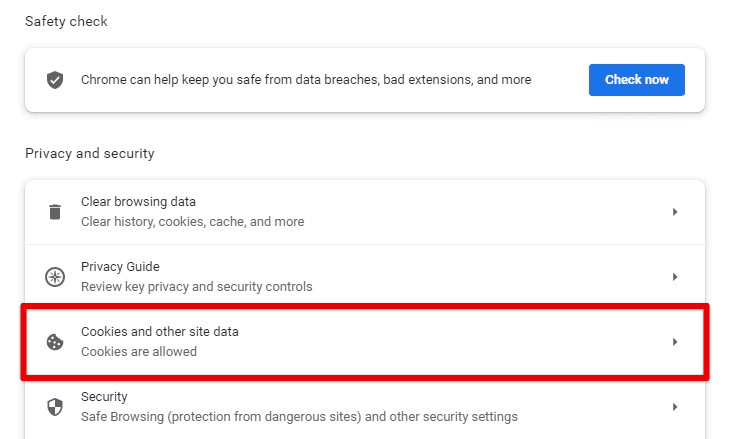
Clicking the “Cookies and other site data” tab
You should now be able to scroll down on the subsequently appearing next page and click the “Preload pages” button. Doing so should launch you to the relevant section and present you with three options. The default is “No preloading,” which you’re probably already using. However, the idea is to get on the “Extended preloading” working mechanism, so Chrome can load an increased number of pages beforehand and allow us to reap faster performance.
The feature is utilized best on websites you often visit, so it gradually starts to remember your link-clicking pattern and provides a sped-up experience next time. We realize this may cause privacy concerns for some, so if you feel this is not something you’d prefer having, change the setting back to “No preloading” at any time.
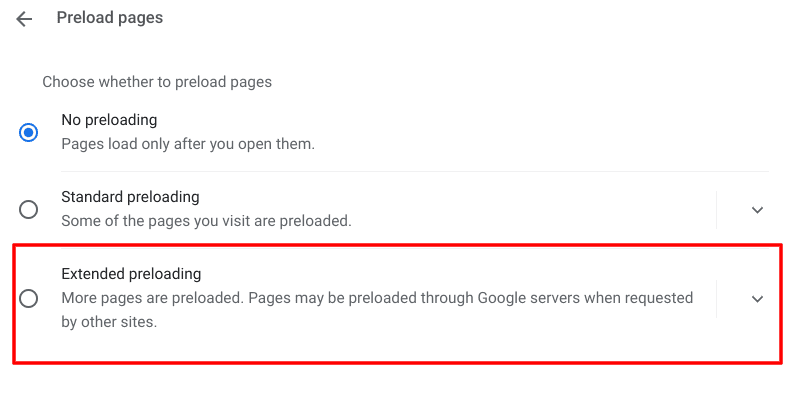
Extended preloading in Google Chrome
This brings the guide to a wrap. We hope that upon following these instructions carefully, you’ll now have Chrome fully optimized for memory and energy saving.
Conclusion
Chrome is reliable, but it often does outright unacceptable things, such as hogging an awful ton of CPU or memory resources to the point where the device’s performance goes down to a fault. Thankfully, there are ways to tackle that, and since Google has incorporated “Energy” and “Memory Saver” tools in Chrome, things are easier to deal with. Let us know in the comments section whether we missed a tip or trick to include. We would love to read your feedback!
