Google Chrome has remained one of the most effective internet browsers on the planet, being available on various platforms. It comes pre-installed on most Android devices, thereby taking care of the internet surfing needs of users right off the bat without having anyone reconsider their browser options. With that said, Chrome has a high potential for receiving tuning and optimization, quite likely to a point where you can observe a significant boost in performance.
In this guide, we’ll be switching to the Android side of things and talking about some simple yet highly effective strategies you can employ to enjoy Chrome and benefit from an optimized experience. Some of the forthcoming tips are general and can be replicated on the desktop version of Chrome as well, should you choose to increase the browser’s performance on your PC. For now, though, let’s commence the guide without further delay.
Best ways to optimize Google Chrome on mobile
We’ve compiled a handful of Chrome optimization techniques for users to follow and speed up their internet browsing experience like never before on Android. It’s recommended to follow each tip diligently since successfully implementing all the forthcoming tips and tricks will help you enjoy the best results.
1. Never delay Chrome updates
Google Chrome is one of the most consistently updated browsers, and it’s your job to ensure that things stay that way. Without the latest updates to the Chrome browser, users can start running into performance issues and other security-related hassles. Therefore, this pre-emptive measure is one of the best ways you can make Chrome stay optimized on mobile, and the best part is that you don’t have to put in a lot of effort for it as well.
To check Google Chrome for an available update, head to the Google Play Store on your mobile and look for Google Chrome with the in-app search bar. After pressing the “Enter” key, you’ll be taken directly to Chrome’s official app page. If an update is live and ready to go, you’ll see an option called “Update” alongside “Uninstall.” If your Chrome browser is on the latest release, an “Open” button will be present instead.
Please check this page occasionally so you don’t miss out on any new releases for the Chrome browser. If you ever spot the “Update” button, click it right away to begin the download. You may also tap on the “What’s new” section to check out the patch notes and understand the new additions in the latest update.
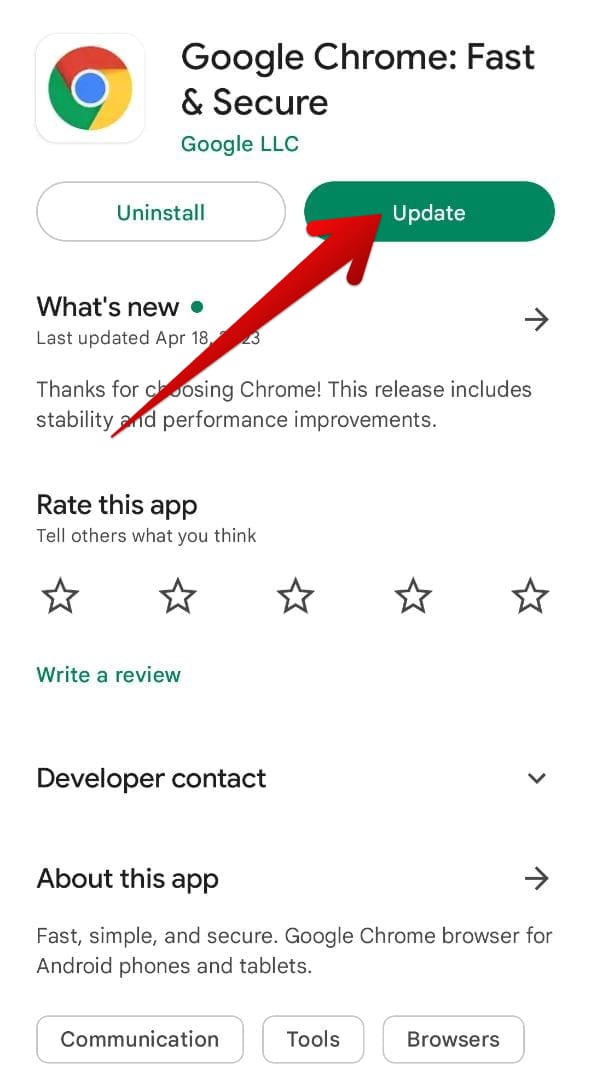
Updating the Chrome browser on Android
We also recommend our readers enable auto-updates on their Android phones for better results. That way, you won’t ever have to manually check for Chrome updates along with all the other apps installed on your phone. However, this will dent your overall data plan if you’re not using Wi-Fi since updates can stack up considerably if downloaded for all existing updates. Make sure your coverage is wide enough to avoid worrisome scenarios.
Get started by opening the Play Store app and tapping on the profile picture on the top-right side of the screen to reveal more options. Once done, choose “Settings,” you should be taken to the relevant page. Here, tap on “Network preference” and select “Auto-update apps” to tweak the required parameter of the feature. Your available options range between “Over any network,” “Over Wi-Fi only,” and “Don’t auto-update apps.” Select “Over any network” for successful results.
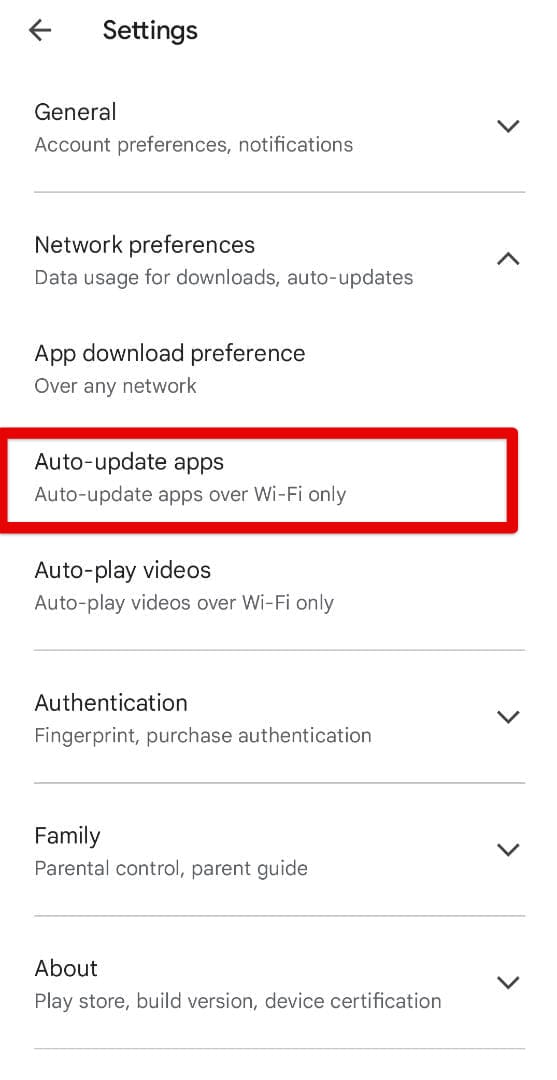
Auto-updating apps on Android
2. Close tabs you do not need
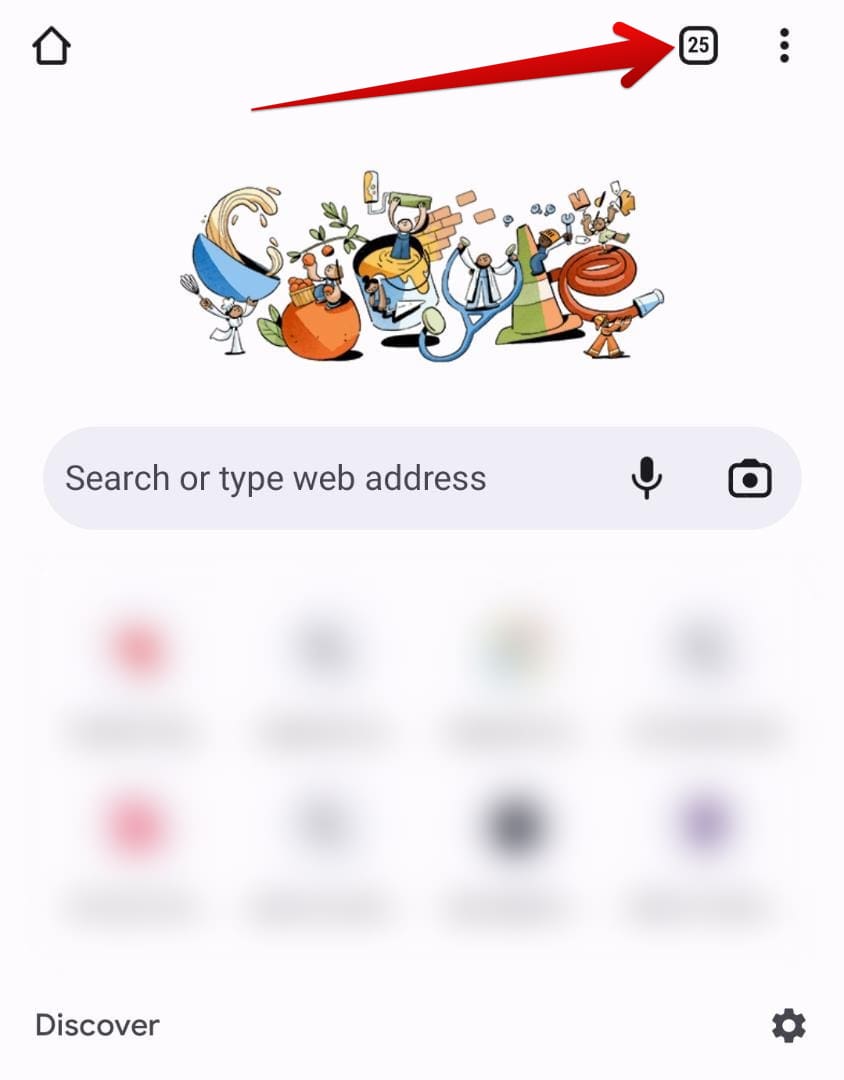
Excess tabs in Google Chrome
We realize the Chrome browser is an indispensable tool for productivity, but that still doesn’t give you a free pass to use the browser while being oblivious to your device’s hardware and technical specifications. If you’re packing a medium-range phone with little power under the hood, keeping opened Chrome tabs to a minimum for faster performance levels is best. The same goes for higher-end devices, especially with 100-150 concurrently open tabs.
Therefore, take a moment to cut out excess tabs in Chrome by tapping on the tab manager. Evaluate the tabs you need and eliminate all the unnecessary ones. If you’d like to shut down your tabs immediately, tap the “More actions” button in the top-right corner and select “Close all tabs.” That will do the trick. From now on, use Chrome sparingly since it can often be a resource-hogging program on Android phones.
3. Use home screen shortcuts for your favorite websites
There is a day and knight difference between the productivity levels of PC and mobile, but there’s one nifty little change you can make to your Android phone to experience Chrome optimally. We suggest using home screen shortcuts for the websites you visit the most. That way, you can get straight to them from the device’s home page without having to open Chrome first and then type in the name of the site in the address bar.
To do this, you must head over to a website and tap on the “More actions” button in the top-right corner of the screen for additional tools to get into. Once done, a drop-down menu will appear, allowing you to tap on the “Add to Home screen” button.
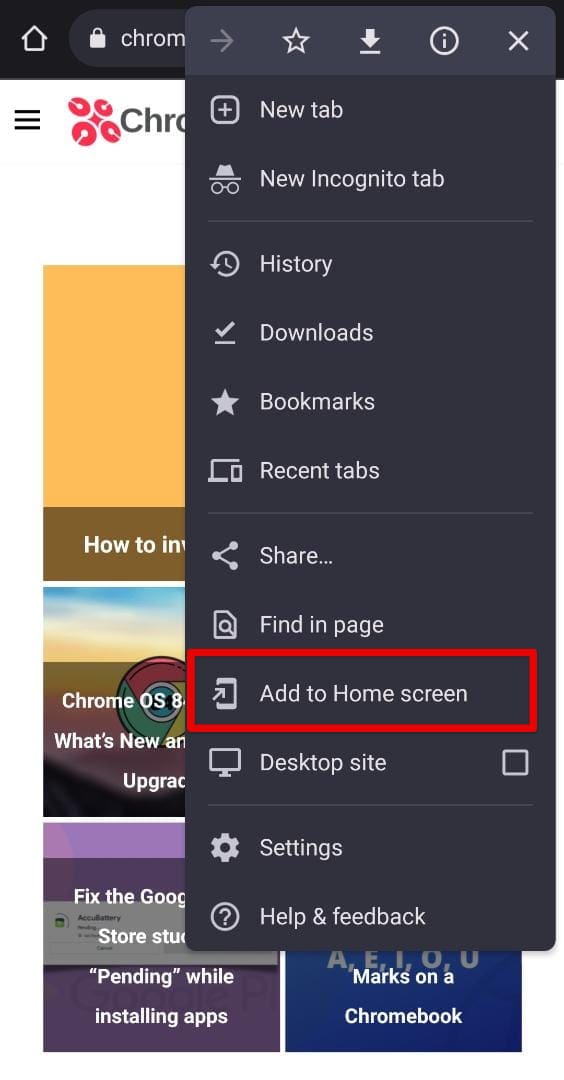
Creating a home screen shortcut for a site
An overlay will now surface on your end, letting you rename the shortcut and making things easier to grasp. Finally, choose whatever you want and tap “Add” to wrap things up.
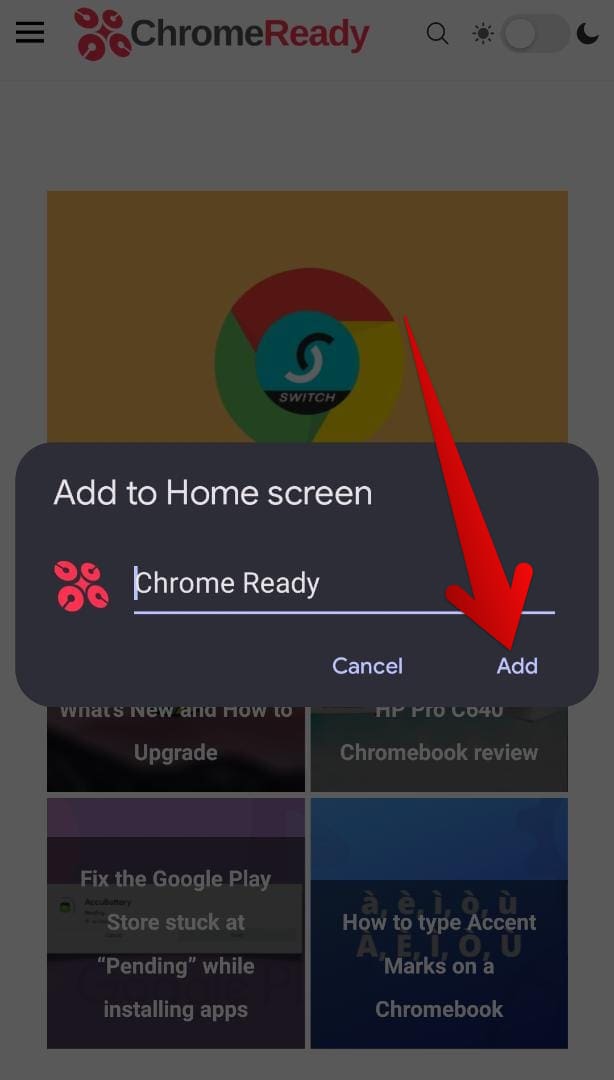
Finalizing the process
This is a quick and easy way to get to your favorite sites instantly without going through the usual steps. You can repeat the process for as many sites as you want, provided there’s enough space on your home screen to accommodate the site shortcuts.
4. Erase Chrome’s browsing history and cache
Another significant way that you can employ to enjoy the faster performance on Google Chrome relates to checking the volume of your browsing history, cache, and other pertinent data. As time goes on and we keep utilizing Chrome daily, loads of content can get piled up in the backlog, hindering Chrome from reaching its entire potential period after period. That is a highly undesirable situation that flourishes off of the carelessness of individuals.
If you’re after an optimized experience with Chrome on your Android, head to the browser’s “History” page and clear out existing data. Use the “More actions” button in the screen’s top-right corner and tap “History” to get to the next step. As you’re taken to the dedicated page on the Chrome browser, tap on the “Clear browsing history” feature at the top of the interface. That should take you to the next step painlessly.
Now the “Basic” tab here can sort things out for you to a reasonable extent; we recommend switching to the “Advanced” tab for better results. That’s because you’ll be able to tweak more parameters of the clean-up process, such as different site settings and your autofill data if needed. Moreover, we highly recommend setting the “Time range” to “All time” so the browser can thoroughly remove excess data and speed up its performance like when you first installed it.
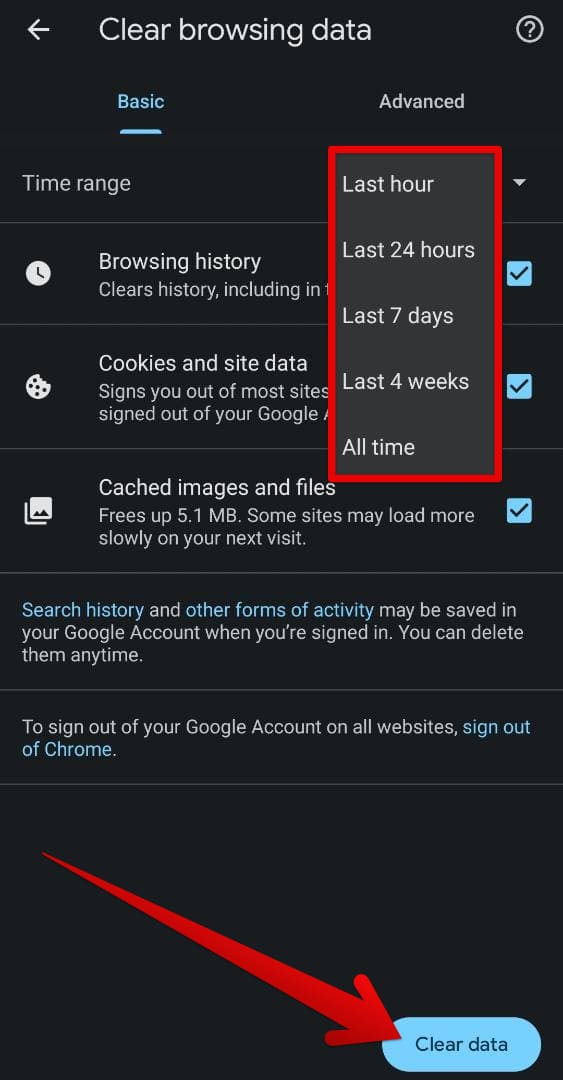
Clearing browsing history and other data
5. Try out “Screenshots for Android V2”
We all take screenshots on our Android phones like there’s no tomorrow, but a setting in Google Chrome can elevate your screen-capturing experience to new heights. Again, this is a Chrome flag we’re discussing here, not an in-built tool. Therefore, in the case of performance issues and similar pangs, you can painlessly disable any experimental flag you enabled and go back to default settings.
Now, the “Screenshots for Android V2” flag allows you to revamp the in-built screenshot tool of Google Chrome and add a lot more depth to it. Before the feature’s previous stance, you can now go on to annotate screengrabs effortlessly, draw over them, incorporate different shapes, and add text as well. Lastly, the “Crop” tool is also present to help you size down your images to your preference.
Head over to Chrome flags on the browser by typing in “chrome://flags” and using the provided search bar to look for “Screenshots for Android V2.” You can also type “Screenshot,” and the flag will pop up. Please enable it from the given option and relaunch the browser for the changes to take effect.
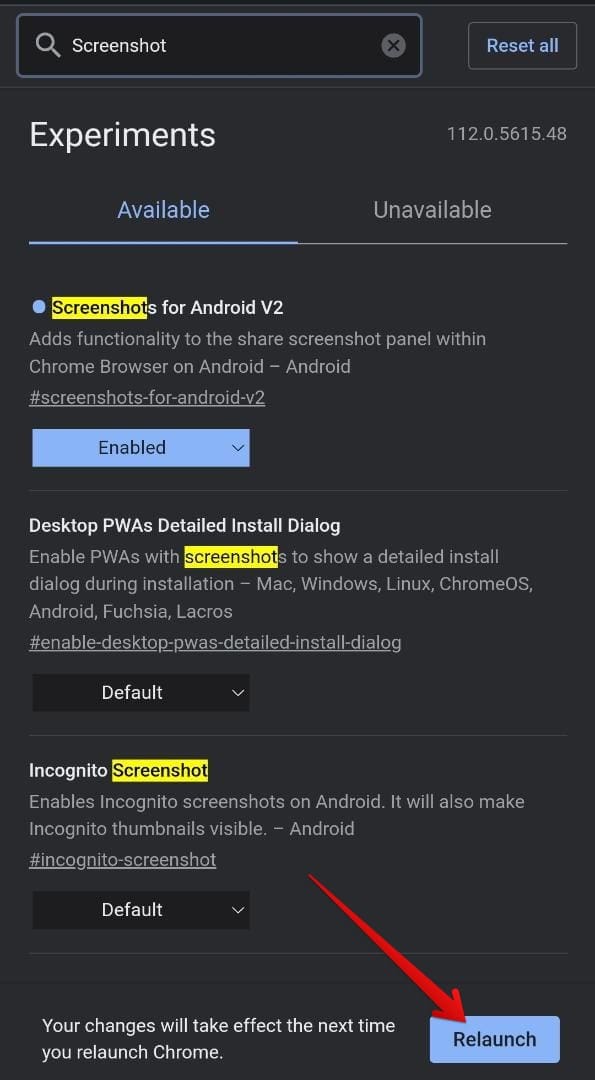
Enabling the “Screenshot for Android V2” flag
Once the Chrome browser boots back on, use the “Share” button in the address bar to bring up more options on the screen. Click “Screenshot,” and you’ll observe that instead of the regular screen capture animation, a toolbar will appear at the bottom, letting you annotate your screenshot in various ways. This is undoubtedly a major step in capturing and sharing their screen with others.
6. Use a more focused dark mode setting
Although the dark mode setting is getting more prominent over time, some websites still won’t adapt to the new age for some reason and force you to stick to the regular light theme. Well, you know what? You can move these websites back into toggling on a dark mode theme for you with the help of a dedicated Chrome flag. That way, you will always come across sites with a dark theme instead of settling for anything else.
Head to the Chrome flags section and look for the “Auto Dark Mode for Web Contents” flag. The exact address for the experimental feature is given as follows. You can copy it on your mobile phone and paste it into the address bar to get to the flag directly. Make sure to restart the browser afterward for the changes to take effect.
chrome://flags/#enable-force-dark
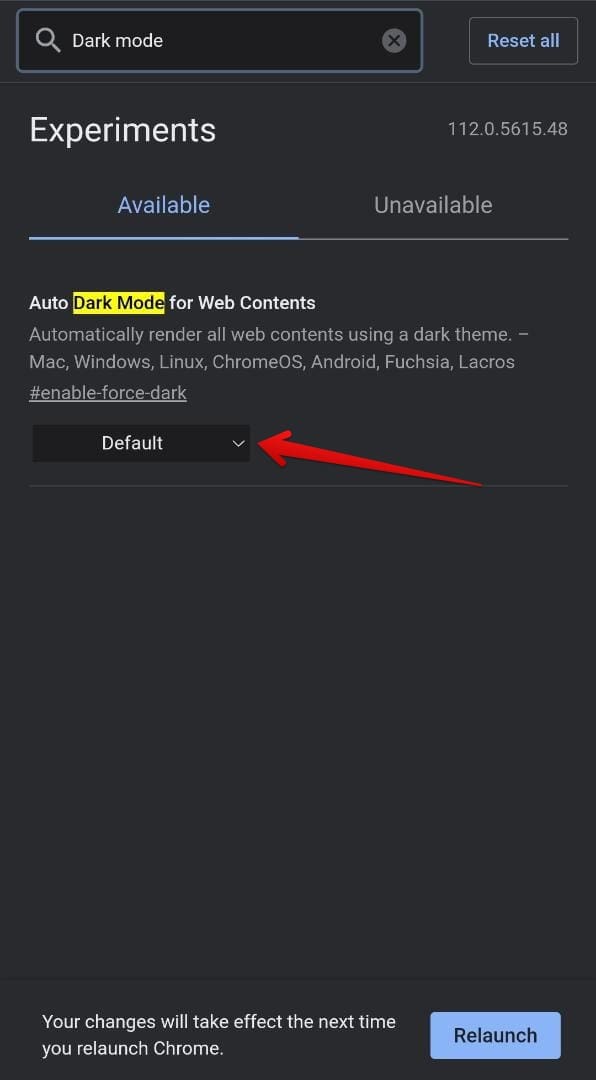
Enabling the forced dark mode Chrome flag
Once Google Chrome boots back up, visit any site you know does not support dark mode. You’ll be surprised to find out this isn’t the case anymore, as the forced dark mode setting does its job diligently and leaves you fully content with the Chrome browsing experience on mobile.
7. Enable the “Preload pages” feature
Another practical tip for enjoying smoother browsing with Google Chrome relates to the browser’s “Preload pages” functionality that lets it gather resources for certain pages before you click on them. However, we advise caution regarding a couple of points before you move ahead. First, enabling the feature prompts Chrome to use more of your internet data. Secondly, the functionality requires cookies.
If you have them disabled for sites, the “Preload pages” add-on won’t help you. With that being said, how the feature works is pretty simple. Based on the identification of your browser cookies, Chrome will predict what pages you are most likely to open while visiting a specific site.
Over time, you’ll notice that various pages will start loading up much faster because of the preload functionality. To get started, therefore, open Chrome’s “Settings” and access the “Privacy and security” option.
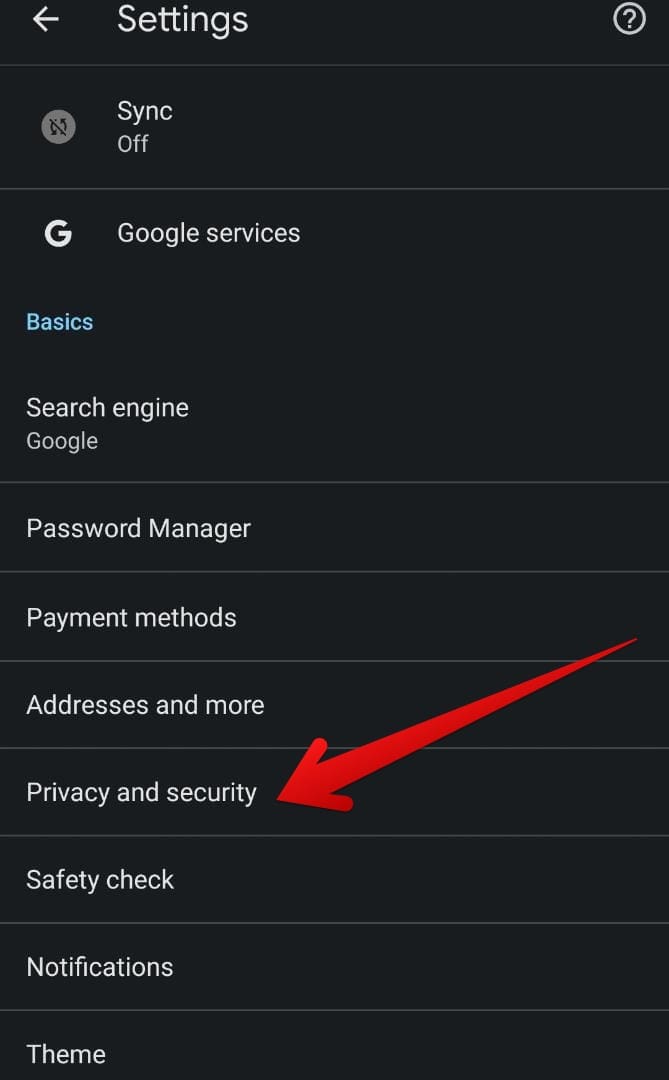
Accessing the “Privacy and security “section in Chrome
Next, select the “Preload pages” option to move forward. You will also be able to visualize the current setting that has been opted for the preload functionality. In most cases, that is “Standard preloading.”
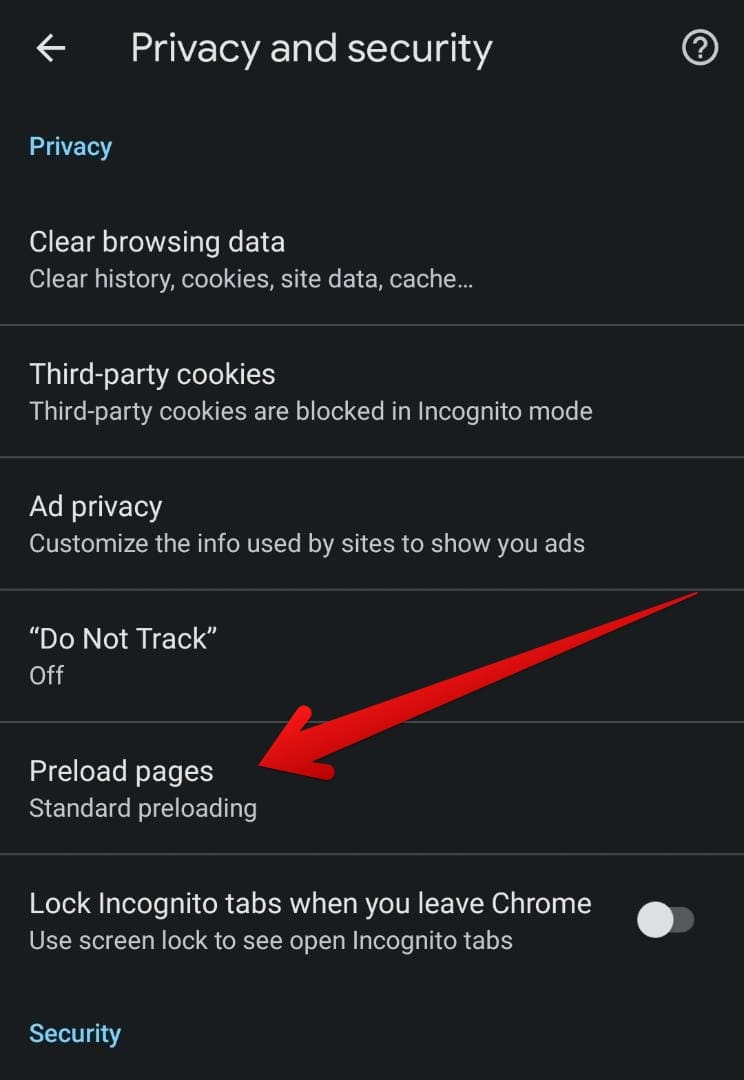
Getting into the “Preload” functionality
The idea is to switch your preload functionality to “Enhanced preloading” so the Chrome browser utilizes more data but offers a heightened performance boost.
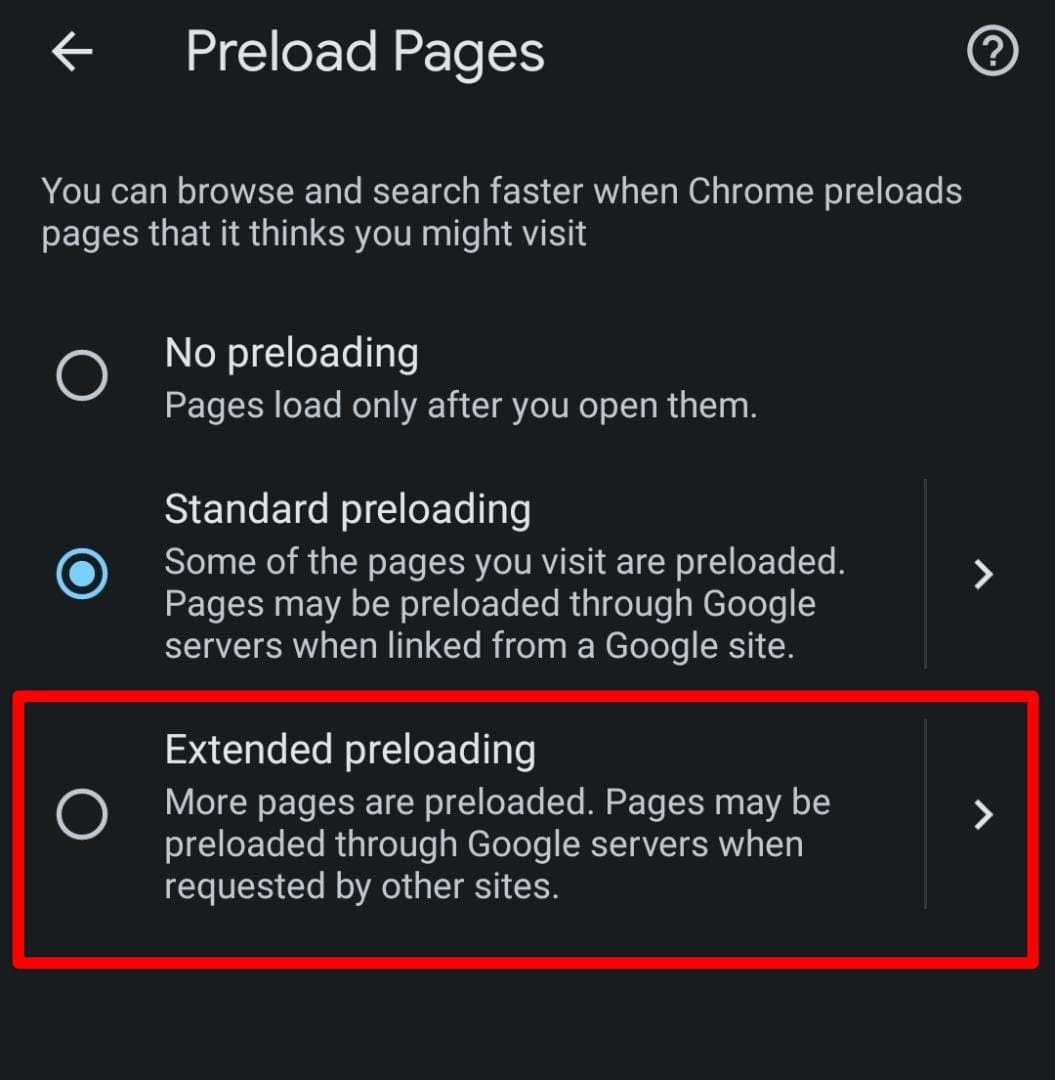
Switching to “Extended” preloading
8. Switch between open tabs quickly
Did you know that the developers incorporated an elegant shortcut into the Chrome browser for switching between open tabs? To try this out, swipe the address bar in the left or right direction, depending on the tab you wish to navigate to, and you’ll smoothly switch right over, following a sleek transition. It’s fast, easy to do, and highly convenient to employ day in and day out.
9. Zoom in and out in swifter ways
We all zoom in and out on different web pages while using Chrome, but did you know there are other ways of doing what you’ve been possibly utilizing for many years? Two additional strategies can help you magnify pages swiftly on your end. One pertains to double-tapping anywhere on a website (except on a link) and discovering that you’ll get all zoomed in afterward. Another way is to double-tap your finger on the screen but don’t lift it after the second tap.
Instead, drag the finger up and down to zoom in and out of the page. These two added ways of zooming about Google Chrome are pretty handy, but the problem is they may not work on every page. That’s because sites comprising mobile-optimized pages will have these shortcuts disabled for zooming in and out by default, but there are multiple ways to get around that.
You can switch to Chrome’s “Desktop site” viewing mode to enable the different zooming methods. Moreover, there is an in-built Chrome feature that you can allow to deliberately force even mobile-centric websites to accept the additional zoom features. To switch it on, you have to head to Chrome’s “Settings” page and click the “Accessibility” tab under the “Advanced” section. Once done, toggle “Force enable zoom,” and you’ll be ready.
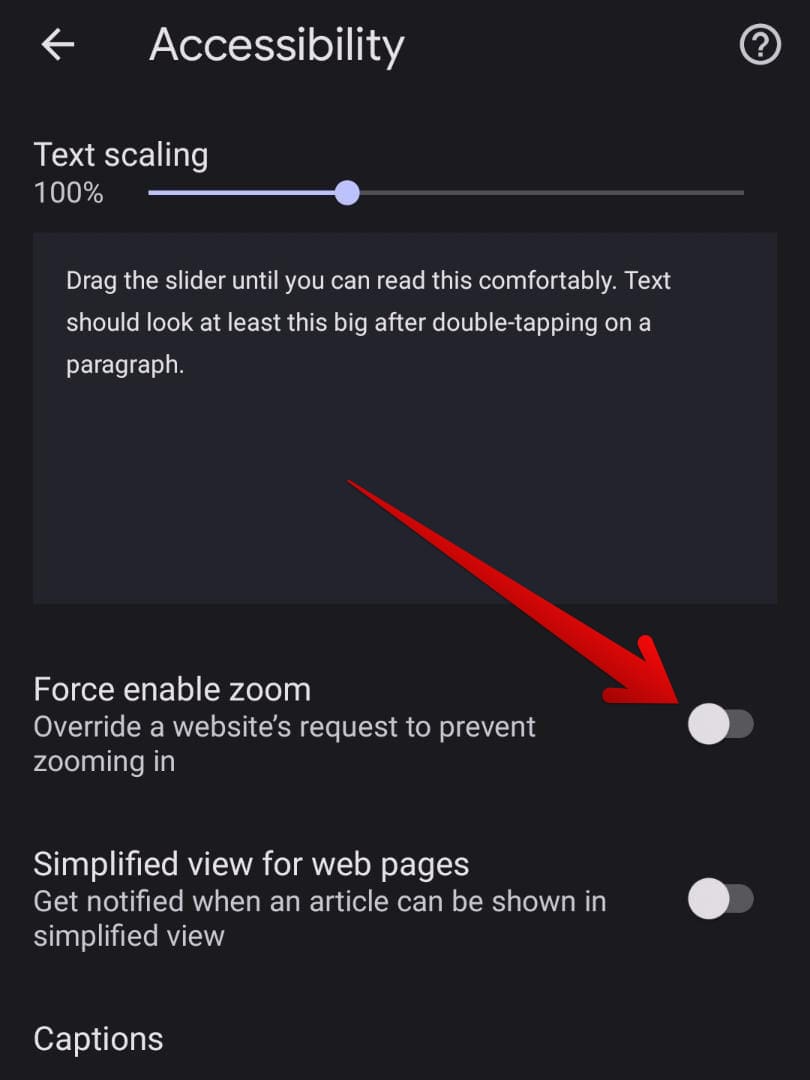
Enabling the “Force enable zoom” feature
10. Log out of Chrome and log back in
The final tip we can offer to boost your Chrome’s Android performance relates to logging out of your Chrome browser and then logging back in. This gives you an opportunity to change your password as well, which you should do every once in a while, and delete cookies for you automatically. Moreover, doing so refreshes the browser and gives you an automatic boost in the working speed of Chrome.
To log out, click on the “More actions” button in the top-right corner of the Chrome browser’s interface and click “Settings.” Doing that will make a separate page appear on your end, making it further possible to choose the “Choose another account” option. That’s your cue. After logging out of the browser, sign back in by clicking the same profile icon button and log in using the on-screen instructions.
Bonus tip: Increase download speed with parallel downloading
“Parallel downloading” is a Chrome flag available for use on the desktop iteration of the browser as well. Since people benefit from other platforms’ functionality, why should you stay a step back with your mobile version of Chrome? The idea of parallel downloading is that it splits up a file into multiple segments and downloads the resources for each segment individually. This, in turn, leads to a speed boost, which users can wholeheartedly relish.
Enable the flag by heading over to the “Chrome flags” section in the browser and typing “Parallel downloading” in the search bar. Once done, you should be able to enable the experimental feature easily. Relaunch Chrome for the changes to take effect, and try downloading a file afterward to determine any difference from a before-and-after stance.
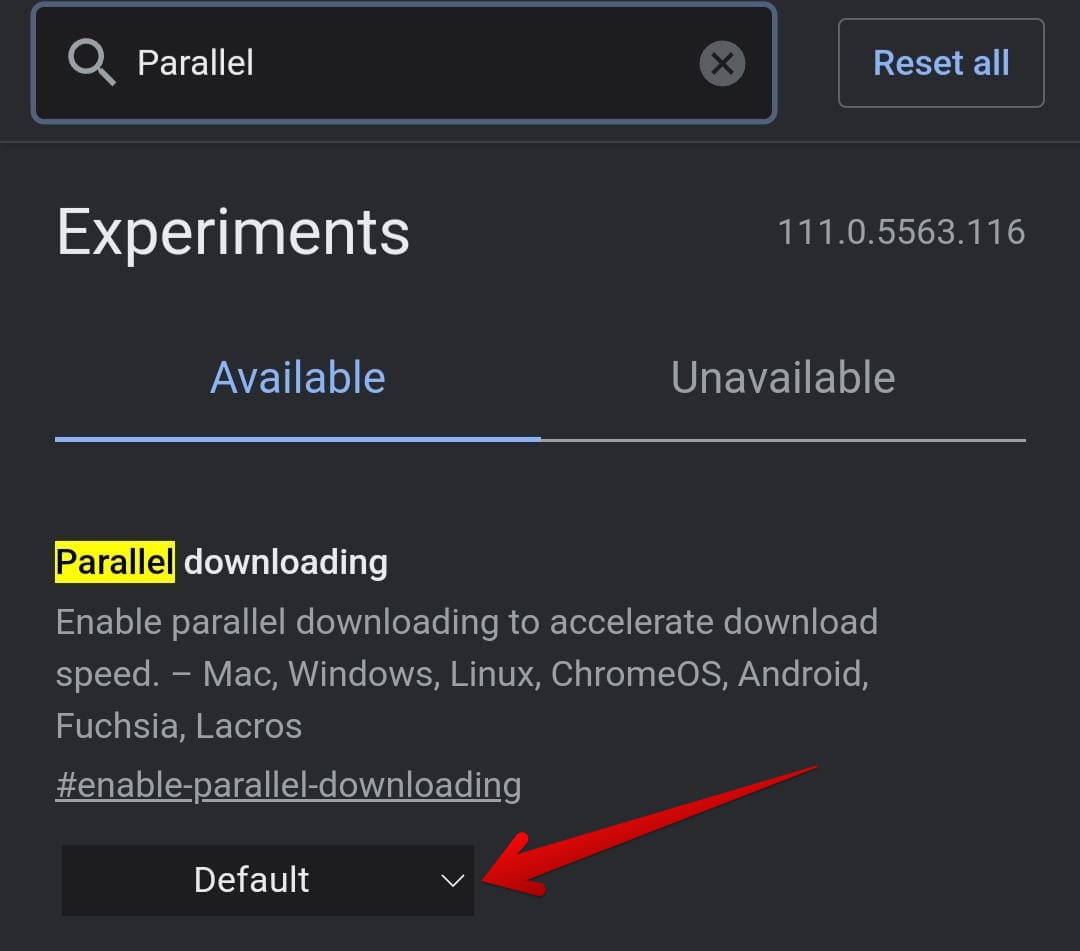
Toggling the “Parallel downloading” Chrome flag
Conclusion
Google Chrome is chock-full of features and tools, such as its voice-activated search capability that paves the way to seamless navigation, not to mention the browser’s innate offline browsing functionality that takes care of users who live more on the fly. With that said, however, you still have to maximize the full potential of your Chrome browser by optimizing it for performance, whether you’re on Android or desktop.
Some general rules of thumb are to ensure you’re not letting Chrome waste away necessary resources just by keeping unwanted tabs open while also being careful of routine browser updates. If you diligently follow the tips outlined in the guide above, you’ll notice your internet surfer getting instantly better in performance. Let us know in the comments ahead if there’s more that you’d like to add to the guide.
Thanks for reading!
