Chromebooks come chock-full of various accessibility tools and features, all geared toward making the core ChromeOS user experience stand out and easier for users to deal with. One such functionality further corroborating that is Google Drive, integrated right within the heart of ChromeOS for easy accessibility.
This guide will cover everything you need to know about Drive being a native part of your Chromebook’s feature set. We’ll walk you through the process of enabling the functionality first and utilizing it efficiently afterward. Google Drive has sprawling potential to keep your workspace organized. Let’s get into all of that right away.
What to know about Google Drive before getting started
Google Drive is a cloud-based file storage platform that’s free for everyone with a Google account. It comes with 15 GB of free storage, generally shared across other major cloud-oriented Google apps, such as Google Photos and Gmail. Note that Sheets, Docs, and Slides documents are part of your Drive account and take up some storage space.
The 15 GB storage limit is for users with a free Google account, meaning they haven’t actively subscribed to any paid Google One or Google Workspace plan. You can upgrade your account at any time by purchasing either subscription.
On ChromeOS, the account you use to log into your Chromebook is the same as the one that gets affiliated with your Google Drive account, so make sure not to sign in with a profile you do not want Drive to connect to. As for the upgraded plans concerning Drive, we suggest reading about Google One for comprehensive details.
How does Google Drive integrate with ChromeOS?
Being an in-house operating system, ChromeOS readily affiliates with many of Google’s services, including Gmail, Google Photos, and other constituents of Google Workspace, such as Docs, Sheets, and Slides. For Drive, though, Chromebooks exhibit an even more special treatment and offer the cloud storage platform as an in-built feature.
If you head over to your Chromebook’s file manager app, notably called “Files,” you’ll find a distinct “Google Drive” folder on the side panel to the left side of the Files app’s window, separated from the rest of the sections with a small-scale horizontal line. That is where you can access your Drive account on your Chromebook without resorting to other methods.
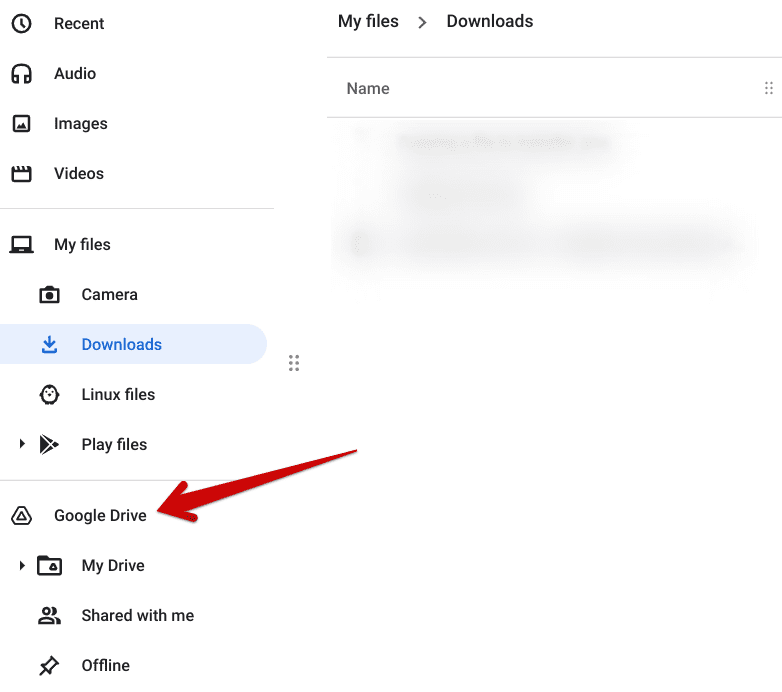
Accessing the “Google Drive” section
With this being said, it’s essential to know that you must enable Google Drive integration in some cases before the folder starts appearing in the file manager. That’s pretty easy to take care of, so let’s look at the process in the section ahead.
How to enable Drive integration on your Chromebook
Google Drive integration is enabled by default on ChromeOS, but you must check for an account disconnection if you don’t see the relevant folder appearing in the Files app. To do that, go to the “Settings” app and expand the “Advanced” section on the side column afterward. You should then be able to click the “Files” area to get to the next step.
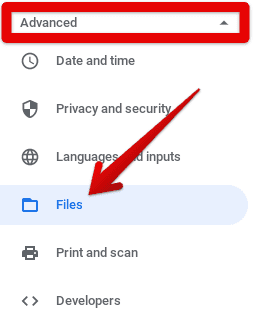
Accessing the “Files” section
Under the “Files” section, an option called “Disconnect Google Drive account” will be present. Make sure to have this feature disabled by turning the toggle beside it off. Once done, go back to the Files app, and you should now be able to access your Drive account painlessly on ChromeOS.
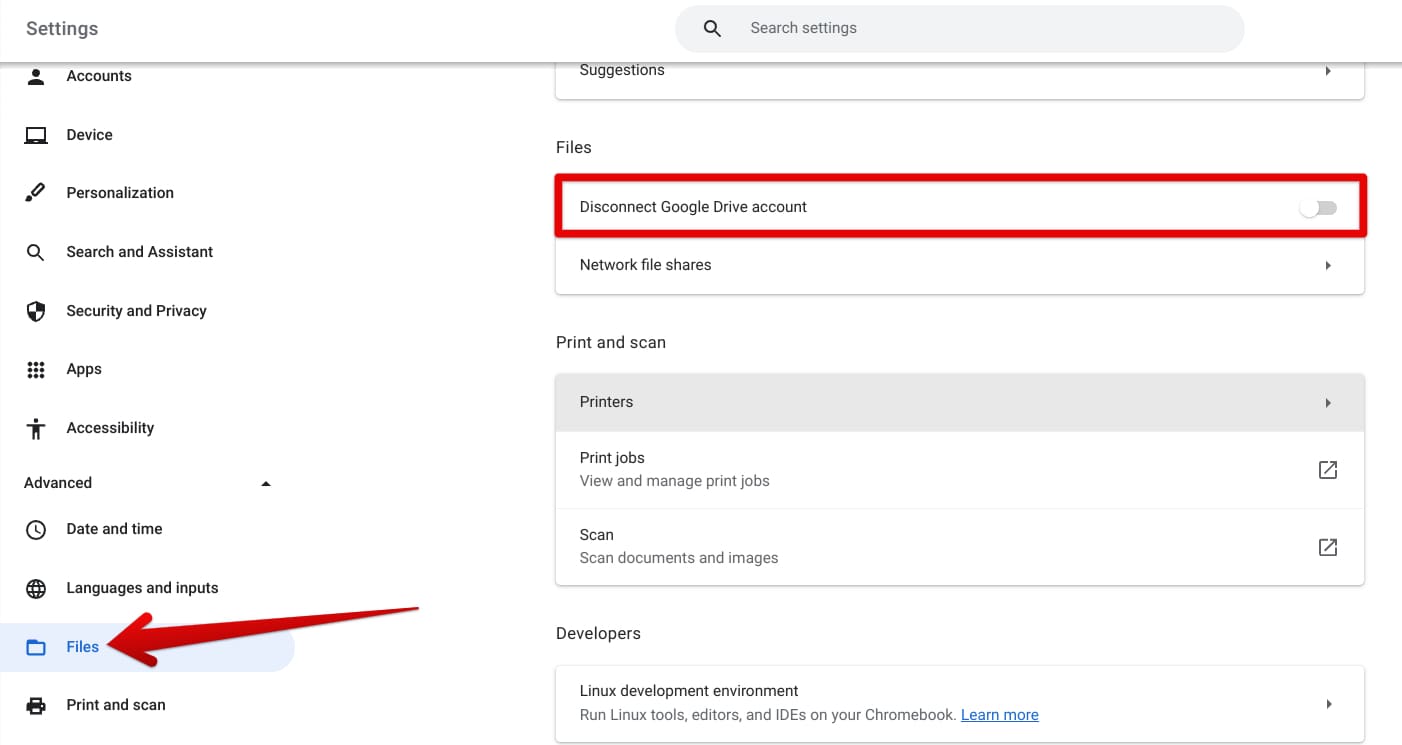
Disabling the “Disconnect Google Drive account” feature
It’s as simple as integrating Drive with your Chromebook in case things weren’t that way from the start. Let’s now go over Drive’s offline usage on ChromeOS.
Changing view type, sorting files, and creating new folders in the Drive folder
We recommend organizing your Drive folder since it won’t be long before your huddled-up file collection starts growing on you in confusion. First, you can change the view type from “list” to “thumbnail” and vice versa.
The latter is more suitable for grabbing a quick preview of your files, but if you seek to copy-paste items swiftly, using the “list” view can be preferable. To change the type of view, tap on the relevant button in the screen’s top-right area, and that’ll do the trick. You’ll either go from the list view to the thumbnail view or vice versa.

Switching the view type in the Drive folder
Next, the tool right beside the latter will comprise various sorting techniques. You can arrange items in your Drive folder based on four different factors, which are “Name,” “Size,” “Type,” and “Date modified.” Switching to “Date modified” would be the right choice to stay in the loop of the latest files you work on.

Sorting files in the Drive folder
Lastly, you can create a new folder within the Drive folder by clicking the “More options” button and then choosing “New folder.” It’s also possible to employ a shortcut key combination of “Ctrl” and “E” for faster results. You’ll then have to name your folder and add whatever you wish to it to organize your Google Drive section on ChromeOS better.

Creating a new folder in the Drive section
How to use Drive offline
One of the best features of Google Drive is how it can be used when there is zero internet connectivity. This is great for specific scenarios, such as traveling, and Wi-Fi or mobile data is scant. Thankfully, Drive’s offline usage is pretty simple and requires only a few clicks.
Get started by opening the Files app and opening the Google Drive folder. Continue by selecting the files that you wish to work offline with, either by tapping on the file type icon or pressing the “Shift” key and mass-selecting the items with the left, right, up, or down arrow keys, depending on the layout of your files in the folder.
Once the desired files have been selected, click on the “Available offline” toggle in the upper-right section of the screen to pump the items at hand with offline functionality. A prompt will also surface on the screen, confirming that your files are currently being made available for offline use.

Making Drive files available offline
To access these files, enter a separate subfolder in the Files app called “Offline.” The latter will appear under the main Google Drive folder, so spotting it shouldn’t be too difficult. In this subfolder, you’ll also observe that the “Available offline” toggle in the upper-right corner has been enabled by default.

Drive files accessible offline
You can now edit and view your offline files effortlessly on your Chromebook via this folder without being connected to the internet. In other news, it’s important to note that offline files take up your Chromebook’s space, so you must be wary of the files you make available for offline use going forward.
If you ever want to get rid of your offline files, select them within the “Offline” folder and tap on the “Available offline” toggle again, similar to how you did in one of the steps above. Once done, delete the files and empty the “Trash” area to free up space on your Chromebook.
Tips and tricks for maximizing efficiency with Drive’s Chromebook integration
The base functionality of Google Drive on ChromeOS is already capable enough to keep us content, but why not go for more when it’s easily possible? There are ways to maximize your efficiency with Drive using your Chromebook, such as knowing how to block spam, using tags in Drive to organize files, and creating direct download links for easy accessibility.
If you missed it, Drive also lets you back up your WhatsApp data, should you choose to check it out for enhanced safekeeping. Additionally, Gmail attachments can be saved in Drive for cases where you want to use them later. Similarly, there’s another valuable setting that you can adjust in your Chrome browser concerning Google Drive.
The gist is that if you want to save up more storage on your Chromebook, why not let Drive take care of your forthcoming downloads? Although this is an unconventional way to save storage space, it’s certainly workable, as we will show you using the steps ahead.
1. Open the Chrome browser and head to its settings page. You can press “Alt” and “E” together, followed by pressing the “S” key to do that directly. Alternatively, the “Customize and control Google Chrome” button can be used for a more standard approach.
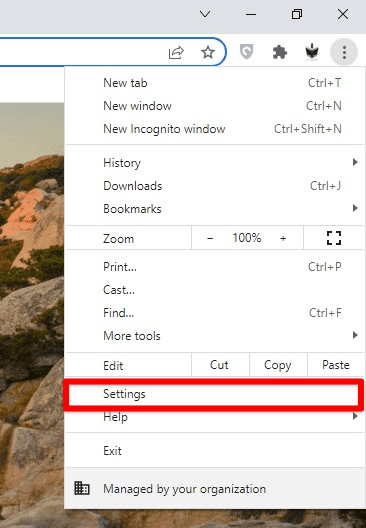
Opening Google Chrome’s settings page
2. Next, click on the “Downloads” tab using the side column to the left side of the settings page. You should then be able to tap on “Change” beside the “Location” option, which would essentially bring up your Chromebook’s local storage.
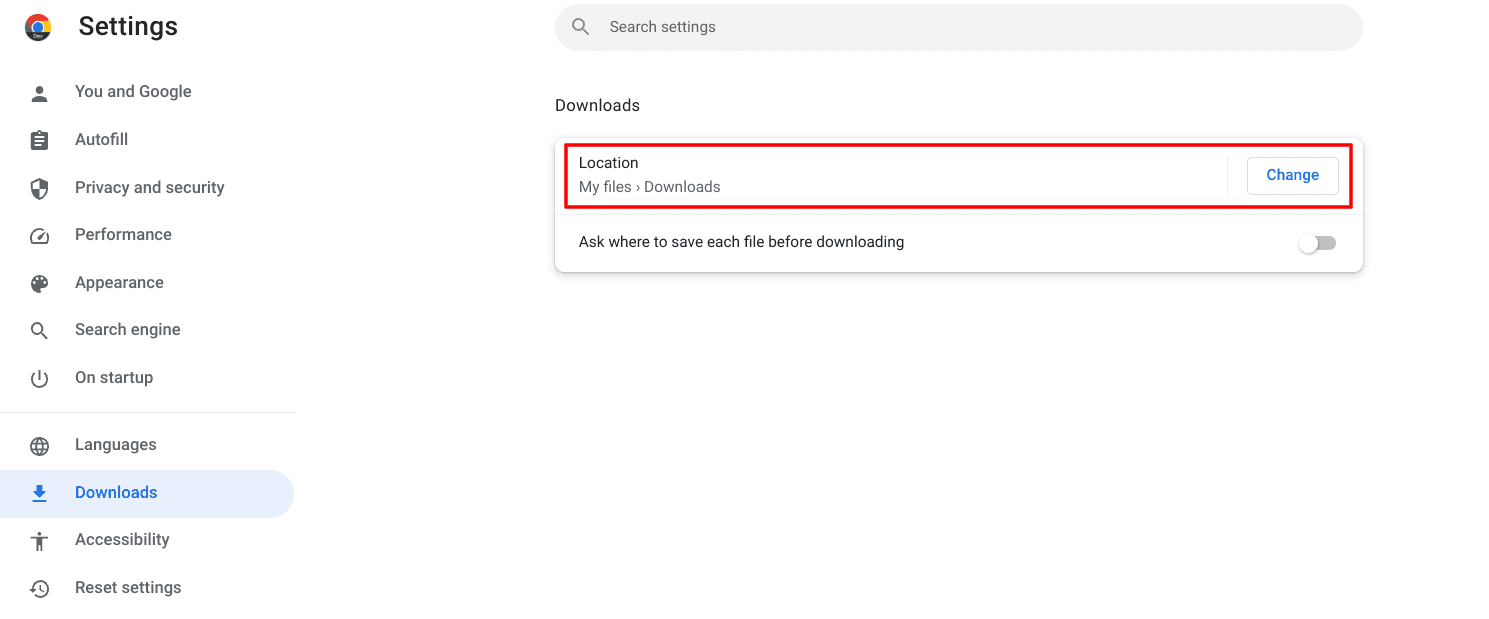
Changing the download location of files on ChromeOS
3. Select “Google Drive” to finalize the process as your file manager window pops up. Your download location for all files in Chrome will now be changed, allowing you to painlessly save space for all those impulse downloads and everything else.
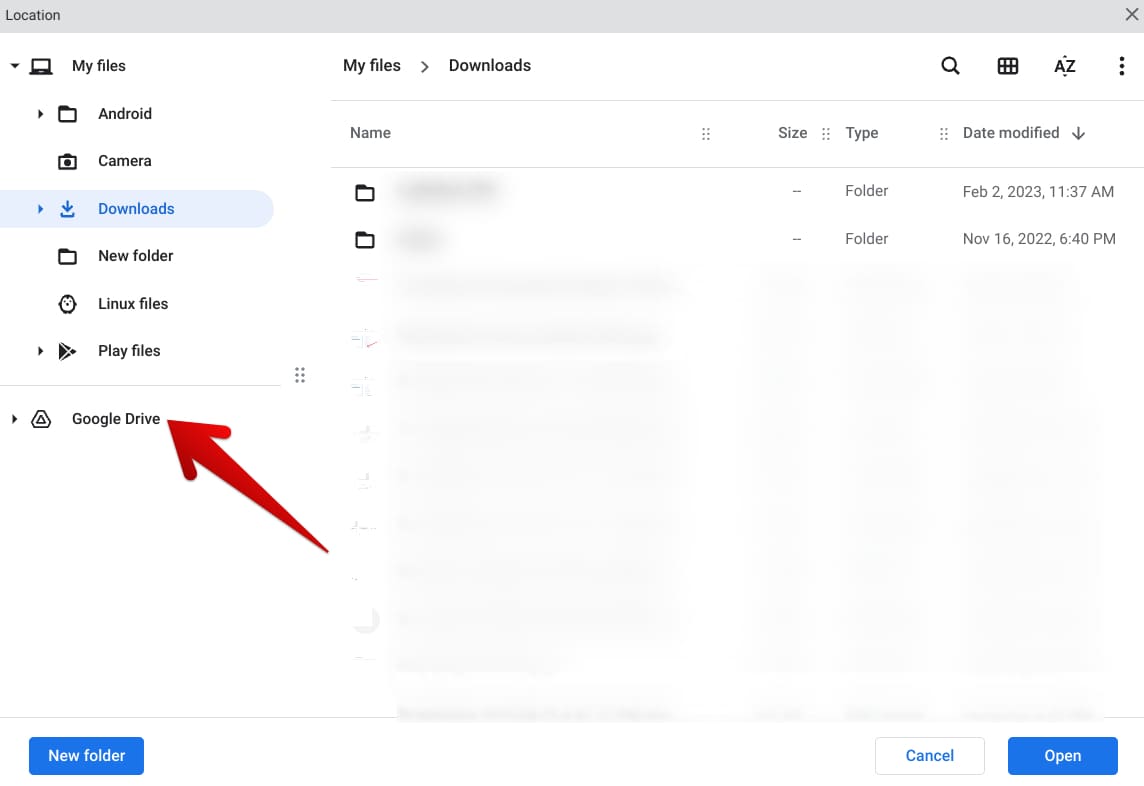
Selecting Google Drive as the download location
You can change the location of your downloads again anytime you want by repeating the steps above but choosing a different folder during the third step.
Conclusion
ChromeOS has long benefited from being cloud-oriented, and further developments only enhance that notion. Google Drive, arguably the world’s largest cloud storage platform with millions of users, is something that Chromebooks support across the board for the convenience of their users, allowing one to take full benefit of native Drive integration.
In this guide, we’ve taken a better look at how Google Drive functions on ChromeOS, including its offline usage, which can come in handy when internet availability is minimal. Let us know in the comments ahead if we missed a tip or trick relating to Drive’s usage on a Chromebook. Chrome Ready wishes you good luck!
