Google Chrome has remained a trendy internet browser over the years and a flat-out industry leader with the most market share on a global level. It’s loaded with features like third-party app support, diverse compatibility with a surreal array of sites, and deep integration with Google’s front-running ecosystem. Moreover, Chrome sports robust tools for sync and backup, allowing you to keep a safe copy of your data on the cloud.
With that said, many users make the mistake of not syncing or backing up their Chrome profile and sometimes lose a part of their account. If you don’t want to mess up in the same manner when switching devices, we highly advise you to learn how to manage your Google Chrome account correctly and sync your profile ahead of time. Let’s jump into the guide without any further delay.
Chrome browser’s sync and backup features explained
Over the years, Google has formulated a whole ecosystem of interconnected applications. For example, it’s possible to schedule Meet conferences from within Google Calendar while being able to send email invites to people directly via Google’s productivity apps, such as Google Docs. Similarly, the whole concept of the cloud is something that this tech giant has seemingly mastered at this point, paving the way to a highly convenient working experience for billions of users.
Now, it appears that Google does not want its users to lose the data they accumulate with time, especially on Google Chrome. For this purpose, a particular “sync” feature has been kicked in, allowing those using Chrome to back up their data on the fly without resorting to manual measures. Of course, the browser’s privacy policy has ensured to keep our data private and secure, so there are no significant concerns to worry about.
Onto the question you probably have now: What data is being talked about here? The Chrome browser can gather various information sources for your cause and store them categorically. These include the following:
- Passwords, user credentials, and other autofill data
- Addresses
- Credit card information and different payment ways
- Cookies
- Browsing history
- Cached data
- Saved settings and adjusted preferences
- Themes
- Tabs you’ve kept open
- Browser extensions
- Apps
All of the enlisted points above are your Chrome browser’s major data points associated with your account. Your job is to ensure that the sync functionality in Chrome has been enabled and you’re signed in with the proper account that belongs to you for the best results. Although the internet surfer at hand is pretty secure, it cannot be responsible for your carelessness, mainly because you deliberately lose data without taking the correct precautionary measures.
We advise using the Google account you wish to keep a secure copy of. In other cases, people often end up backing up the wrong Chrome profile, which leads to imminent data loss in some situations. The worst case scenario is that you’ll have to type all of your saved passwords by yourself again, visit your favorite websites to re-bookmark them, re-install your extensions, and do just about everything that Chrome had automated for you prior.
With a brief idea of the sync and backup features in Chrome, let’s move forward with an easy-to-follow method of utilizing this innate Chrome functionality and breathe a little easier when it’s time to move to a newer device.
How to sync and backup your Google Chrome profile
You might wonder how difficult it would be to enable sync in Google Chrome and take care of your profile’s backup. The best part is that Google makes it relatively effortless for us to accomplish the task in question, requiring just a simple sign-in of our account and enabling the “Sync” option from that point on. However, verifying whether the latter is happening on your end is still essential.
For this purpose, open the Chrome browser and head to the “Settings” section. You can either click the “Customize or control Google Chrome” button in the top-right corner and select “Settings” or press “Alt” and “E” together and then use “S” to get to the next step. Once done, choose “You and Google” from the sidebar to the left and confirm from the middle of the page whether you’re syncing your data on Chrome. If the option says, “Turn off,” you’re already backing up your data.

Backup and sync in Google Chrome
Good going if you’ve already authenticated the feature’s workability on your end. However, this isn’t where we draw the line. Proceed to the next step by selecting the “Sync and Google services” option right underneath the area highlighted in the screenshot above. The aim now is to quickly look at your sync preferences and alter them to your liking if needed.

Accessing sync settings in Google Chrome
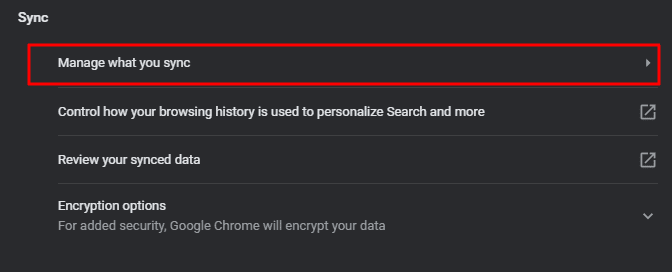
You should be taken to the “Sync” section in Chrome’s settings. Tap on “Manage what you sync” to get to the next step.

Managing sync options
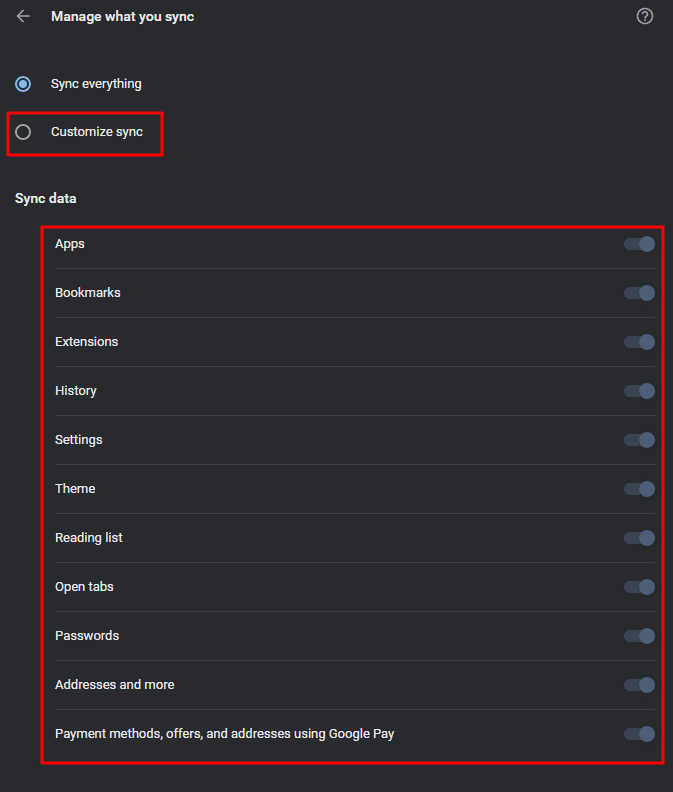
Finally, this is the section where you can choose what type of data gets synced to your Google account and what gets left behind. The default option called “Sync for everything” takes care of all of the relevant information tied to your Google account, but if you wish to exercise some semblance of control, choose “Customize sync” and select the type of data that you’d like to sync. Your options range from Apps, Bookmarks, and Extensions to Addresses and Payment methods.

Tweaking sync preferences in Google Chrome
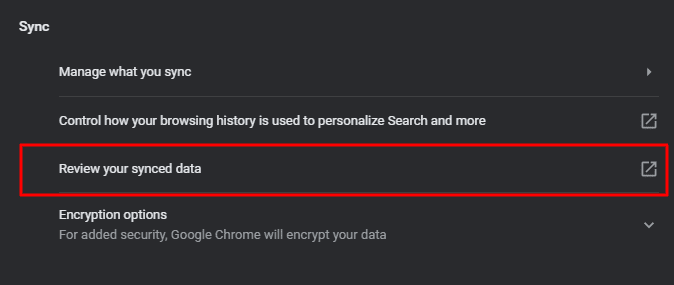
Once you’re done with the process above, you can also review your synced data. Then, return to the main “Sync” settings and choose the appropriate option to launch a new tab.

Reviewing the synced data
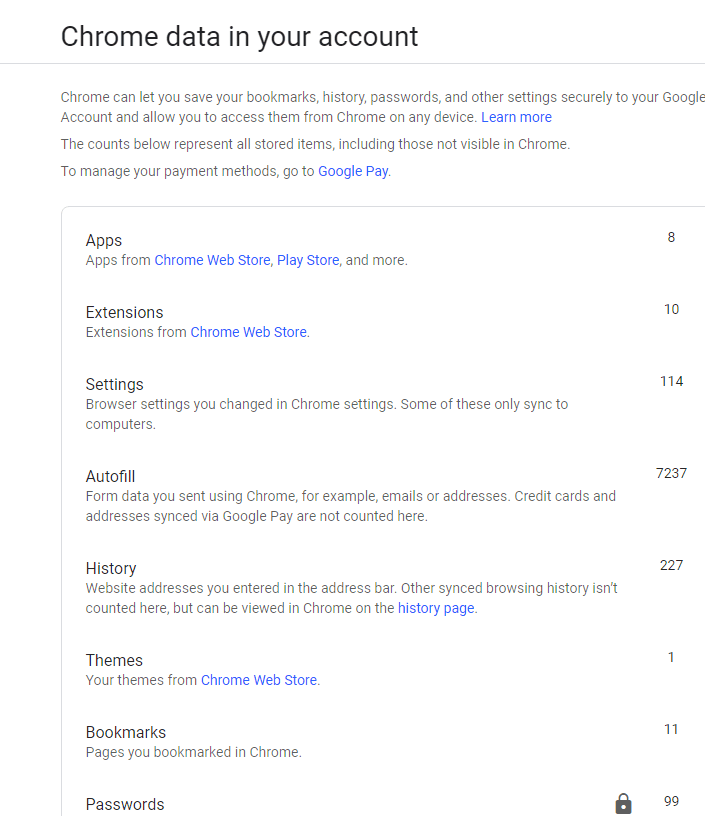
This new page will go over the Chrome data in your account, enlisting what you’ve tied to your Chrome profile and giving you a chance to clear everything if the need arises. Scroll to the bottom to find the “Clear Data” option and tap on it to erase the essentials of your profile. Again, this is only something we recommend doing if you wish to create a new Google account and would like to remove traces of the existing one.

Synced data on a Chrome profile
That covers one side of the story, but we’ve still yet to go over the other end of syncing your data, which is why everyone goes for it in the first place. After successfully backing up your data using your Chrome profile, log into any new device with the account, and you’ll find all of your previous stuff carrying over just like that. This is why it’s super important to authenticate a proper Chrome backup system for your safekeeping.
That’s all there is to learn regarding managing your Google Chrome profile and acknowledging the ins and outs of syncing and backing up your precious data.
Point to be noted for bookmarks and your saved passwords
For the uninitiated, Google Chrome lets you export your bookmarks and saved passwords separately, so you can import them to a different computer using a more manual approach. For passwords, we recommend following our thorough guide on their export and import for step-by-step instructions. The gist is that you go to the Password Manager in Chrome and dig up the “Export Passwords” button.
As soon as you get your hands on the CSV sheet comprising your saved passwords, use that sheet for an import purposes as well. The same goes for the domain of bookmarks. You export them to your PC’s local storage via the “Bookmark manager” and then import them to a newer device in the same easy manner. Managing both passwords and bookmarks is a simple, straightforward process that can’t get any easier, even for beginners.
Conclusion
Google Chrome has been the center of attention in the internet browser domain ever since it stepped foot into the world. Over time, Chrome has outclassed browsers, such as Opera and Mozilla Firefox, that even came before it. Currently, the browser at hand leads the industry with the highest percentage of market share compared to its competitors. But all this success did not come immediately; it took a lot of maintenance and consistency to get Chrome where it currently is.
A small figment of Chrome’s overall functionality is its ability to back up user data and sync it across multiple devices if one wants. That is to say, the famed internet browser is available on different platforms, including Android, so if you wish to keep up a continuous momentum of productivity, the backup function will help you get there. Let us know in the comments ahead whether you found this write-up worth reading.
We would love to read your feedback!
