ChromeOS is lightweight, speedy, and utterly secure, making it one of the most desirable operating systems in the world right now. However, like any other computer software that powers entire devices, there are various pop-ups and notifications to customize and control on Chromebooks if you’re after a personalized core experience.
This guide will explain how to modify your Chromebook’s notification alerts and other system pop-ups per your preferences. That way, you can seemingly improve the overall ChromeOS user experience by only receiving personalized messages that are relevant to you. So let’s get started with no further ado.
What are Chromebook notifications?
In essence, notifications are simple messages sent out by applications, programs, or other people to inform you about a particular concern. The alert itself can be about anything, whether it’s a website notifying you about a new hot topic or an email sent out to you by a colleague.
Notifications have become ubiquitous in the day and age we live in today. You’ll find these existing in one way or the other on all multi-media devices, including Android phones (especially Android phones), Chromebooks, Windows PCs, Macbooks, and others.
On ChromeOS—given the easygoing nature of the operating system—notification alerts are easy to deal with and can be managed at will. Chromebooks have a dedicated section for storing notifications. You’ll find it in the extended Status Tray area, where you can see your Wi-Fi status, remaining battery, and time.
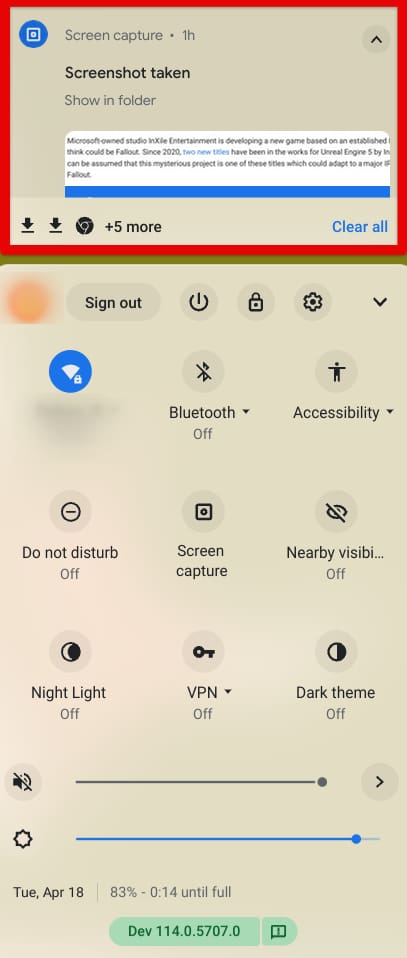
The notification section in Chromebooks
Notifications are like a double-edged sword. Some people like staying up to speed with the latest and greatest happening around them, but not all would prefer keeping it that way. Some would like a more personalized approach to dealing with alerts on their end, where some apps are permitted to send out messages while others are kept tight-lipped.
If you also want to customize your notifications on ChromeOS, read on for a complete tutorial in the section ahead.
Customizing various notification types on ChromeOS
Chromebooks, being multi-faceted yet simple devices, comprises various notification sources. One pertains to the alerts from your operating system, while the other relates to the Chrome browser and the boundless internet. Apart from those, there are also more notification types to talk about.
We’ll break down everything you need to know about customizing your Chromebook’s notification settings in the subsections ahead in a step-by-step manner, starting with system notifications and continuing until the Google Play Store hands out the alerts.
Chromebook system notifications
The primary notifications on your Chromebook will relate to that of the operating system. Chromebooks take it upon themselves to push out alerts for anything remotely important to the user, such as when you take screenshots, record videos, connect the Chromebook to your Android phone wirelessly, or even when you’re running on low battery.
With that said, there is no way to silence these alerts one by one, but ChromeOS does encompass a specific functionality to help you get to the bottom of that. To mute system notifications and every type of alert along with it, you can utilize the “Do Not Disturb” feature, which is embedded in your Chromebook.
The latter is one of the best ways to control notifications on ChromeOS, especially when you do not want to be bothered by any system- or browser-induced application and are trying to work with focus. Get started by opening the Status Tray by using the shortcut key combination of “Alt,” “Shift,” and “s.”
Once done, the menu should pop up, allowing you to click “Do not disturb” and toggle the feature. It’s also possible to further tweak the functionality by allowing notifications from specific apps. The latter is optional, and you can choose to disable alerts.
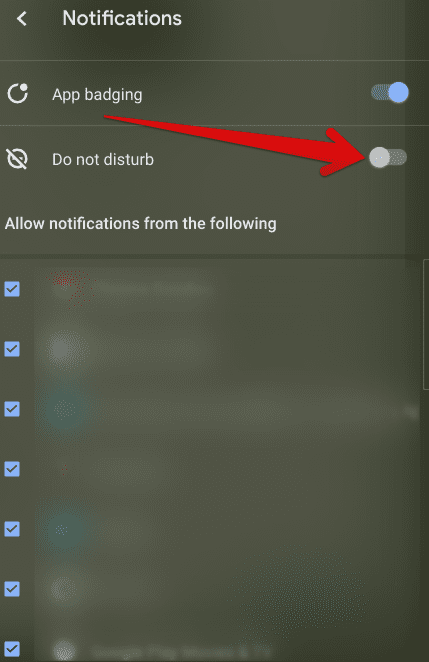
Enabling “Do not disturb” on a Chromebook
In addition to the possibility above, there is also an option to optimize Chromebook alerts sent out by system-installed applications. To check that out, head to the “Settings” app on the device by either accessing it via the shelf or looking it up through the “Search” key on the keyboard.
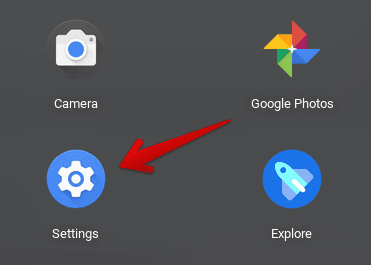
Opening “Settings”
Once done, select the “Apps” button in the side column to the left and follow things up by clicking “Notifications.”
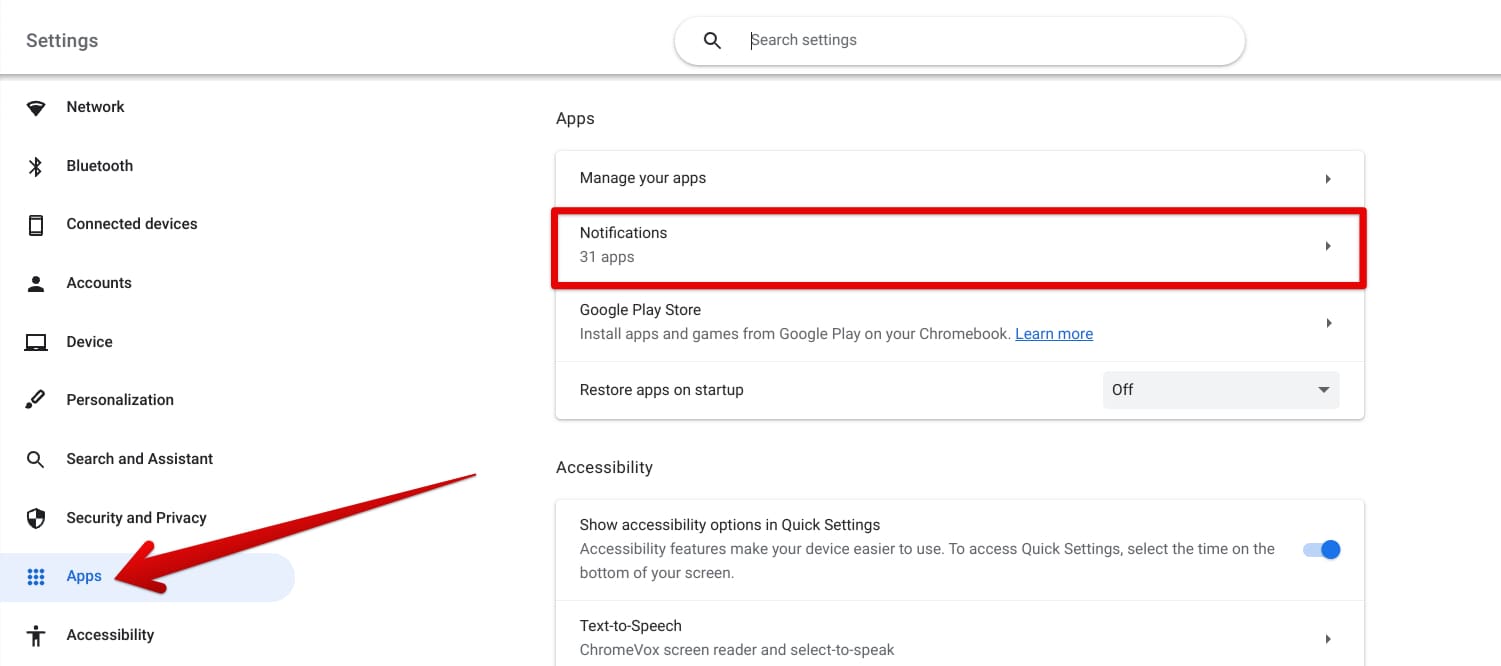
Accessing the “Notifications” section
As soon as you’re in the “Notifications” area, you’ll have enough flexibility to weak the alerts setting of each system app one by one, unlike the “Do not disturb” mode, which muzzles all types of notifications altogether. Sift through the available options and decide accordingly.
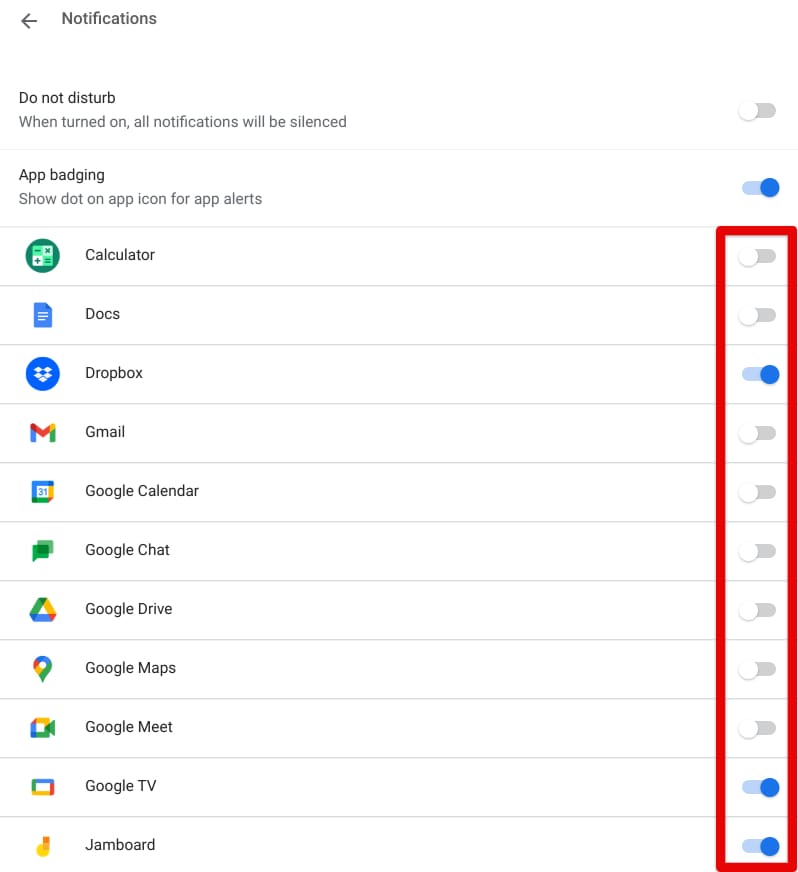
Tweaking the notifications of system apps on ChromeOS
Phone Hub notifications
Next, we’ve got Phone Hub notifications to discuss and optimize. However, this subheading is for users who’ve connected their Android phone to ChromeOS in advance and would like to adjust what type of alerts they’d like to receive. If you haven’t done this and have no interest in doing so, skip to the following subsection.
“Phone Hub” on Chromebook is a convenient tool that lets people conjoin their Android smartphones and ChromeOS. One of the primary benefits of delving into the Phone Hub is Smart Lock, a quick and painless way of logging into your Chromebook, provided that your Android phone is nearby.
Additionally, notifications from your phone will pop up on your Chromebook via the Phone Hub functionality. But if you’ve grown tired of receiving one alert after the other, you can disable Phone Hub notifications painlessly.
Get started by heading over to the “Settings” system app on your Chromebook and clicking the “Connected devices” tab on the left. Once done, choose your phone next to move forward.

Accessing the connected device’s settings
You will now be taken straight to the settings concerning your connected Android phone. Click the “Notifications” button under the “Phone Hub” area, and you’ll be ready to go. Doing so will disable your Android phone notifications on ChromeOS.
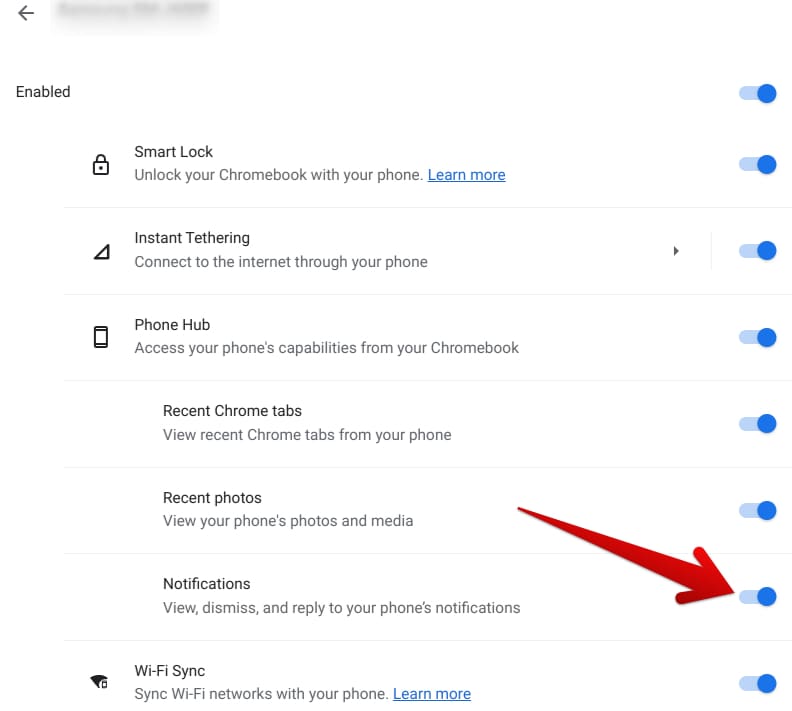
Disabling Android phone notifications
Google Assistant notifications
Next up, we’ve also got Google Assistant sending notifications to Chromebook users, and thankfully, there is a way to customize those as well. Go to the “Settings” app, same as before, and choose the “Security and Assistant” tab on the side panel to the left. Click “Google Assistant” on the right side to move ahead.

Accessing Assistant settings
After arriving at the specialized “Google Assistant” section, you can seamlessly turn to the “Notifications” toggle and disable it. It’s as easy as that to keep tabs on the notifications from Google’s virtual handyman.
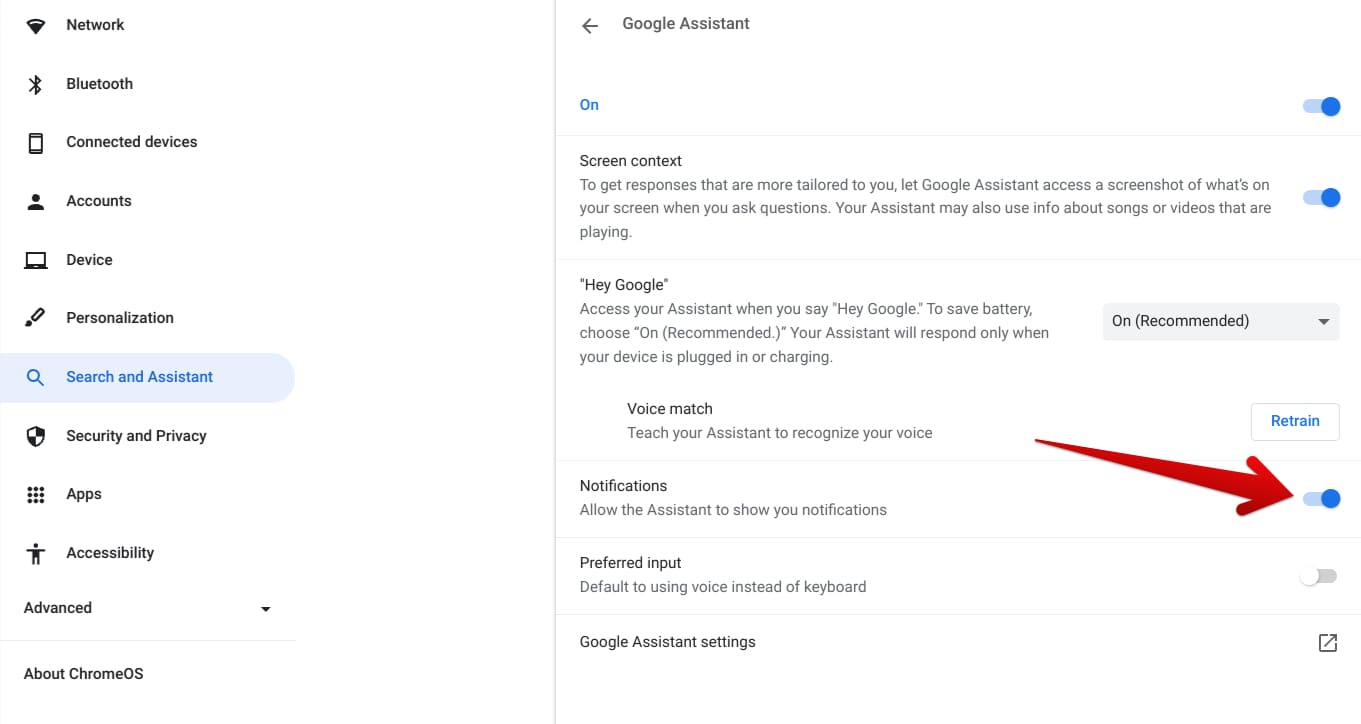
Disabling Assistant notifications
Google Chrome notifications
The Chrome browser is one of the cornerstones of your Chromebook, powering almost half of the device’s functionality and serving as ChromeOS’ bedrock. It’s no wonder at this point that those who work online make Chrome their daily driver, mainly due to the browser’s ingrained capacity for keeping things simple and effective.
With that being said and done, Google Chrome can also be the primary sender of notifications on your Chromebook, doling out alerts for the various websites that you’ve followed and enabled push notifications for. The good news is, Chrome does not come without its fair share of optimizable features and settings, with push alerts being one of them.
Even more so, you can customize notifications for specific websites rather than going for a singular general setting, like those above “Do not disturb” mode. To get going, open the Chrome browser (duh) and click the “Customize and control Google Chrome” button to reveal more options. Then select “Settings” to get taken to the next step.
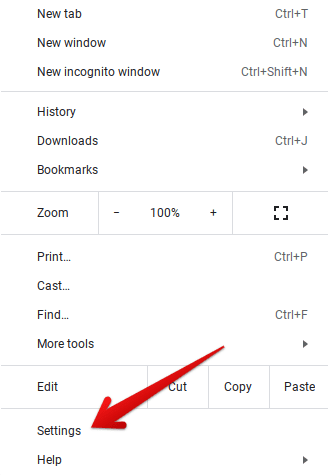
Clicking on Google Chrome’s “Settings”
When the “Settings” section arrives, choose “Privacy and security” on the side column to the left to go to that relevant area. You should then be able to click “Site settings” in the middle of the page to move forward.

Accessing “Site settings” in Google Chrome
The next step is to scroll down the “Site settings” area and select “Notifications.” Doing so will help you tweak Chrome browser alerts on the Chromebook in just a couple of clicks ahead.
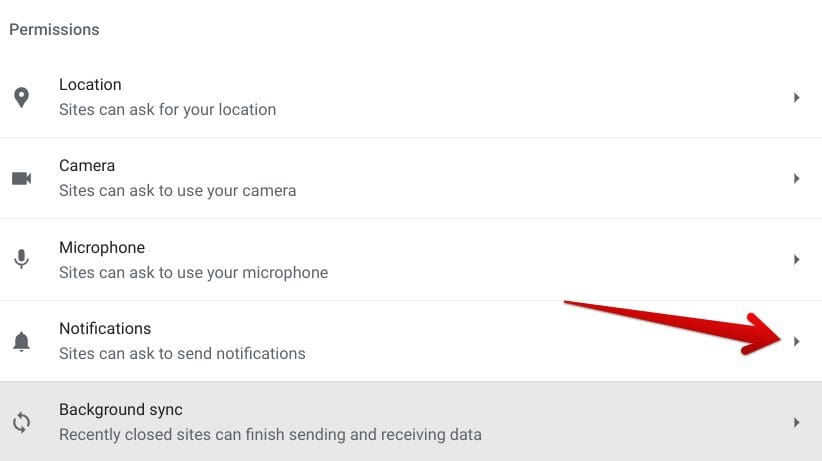
Clicking on “Notifications”
With the “Notifications” section entered you can now seamlessly realize your options and customize your ChromeOS alert settings. The idea is to either hand-pick the sites you’d like to enable notifications for or disable alerts altogether, so Chrome can’t send you a pop-up.
We recommend experimenting with the options available to determine the best possible outcome per your preferences. For starters, if you’d like to eliminate messages sent out by the Chrome browser, you can opt for the “Don’t allow sites to send notifications” under the “Default behavior” section.
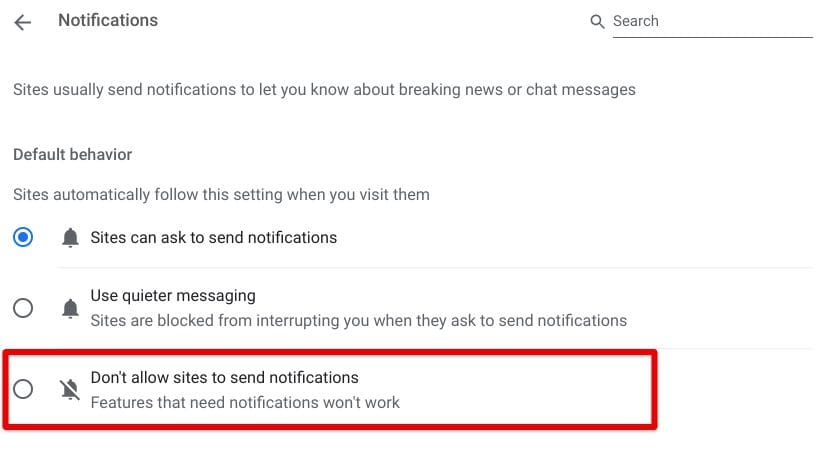
Clicking on “Don’t allow sites to send notifications”
On the other hand, you can customize the behavior of certain domains yourself by scrolling down on the same “Notifications” page and clicking on sites of interest. Over time, Chrome will automatically collect what websites can send you notifications and which ones have been barred from the idea.
Click on the arrow beside any domain to access its overall settings. The latter will go over notifications and several other parameters, including Location, Camera, JavaScript, Images, and a bunch of additional settings.
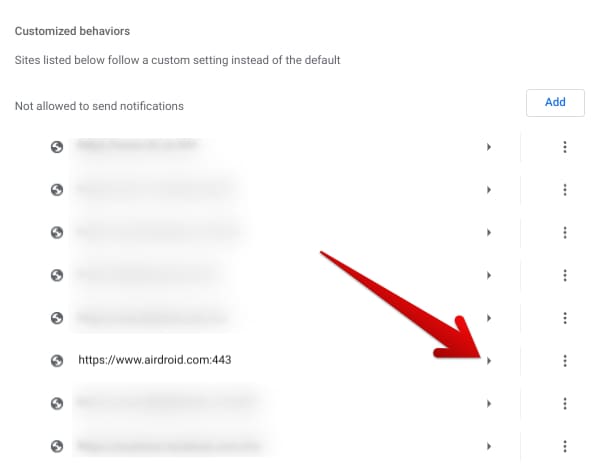
Accessing the settings of a domain in Chrome
The next step after arriving at the settings of a domain is to find the “Notifications” permissions and click the toggle beside it. You can then proceed to set your preference to either “Ask (default),” “Allow,” or “Block,” whatever suits you more.
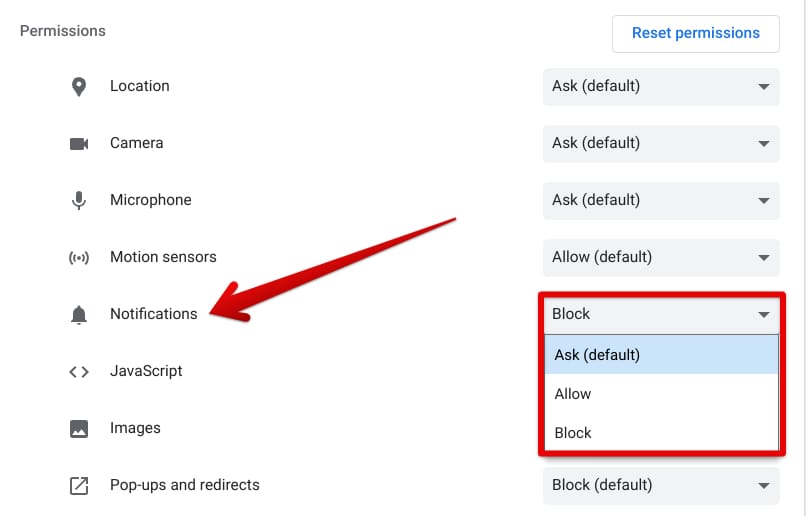
Optimizing the notification settings of the domain
This is the standard way of keeping tabs under your Chrome browser’s notifications. If you’d ever like to re-adjust the notification settings of a particular domain or all websites in general, feel free to head over to the “Notifications” section again and repeat the steps outlined above.
Google Play Store notifications
Moving ahead, we have one more type of notification on your Chromebook that can be optimized to your liking. These are the alerts that the Google Play Store sports, sending you app notifications and other types of heads-ups daily. To start managing those immediately, head to the “Settings” app and choose the “Apps” section on the side panel to the left.
You should then be able to click the “Google Play Store” option as you’re taken to the “Apps” area in the Chromebook “Settings” app.
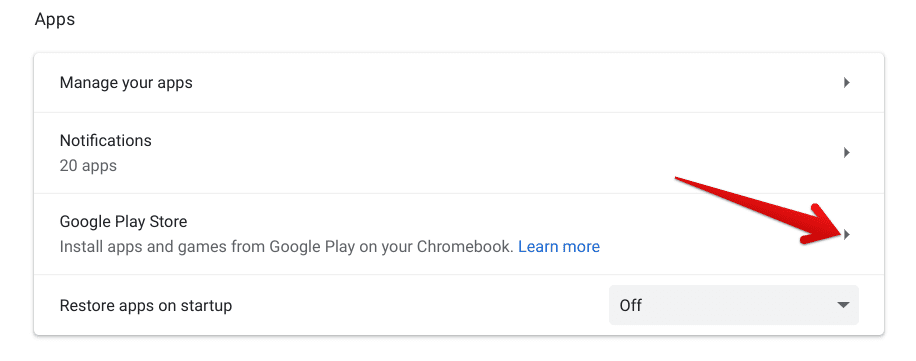
Clicking on the “Google Play Store” button
The next step is to get into the “Manage Android preferences” window on your Chromebook, which will redirect you accordingly. A new window should pop up on your end by the end of this step.

Clicking on “Manage Android preferences”
In the main menu of the Android-centric “Settings” window, click on the “Apps and notifications” section to go forward. The options that concern us aren’t too far out.
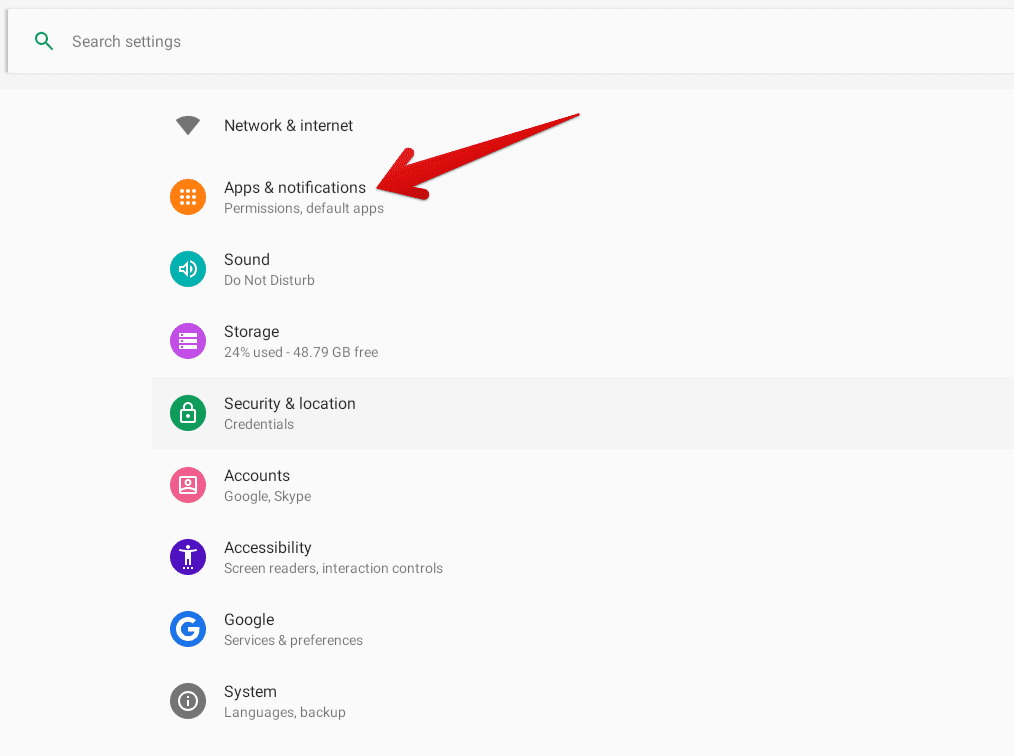
Selecting “Apps and notifications”
You should now be able to access the main “Notifications” section on your Chromebook immediately. Then, simply the relevant button, which will carry things forward for you.
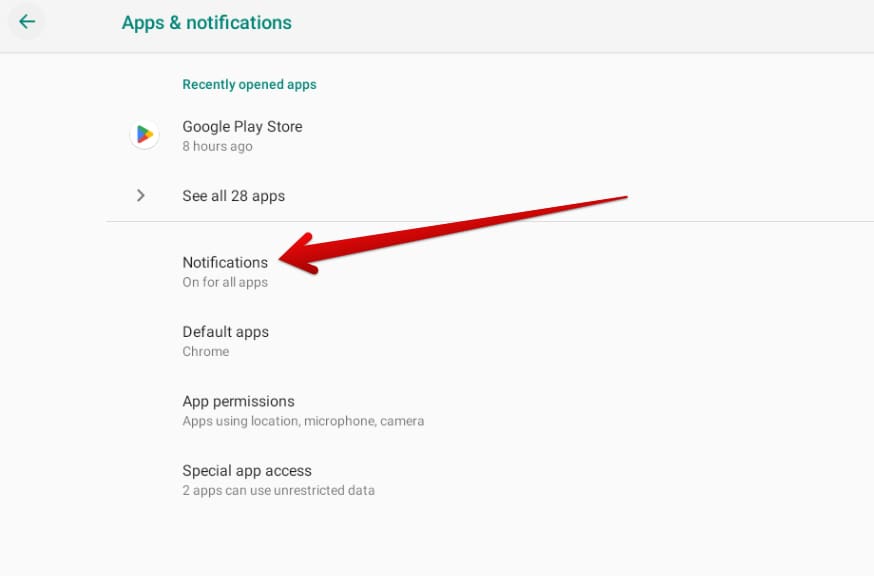
Accessing the “Notifications” section of Android apps
Finally, you can change the notification settings of Android apps on your Chromebook installed via the Google Play Store. The first option, called “On lock screen,” furthers things with two additional settings: “Show all notification content” and “Don’t show notifications at all.”
The apparent “Do Not Disturb” tool is self-explanatory since we reviewed it in one of the sections above. It quietens all of your Android apps with no exceptions. Choose what you feel is more suitable after carefully assessing both use cases.
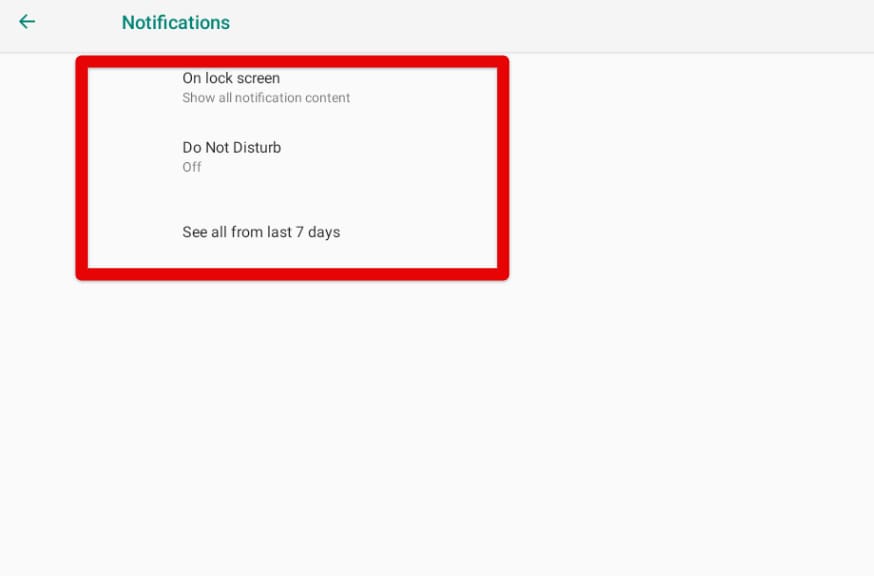
Notification settings for Android apps on ChromeOS
Chrome extensions notifications
And at last, Google Chrome extensions that notify you regarding something, in particular, have to be taken into account when optimizing the entirety of alerts on a Chromebook. However, the problem with installed browser extensions is that they cannot be adjusted in a way that would stop sending out alerts. To do that, you’ll have to disable them flat-out.
Make your way to the “Extensions manager” area by clicking the “Customize and control Google Chrome” button and hovering your cursor over the “More tools” tab. Once more options appear on the screen, choose the “Extensions” option to get to the next step.
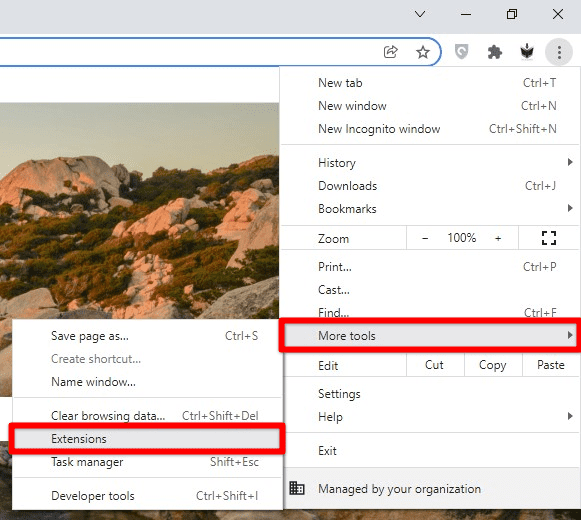
Accessing the “Extensions” section
You should now be able to hand-select the extensions that you wish to disable or keep running. This is the area where all installed Chrome extensions will manifest. Take your time to evaluate your preferences and decide accordingly.
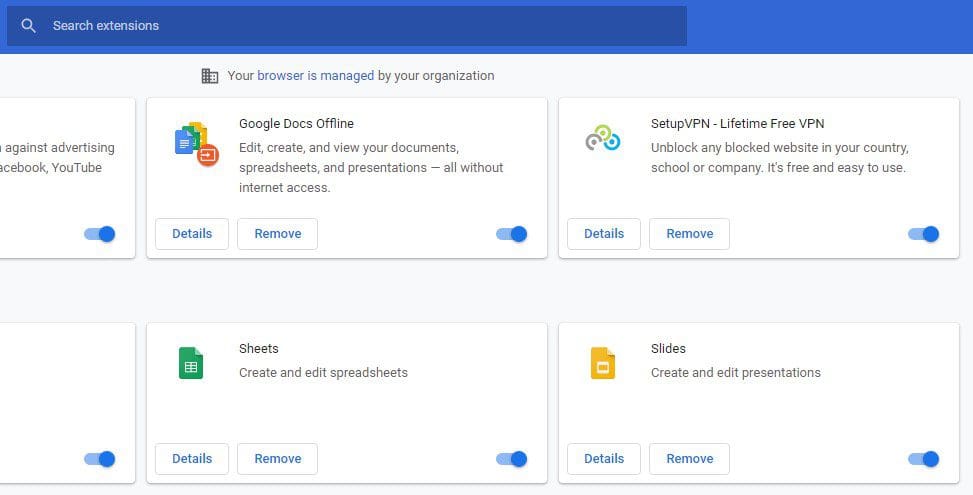
Extensions page
Conclusion
Chromebooks have become widely accessible in the modern computing world thanks to their ingrained ability to get things done securely and timely. From being mocked as a web browser to officially coming out with the world’s first-ever proper gaming Chromebook, ChromeOS’s journey is awe-inspiring.
In this guide, we’ve highlighted how you can customize your Chromebook’s notification settings that encompass various processes, including Assistant settings, Chrome browser settings, Android app preferences, and even extension notifications. In the comments section, let us know whether you found the guide helpful.
Chrome Ready wishes you good luck!
