Google Calendar is a multi-purpose calendar scheduling service that traces its initial launch back to 2006 in its beta phase. Ever since then, the program has continually received support in the form of feature additions, bug fixes, and other improvements that have refined the core Calendar experience to a great extent. Even travelers can benefit optimally from the application now; if you are one, all that’s needed is the right know-how of Calendar tools, and you’ll be set.
In this guide, we’ll go over some of the easily missable Google Calendar features that, in turn, offer terrific viability for travelers looking to explore the world. Contrary to popular belief, Calendar’s multi-faceted user interface elements allow people to plan ahead of their trip and integrate other Google services for seamless navigation. So without any further delay, let’s learn how to plan your next vacation with Google Calendar straight ahead.
Best Google Calendar tips for travelers and vacation planning
We have compiled a selection of helpful tips, tricks, and other information for you to absorb and start using Calendar the right way subsequently for traveling purposes. Be sure to read until the end and implement each forthcoming word of advice for the best results.
Use a separate calendar for traveling purposes
First, to formulate a high-quality trip and plan out the elements of your outing beforehand, you’re much better off catering to a new calendar in your Calendar account. It’s worth noting that Calendar lets you create separate entries to differentiate between one workspace and the other, so you can place your work objectives in a dedicated area and set tasks out for your family.
To start a new calendar, head to the Calendar website on your desktop and sign in if necessary. Once done, click on the cog-shaped “Settings” icon in the top-right section of the Calendar interface. This will reveal more options on the screen, allowing you to select “Settings” again to get to the next step.

Accessing Calendar’s settings
As you’re taken to the “Settings” section, look to the left of the screen, and you’ll find a column listing multiple different areas. Scroll down until you see “Add calendar,” Click on it to reveal more relevant options. You should then be able to click the “Create new calendar” button to get to the next step of the calendar creation process.
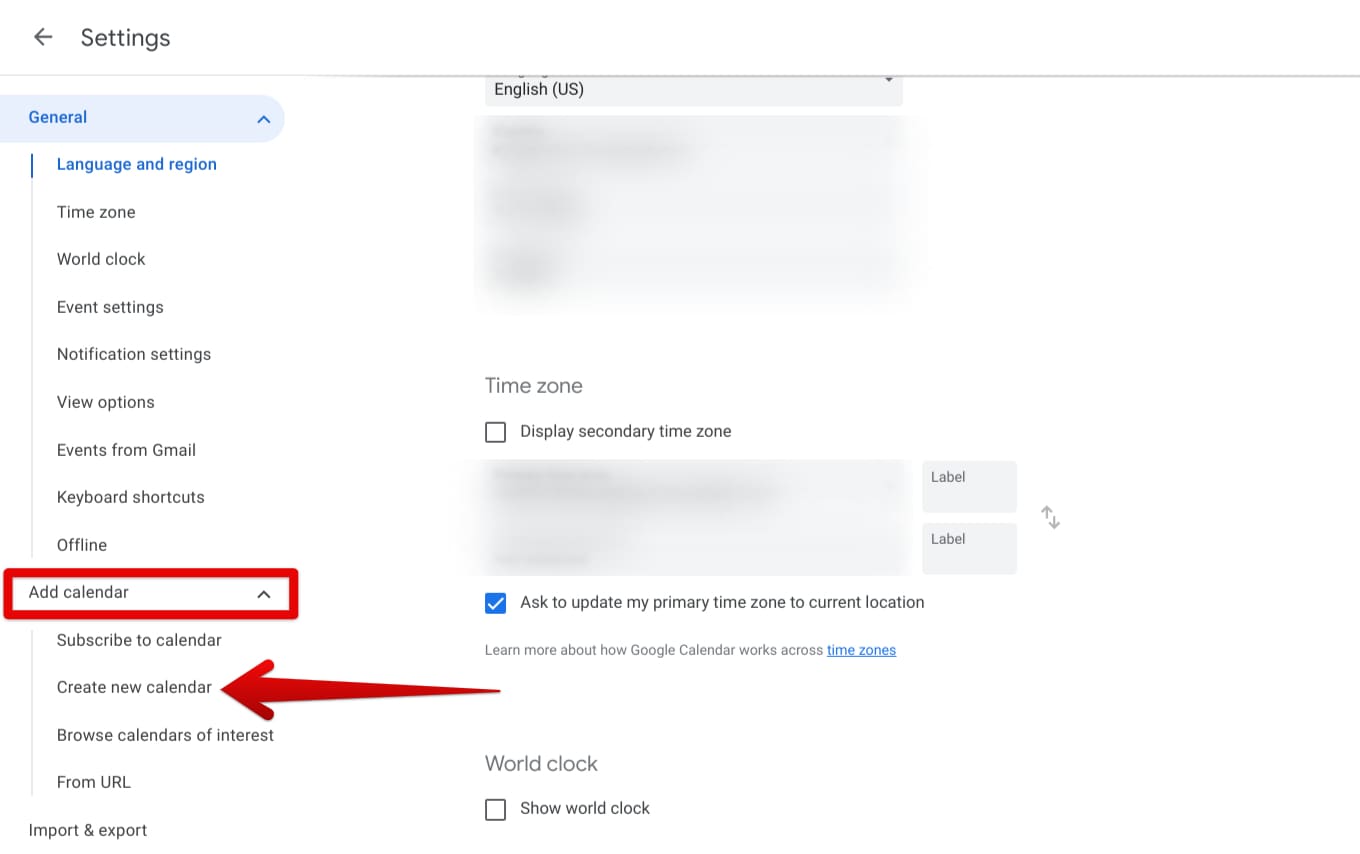
Creating a new calendar
After that, you should be taken to the “Create new calendar” page. Here, enter the name of the calendar, preferably something that goes well with trip planning, write out the description, and adjust the time zone. The owner of the calendar will be decided automatically, of course. Finally, click on “Create calendar” to wrap things up here.
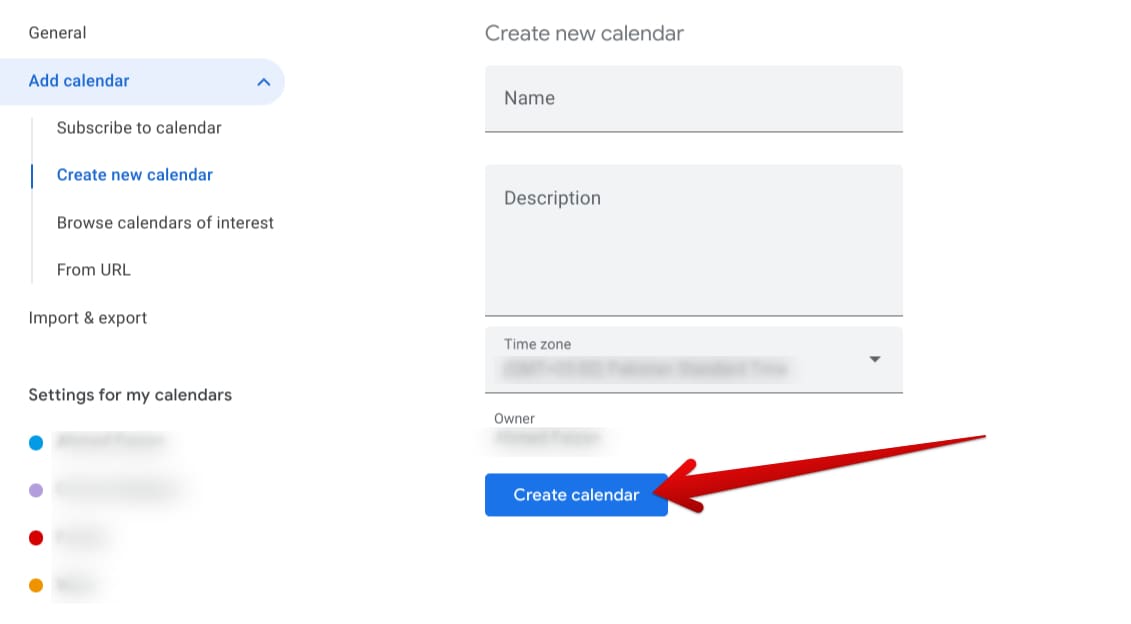
Finalizing the process
That’s about it! You’re off to a great start here. Now that a separate calendar has been created to plan your next vacation, things can proceed smoothly and in a highly organized manner. Let’s begin with the basics of what you must take care of going forward, starting with the event creation.
Create events to stay organized with your travel plans
Creating an event within this newly developed calendar for planning your vacation is the way to go as one of the best measures of preparing for your trip in advance. The primary benefit that will arrive In the wake of having a dedicated event in the calendar is that you’ll have a much easier time organizing things and various other parts of your vacation, given the availability of different options in the event creation area in Google Calendar.
For example, you’ll be able to determine where exactly you’ll be staying, the areas you’ll be visiting during your vacation, the people you will be with, the exact dates and the time, and even other parameters such as flight itinerary. To start with event creation, click on the vividly apparent “Create” button in the top-left corner of the screen, followed by tapping “Event.” That should get the job done for now.
- Alternatively, you can press the shortcut keyboard key “c” to instantly create a new event in Calendar.
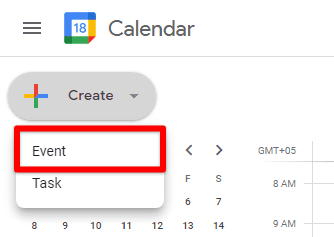
Creating a new event
You should now be able to create an event in Calendar and orient it around your upcoming vacation. Now, the choice is up to you, whether you’d prefer having separate calendars to accommodate your trip or a singular calendar is what you think is enough to do the job. Whatever the case, add the event title, specify the date and time at the top of the overlay menu, and lay out the description for the event. This will help you stay organized.
Other measures you can take while creating an event include setting a notification for a specific amount of time before your event goes live, so you and other joining parties can be alerted ahead of the due time. If you’re creating separate events, selecting varying colors is an excellent choice so different calendar entries can be distinguished.
- There’s also the possibility of integrating the event with a Google Meet conference call, should you require that in any way. Click the “Add Google Meet video conferencing” button, and your unique meeting code will be generated to share with others.
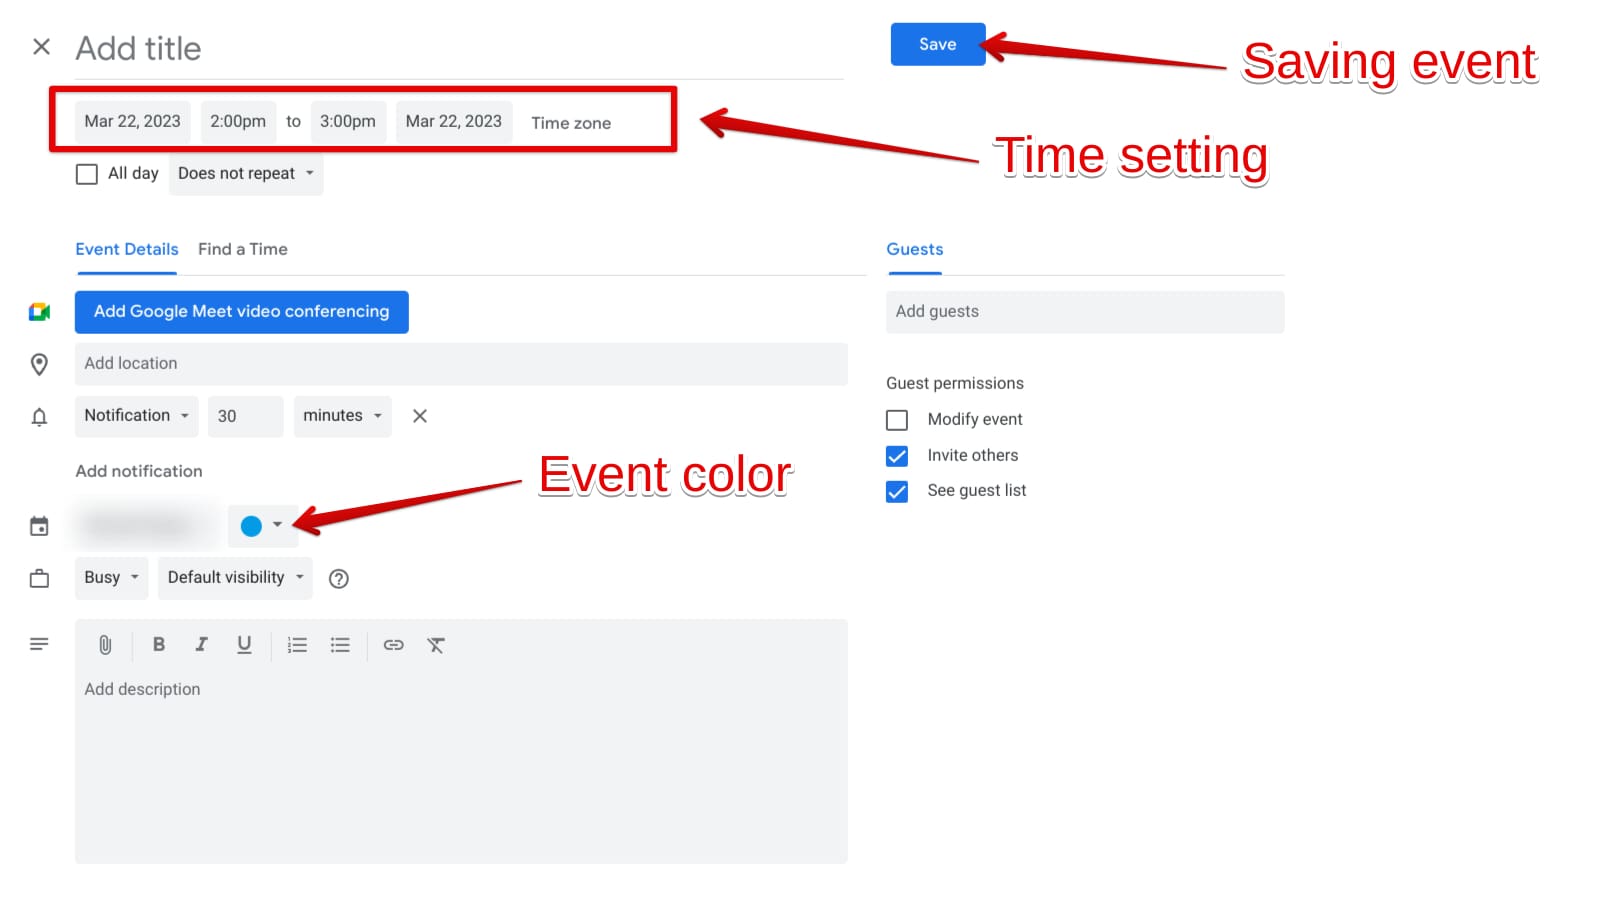
Creating an event template in Google Calendar
That’s about it regarding creating an event in Google Meet for planning your trip. So let us get down to the itty bitty details of this feature to help you have a great time vacationing.
Make sure your event is shared with others
If you’re not traveling alone, you might want to benefit from the shared functionality that Calendar offers for robust workability. That way, others can join in on your calendar, make desirable changes, and contribute to the overall vacation in any way they can. To get going on that front, head to the “Settings” section by pressing “s” on your keyboard and then continue by selecting the calendar on the left side of the screen that you wish to share.
After that, you must scroll down until you visualize the “Share with specific people or groups” area. Click on “Add people and groups” to bring up an overlay on the screen and start sharing the selected calendar through email address. Click on “Send” after entering the emails of relevant people, and invitations will be sent out. The individuals that you selected will be able to access your calendar from here on out.
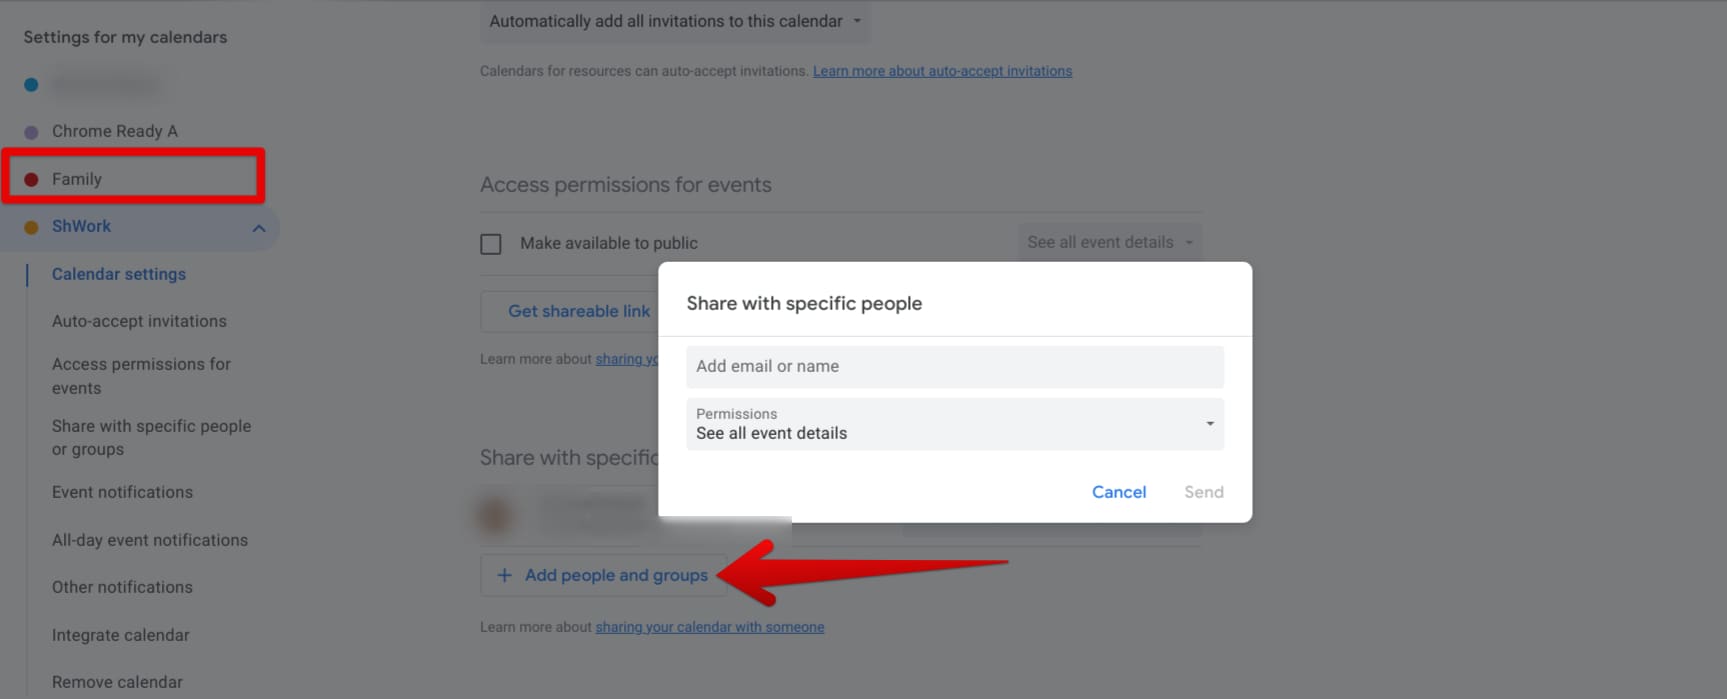
Sharing the selected calendar with others
Add travel documents to your event
When creating an event, you can write a description for it to facilitate yourself in the near future. However, if you’ve already done that, you can still edit the event to make further additions. We believe that adding your travel documents, such as your flight itinerary, ticket, passport photo, and other relevant details, is a great way to manage the essentials of your trip.
To add the documents, tap on your event and click the “Add attachment” icon that looks like a pin near the main description box. Attach whatever you think is necessary for your vacation to make things proceed smoothly from here on out.

Adding attachments to your event in Calendar
Use Google Maps in Calendar for seamless navigation
Google Maps is another application that resides within the Google ecosystem and flows well with Calendar. You can use it to create an event to determine your destination’s route after arriving at a particular place. If you’re traveling to another country, you must set the addresses of the different locations accordingly. But if your trip is scheduled to start and end locally, Maps can significantly help save you time.
The best way to get started is via the same event creation window, where you can access a particular “Maps” section. Tap on the “Add a location” bar right below the Google Meet area and type in the name of the area you’ll visit during your vacation. Press the “Enter” key to find the relevant entry to the next step.

Adding a location in the Calendar
You can now tap on the “Preview” button beside the location bar to get a better idea of the place you’re visiting. Using this feature, you can check out nearby areas of interest in the specified location and gain valuable insights and other helpful information on the fly. If you want to get to know more about Maps, here is a guide that lets you unlock Google Maps’ power and walks you through the top 10 tips for advanced users.

Checking out the preview of the location
Create a to-do list for a great experience
Heading to a new place on a whim can often leave you wanting more when you’re on your way back, but this situation can be alleviated for the better when you have a to-do list to follow. Thankfully, another Google application called Tasks operates right within Calendar for your convenience. Tap the “Tasks” app icon in the side panel to the right of Calendar’s user interface to get started.

Creating a to-do list in Calendar
- By the way, you can navigate to this side panel easily in the app by using the shortcut key combination of “Ctrl,” “Alt,” and “.” together and then pressing the “tab” key to switch between the indulged apps.
After clicking the “Tasks” icon, another panel will appear beside the section, explicitly adding tasks to the Calendar app. Click on “Add a task” and start preparing your very own bucket list so you don’t miss anything of importance during your vacation. It’s fast, easy, and quite beneficial in the long run to have. You can add details to your task and even designate a time and date for the task’s completion.
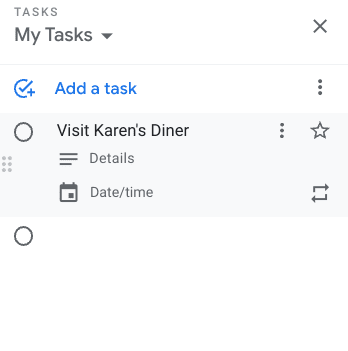
Creating a task in Google Calendar
Don’t forget the shortcut keys
Whatever you do in planning your next vacation with Google Calendar, there is one general piece of advice you have to consider. It’s possible to boost your productivity with Calendar keyboard shortcuts that enhance the base user experience to a noteworthy extent. You can get around the application interface faster and make yourself better capable of dealing with tasks on the fly.
Here is an overview of some of the best shortcut keys in Calendar that millions of people enjoy.
- Access the settings are: “s” key
- Go back to the main Calendar UI from any event creation or settings overlay: “esc” key
- Switch to a monthly view: “m” key
- Switch to a yearly view in Calendar: “y” key
- Switch to a daily view: “d” key
- Go to the next date range: “j” or “n” keys
- Go to the previous date range: “p” or “k” keys
- Go straight to the search bar: “/” key
- Head to an exact date quickly: “g” key
- Take yourself back to the current date: “t” key
Conclusion
From being able to export and import Calendar data to using your Google Calendar account to manage your family’s busy schedule, the program in question has come a long way from being a barebones calendar application. It’s now also possible to create event templates in the program and share them with others seamlessly, not to mention sharing your created calendars all around effortlessly.
In this guide, we’ve learned many valuable tips for managing a trip with Google Calendar, including employing a separate calendar in the app that differs from your work or personal calendars. That way, you can set the tone for what’s about to come and be able to exercise effective planning strategies. Let us know in the comments below if you have a relevant trick we missed in the article.
We would love to read your feedback!
