Event templates in Google Calendar are a boon for those who have to host business meetings week in and week out and like to save time while doing so. A template for an upcoming event defines the basic parameters of the occasion ahead of time, so it is possible to gather the relevant details on the spot and place them together to create a well-informed conference. Of course, the integration of Meet is the cherry on top here, allowing you to add further depth to your event.
This guide will teach us an easy-to-follow method to create event templates in Google Calendar. In addition, you’ll also see how painless it is to share the Calendar event with others, so you don’t have to dive into the same old manual approach and put up with the headache. Fortunately, Calendar’s easy-to-use interface is a blessing for millions worldwide, as you’ll affirm in this article ahead.
Creating Calendar event templates
Google Calendar makes it plain and simple to partake in event template creation, so you can consistently follow it for the times to come and share it with others for easy access. One of the significant benefits of having an event template to accompany your work occupation is that the approach cuts down your time in half, which is usually spent organizing an event. Therefore, the template can be modified to a great extent, so let’s dive into the whole operation immediately.
To get started, go to the Calendar app using this direct link and sign in with your Google account if you haven’t done that. As soon as you’ve arrived at the front page of Calendar, click on the “Create” button marked by a large-sized “+” icon, and a drop-down section will appear there. Choose “Event,” and that’ll take you to the next step.
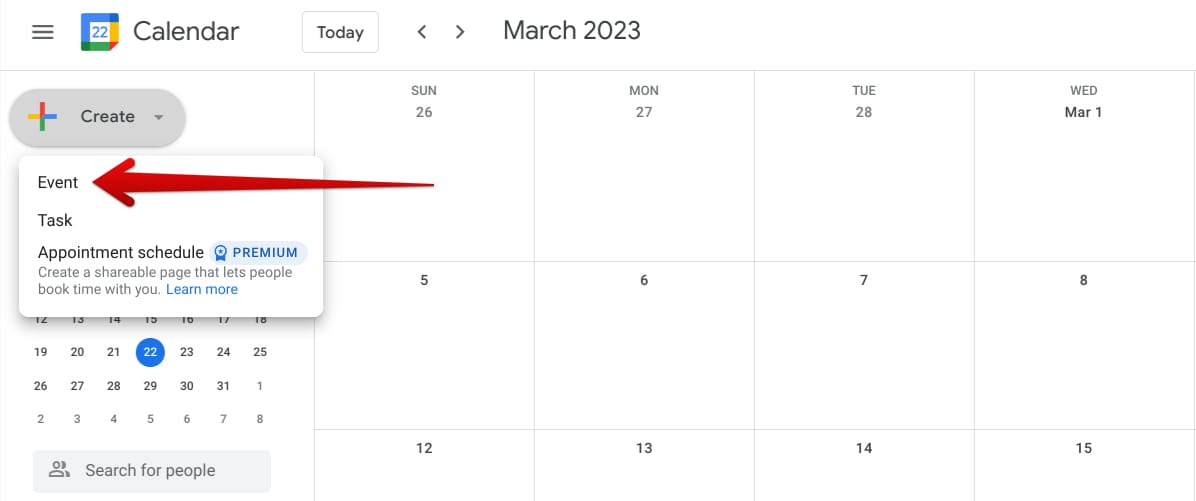
Creating a new event in Calendar
You will now be able to comfortably tweak the various parameters of your event template following the appearance of a window afterward. However, before you start filling out the details, take a moment out and click on the “More options” button to access the full scale of the event template to tweak more of the occasion’s details.
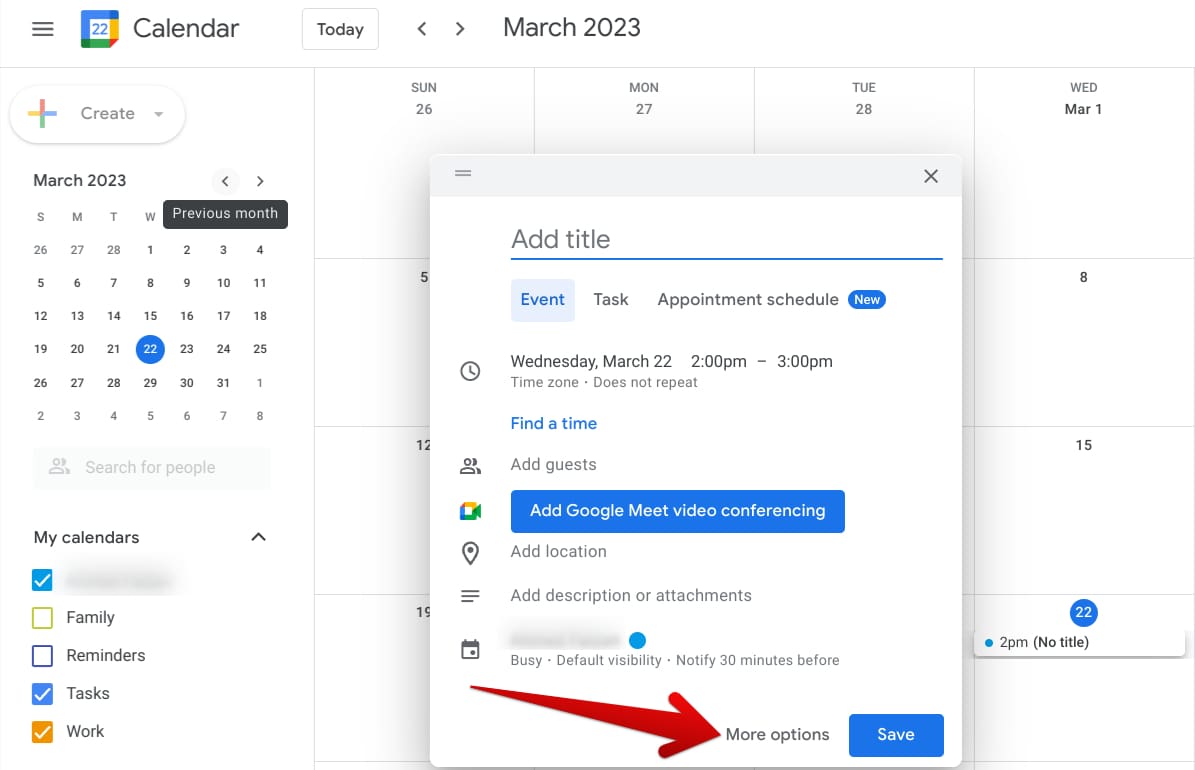
Selecting the “More options” feature
You should now be able to create an event template in Google Calendar in a preferable manner, given the availability of extra options in front of the user. At first, we recommend adding the event title, so everyone knows what the proceeding is about. You can be creative with the title if it’s a family event you’re planning and not something more suited to business settings. Next up, select the time and date for the event using the section right below the title area.
Ahead of that lies an option to set the event to stay consistent “All day,” so you won’t need to specify a time for it afterward. If this is something that suits your cause more, enable the functionality right away. Another small-scale feature besides “All day” relates to the event being more habitual, where it keeps recurring at some point. Your available options in that area include the following:
- Does not repeat
- Daily
- Weekly on [current date]
- Monthly on the fourth [current day]
- Annually on [current date]
- Every weekday (Monday to Friday)
- Custom range
Right after that arrives the event details, where you can enter the ins and outs of your occasion. Start by creating a direct link to Google Meet if there’s a requirement. Then, quite intuitively, a meeting link with its designated code will be generated immediately, allowing you to copy and use it when your event comes up. Next is the “Location,” and the provided bar integrates with Google Maps, so expect lightning-fast results on the fly.
You can even set a notification timer for your event by email or alarm. Do note that the feature here pushes out the notification before the time you set. For instance, if you set the functionality to “30 minutes,” you will be reminded about the event 30 minutes before it’s green-lit. Next, you have to choose the calendar for which this event will be created. Sift through the available options and select what you think is preferable. There’s also a color option available that can help you distinguish this event of yours from others if you plan on creating multiple ones.
We’re almost nearing the end of the event template creation now, but there are still some further details to get into. Your next optimizable option includes setting your availability, whether you’d like to be shown as free or busy to others. Moving forward, briefly describe your event by filling out the “Add description” part. You can insert attachments, use formatting, and even incorporate links—the description box is pretty feature-rich.
At last, the “Guests” section allows you to send invites to people, so they can be aware of the event beforehand and join in quickly when the time comes. The meeting code will also be sent to them if you have opted for Google Meet to step into the picture. The additional section below the “Guests” area lets you specify permissions for the people attending the event, such as letting them invite other individuals, seeing the list of all guests, and allowing them to make changes.
As soon as you’ve double-checked the parameters of the event template and you feel that the work is done, click “Save” to back up your progress and make the event pop up on the calendar it was created for on your account. You’re halfway done now, but there are still some crucial details left that you should consider.
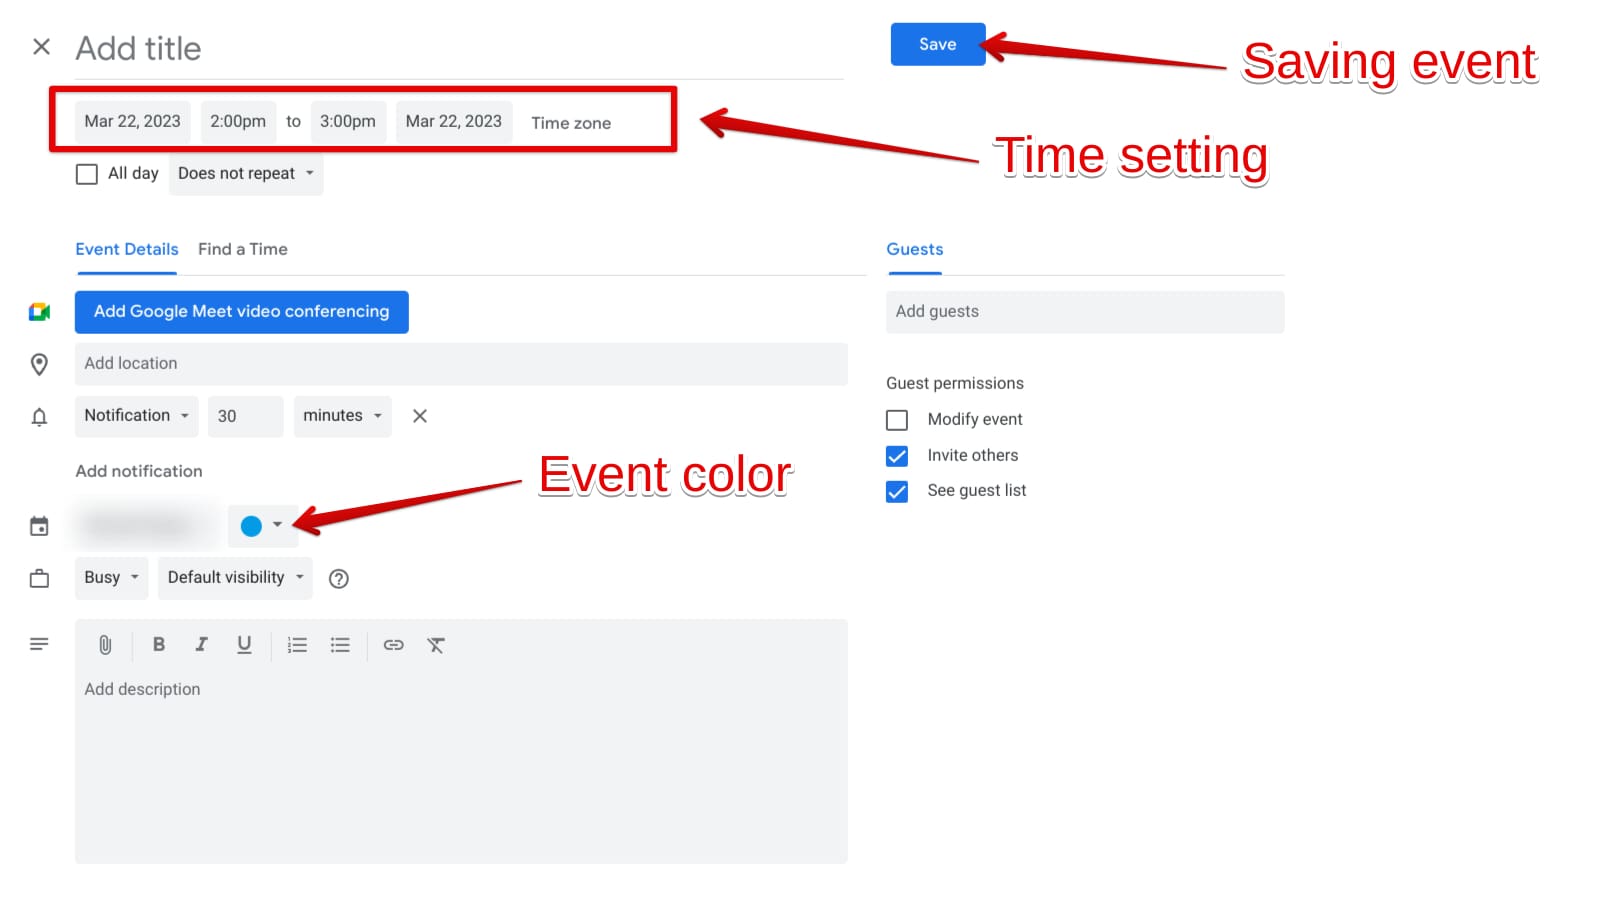
Creating an event template in Google Calendar
When you click on “Save,” the created event template will pop up on your Google Calendar’s main page on the date you picked at the time of the event’s creation. Look for it on your end, and you’ll see how it appears with the color you gave the event. The event’s title will help you spot it quickly too.
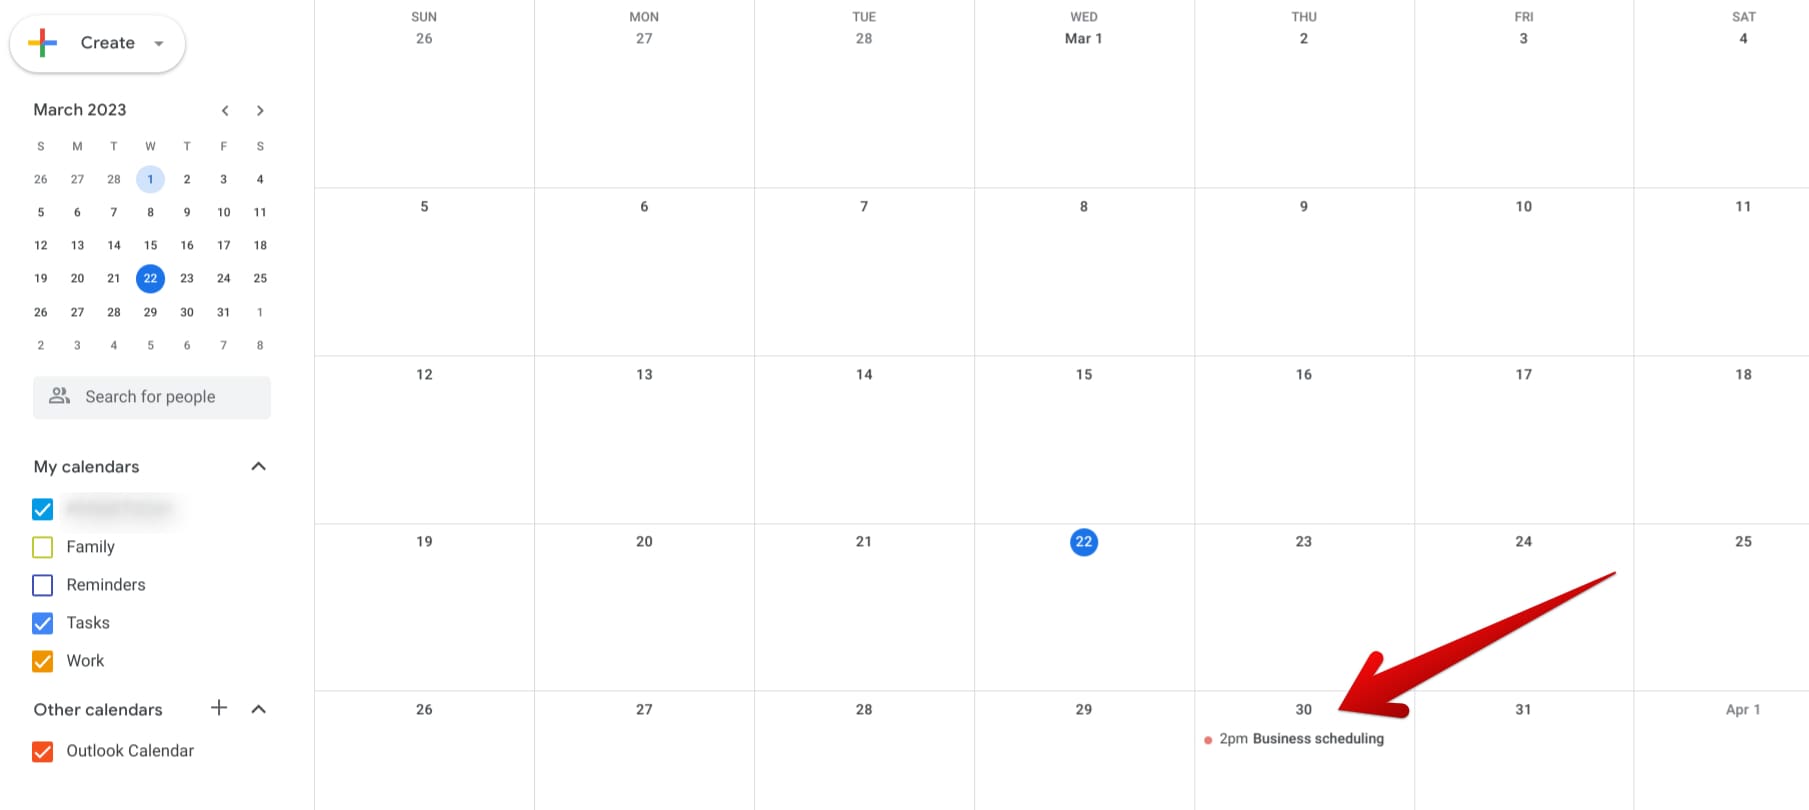
The created event popping up on the Calendar
That’s all about creating an event template in Google Calendar. We’ll now shed some light on sharing this event with others in the next section.
Sharing Calendar event templates
Sharing an event template in Google Calendar takes less than half the work compared to creating one. When you’re done with the latter and see your event popping up on the Calendar main page, click on it to bring up an overlay menu. Make sure to click the event’s title and not the date since that’ll pull you all the relevant events on that day. Once the overlay has appeared, tap on the three vertical dots symbolizing the “Options” button. Doing that will reveal more info.
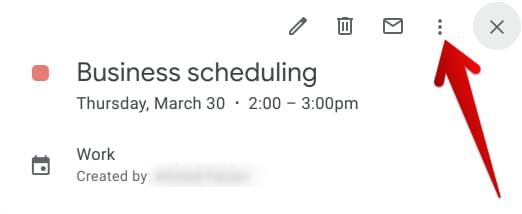
Accessing the event’s options
After the options appear on your screen, click “Publish event” to reach the next step. Note that some of the other included features let you print, duplicate, and copy the event to other calendars and even allow you to change the owner of the event.
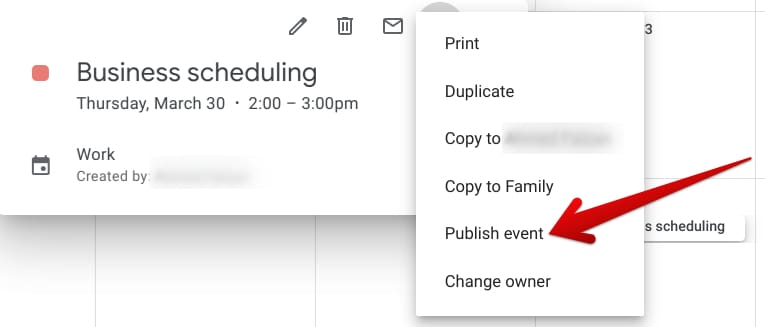
Publishing the created event
Finally, here are all the details you need to share your event template via Google Calendar with others. You can either copy the HTML code of the event thanks to this new overlay that surfaces following accessing the “Publish event” section or utilize the link to the event directly. After copying the link, you can share it with anyone to get the job done. Note that the HTML link lets you embed the event template on web pages, so do check that out as well if needed.
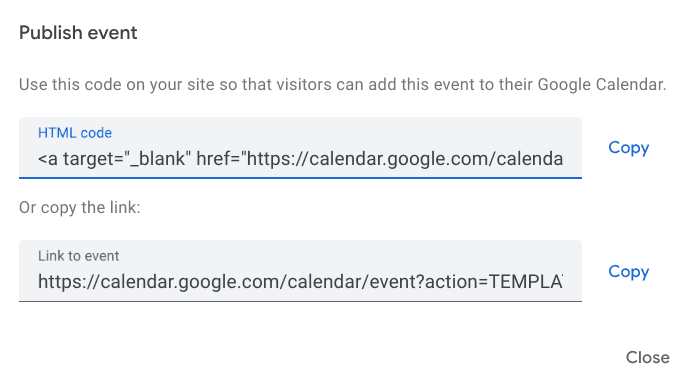
Sharing the event template via Calendar
That’s all you need to know about creating and sharing event templates in Google Calendar. Thanks for reading!
Conclusion
Now that you’re aware of creating and sharing template events in Calendar, you’ll likely benefit from a boost in your work rate. Just make sure to fill in the relevant details as you create the event, and send out invites to people to their email addresses to get everyone up to speed. Do comment down below and let us know whether you found the write-up helpful on your end.
