Google Jamboard is one of the finest innovations of the US conglomerate that traces its initial announcement back to 2016. In professional spaces such as business and education, Jamboard has become a rising star in allowing groups of individuals to collaborate as a team, work together, and brainstorm ideas for further growth. Thanks to the indispensable tools provided by the Jamboard app, you no longer have to resort to traditional methods now that this service is here.
This guide will take an up-close look at how Google Jamboard is best utilized for brainstorming and creativity. If you’re a teacher looking to spice things up in the classroom by making the students partner up and think hard or someone presenting a topic to their peers in the coming few days, this write-up will be a handy guide. So let’s get started right away.
- Another helpful article: Google Forms for Education: Enhancing classroom engagement.
Why Jamboard is perfect for idea brainstorming
Brainstorming is a process where a specific individual thinks long and hard about a particular problem and intends to derive a working solution. This process can be divided into steps, where the available information or the problem itself is analyzed and processed first, along with the ideas that jump out immediately. Once that portion of the procedure is taken care of, the next step is to sort the available thoughts and organize them for a better perspective.
Then, the best possible course of action is taken, and a resolution is achieved. This description is something that fits Google Jamboard nearly perfectly. The service at hand caters to those looking to develop new ideas regularly, offering template integration with Google Slides, in-built annotation tools, and generous frame availability for everyone to join in on the fun.
We fare it as one of the most capable digital whiteboards in the business that can take care of your brainstorming requirements on the fly. It’s easy to access and can even be launched from Google Drive by heading over to the cloud-based storage platform on the web, selecting “New,” hovering over “More,” and then choosing “Google Jamboard.” Moreover, the fact that you can share your jam session with others for your peers to work remotely is just the cherry on top.
Let’s get into some of the best ways to utilize Jamboard for brainstorming and creativity without further delay.
Using Jamboard to generate ideas and brainstorm
We’ve curated an outline for you to go through regarding using Jamboard as a means of brainstorming. Make sure to follow the instructions written in the subheadings accordingly for the best results.
Taking care of the initial setup
First, it’s better to prime your Jamboard session to set the tone and prepare yourself and others for a productive brainstorming sequence. For this purpose, there are pretty several tweaks that you can make for positive results. After arriving at the Jamboard home page, Let’s begin with renaming the jam to something that suits the scenario more. After all, the “Untitled Jam” heading isn’t inspiring anything. So click on the relevant box to rename it to something else.
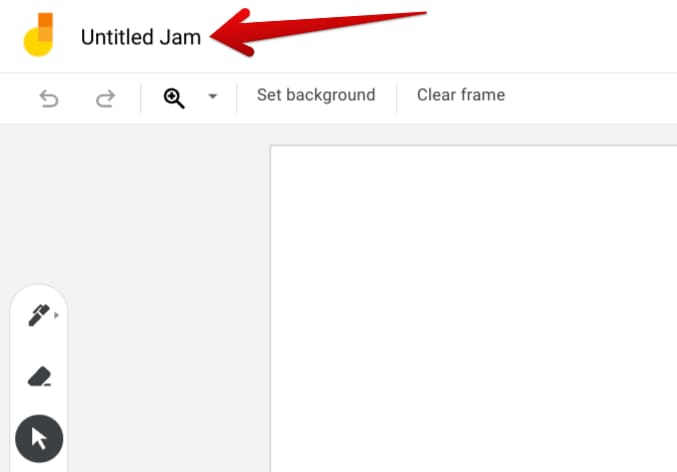
Renaming your jam
Once you’ve cleared the session’s name, the next step is to change the background. Again, the default white backdrop isn’t making any point. However, you can alter that to the best of your interest by clicking on the “Set background” option beside “Clear frame” and then choosing a fitting background. There are several options to choose from, but you can also import your image and add it as a background to Google Jamboard.
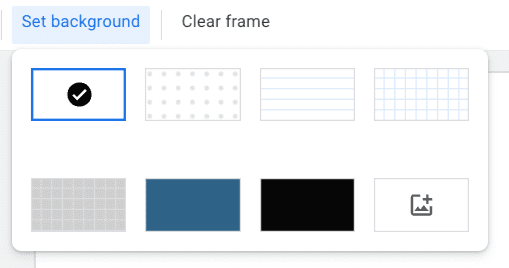
Choosing a relevant background
Last, specify the correct sharing permissions for others to easily access, view and edit the jam session. Thanks to Jamboard’s user-friendly interface, there’s a vividly apparent “Share” button in the top-right corner of the app’s UI which you can use to accomplish the purpose at hand. Tap on it, and you’ll get an overlay to appear on the screen, allowing you to tweak the share permissions of the document as a whole.
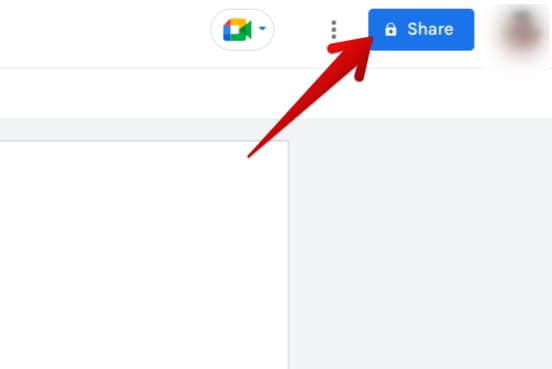
Sharing the jam session with others
From this point onward, you can either send out personal invites to people specifically or tweak the general access of the jam session. The latter will provide you with the convenience of sharing your document just with a single link. People who click on the link will join in automatically and start collaborating immediately whenever you’re ready. Just provide editorial access to those trying to work with your jam session to avoid obstructions.
Choosing the right template
Now that your Jamboard document is primed and ready, it’s time to use the correct template to kickstart the brainstorming session. With Jamboard, you open yourself up to dozens of different options, whether you build a template from scratch that perfectly aligns with your goals and aspirations or opt for a pre-created template from platforms such as Canva or Linktree.
We’ve left the relevant links for two of the best places to grab pre-built Jamboard templates from, so that should nudge you in the right direction. We’ve taken an example template from Canva in the screenshot above. The idea is to download it in PDF form and upload it next to Google Slides. That way, you can edit the content inside per your preferences and create an outline for the brainstorming session.
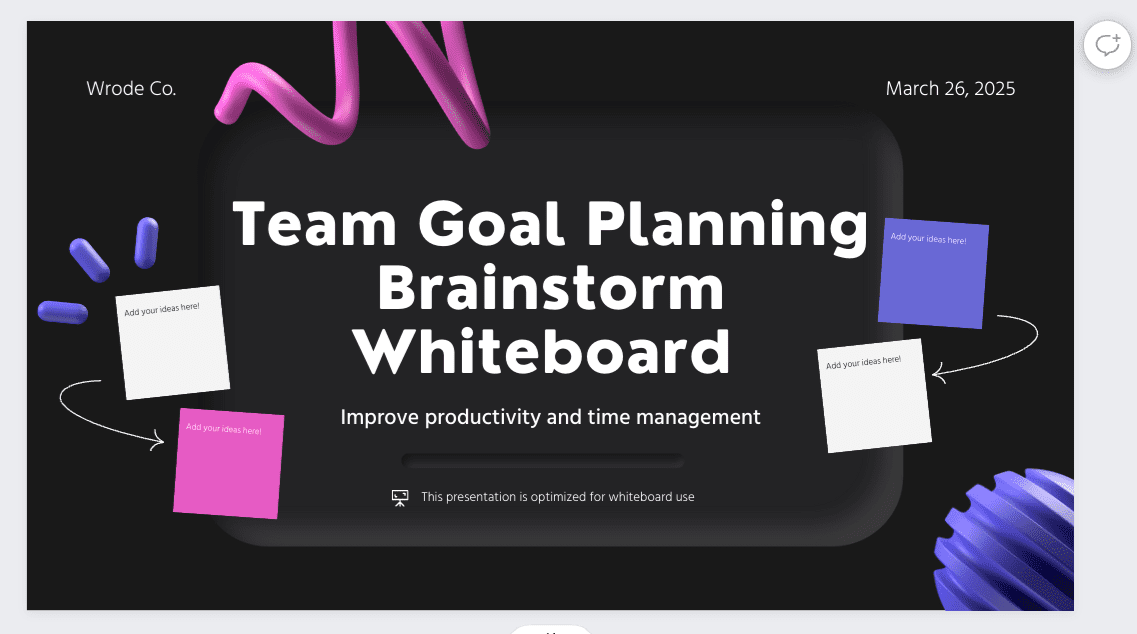
A relevant Canva template for Jamboard
Choosing the suitable template for the job is a step that you should take due interest in. Search through your sources and take some time to develop something that gets the job done right. You also have the option to fire up Google Slides and start crafting your Jamboard presentation template. We recommend new users check out our detailed guide on Google Slides to gain a headstart.
Annotate for an added effect
Annotation is a must if you want the storm of ideas in your mind to make sense and come together due to the courtesy of Jamboard’s in-built annotation tools, involving various shapes, a text box, a laser pointer, and most importantly, a sticky note application. These features come together and deliver reliable brainstorming sessions where the available tools help you communicate your message, discuss your idea, and get to the bottom of the discourse.
You’ll find most of these features on the left side of Jamboard’s UI—readily available. Apart from the “Pen,” “Erase,” and “Select” buttons, the rest of the functionalities are as follows. In our opinion, the “Sticky note” tool is one of the most productive annotation tools that Jamboard can let you get your hands on. Right after that, Google image integration is no joke, either. You can fetch photos from Google’s search engine instantly from within Jamboard.
Moreover, the “Shapes” tool lets you incorporate triangles, circles, half circles, diamonds, rounded rectangles, bars, arrows, and squares, making it less complicated to add more depth to your brainstorming sessions. Lastly, the “Text Box” tool lets you specify a specific box in your jam session and use it for writing text. Your options include changing the text’s color while choosing between six variations and increasing or decreasing the size.
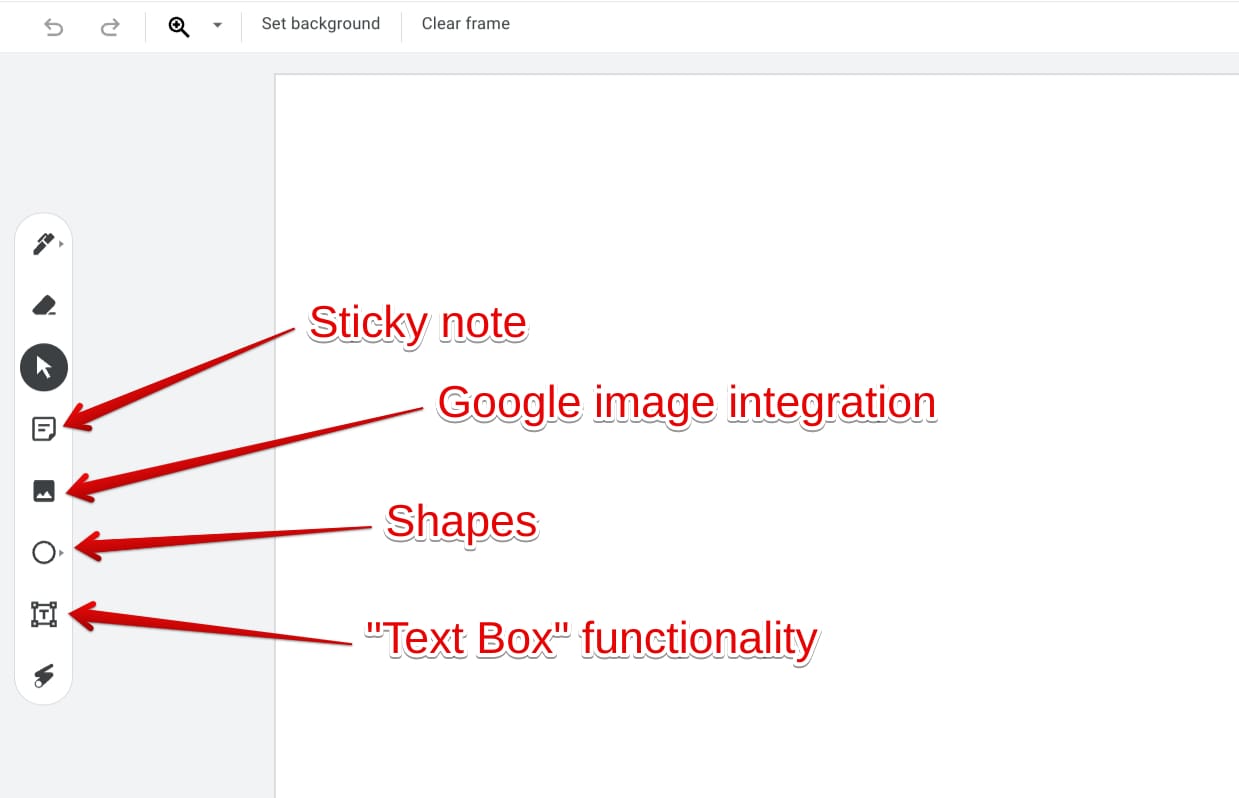
Annotation features in Google Jamboard
Usually, combining these features yields the best results when you’re constantly staying proactive in creativity and brainstorming. Whenever a new idea pops up, you can use a sticky note to jot it down and place it on the frame. If needed, you can add more authenticity to your concept by fetching a relevant image from Google. Even if that is not enough, encompassing the photo or idea with a fitting shape will also advance your imagination.
Use Google Meet
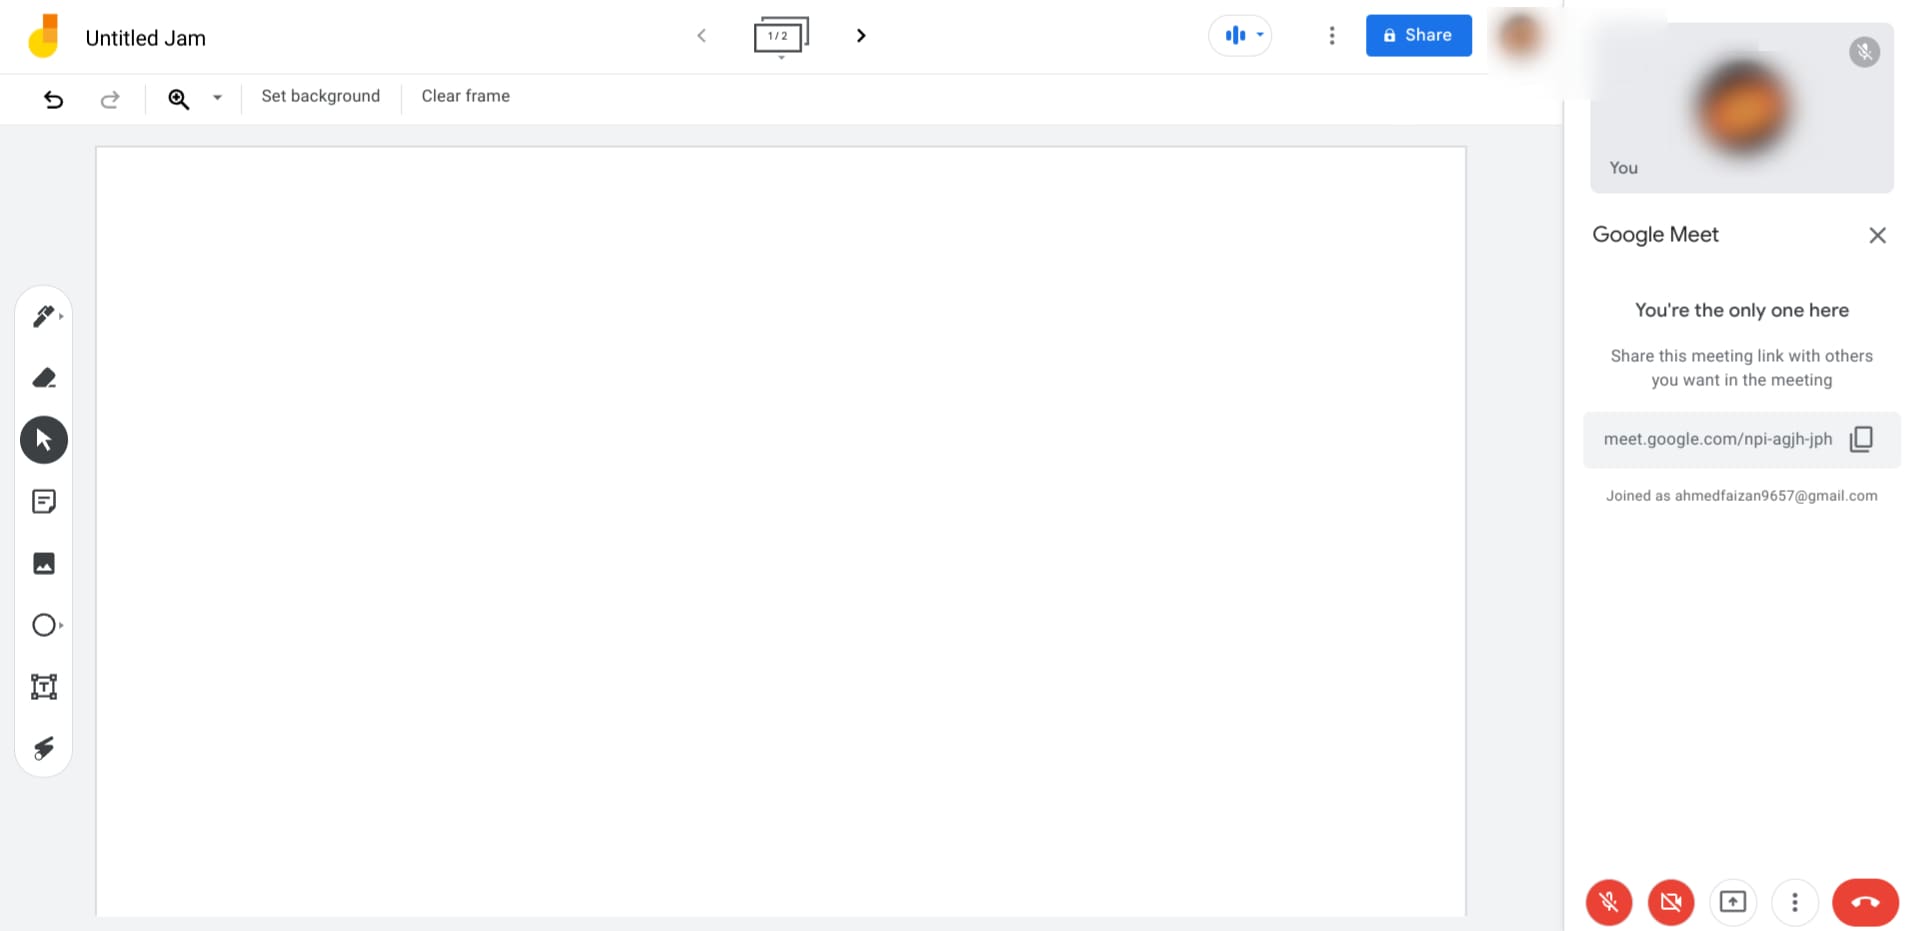
Google Meet integration with Jamboard
Finally, one of the last tips we’d like to discuss pertains to Google Meet and how it establishes a robust connection with Google Jamboard. Meet is a program that needs no introduction whatsoever, being one of the world’s most popular video conferencing platforms out there. It’s free to use to a certain extent, comes feature-filled, and even sports its range of extensions for users to download and install on the Chrome browser.
To begin conducting a Meet meeting while working with Jamboard, tap on the dedicated Meet icon in the top-right section of the Jamboard app. Doing so will make further options appear in that particular area. We recommend choosing the “Start a new meeting” option to get right into Meet. You can join another person’s meeting by clicking “Use a meeting code.”
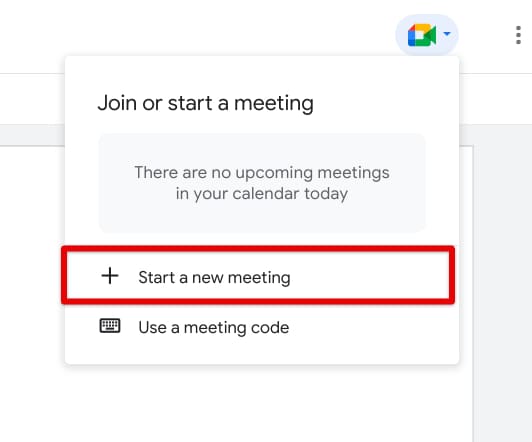
Starting a new meeting in Jamboard
After you commence a new meeting, a portion of your Jamboard’s screen will start comprising the Meet user interface with all its familiar buttons and features. However, the option to move the meeting to a new tab will always be present. In our opinion, trying to brainstorm and generate new ideas about a particular topic in Jamboard without the involvement of Google Meet is a failed prospect.
Meet has established itself as an extremely vital tool for collaborating with others and working on a particular project together. You’ll let others edit and take over your initial draft by sharing the link to the Jamboard session we discussed in one of the previous sections. However, with the ability to conduct a virtual meeting right there and then, you’ll simply be taking your brainstorming experience to the next level.
- A helpful article: How to record a Google Meet meeting.
Conclusion
Google Jamboard makes itself approachable for brainstorming and creativity due to the courtesy of all the tools and functionalities it has been bestowed with. However, with that said, learning the right know-how for effective idea generation in Jamboardcan only be done when you’ve read up on a helpful guide. So let us know in the comments ahead whether the write-up helped your cause. Thanks for reading!
- Do check out as well: How to add an electronic signature in Google Forms.
