Chrome is one of the most widely used web browsers worldwide, renowned for its speed, reliability, and user-friendly interface. While it is a powerful tool right out of the box, Google Chrome offers an extensive range of customizable settings that can enhance its performance even further.
This article will explore different aspects of customizing Chrome’s settings to optimize its performance. Whether you want to speed up Chrome’s launch time, enhance your browsing capabilities, or maximize its privacy and security features, going through the following sections will help you get the most out of your browsing experience. Out of all the different components that constitute the interface of Google Chrome, there exists the toolbar area you can focus on and become more productive. Learn how to customize the Google Chrome toolbar in this detailed guide.
Understanding the basics
Before diving into the more advanced customization options, it’s important to have a basic understanding of the browser settings. Chrome settings can be accessed by clicking the three dots in the top right corner of the browser window, then selecting “Settings” from the drop-down menu.
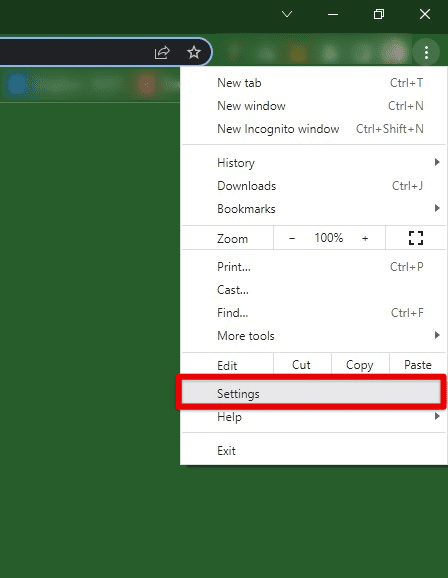
Opening Google Chrome settings
The settings page is divided into several sections, each with its own set of options. These sections include appearance, search engine, privacy and security, sync and google services, languages, downloads, tabs, site settings, accessibility, and about Chrome. Each section contains a range of options that can be customized to enhance the user experience. For example, in the “Appearance” section, users can change the browser’s theme, font size, and zoom level. In the “Privacy and security” section, you can control cookies, block pop-ups, and manage browsing history.
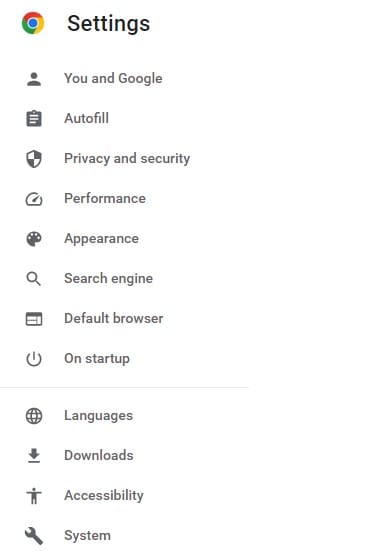
Google Chrome settings menu
It’s important to note that some settings may have unintended consequences, such as blocking certain websites or causing compatibility issues with some extensions. As such, it’s recommended to research each setting before making changes and to experiment with settings on a case-by-case basis.
Customizing startup settings
Chrome’s startup settings determine how quickly the browser launches and how it behaves when it is first opened. Users can speed up launch time and optimize its performance by customizing these settings.
To access Chrome’s startup settings, click the three dots in the top right corner of the browser window, then select “Settings” from the drop-down menu. From there, navigate to the “On startup” section.
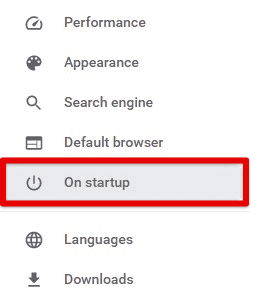
Opening on startup settings tab
One of the easiest ways to speed up Chrome’s launch time is to select the “Open the new tab page” option. This will load a blank page when Chrome is first opened rather than attempting to load a previously opened page or restoring a session. Doing so can significantly speed up your browser, especially for users with slower internet connections or older devices.
You can also open specific pages or a set of pages when Chrome is launched. Select this option and click the “Add a new page” button to include the desired pages.
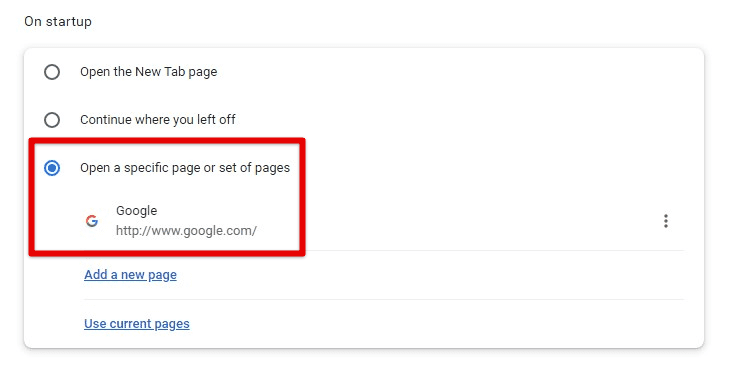
Opening a specific page or set of pages
In addition to customizing what pages are opened, you can enable or disable various startup options, such as restoring the last session, automatically opening certain apps or extensions, and more. Chrome OS is loaded with several convenient features. Some may come in handy, while others are there merely for aesthetic appeal. Are you looking for such funky features? Please review our article on enabling startup sound on your Chromebook.
Configuring privacy & security settings
Privacy and security settings allow users to control their browsing data collection, storage, and sharing. By configuring these, you can enhance online privacy and protect yourself from various security threats.
To access Chrome’s privacy and security settings, click the three dots in the top right corner of the browser window, then select “Settings” from the drop-down menu. From there, navigate to the “Privacy and security” section.
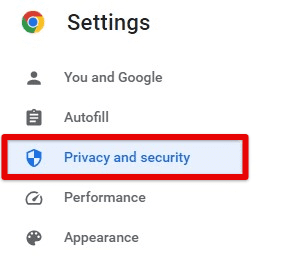
Opening the privacy and security tab
The most crucial privacy setting is the ability to control cookies. Cookies are small files that websites use to store data about a user’s browsing history, preferences, and login information. While cookies can enhance the overall experience, they can also be used to track users across multiple sites and collect sensitive information.
To control Chrome cookies, click the “Cookies and other site data” tab under the “Privacy and security” section. From there, you can block all cookies, block third-party cookies, or allow cookies only for specific sites.
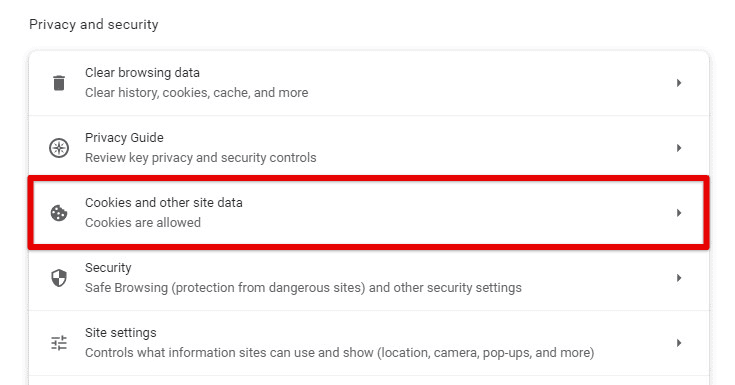
Cookies and other site data
Another central setting is controlling how Chrome handles site permissions, such as camera access, microphone access, and location tracking. Users can customize these settings on a per-site basis or block permissions entirely.
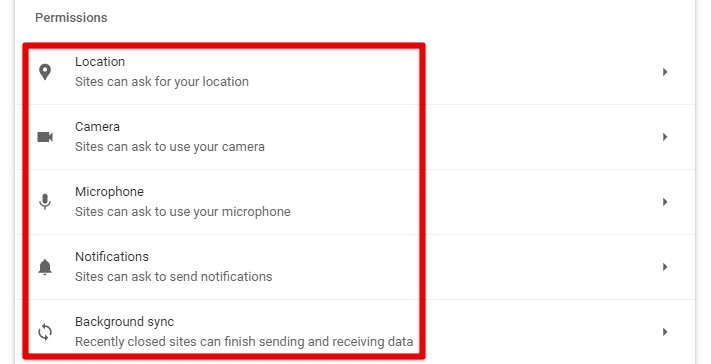
Site permissions on Chrome
Chrome also offers a range of security settings to protect individuals from malware, phishing scams, and other potential threats. Users can enable the “Safe Browsing” feature to receive warnings when visiting dangerous or deceptive sites or turn on “Enhanced protection” to prevent specific types of attacks.
Note: No browser can guarantee 100% security, so it’s always recommended to practice safe browsing habits and use additional security measures as necessary.
Managing and optimizing extensions
Extensions allow users to customize and enhance their browsing experience. However, too many or poorly designed extensions can negatively impact Chrome’s performance and stability. Therefore, managing and optimizing extensions is important to ensure they are not causing any issues.
Click on the three dots in the top right corner of the browser window, and then go to “More tools” and “Extensions” from the drop-down menu.
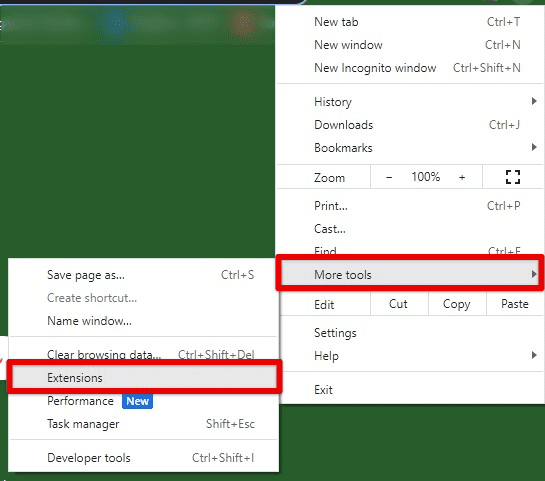
Opening extensions settings in Chrome
From there, users can view their installed extensions, disable or enable them, and access their individual settings. Removing extensions you no longer need or want is also possible.
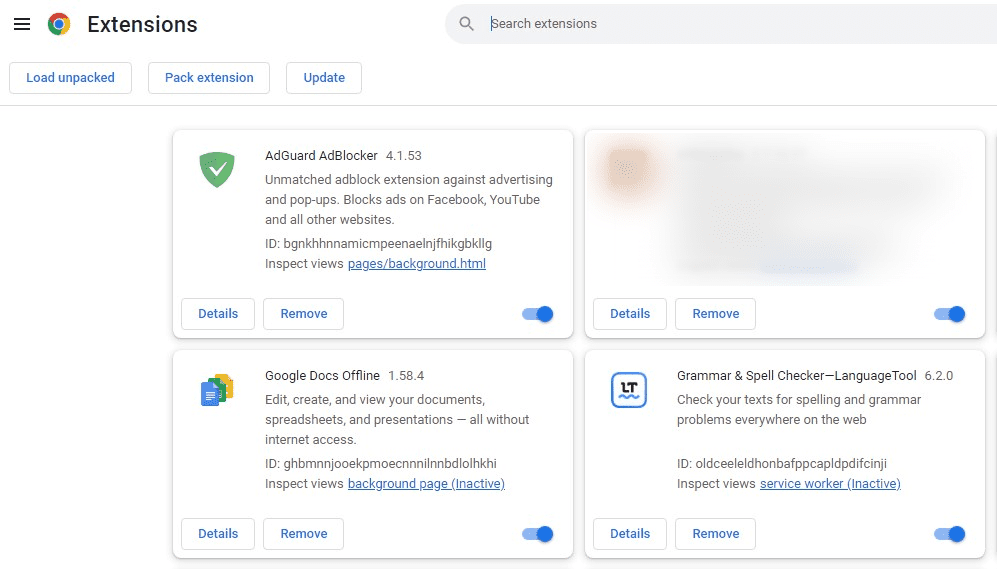
Chrome extensions page
To optimize extensions for better performance, try disabling or uninstalling extensions that are not used as frequently or the ones which are causing particular issues. Try using fewer extensions, as each extension can use valuable system resources. Another way to optimize extensions is to configure their settings to reduce the impact on Chrome’s performance. Configure ad-blockers to only run on specific sites or limit the number of tabs these extensions can open simultaneously.
Customizing Chrome’s appearance and themes
Chrome’s appearance can be customized in various ways, from changing the background image to applying a custom theme. This allows for browser personalization and makes it more visually appealing.
One of the simplest ways to customize Chrome’s appearance is to change the background image. Users can choose from various pre-installed images or upload their own images as the background.
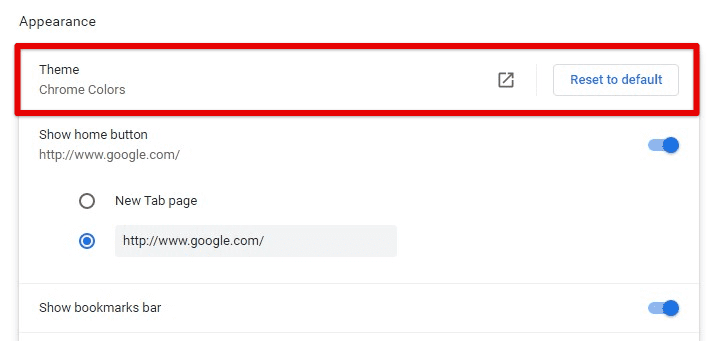
Customizing Chrome’s appearance
You can also customize the appearance of Chrome’s tabs by enabling or disabling the “Tab color” option. When this option is enabled, each tab will be colored based on the site’s favicon, making it easier to distinguish between different tabs that are opened simultaneously.
For users who want to go even further, a variety of custom themes are available in the Chrome Web Store. These themes can completely change the look and feel of your browser, from the color scheme to the icons used for various buttons and menus.
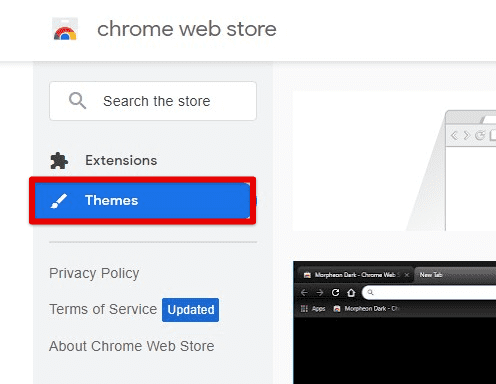
Themes section on Chrome Web Store
To apply a custom theme, navigate to the Chrome Web Store, search for “Chrome themes,” and select the one you like the most. Once a theme has been installed, it will automatically be applied to Chrome on the next launch.
Using Chrome flags
Chrome flags are experimental features that are hidden within Chrome’s settings. These features are not enabled by default but can be enabled to test new features or experimental functionality. However, allowing flags can sometimes lead to unexpected behavior or stability issues, so proceeding with caution is recommended when dealing with them.
To access Chrome flags, type “chrome://flags” into the address bar and press Enter. You can view, enable, or disable various experimental features from there.

Chrome experiments page
Some examples of Chrome flags include enabling dark mode, tweak JavaScript, or turn on web platform features. These flags can be helpful for developers or advanced users who want to test out new features or functionality before they are officially released in the next update.
Click the “Enable” button next to the flag name to enable a flag. After enabling a flag, Chrome must be restarted for the changes to take effect.
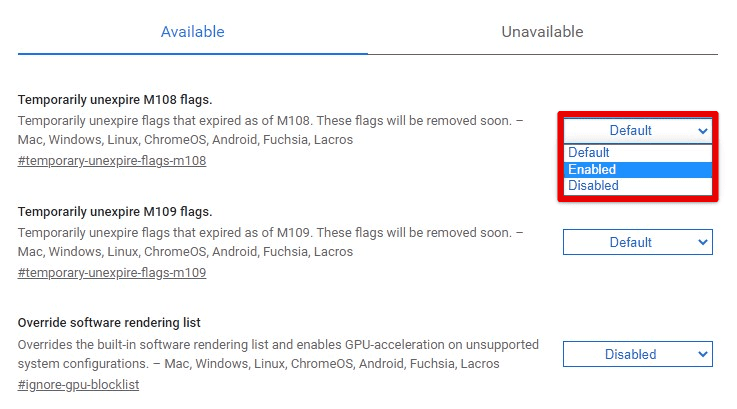
Enabling a flag on Chrome
It’s important to note that not all flags will work on all devices or platforms, and some may cause unexpected behavior. Therefore, only enable those you understand and are comfortable with, and be prepared to disable them if any issues arise.
Adjusting Chrome’s cache settings
Cache is a temporary storage location where the browser stores website data, images, and files to improve performance and reduce page load times. By adjusting Chrome’s cache settings, controlling how much storage space is used for this purpose and how long the cache data is retained is possible.
From the Chrome settings page, navigate to the “Privacy and security” section, and click “Clear browsing data.” In the “Basic” tab, users can select how much data they want to clear, including the cache.
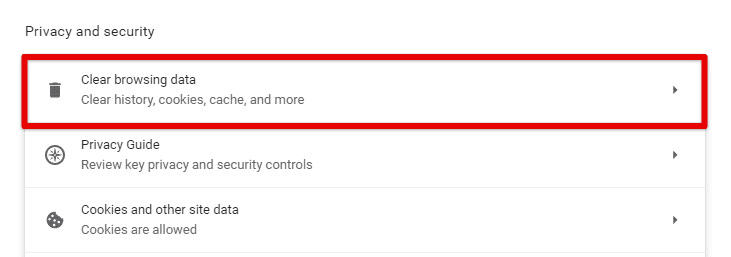
Clear browsing data tab
Click on the “Advanced” tab in the “Clear browsing data” dialog box. When clearing cache and other browsing data, you can select the time range and what to include or exclude.
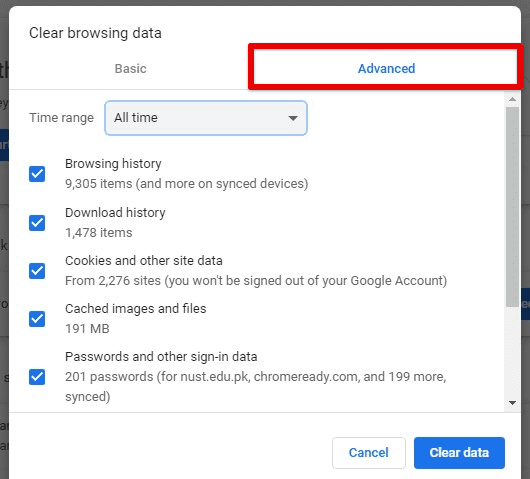
Advanced precise browsing data settings
Depending on the requirements or local hardware limitations, you can choose to allow more or less storage space. By default, Chrome uses up to 10% of the available storage space on the user’s device for the cache. However, it can be significantly increased or decreased, as desired. Also, by default, Chrome retains cached data for 7 days. This can also be adjusted to a shorter or longer period or even disabling caching entirely.
Chrome caches data on your hard drive, such as photos and web pages, to allow faster access when you return to the same pages or pages with the same components. Here is how you can clear cache and cookies in Google Chrome.
Customizing keyboard shortcuts
Chrome’s keyboard shortcuts may be customized to suit your needs and workflow better. By customizing keyboard shortcuts, you can perform everyday tasks more quickly and efficiently without navigating menus or using the mouse.
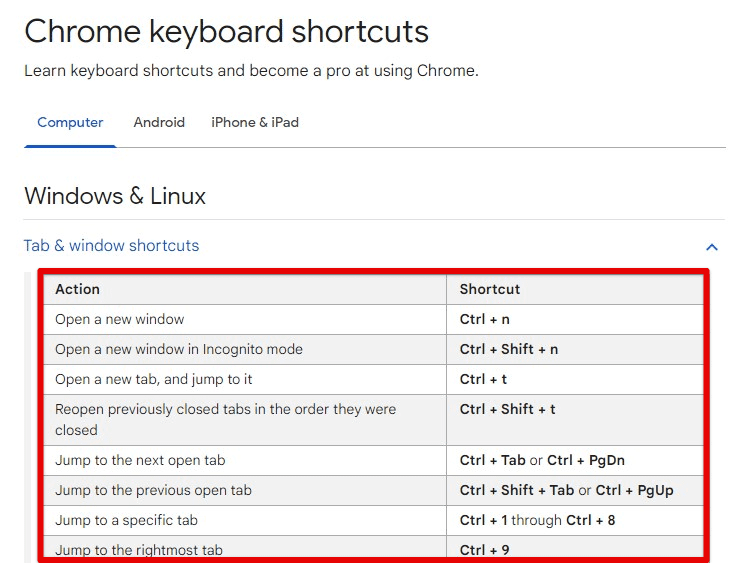
Google Chrome keyboard shortcuts
In the “Keyboard shortcuts” section, view a list of all the available keyboard shortcuts in Chrome and their default key combinations. To customize a shortcut, click the “Edit” button next to it.
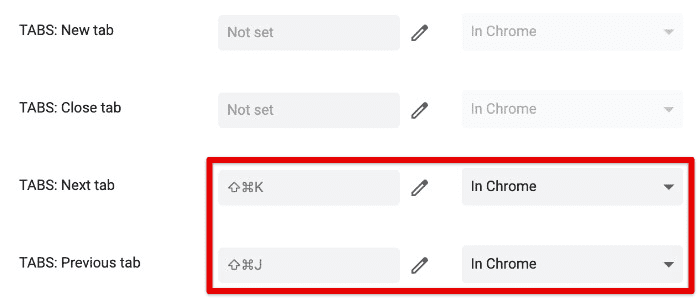
Customizing keyboard shortcuts
Enter a new key combination for the shortcut, or choose from a list of pre-defined combinations. Choose which type of shortcut to use, such as a global shortcut that works across all tabs or a tab-specific combination that only works in the current tab only.
Some common keyboard shortcuts that you may want to customize include:
Opening a new tab: By default, you can open a new tab by pressing “Ctrl + T” (Windows) or “Command + T” (Mac). However, one may prefer a different key combination that is easier to reach.
Switching between tabs: It is possible to switch between currently opened tabs with “Ctrl + Tab” (Windows) or “Command + Option + Right Arrow” (Mac). Still, many users need to customize this to suit their job-specific workflows better.
Closing a tab: The default shortcut for closing a tab is “Ctrl + W” (Windows) or “Command + W” (Mac). However, many would like to disable this shortcut to avoid accidentally closing important tabs.
Conclusion
Customizing Chrome browser settings can significantly improve its performance, privacy, and security and enhance the user’s overall browsing experience. In this article, we covered different sections that outlined how users can customize these settings for optimal performance.
We started with the basics of understanding Chrome, then moved on to startup settings, configuring privacy and security, managing and optimizing extensions, customizing Chrome’s appearance, using experimental flags, adjusting cache settings, and changing the default keyboard shortcuts. You can take full advantage of these features and capabilities to enjoy a faster, safer, and more efficient internet browser.
