Today, I’m excited to share a comprehensive guide on one of the most fundamental yet crucial skills you’ll need for your Chromebook journey: copying and pasting. Whether you’re compiling research, working on a project, or simply sharing information with friends, mastering copy and paste can significantly streamline your workflow. So, let’s dive in!
Understanding the basics
Copying and pasting on a Chromebook is not vastly different from doing so on other platforms, but there are some nuances worth noting. At its core, the function allows you to duplicate text, images, or files from one location and place them in another. This basic skill, while simple, plays a pivotal role in efficient digital navigation.
How to Copy and Paste in Chromebook
We will look at how you can copy and paste texts, documents, folders, images, Terminal commands and output, and much more. We will focus on two main utilities, the Keyboard and the Chromebook touchpad/mouse. Before getting started, let’s first understand how you can right-click on a Chromebook.
How to right-click in Chromebook
Chromebooks differentiate themselves from other laptops by featuring a unique touchpad design; they possess a single button that functions primarily as a left-click. This simplicity, while sleek, may initially puzzle newcomers accustomed to separate buttons for left and right-click actions. Fortunately, there are three intuitive methods to execute a right-click on a Chromebook, ensuring users can easily access contextual menus and additional options.
The first and most user-friendly method involves a two-finger tap directly on the touchpad. This gesture is designed for ease and speed, offering a seamless way to right-click. Alternatively, users can achieve a right-click by pressing the Alt key while performing a single tap on the touchpad, a method that combines keyboard and touchpad interaction for precision. Lastly, for those who prefer the traditional mouse setup, connecting an external mouse through the Chromebook’s USB port instantly enables the conventional right and left-click functions, catering to diverse user preferences and enhancing the Chromebook’s versatility.
1. Copy and Paste text selections
Step 1: To copy the text, you first need to select it using the cursor or Keyboard. To select using the cursor, click and hold at the beginning of the text and drag. In word documents and text editors, you can select the entire text using the keyboard combination Ctrl + A.
Step 2: Once selected, we can now copy the text using the keyboard combination Ctrl + C. Alternatively, you can right-click on your Chromebook to open the menu. Select the Copy option.

Copy Text
Step 3: To paste the text, use the keyboard combination Ctrl + V. Alternatively, right-click and select the Paste option from the list.

Paste Text
Note: The copied text will remain in the clipboard unless it’s overwritten with another Copy action. You can, therefore, paste it multiple times without the need to select and copy again. Also, the Chrome OS saves the text formatting to clipboard. If you copy a bold text, it will come with a bold format when you paste in word.
2. Copy and paste files and folders
You can Copy and Paste media files, applications, text documents, and folders easily with Chrome OS.
Step 1: You need to select the particular file(s) and folders you want to copy. Suppose it’s a single file, single-click on it. To select multiple files in order, click and hold on the first file and drag to select other files. If you want to select all files in a folder, use the keyboard combination Ctrl + A.
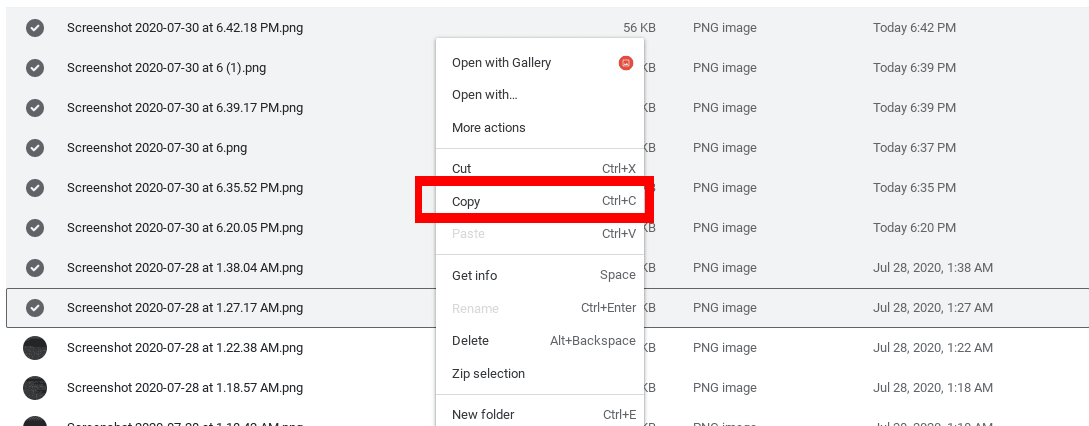
Step 2: Once selected, copy the files by pressing Ctrl + C. You can also right-click on the selected folder and choose the Copy option.

Copy Files
Step 3: To paste, use the keyboard combination Ctrl + V. Alternatively, right-click on the destination folder and select the Paste option.

Paste Files
3. Copy and Paste on the Terminal
If you have installed Linux (Beta) on your Chromebook, you should see the Terminal among the installed applications. To copy and paste on the Terminal, the standard Ctrl + C and Ctrl + V keyboard combination will not work alone. We will need to include the Shift key. That is because the Ctrl + C and Ctrl + Z combination are commands used to cancel running Terminal operations.
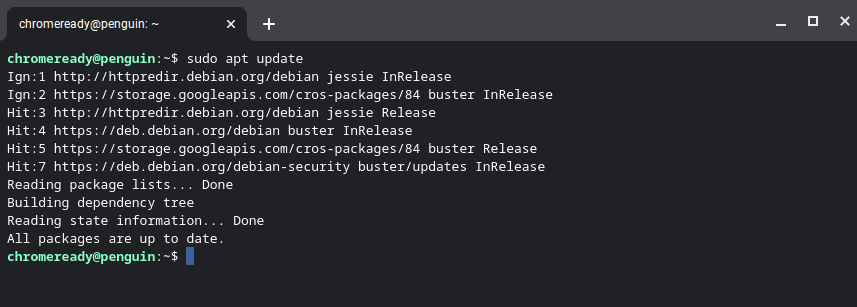
Step 1: To Copy terminal content, all you need to do is select it by clicking and hold at the beginning of the text and drag. That’s it! You don’t need to use a keyboard combination like Ctrl + C. However, if that doesn’t work for you, once you have selected the content, use the combination Ctrl + Shift + C to copy.

Terminal
Step 2: To paste on the Terminal is much simpler. Right-click anywhere on the Terminal. This action will paste your copied content. Alternatively, use the combination Ctrl + Shift + V to paste.
4. Copy and paste images from the internet
There are times where you need to use images from the internet in your documents and presentations. Let’s look at how you can copy and use these images.
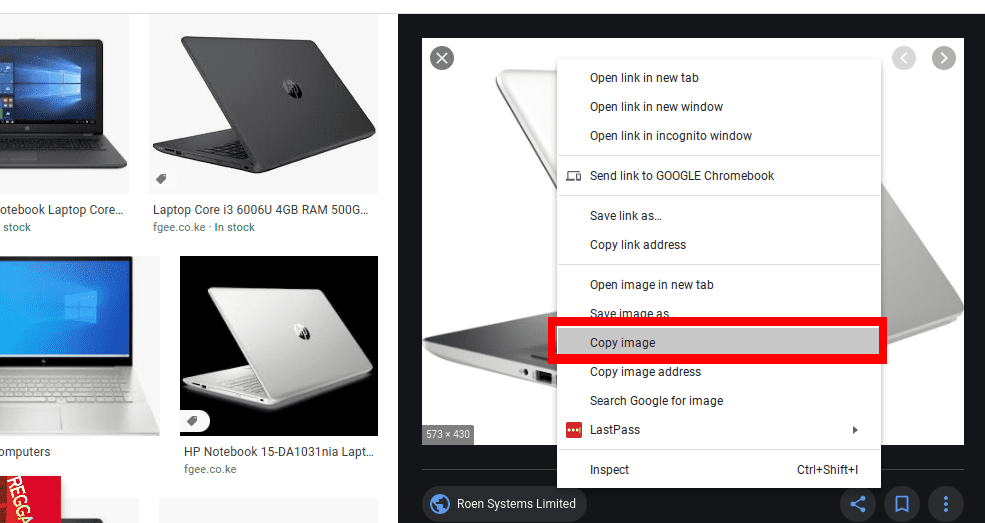
Step 1: Right-click on the image and select the copy option.

Copy image
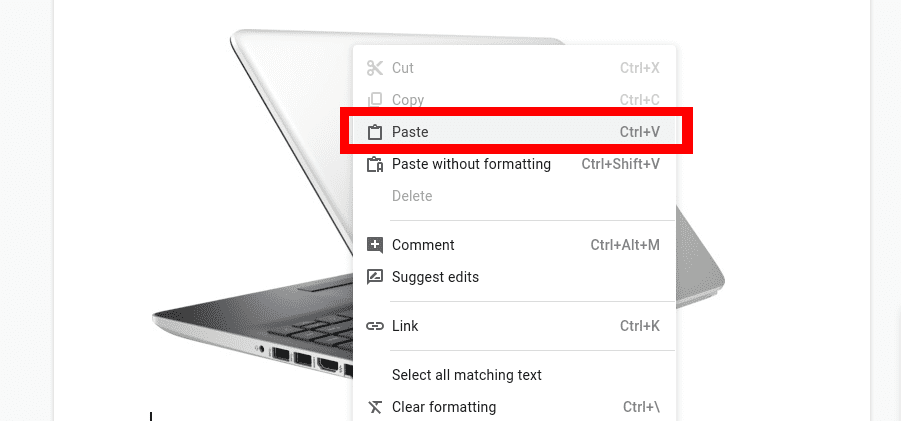
Step 2: Navigate to the document where you want to paste the image. Right to click and select the Paste option from the pop-up menu.

Paste Image
That’s it! Those are four ways you can apply when performing copy and paste actions in a Chromebook.
Tips for efficient copying and pasting
- Use keyboard shortcuts for speed: Learning the keyboard shortcuts for copy (
Ctrl+C) and paste (Ctrl+V) can significantly speed up your workflow. - Utilize the clipboard history: Chromebooks support clipboard history, allowing you to access multiple items you’ve copied. Press
Search+Vto open the clipboard manager. This is a game-changer for multitasking and complex tasks. - Practice with different content types: Experiment with copying and pasting text, images, and files to get comfortable with the process across various applications and websites.
Conclusion
Mastering the copy and paste function on your Chromebook can enhance your productivity and make your digital life much more convenient. While it may seem like a basic skill, its applications are vast and can support a wide range of tasks. Personally, I’ve found that becoming proficient in these shortcuts and methods has allowed me to work more efficiently, whether I’m researching, creating content, or simply organizing my files.
