Chromebooks come loaded to the brim with accessibility tools and features, making it possible for these sleek devices to stand out from the competition. They run the Android-oriented Google Play Store and have other tools to help them work closely with Android devices, such as Nearby Share, for seamless shareability.
However, if you’d like to take things up and would love to learn how to mirror your Android phone to a Chromebook, you’ve come just to the right place. In this guide, we’ll talk about not just one but two different ways of successfully establishing a mirror connection. So keep on reading until the end for the best results.
- Recommended read: How to connect to Remote Servers using SSH on your Chromebook.
Mirroring an Android phone to a Chromebook
As it turns out, multiple methods are available to ChromeOS users to mirror an Android device to the operating system. However, for this guide, we’ll only highlight the best ones that do the job commendably.
We recommend following each listed technique to determine your best option after some good, old trial-and-error. So, with that being said, let’s dive right into the first method with no further ado.
Option #1. Using Vysor to mirror an Android phone to ChromeOS
The first option we’d like to focus on pertains to a Play Store app called Vysor. This dedicated software is built to mirror Android phones to Chromebooks, thereby comprising an easy-to-grasp user interface and simple controls to help users get the job done.
Thanks to the app’s innate ability to replicate the screen of an Android phone on a Chromebook, it’s possible to negate other, far more complicated options, such as using an emulator to achieve the purpose at hand. The application has received over 1 million downloads on the Google Play Store and judging from the reviews, Vysor is pretty convenient.
The app’s premium version features exciting tools like going full-screen, recording your screen, and more. However, if your concern stands with basic screen mirroring, the free version of Vysor will do.
Since the process of mirroring is pretty time-consuming, we’ll break the forthcoming instructions down into multiple subheadings so that you can follow the procedure painlessly.
Installing Vysor on both the Android phone and Chromebook
To set up mirroring with the application, you first need to install Vysor on your Android phone. Feel free to use this direct link straight to its official app page. Once you’re there, follow the on-screen instructions to download and install the program on your Android device.
Vysor requires you to enable USB debugging on your Android device to further the process. This will reside in the “Developer settings” on your phone. If you haven’t tried doing it before, it’s worth looking up a tutorial online, such as this one, and understanding the working steps of the process.
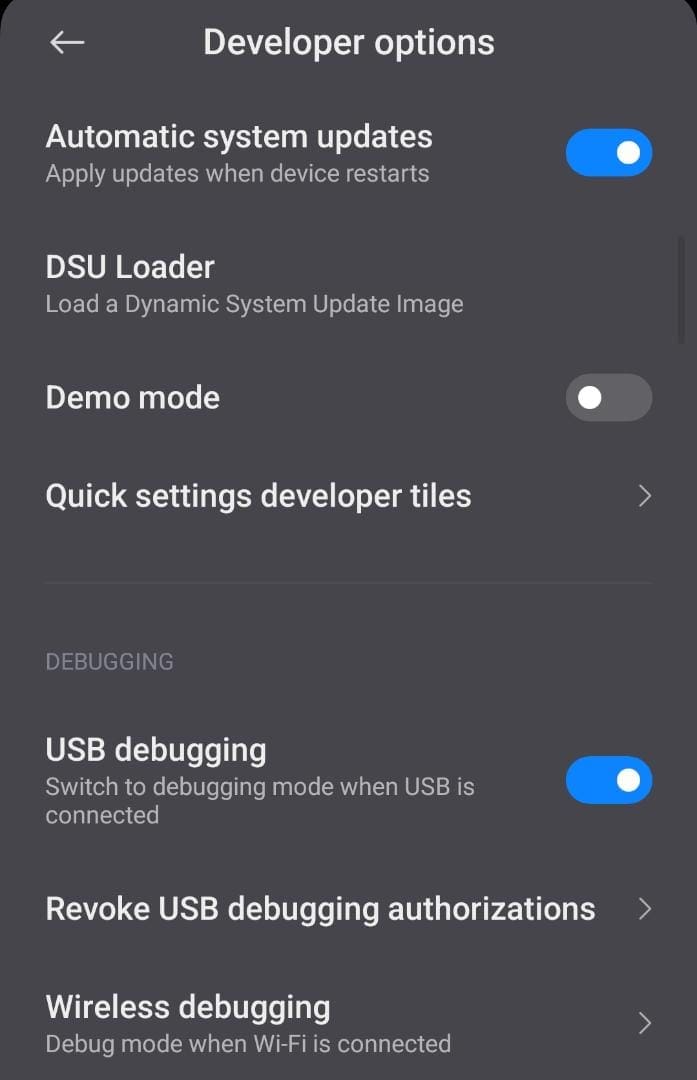
Enabling USB debugging in the “Developer” options
After you’ve taken care of the latter, it’s time to turn to your PC now. We’ll install the Vysor app from the Chrome Web Store so the two ends- your Chromebook and Android phone- can be hooked up. Next, head over to the main Vysor app page on the Web Store and download the application from there.
As you can comprehend, Vysor has made quite several rounds on the famous Chrome extension-installing platform. It’s been downloaded more than 5,000 times and comes from a well-reputed developer. As you click on “Add to Chrome” after landing on the installation page, you’ll need to confirm the download from a subsequently appearing prompt as well.

Adding Vysor to Chrome
Connecting the Android phone to Chromebook via USB
With both ends of the equation ready to move forward, you must grab a USB to connect your Android phone and Chromebook. The type of USB will depend on the port that both your Android and Chromebook have, whether that’s a Type-C or another variant. Please assess the port carefully and use a compatible USB to further the process.
Following Vysor’s instructions to set up mirroring
After connecting your Android phone to the Chromebook, open the Vysor app and tap “Next.” You’ll shortly see the “All set here” message, and the app will instruct you to open the Vysor app on your Chromebook.
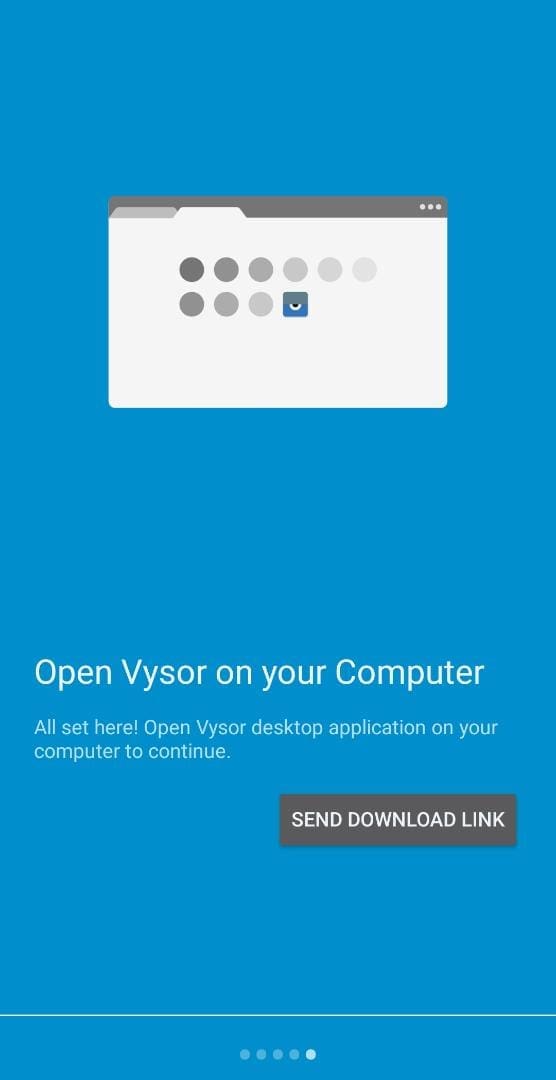
Vysor all set up on the Android phone
Turn to the Vysor app installed via the Chrome Web Store on your Chromebook now. As soon as you open it up, it’ll ask you to click on the link displayed in the window. Do that to get to the next step.
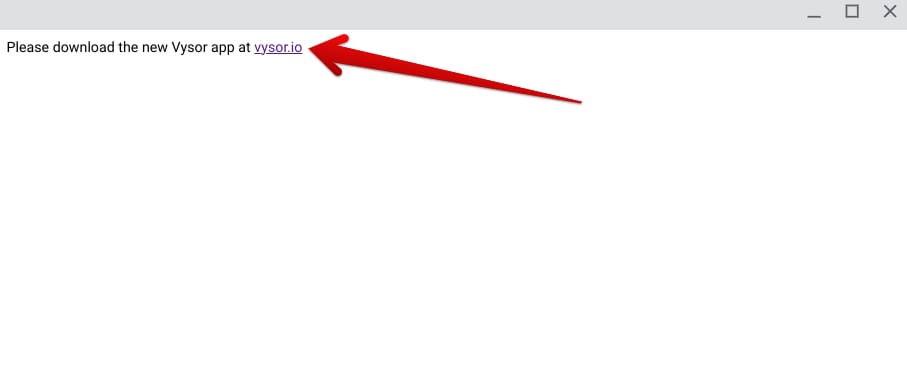
Clicking on the relevant link
A page will start loading in Chrome, taking you straight to the Vysor website. Select ” Browser ” below the “Download Vysor” section. Doing so will take you to the next step.
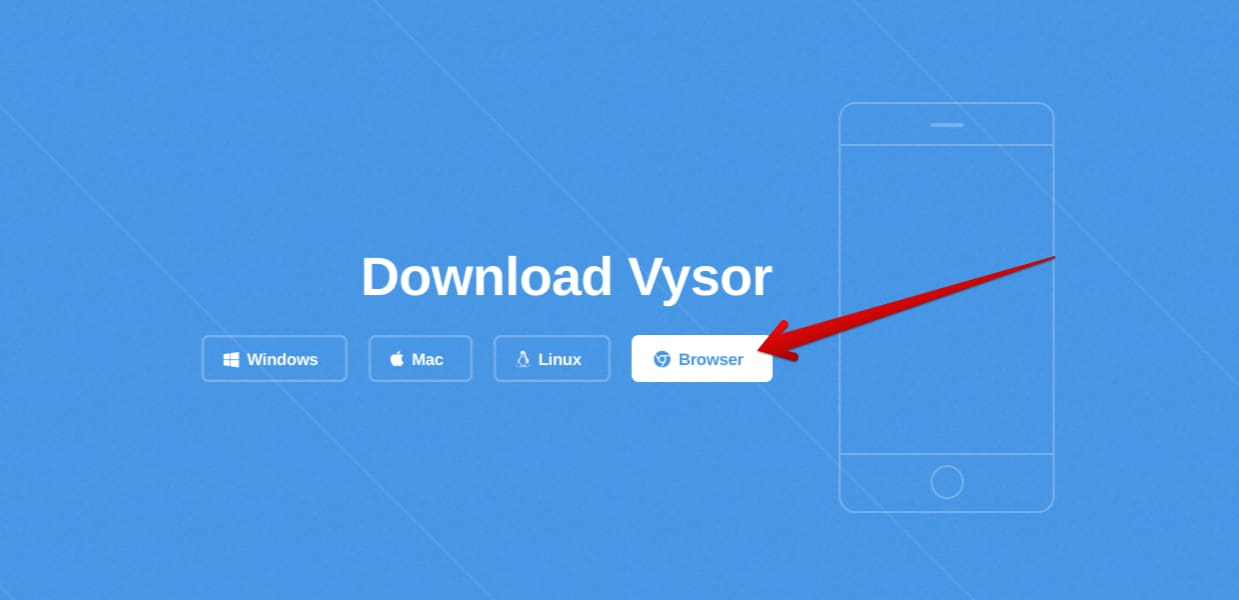
Clicking on the “Browser” option
Another page will load up, and you’ll be prompting the Vysor application to establish a connection with your Android phone.
Get started by clicking on the “Connect USB” button, as shown in the screenshot below. Once done, a prompt will appear, allowing you to select the device connected to your Chromebook.
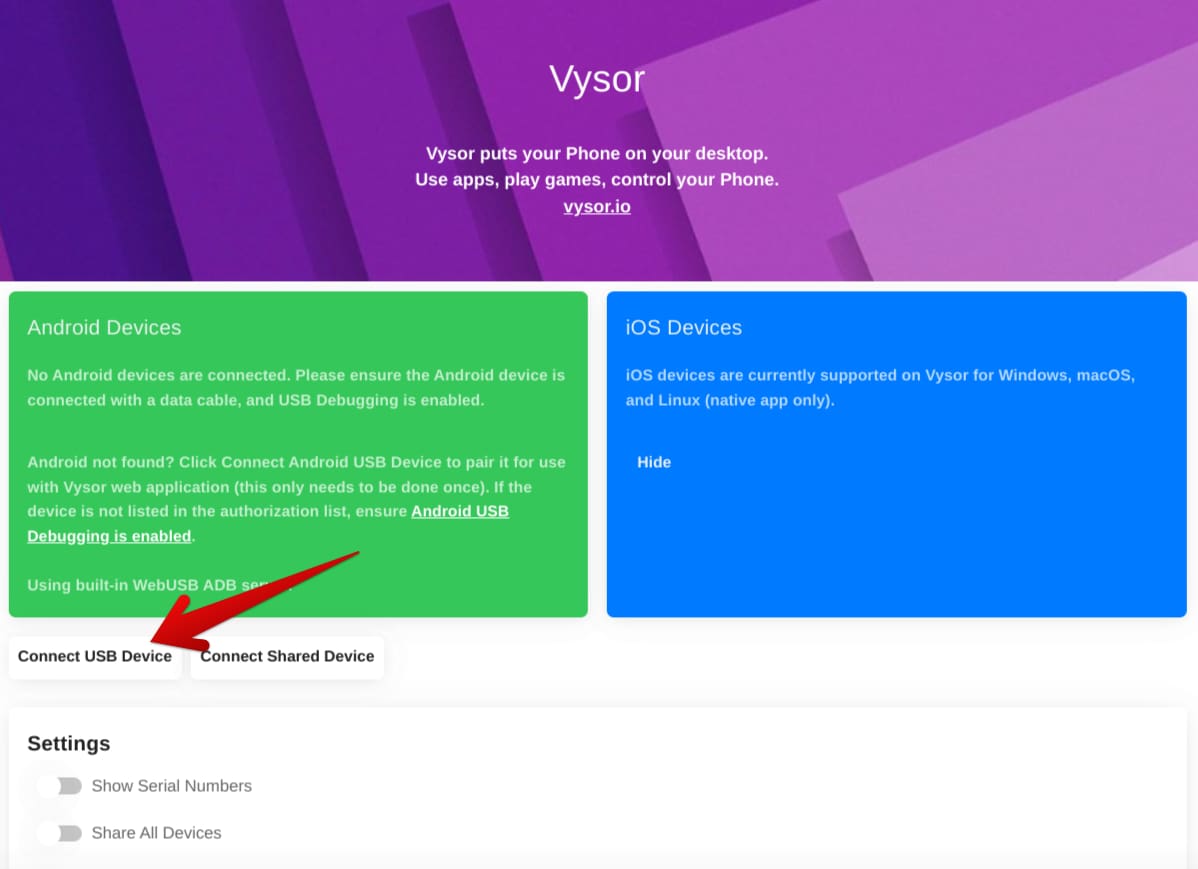
Clicking on “Connect USB” Device
We’re not entirely done yet. You still need to grant permission and ensure everything else is kicked in motion before the mirroring can occur. That said, we will proceed sequentially. Click on the “View Device” button to further the operation.

Clicking on the “View Device” option
You’ll be taken to another page on your Chrome browser. Here, the mirroring process will be topped off. At first, you’ll be required to confirm USB debugging on your phone. Say “yes” to the prompt on the Android device to continue.
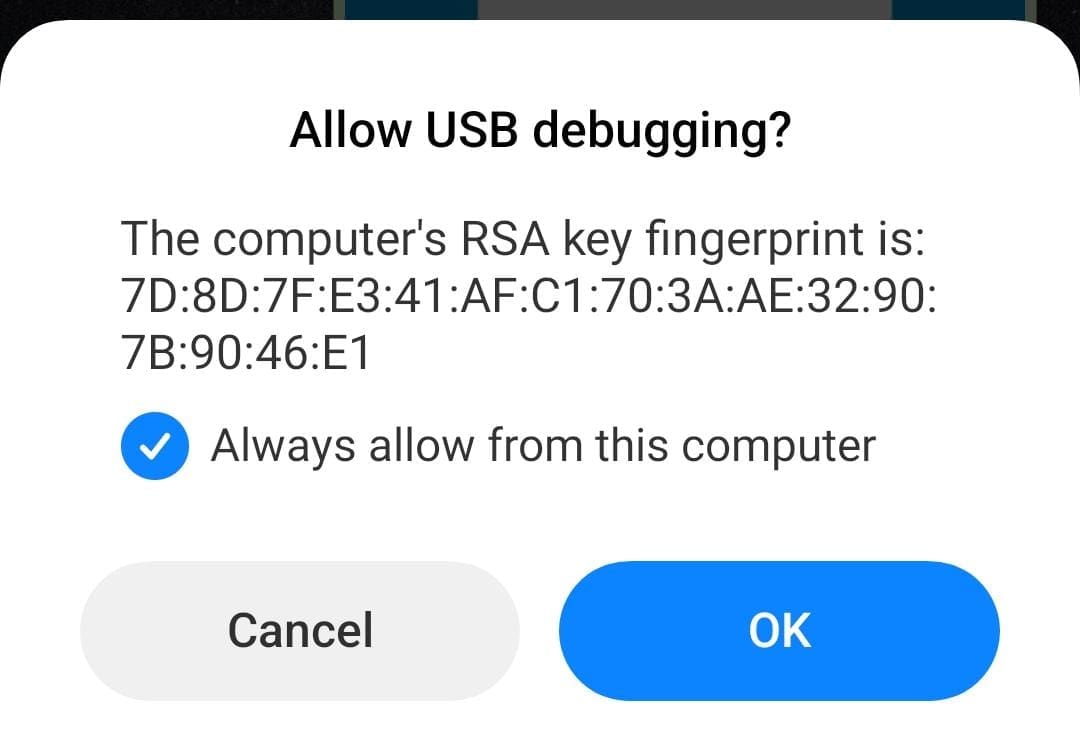
Allowing USB debugging on the Android device
Last, you must take care of your Android device’s “Install via USB” feature. Vysor on the web will prompt your device to install the latest, browser-ready version of the application, but it will require the “Install via USB” permission to follow through with that.
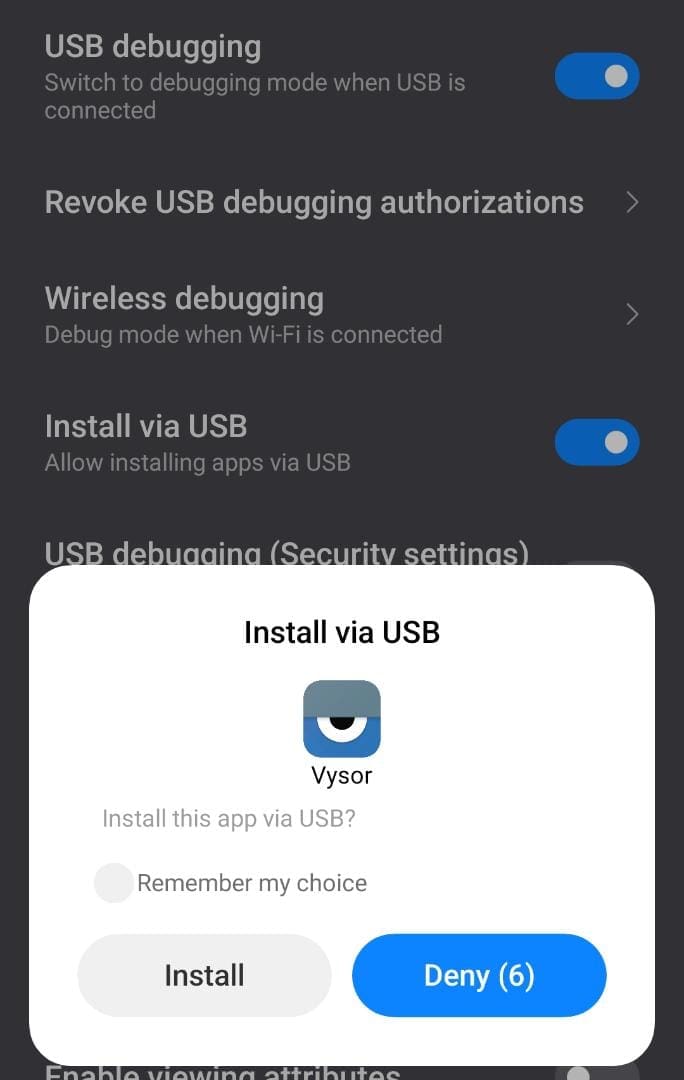
Installing Vysor via USB
That’s about it! As soon as you allow the installation of Vysor on your Android phone via USB, it’ll take a moment or two for the Android screen to pop up on your Chromebook. We’ll admit that the procedure was a bit lengthy, but it was nothing short of easy to follow.
In the image below, we’ve instructed the Vysor app to take a screenshot of the Android device. As you can understand, the mirroring process was a success.
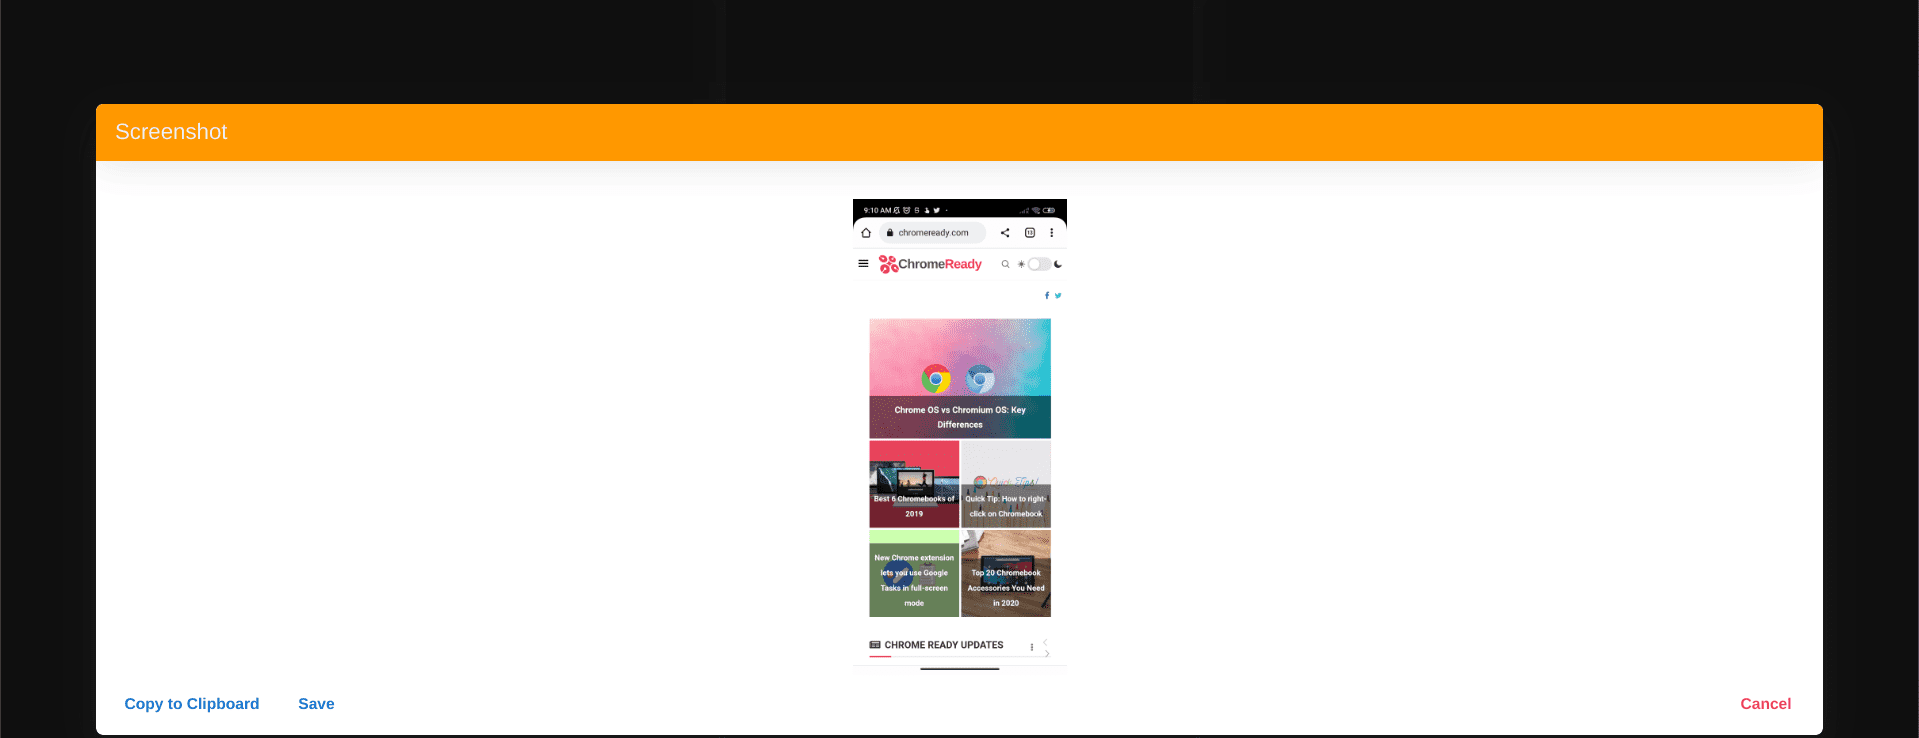
Android phone mirrored on a Chromebook
That was just one way of mirroring your Android phone to ChromeOS. In case utilizing Vysor couldn’t do the trick for you, we have other options available at your disposal as well. Feel free to look into those.
Option #2. Using AirDroid Cast for seamless mirroring
If there’s any free-to-use screen mirroring option that can help you hook up your Chromebook with an Android phone in the most seamless manner possible, it’s AirDroid Cast. We speak from personal experience because this software has made life easier since the day it came out. Let’s find out how.
Unlike Vysor, the procedure here is effortlessly simple. All you need to do is first head over to the AirDroid Cast website on your Chromebook, advance without creating an account, and use a “cast code” that they provide for your Android phone. Of course, the AirDroid Cast app will be needed to be installed on the Android device as well for the mirroring to be set up.
Once you get everything right, it’ll be smooth to mirror your Android phone to ChromeOS. We’ll leave step-by-step instructions to prevent you from running into any issues during the operation.
1. The first step is to visit the official AirDroid website using this direct link. Once you’re there, scroll down to find the AirDroid Cast section. Select the “Download” button beside it and choose “Web” to get to the next step.
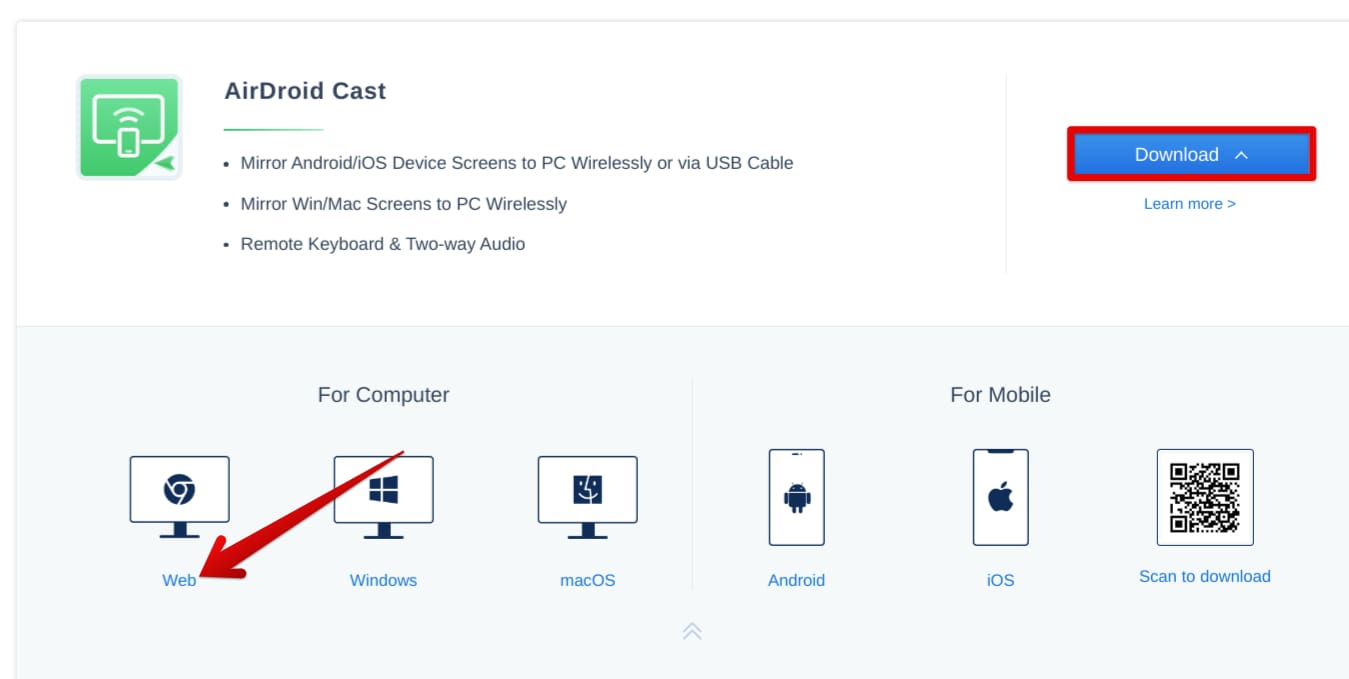
Choosing the “Web” option
2. Official AirDroid Cast Web handle page should now load. As iterated earlier, the app gets straight to the point—no need to sign up, pay a fee, sign up for a trial, or anything of the like.
Upon arriving at the page, you’ll be provided a “cast code” comprising 9 digits. In addition, there’s going to be a QR code as well for your convenience. You need to turn to your Android phone and install the AirDroid Cast application from the Google Play Store to continue. Use this link on the Android device to get straight to the app page.
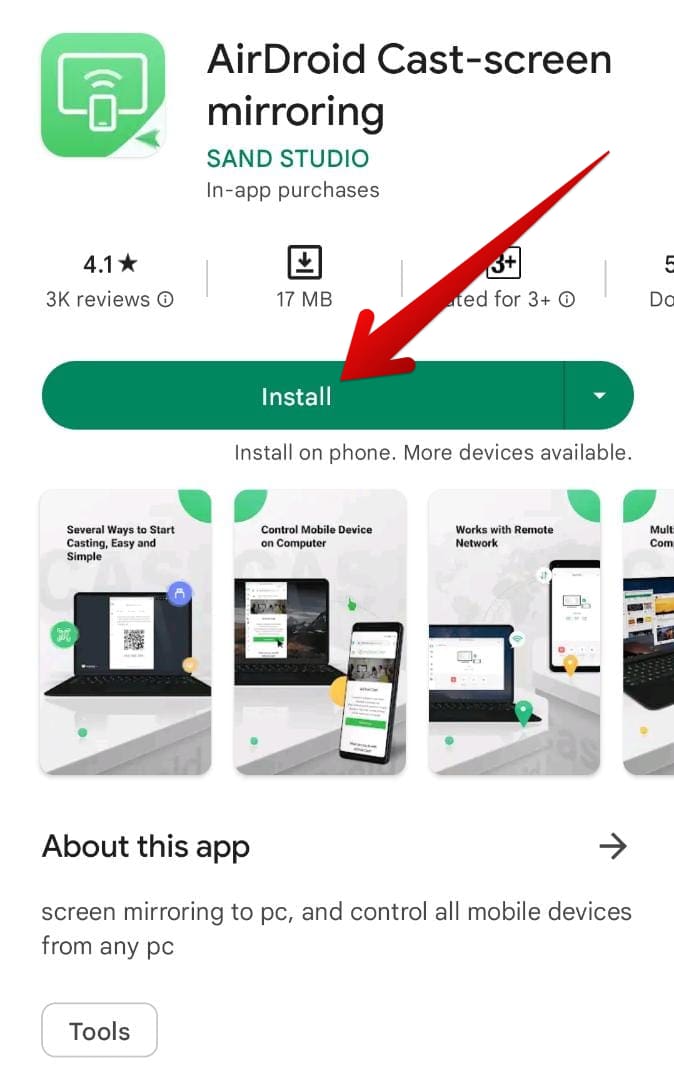
Installing the AirDroid Cast app on Android
3. Fire it up to get straight to its main menu. There, you will be given the option to enter the cast code to establish a successful mirror connection.
You should now grab the code sitting on the AirDroid Cast Web page on your Chromebook. Although you can enter the code manually, we prefer using the QR code method, which is undeniably the fastest way to get things going.
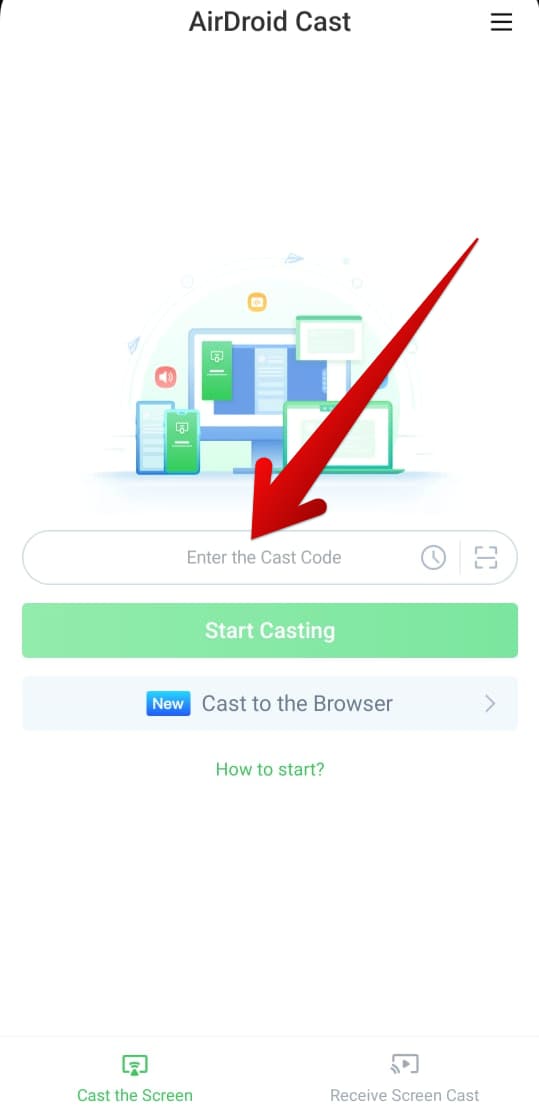
Entering the cast code
4. The AirDroid Cast Web handle will ask for permission before it can move ahead. Click on the “Allow” button to ensure that the casting procedure is green-lit from the side of your Chromebook.
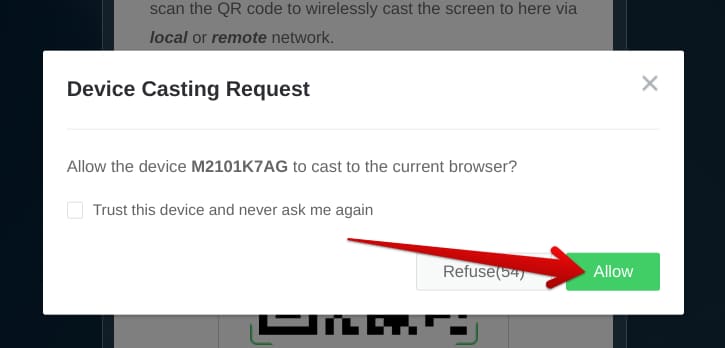
Granting the permission to cast
5. You’ll also need to allow the screen casting function on your Android phone. These steps will take place simultaneously, more or less, so you’ll be winding up the procedure hurriedly. Select the “Start now” button or anything similar before casting your screen to ChromeOS.
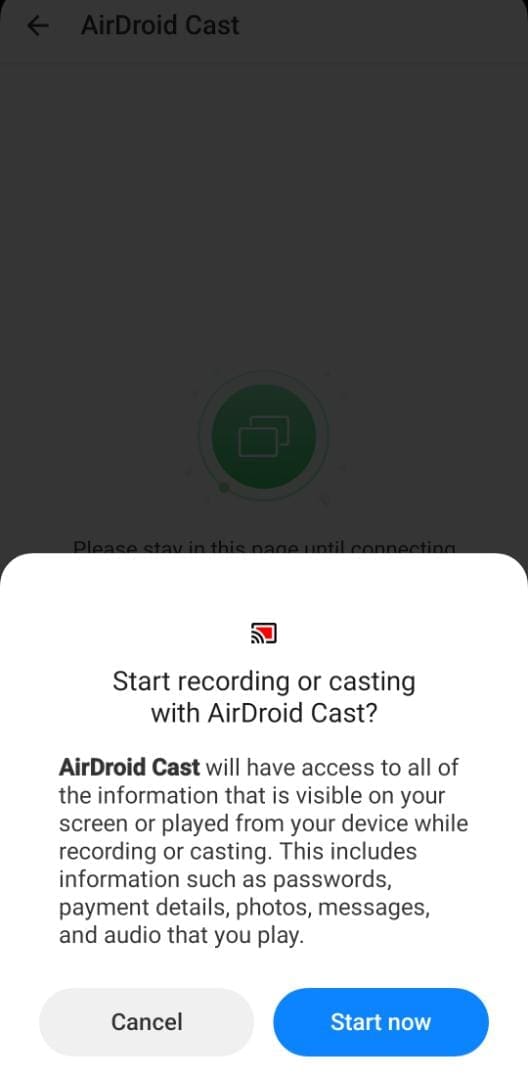
Allowing to cast the screen on Android
6. That’s about it! The screencast will begin immediately. The app recommends you disable the battery-saver option on your Android phone to ensure even more smoothness as the screen gets mirrored to your Chromebook.
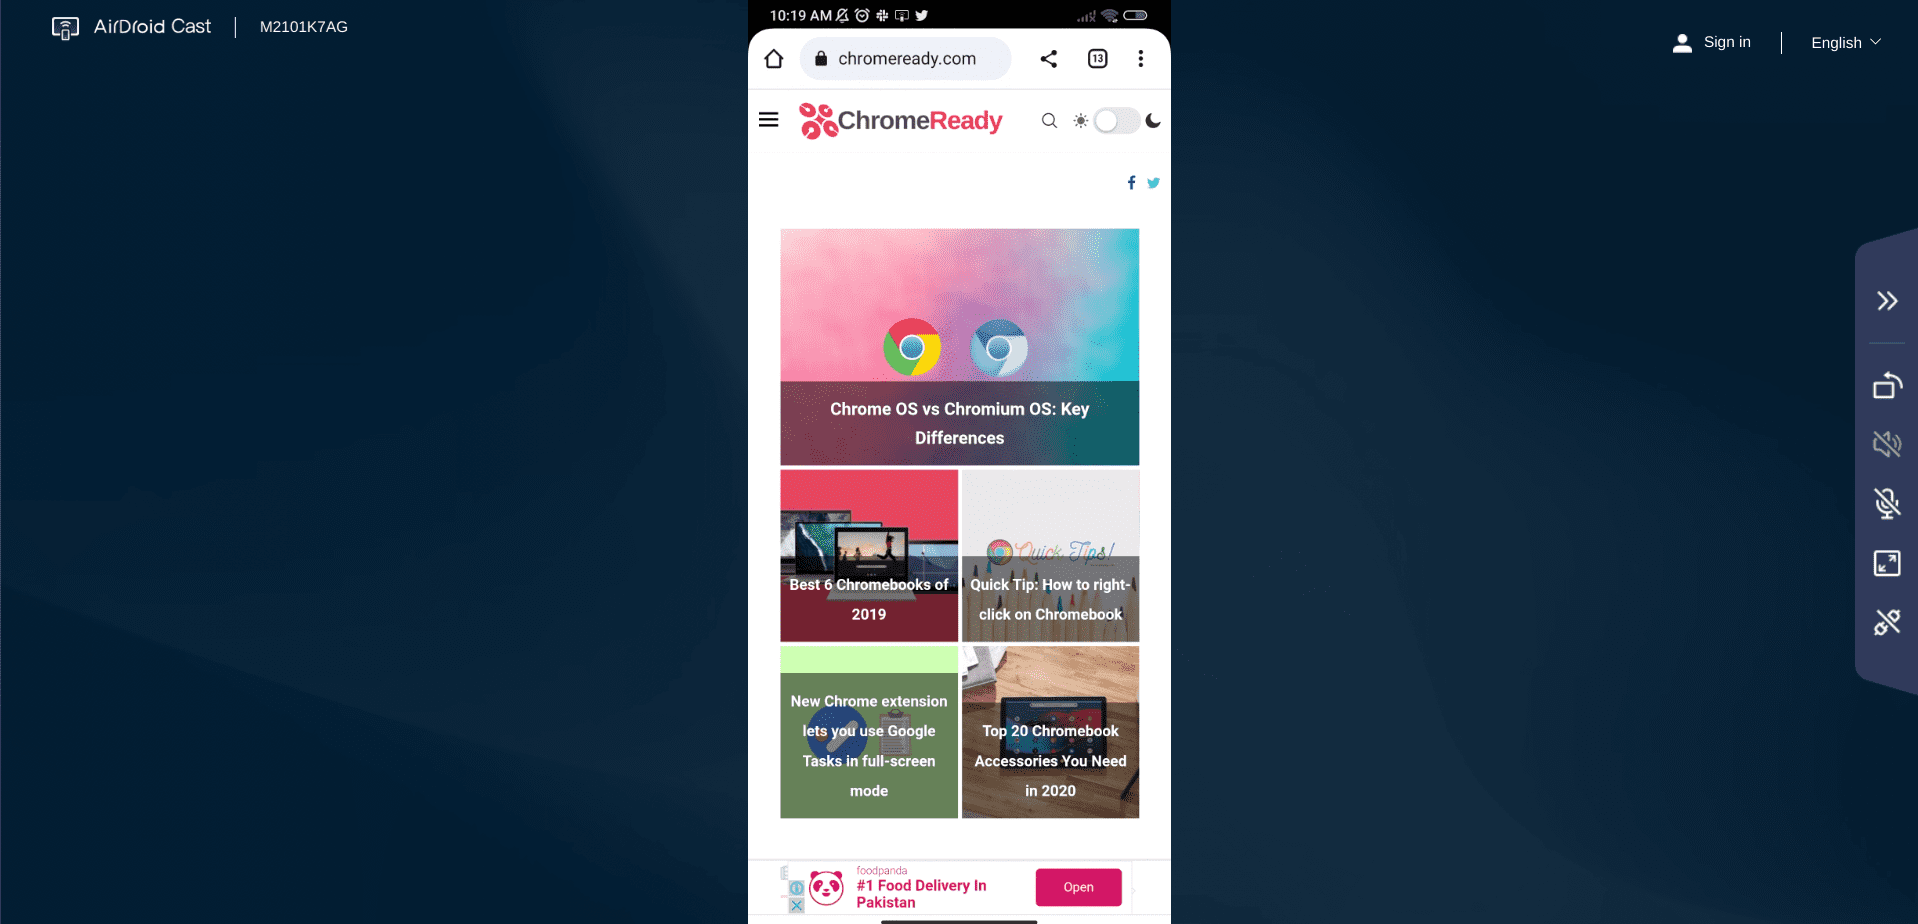
Screencast successful via AirDroid Cast on ChromeOS
The side panel to the right side of the screen features interesting tools to revamp your Android screen mirroring experience. For starters, you can rotate your screen, enable or disable the microphone, toggle the sound, and even try out the full-screen mode if you get into the mood for streaming Netflix or Amazon Prime Video.
As we’ve now detailed both methods of mirroring your Android phone on a Chromebook, it’s about time we conclude this write-up.
Conclusion
We’ve highlighted highly workable ways that make it possible to mirror an Android phone to a Chromebook. In our opinion, Vysor is a reliable option that works like a charm every time you set it up and proceed with it. Please let us know in the comments section if you found the guide helpful.
As always, Chrome Ready wishes you good luck!
- Another worthwhile read: How to get full battery alerts in Google Chrome.
