Google Docs is a powerful word-processing tool that allows users to create and edit documents online. One of the lesser-known features of Google Docs is its built-in drawing tool, which allows users to create and insert drawings directly into their documents. This feature is handy for creating diagrams, flowcharts, and other visual aids to supplement written content. This article will take a detailed look at how to use the drawing tool in Google Docs, from setting it up to creating professional-looking drawings.
We will cover basic drawing techniques, advanced features, and tips for collaborating with others on your drawings. By the end of this article, you will be able to create beautiful and effective drawings that enhance your documents and help you communicate your ideas more effectively. Have you been using MS Word previously? Here is how you can open an office word document with Google Docs.
Setting up the drawing tool on Google Docs
Setting up the drawing tool in Google Docs is a simple process that can be completed in just a few steps. Follow these instructions to get started:
Step 1: Open a new or existing document in Google Docs.
Step 2: Click on the “Insert” menu at the top of the screen.
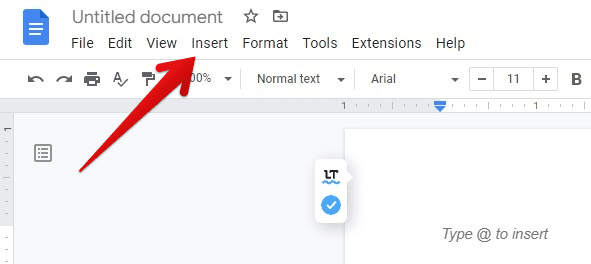
Insert menu
Step 3: From the drop-down menu, select “Drawing.”
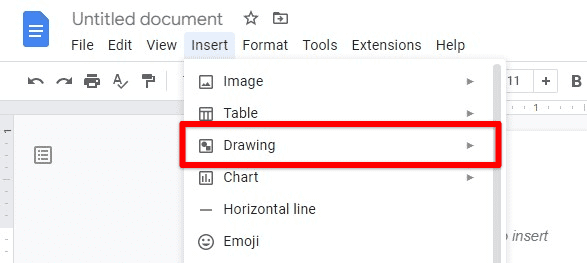
Selecting drawing from the drop-down menu
This will open the drawing tool in a new window. You should see a toolbar on the left side of the screen with various drawing and editing tools.
Step 4: To start a new drawing, click on the “New” button in the side menu of the drawing tool.

Starting a new drawing
Step 5: If you wish to insert an existing drawing into your document, click on the “Open” button in the side menu, then select the drawing you want to insert from your Google Drive or your computer.

Inserting an existing drawing
Step 6: Once you have a new drawing open, you can start drawing by selecting a tool from the toolbar on the top of the window and clicking and dragging it on the canvas.

Drawing canvas
Step 7: To save a drawing, click on the “Save and Close” button in the upper right corner of the drawing tool window.
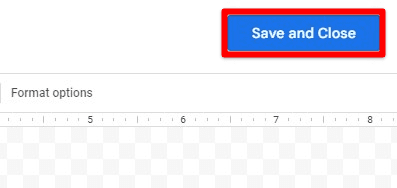
Save and close button
Step 8: To insert the drawing into your document, click on the “Save and Close” button in the drawing tool window. The drawing will be inserted into your document at the location of your cursor.
Now, you have successfully set up the drawing tool in Google Docs. You can start creating your drawings and inserting them into your documents to enhance their visual appeal. There is also an option to add captions to images inserted in a document uploaded to Google Docs. You can use it to improve the quality of the text even further.
Basic drawing techniques
Once you have set up the drawing tool in Google Docs, it’s time to start creating your drawings. Here are some basic drawing techniques to help you get started:
Freeform drawing: Use the “Pencil” tool to draw freeform lines and shapes. Simply select the tool from the toolbar on the left side of the screen and click and drag on the canvas to create your drawing.
Straight lines: Use the “Line” tool to create straight lines of various lengths and angles. Select the tool from the toolbar and click on the canvas to set the starting point of your line. Then, click and drag to set the endpoint of your line. Release the mouse button to create the line.
Shapes: Use the “Shapes” tool to create basic geometric shapes such as circles, squares, and triangles. Select the tool from the toolbar and click and drag on the canvas to create the shape. You can also use the “Rectangle” and “Oval” tools to create more precise shapes.
Text: Use the “Text” tool to add text to your drawings. Select the tool from the toolbar and click on the canvas to set the location of your text. A text box will appear where you can type your text. Use the formatting options in the toolbar to change your text’s font, size, and color.
Color: Use the “Color” tool to change the color of your lines, shapes, and text. Select the tool from the toolbar and choose a color from the color palette that appears. You can also use the color picker to select a specific color.
Eraser: Use the “Eraser” tool to erase mistakes or unwanted parts of your drawing. Select the tool from the toolbar and click and drag over the areas you wish to erase.
Using these basic drawing techniques, you can create simple and effective drawings to enhance your documents. As you become more comfortable with the drawing tool, you can experiment with more advanced features and techniques to create more complex and professional-looking drawings.
Advanced drawing features
As you become more comfortable with the drawing tool in Google Docs, you may want to explore some of its more advanced features. Here are some advanced drawing features that can help you create more complex and professional-looking drawings:
Layers: Use the “Layers” feature to organize your drawings and make editing easier. Layers allow you to separate different parts of your drawing into separate layers, which can be edited and moved independently. To access the Layers feature, click on the “Layer” button in the toolbar, and a new window will appear.
Transparent fills: Use the “Transparent fills” feature to create shapes with transparent fills. This can be useful for creating diagrams or flowcharts with multiple layers. To use this feature, select the shape you want to modify and go to the “Format options” in the toolbar. Then you can adjust the transparency of the fill color.
Connectors: Use the “Connectors” feature to link different shapes in your drawing. This can be useful for creating flowcharts or diagrams. Select the “Connectors” tool from the toolbar to use this feature, then click on the shapes you want to connect. A line will appear between the two shapes. You can also adjust the style of the connector and its endpoint.
Image import: Use the “Image import” feature to import images from your computer or the internet and add them to your drawing. To use this feature, click on the “Insert” menu at the top of the screen, then select “Image” from the drop-down menu. You can then choose an image of your computer or enter a URL to import an image from the internet.
Grouping: Use the “Grouping” feature to combine multiple shapes and elements. This can make it easier to move and edit various elements at once. To group elements, select them with your cursor, right-click and choose “Group”
Rulers and gridlines: Use the “Rulers” and “Gridlines” feature to align and position elements in your drawing. To access the rulers, click on “View” and select “Show ruler,” and to access gridlines, click on “View” and select “Show gridlines.”
With these advanced features, you can create more complex and professional-looking drawings to enhance your documents. Remember that some features may not be available in all versions of Google Docs.
Collaborating on drawings in real-time
Collaborating on drawings in real-time can be a great way to work on a project with others and get real-time feedback. Here is a step-by-step guide on how to collaborate on drawings in Google Docs:
Step 1: Open the document that contains the drawing you wish to collaborate on.
Step 2: Click on the “Share” button in the top right corner of the screen.
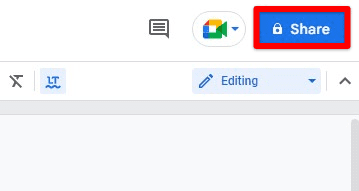
Share button
Step 3: In the share window, you can invite specific people by entering their email addresses or generate a link that can be shared with anyone.
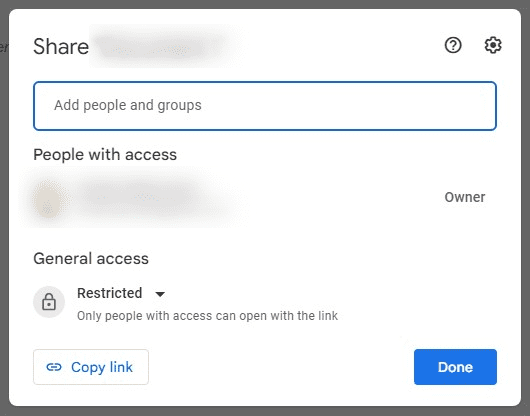
Share window
Step 4: Set the permissions of the people you invite, whether they can view, comment or edit.
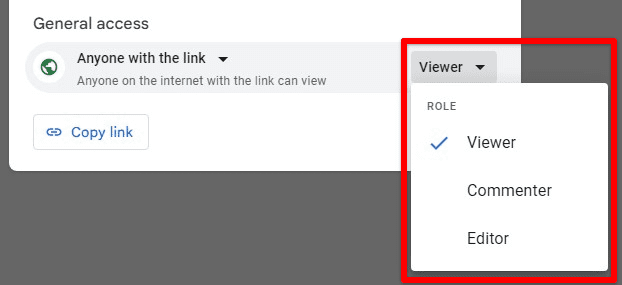
Setting permissions
Step 5: Click “Send” or “Save” to send the invitation or link.
Once the document is shared, anyone with access to the link or who was invited can view and edit the drawing in real time. You can see who else is viewing or editing the drawing by looking at the list of collaborators in the top right corner of the screen.
Step 6: To start collaborating, open the drawing tool by clicking on “Insert” and selecting “Drawing”
Step 7: When working with others in real-time, you will see the cursor of other collaborators and their changes in real-time. You can also communicate with them by typing in the bottom chat box on the screen.
Step 8: Once you are done working on the drawing, click on the “Save and Close” button in the upper right corner of the drawing tool window to save the changes.
By following these steps, you can easily collaborate on drawings in real-time with others, making it a great way to work on projects, brainstorm ideas, and get feedback.
Tips and tricks for creating professional drawings in Google Docs
Creating professional-looking drawings in Google Docs can take some practice and experimentation. Here are some tips and tricks to help you create polished and effective drawings:
Plan your drawing before you start: Before you begin drawing, take some time to plan out what you want to make. Sketch a rough idea of the layout and composition of your drawing on paper. This will help you create a more polished and well-organized final product.
Use layers: Layers can be a great way to organize your drawings and make editing easier. Use them to separate different parts of your drawing and make editing and moving elements easier.
Experiment with different styles and effects: Google Docs drawing tool offers a variety of tools, shapes, colors, and effects. Take some time to experiment with other options to find the best ones for your drawing.
Use gridlines and rulers: Use the gridlines and rulers feature to align and position elements in your drawing. This can help to create a balanced and polished composition.
Keep it simple: Simple drawings can be just as effective as complex ones. So keep your drawings simple and uncluttered to help them communicate your message more effectively.
Pay attention to the details: When creating a professional-looking drawing, it’s important to pay attention to the details. Use the eraser tool to clean up stray lines or smudges, and ensure that your text is legible and well-aligned.
Use appropriate colors: Use the right colors for your message and audience. Bright colors can be effective for grabbing attention, but too many bright colors can be overwhelming. On the other hand, a too-monochromatic drawing can be too dull.
Practice, practice, practice: Like anything, the more you practice, the better you will become at creating professional-looking drawings in Google Docs. Take some time to experiment with the different tools and features, and keep working on your drawings.
Conclusion
Google Docs is a powerful word processing tool that offers a built-in drawing tool that allows users to create and insert drawings directly into their documents. You can create diagrams, flowcharts, and other visual aids to supplement your written content. The process of setting up the drawing tool and creating drawings is relatively simple as well. This article covered a detailed guide on how to use the drawing tool, basic drawing techniques, advanced features, and collaboration with others on these drawings. Following these guidelines can create polished and effective drawings that enhance your documents and help you communicate your ideas more effectively. Are you a beginner at Google Docs? Learn how to add new words to the Google Docs dictionary.
