If you’re new to Google Docs, it can be pretty daunting to get the hang of things, despite the program’s utter ease of use and simple user interface. In this detailed guide, we’ll go over Google Docs’ most notable highlights while showing you how to use the program from top to bottom. There will also be a brief comparison with Microsoft Word at the end, so stick around for the ultimate learning material that this write-up will bring.
As far as word processors come and go, only a handful manages to stay and make a name for themselves. Google Docs is one such name that has taken over the world by storm ever since its initial promulgation in 2006. Since then, the software has received a lot of love from Google regarding consistent updates and feature additions. Today in 2023, Google Docs is one of the world’s most popular word processors that’s easy to use and widely available.
Without any further delay, let’s briefly introduce Google Docs and learn its fundamentals. Then, we’ll take things forward from there on out.
- Recommended article to go along with Google Docs: Your Ultimate Guide to Gmail Labels.
What is Google Docs?
Google Docs is a word processor by definition. This means that Docs is an application that allows you to write text and format it differently to meet certain use cases. It’s one of the reasons why word processors are also called text editors, mainly because of their core functionality that revolves around writing and editing text. There is no practical limit to the number of words you can write in Docs. It’s free to use and can be used on different devices.
That is to say, Docs is one of the world’s most widely available programs, alongside the rest of its counterparts, such as Google Sheets and Google Slides. It doesn’t matter if you have a Windows PC, Mac, Chromebook, or a mobile operating system such as Android or iOS—you’ll be able to use Docs as long as the device has an internet browser.
Speaking of internet browsers, there’s a term called “agnostic” in modern-day data computing. It refers to any software that can process information from multiple sources without breaking its functional effectiveness. Google Docs is agnostic in that sense as well. It can run on Brave Browser, Google Chrome, Safari, Opera, Mozilla Firefox, and other lesser-known web crawlers.
In addition to that part of Docs’ working capacity, it’s worth mentioning that Google has engineered all of its mainline business apps to be cloud-first, just like ChromeOS—Google’s very own computer operating system. In the wake of this proceeding, Docs boasts best-in-class cloud features where it actively saves your content as you produce it in the text editor. In this manner, it’s unlikely to lose any of your progress made in Google Docs, unlike other non-cloud word processors.
Another benefit of the program’s cloud-centric nature is that it lets you carry over your saved documents and everything of the like on all devices you can sign into with your Google account. A singular Gmail account will make it possible for you to access your Docs files across every platform without hassle. This is an exceptionally advantageous facet of this text editor’s cloud-first build.
Lastly, you should know that Google Docs is part of Google Workspace, the tech giant’s desktop suite of productivity applications spanning various apps. This platform was formerly known as G Suite, but the rebranding that occurred in 2020 changed the name to Google Workspace. Now, Docs is a major constituent alongside the likes of Google Drive, Google Slides, Google Sheets, Gmail, and Google Photos.
Enough of the theory; let’s now delve into the practical side of things. The section given ahead will explain Google Docs’ working interface and how to start with it.
How to get started with Google Docs
It’s plain and simple to fire up Google Docs and start working in the text editor immediately. Thanks to the widespread availability of software, it’s possible to use Docs on desktop and mobile. This article will cover the desktop edition of Docs. Still, we’re sure understanding it will significantly help you with the program’s Android and iOS iterations.
With that said, head to the official Google Docs website to begin using this direct link. As you land on the page, click the “Go to Docs” button to move forward. If you click on “Try Docs for Work,” the website will take you to a dedicated Workspace page where the pricing of the platform’s paid version will be discussed. You do not have to concern yourself with that to get started with Google Docs.
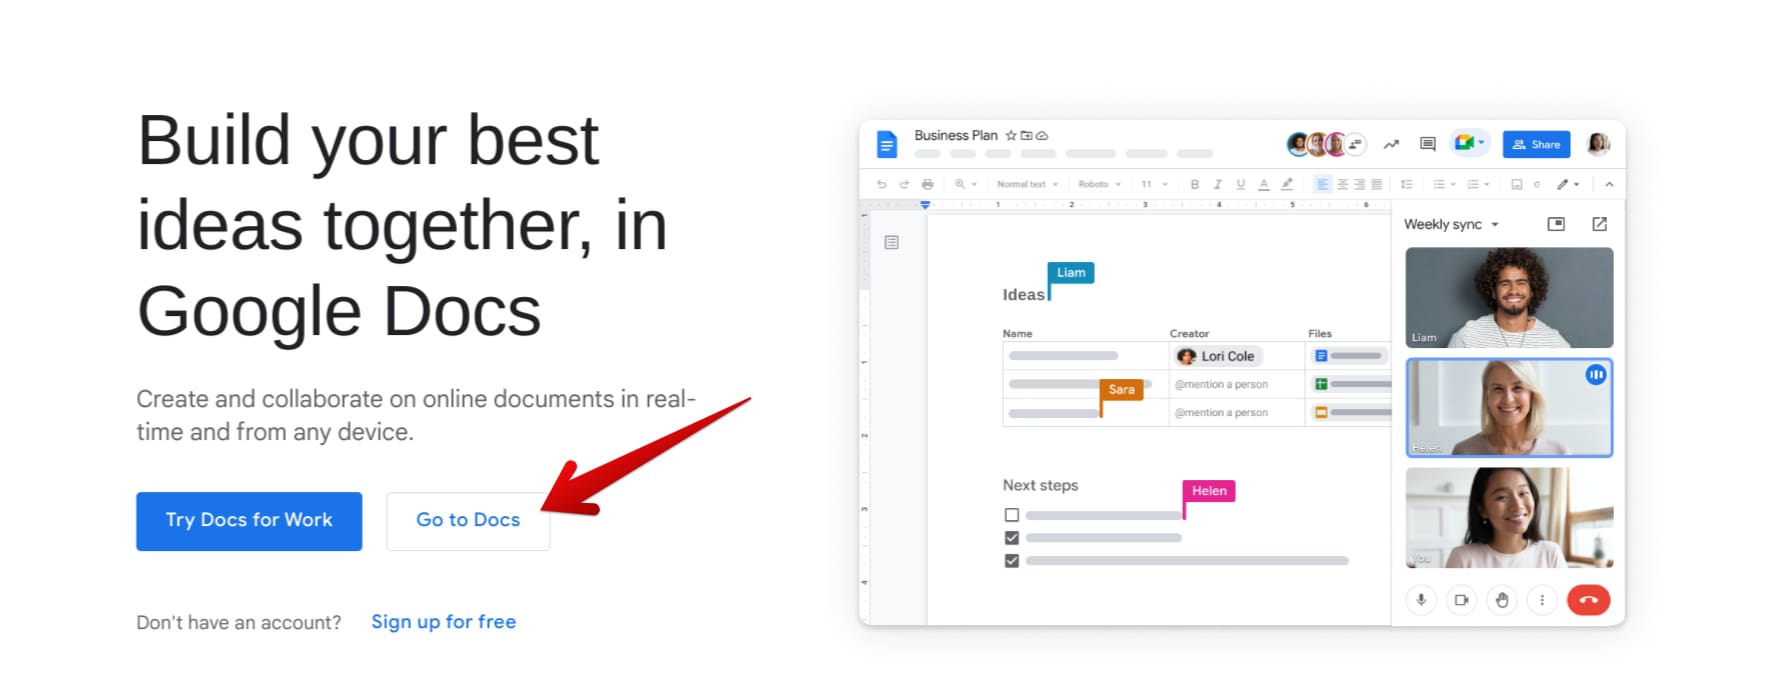
Getting started with Google Docs
After clicking on “Go to Docs,” a new page will load, taking you to the main Google Docs web handle that handles all the major processing of the famous text editor. The following screenshot depicts what this page is going to look like. If you’ve worked on documents in the past, they will also appear here.
However, to create a new document from scratch without any preset template, which falls on the advanced side of things, click on the large “+” icon right above where it says “Blank.” Doing so will open a blank document in Google Docs, ready to serve as the foundation of your next draft.
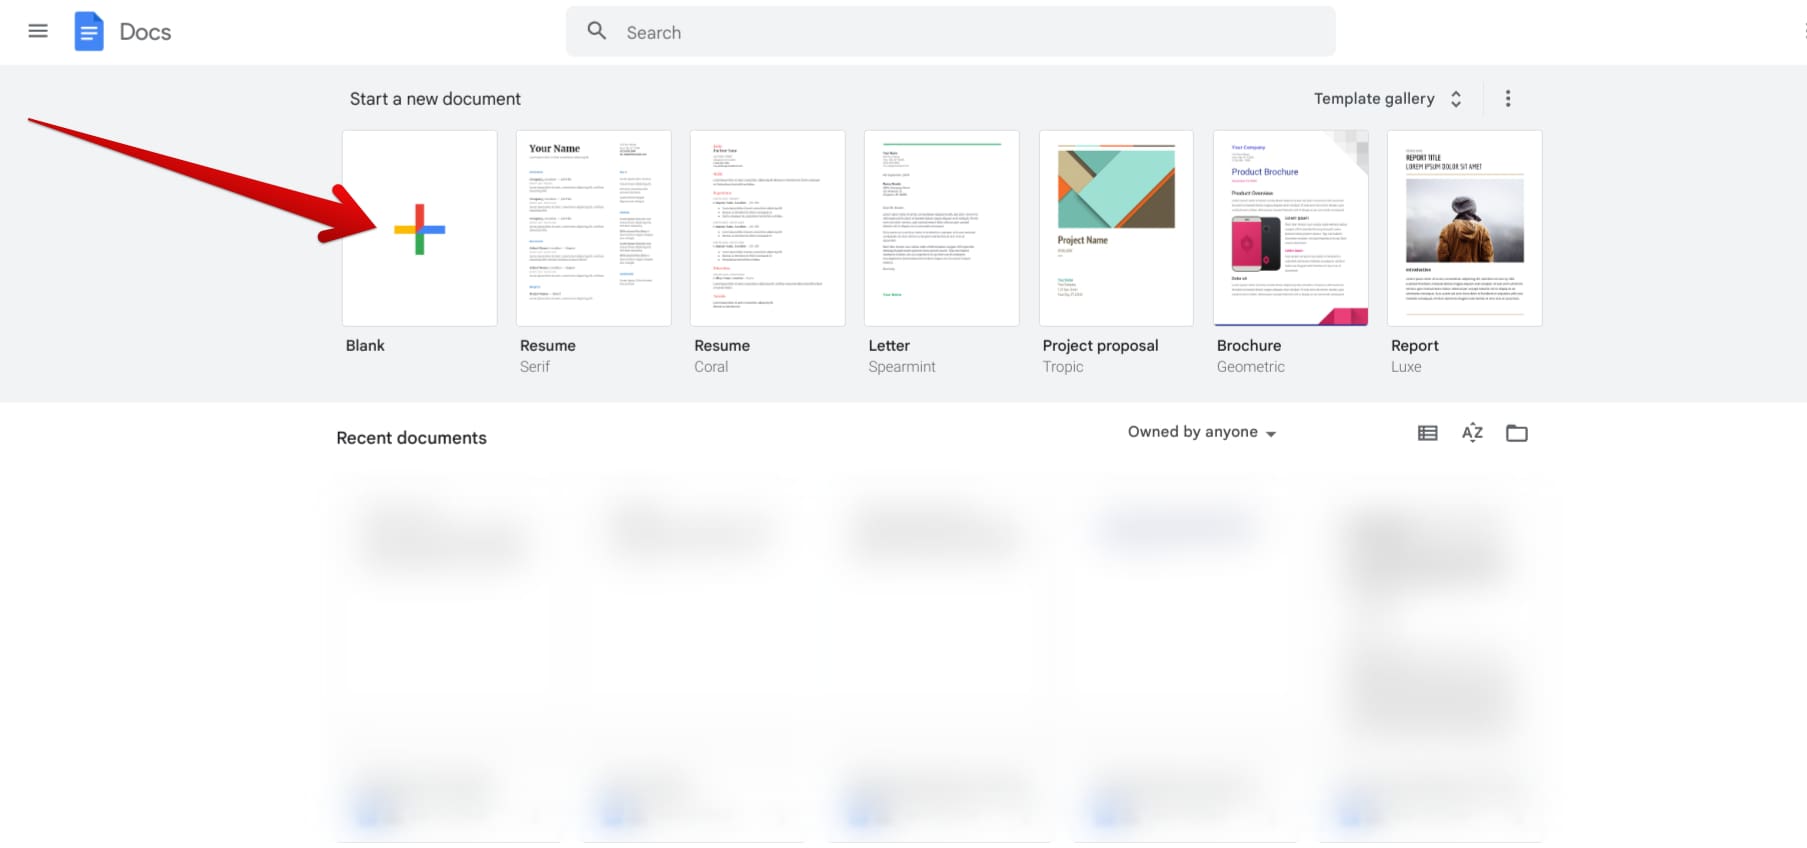
Creating a new document in Google Docs
Completing the previous step should get you started with opening a new document in Google Docs, but this is hardly the beginning of the matter here. The following section will explain the working interface of the Docs editor and how you can get started with it.
Working interface of Google Docs explained
Let’s put this out there first—the user interface of Google Docs has been designed to appeal to the masses in a friendly manner. If you’re a beginner, it won’t take long to grasp what goes where and how things operate in the foreground, thanks to how the various elements of the in-app interface are laid out. Nevertheless, you’ll now learn the ins and outs of the fundamental tools present in Docs. So let’s start with the basics.
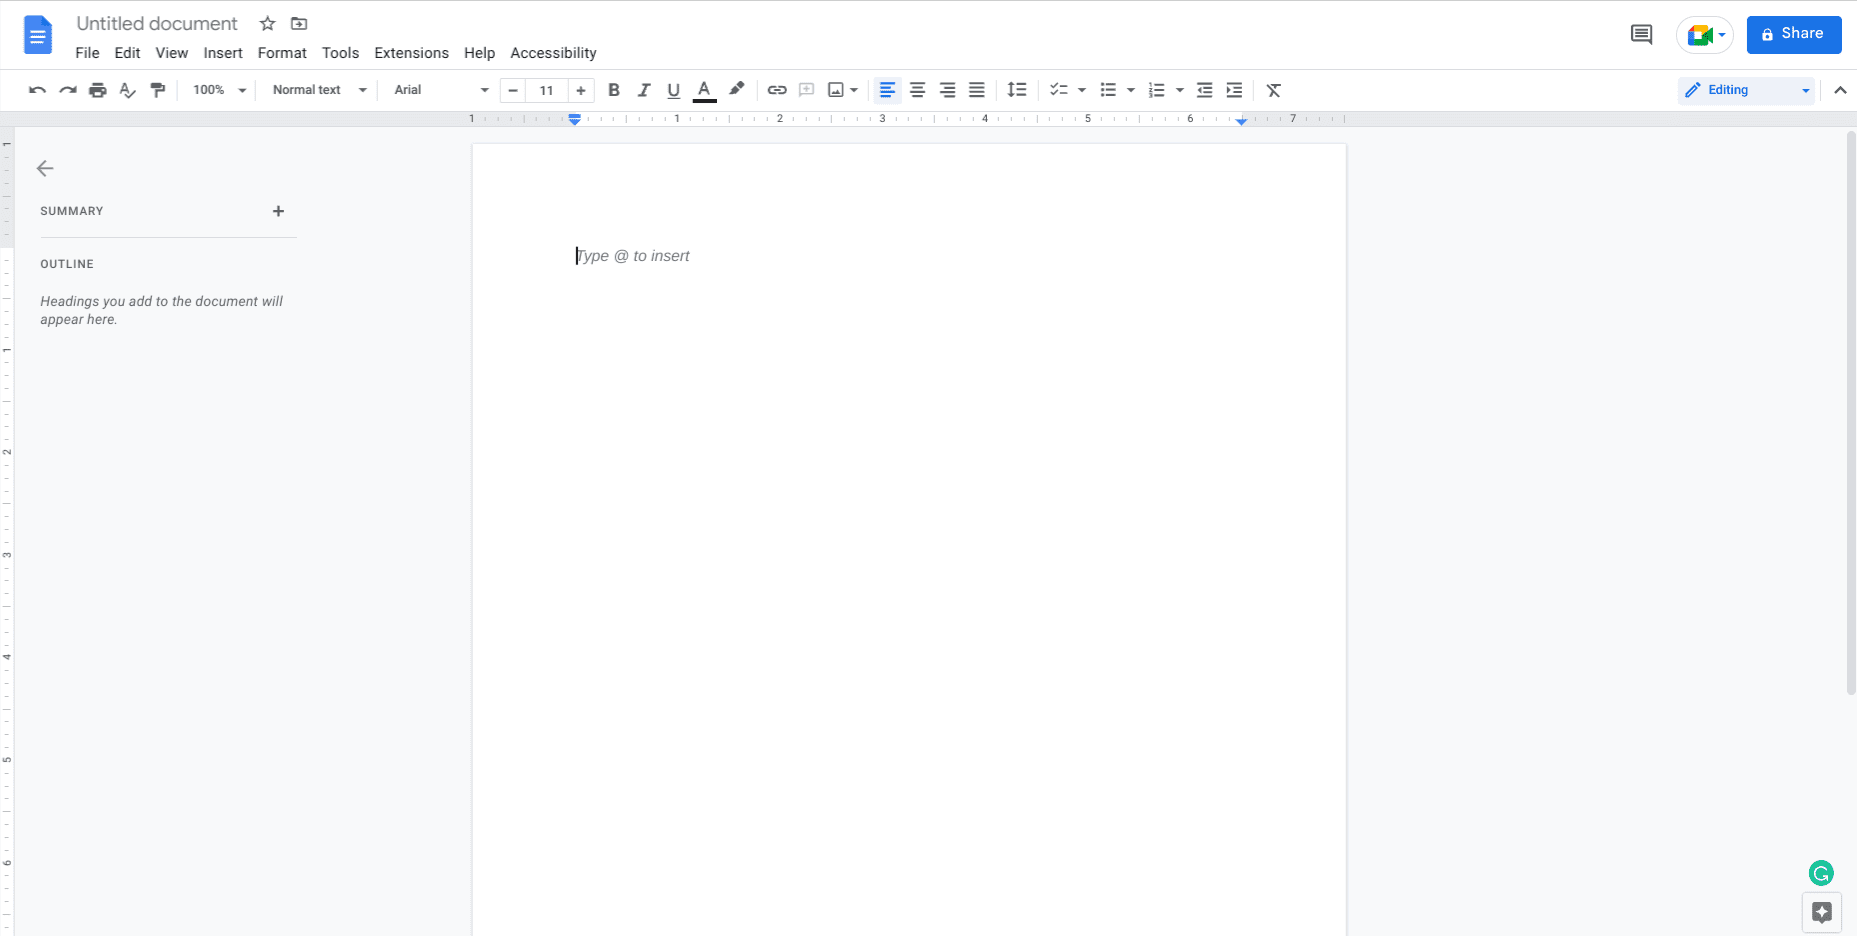
Screenshot of the Google Docs editor
The moment you step foot into the Docs editor, it seems easy to start typing away. However, that is not how documents are correctly created. It would be best if you had the proper know-how to craft the perfect text file, which takes a little practice and patience. You’ll find the main editor interface at the center of the page, where it’s possible to type with your keyboard.
You can press any of the lettered, digit, or special keys on your keyboard, and all of it will get typed away in the default size of the text and the font. So that’s that, but what are some other crucial informative points you need to know about regarding Docs? There’s a lot of ground to cover here, but we’ll begin in a step-by-step structure, starting with how to make headings in Google Docs.
Creating different headings
No long-form article is complete without headings. Without this essential formatting component, your write-up won’t leave the type of impression you want the other person to have. That is why it is significant to use headings and outright required in some cases.
Fortunately, creating headings is child’s play in Google Docs. All you need to do is click the “Format” button, come down with your cursor, and hover over the “Paragraph styles” option in that section. As soon as you do that, more options will subsequently appear. Please now choose any headings you wish to incorporate into your text.
The “Title” heading is the largest, whereas “Heading 6” is the smallest. The size of the headings decreases as you go from top to bottom—that’s their whole purpose.

Adding headings in Docs
Renaming the document
To rename a document in Google Docs, you must click on the bar where it says “Untitled document.” This specific area is located in the upper-left section of the screen. After you tap on it once, a text cursor will appear there, allowing you to name the file whatever you wish. Unlike Microsoft Word, Google also allows you to enter special characters, such as “^,” “$,” and even “#” in the name of your file.

Renaming the document
Checking the word count
It can be great to keep track of the overall word count for pieces of writing that span thousands of words. Unfortunately, Google Docs does not display a word counter at the bottom of the text editor somewhere automatically, so we need to tend to it manually for our cause.
Still, the process at hand is nothing but difficult. All you need to do is click on the “Tools” button at the top of the page and click on the “Word count” option. You can use a shortcut here to bring up the word count of the document seamlessly without having to click on anything. Press “Ctrl,” “Shift,” and “C” together, and that will do the trick.
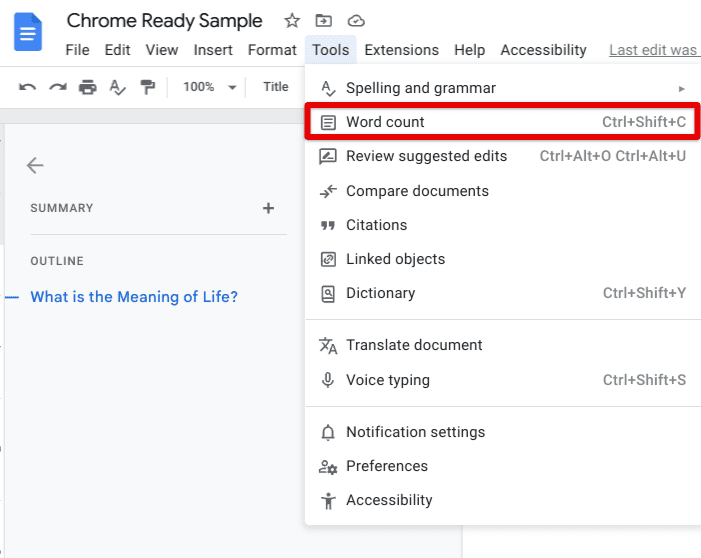
Checking the word count
Verifying the spelling and grammar
No matter how adept you get at the art of writing, it’s always better to have an AI companion assisting you and pointing out your errors. Google Docs feature an in-built spell checker and grammar verifier that ensures your writing’s fundamentals are structured correctly.
To begin, click on the “Tools” tab again, hovering over the “Spelling and grammar” option. Once done, click on “Spelling and grammar check” to begin the scan. Similar to checking the word count of your text, there’s a shortcut that can be applied here to speed things up. Press “Ctrl,” “Alt,” and “X” together, and the scan will begin right there and then.
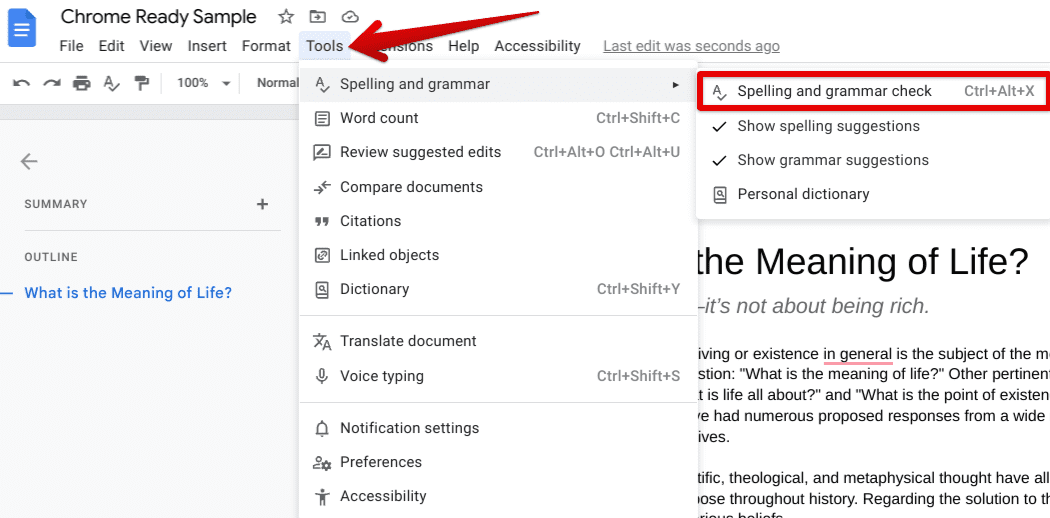
Checking the spelling and grammar
Changing the size of the font
One of the most fundamental parts of the Google Docs text editor is the text itself. You’ll spend a fair amount of time tweaking how you want the font size to be, and fortunately, Docs is pretty generous with size options and the feature’s overall usability. All you need to do is click on the “Font size” button embedded in the toolbar in the top half of the editor interface and then type the size in manually with digits.

Changing the font size in Google Docs
If you don’t want a substantial increase or decrease in size, you can easily use the plus and minus buttons on either side of the “Font size” tool. That way, you can quickly make the relevant changes without manually typing in the font size.
Changing the type of font
Along with changing the font size, it’s also possible to change the font type itself. For as long as one can remember, there has been a plethora of different font styles in the world, ranging from the likes of Arial, Georgia, and Lexend to Nunito, Roboto Mono, Times New Roman, and Comic Sans MS.
Click on the area where you see the contemporary font style, and a dropdown list of all different file types will pop up. It’ll then be simple enough to choose the font style you want for your draft. The instances have a ton of experimentation potential as well.
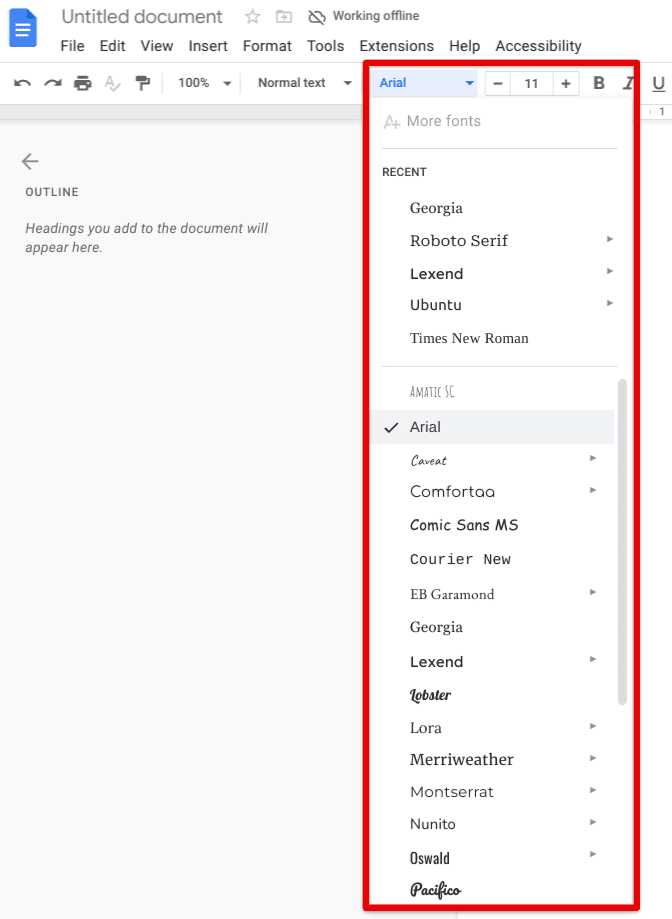
Changing the style of the font
Zooming in and out of the text editor
Some users like to have more of a zoomed-out feel when using a text editor. One can certainly see eye to eye with this decision, as zooming out of a page allows you to visualize more screen content simultaneously. However, others believe that zoomed-in text is the best choice. You can decide by zooming in and out of the text editor.
To get that done, click on the “Zoom” area on the left side of the basic toolbar. The zoom percentage is default set to 100%, but a dropdown list of options will appear as you click on it. Users can choose from 50%, 75%, 90%, 100%, 125%, 150%, and 200% of zoom in Google Docs.
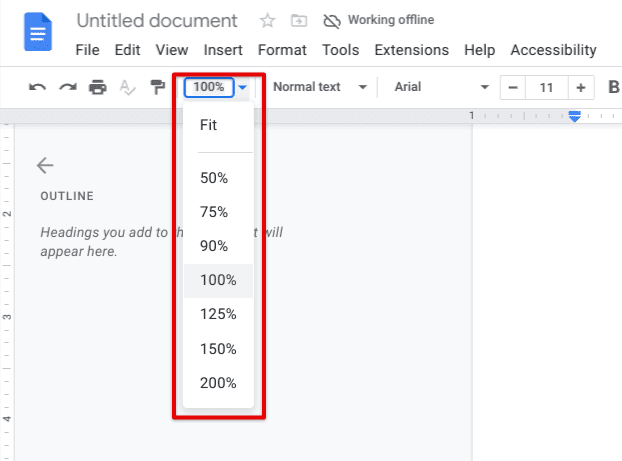
Adjusting the zoom feature in Google Docs
Changing the alignment of the text
There cannot ever be enough emphasis on the formatting of text in Google Docs or any other word processor, for that matter. To create a picture-perfect draft, you have to ensure that the write-up looks good, and without tweaking the text format, the latter won’t be possible. One of the major constituents of Google Docs formatting is the alignment feature, which determines whether your text sits on the Docs editor’s left, middle, or right side.
To change the alignment of text, you first need to select it with your cursor and then click on any of the alignment options, which are namely “Left align,” “Center align,” and “Right align.” There’s also an AI-powered tool called “Justify” that will automatically decide the proper alignment of your text based on the rest of the document’s formatting. Shortcut keys can also allow you to quickly align your text as per requirement.

Alignment options in Google Docs
Creating list points
Depending on the type of write-up you’re drafting, some parts of your writing might warrant you to enlist items or objects. In that case, regular formatting won’t do the trick. You must rely on a distinct Google Docs feature to ensure your draft looks presentable. The Docs editor lets you create list points, both bulleted and numbered, to help you write correctly. The functionality is easy to implement and can even be followed through with a shortcut key combination.
For “Bulleted list,” you can click on the specified tool in the upper-right area of the Docs editor in the toolbar. Once done, you can type your list items and separate them from each other by pressing the “Enter” key. As for the numbered list, the procedure is similar, but you need to click on the “Numbered list” option that’s right beside “Bulleted list.” The keyboard shortcuts for these features are “Ctrl,” “Shift, ” and “7” and “Ctrl,” “Shift,” and “8,” respectively.
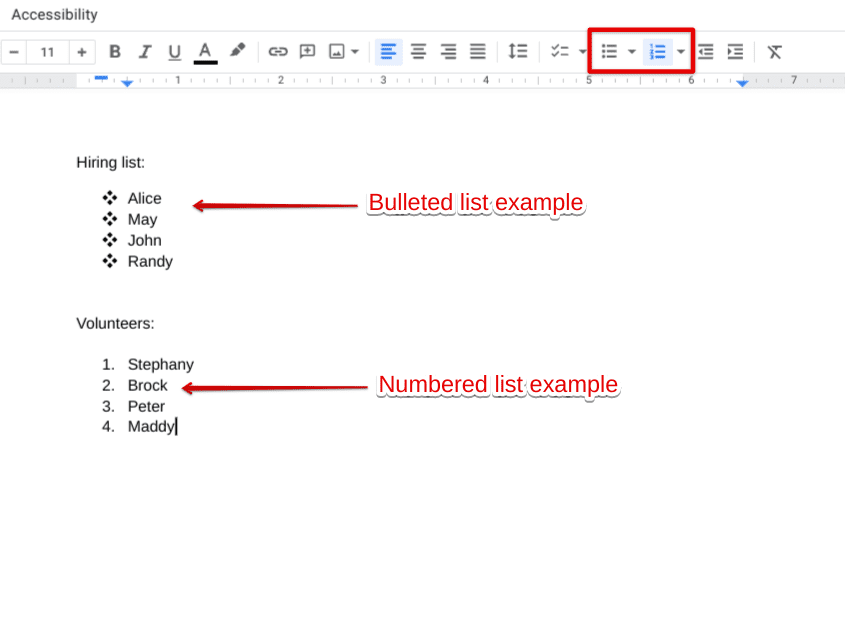
Creating list points in the Docs editor
Google Docs even lets you use different styles of creating list points. By clicking on the dropdown arrow associated with both of these tools, several options will appear, allowing you to switch up the type of list points that you can use.
Bolding, italicizing, and underlining text
In case you’re out there trying to make your drafts stand out more than anybody else’s, you should know about the “Bold,” “Italicize,” and “Underline” features. “Bold” intensifies the color of your text and makes it more revealing. If there are parts of your draft that you wish to highlight and cast a lens on, bolding them is highly recommended.
To italicize is to demand the reader’s attention for your text’s italicized parts. Commonly, pieces of text where you’re quoting someone are italicized and bolded together. Last but not least, “Underlining” is another prominent feature and a visual cue that most typically associates itself with a link text.
Here are the shortcut keys for all three of these powerful writing tools:
- Bold: Ctrl + B
- Italicize: Ctrl + I
- Underline: Ctrl + U
If you’d like to use these features manually with your cursor, you can click on their relevant buttons in the Docs editor.

Bolding, italicizing, and underlining text in Docs
Highlighting font
The “Highlight” feature works in tandem with the writing above tools of bolding, italicizing, and underlining text in Google Docs. However, this one brings more focus to the forefront of your draft, making it possible to delve into a higher form of formatting text and paint a visual picture for your readers. Select any line with your cursor by clicking and dragging and then clicking on the “Highlight color” button.
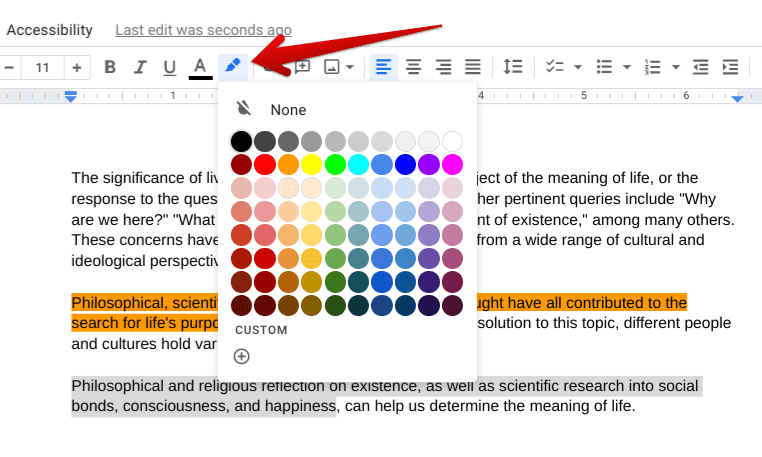
Highlighting color in Docs
Sharing the document
At last, you need to share your document as well after you’re done finishing it up. For this purpose, Google Docs boasts highly convenient shareability features. Click on the “Share” button in the top-right corner of the screen to bring up a dedicated menu on the screen.
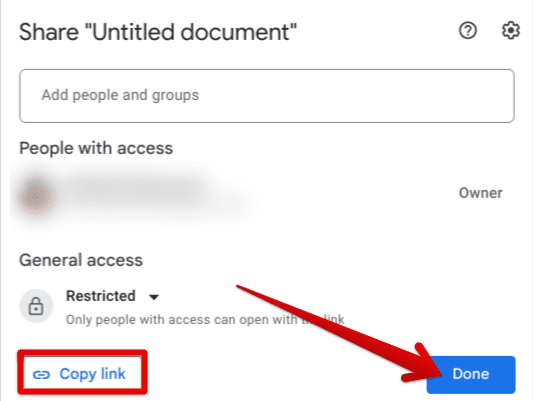
Sharing the Docs document
Can Word files work with Google Docs?
Yes, one of Google Docs’ most well-grounded features is its ability to work with multiple file formats. If you’re coming from Microsoft Word, it won’t take long for you to adapt to Docs because of how easily the latter processes all Word files. You have to open them up from your local storage, and by the time you’re done, it’s possible to convert their format to something more preferable for Google Docs, which is .docx.
Additional Google Docs features
Before we conclude the write-up, some of our related articles on additional Google Docs features are worth mentioning. Skimming through these guides will ensure you have the best possible user experience that Docs can offer, especially after learning some advanced tips and tricks.
- How to use hanging indent on Google Docs.
- How to open Office Word Document (.docx) with Google Docs.
- How to add new words to the Google Docs dictionary.
- How to add captions to images in Google Docs.
- How to add fonts in Google Docs.
- How to translate a document in Google Docs.
- How to enable dark mode in Google Docs.
- Markdown in Google Docs: Fancy text tricks you should know.
- Top 10 helpful Google Docs usage tips on your Chromebook.
Conclusion
Whether you belong to a professional organization or are just a student trying to get their writing assignments done on time, Google Docs is something that you’re not going to want to miss out on. It’s a word processor that boasts exceptional collaboration features, but the way it comprises such an easy-to-use interface has increased its popularity over time.
In this article, we’ve jotted down a detailed Google Docs beginner’s guide for those just starting with the software. The guide has covered all the basics of the Docs editor, so you should be able to start writing efficiently right away. As time goes on, you are bound to get more productive after learning the ins and outs of Google Docs. Please let us know if you found the guide useful in the comments below.
We would love to read your feedback!
- Read next: The beginner’s guide to drawing on Google Docs.
