Google is known for its wide array of applications and programs, such as Google Docs, Google Sheets, and Google Slides. There are few spaces of the modern-day left where Google has not made its mark yet, as the famous tech giant continues to create a product that has solutions to most people’s problems. Talk about Google Maps, for instance. It’s one of the world’s most popular services that take up the hefty task of detailing geographical zones and regions.
On the flip side, creating a custom map might be the best option if you’re already a Google Maps user and have been meaning to organize and schedule your daily traveling routine. In this guide, we’ll be learning how to create custom maps in Google Maps, so you can personalize the geographical appearance of your city and make things more convenient for you. So let’s begin right away.
- Check out another article: Google Maps on Chromebook.
Why should you create custom maps in Google Maps?
Google Maps, outside of its core features and functionalities, also makes it possible for users to create their own maps inside the application. It does not require you to grab any third-party software to make that happen; all the necessary tools are present within Maps. The primary reason one would want to delve into this feature revolves around the freedom to create a map that resembles their preferences and style.
A customized map in Google Maps lets you become better organized since it allows you to take some time and group either your favorite places together for a seamless routine or place points of interest in an arranged manner so that you can sort out your workflow accordingly. Whatever the use case, a custom Google Maps map is pretty handy when it boils down to categorizing your trips in the city you live in.
In addition, the custom map creator functionality in Google Maps is feature-rich, which allows you to add layers and custom components, such as marker points, lines, shapes, and even customized directions. Therefore, Google Maps provides a fleet of resources to help you create the perfect personal map. This is one of the reasons that custom maps are a popular feature in the program at hand.
The following section will discuss all there is to know about the custom maps functionality in Google Maps. The details will guide you in creating the most effective personal map with the help of the Maps software. Let’s get into that right away.
Creating a custom map in the Google Maps app
Getting started with creating a custom map in Google Maps is easy, but the difficulty lies in structuring the map correctly. That, too, can be quickly dealt with, given that you spend some time learning the ins and outs of the functionality in question. As for the prerequisites for creating a map, you will need to hop on a desktop for this one. Currently, the mobile version of the Google Maps application does not support creating custom maps.
Therefore, visit this direct link while on your PC, and you should be taken to the official Google Maps website. Once you’re there, click on the hamburger icon in the top-left corner of the screen, which otherwise looks like three horizontal lines spaced together. The button is named “Menu.” After selecting it, several options should appear on the screen. Choose “Your places” to get to the next step.
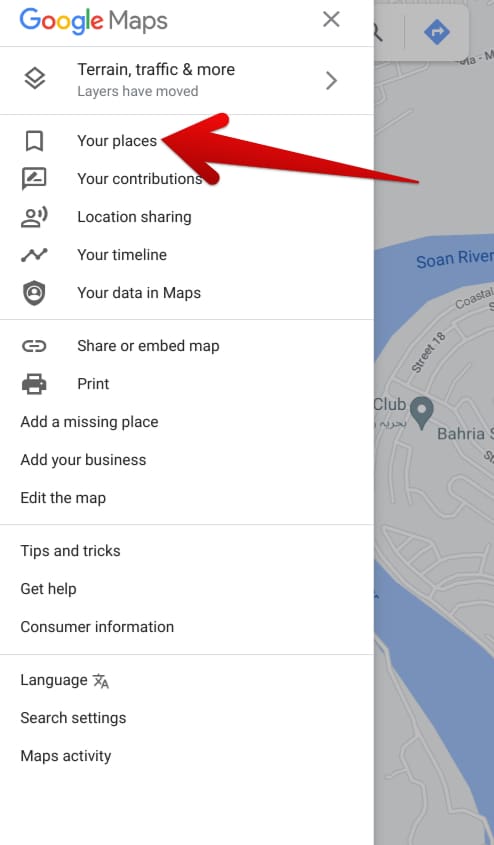
Selecting “Your places”
After clicking on “Your places,” the next step is to select the “Maps” tab and then click on “Create Map” at the bottom of that section. Doing so should take you to the next step painlessly and open another page where the Google Maps map creator will surface for your convenience.
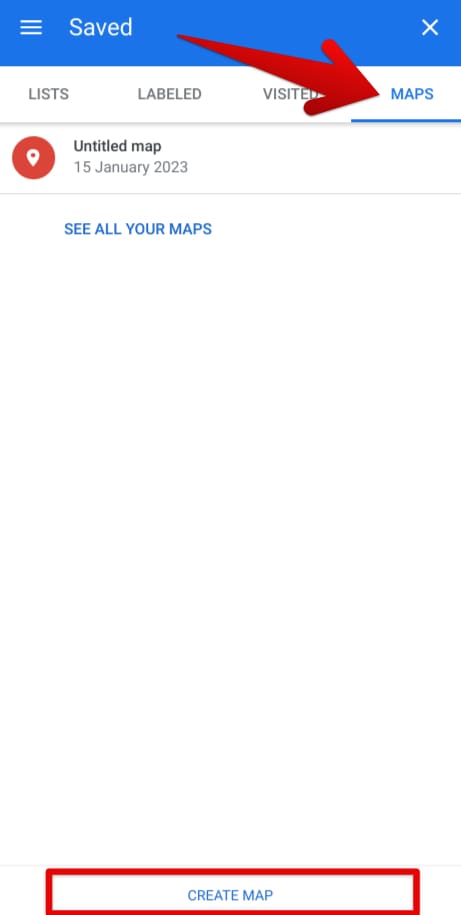
Clicking on “Create Map”
This is where you’ll be concerned with creating a new map. As you can comprehend from the screenshot below, Google hasn’t given out instructions for creating a custom map correctly, leaving room for confusion, especially for beginners. However, fret not. We’ll explain what goes where and how you can create a correctly working custom map in the Google Maps app.
We suggest starting by renaming your map using the menu provided in the upper-left corner of the screen. Click on the “Untitled map” space, and you can rename your custom map to whatever you want. There will also be a space for entering the map’s description.
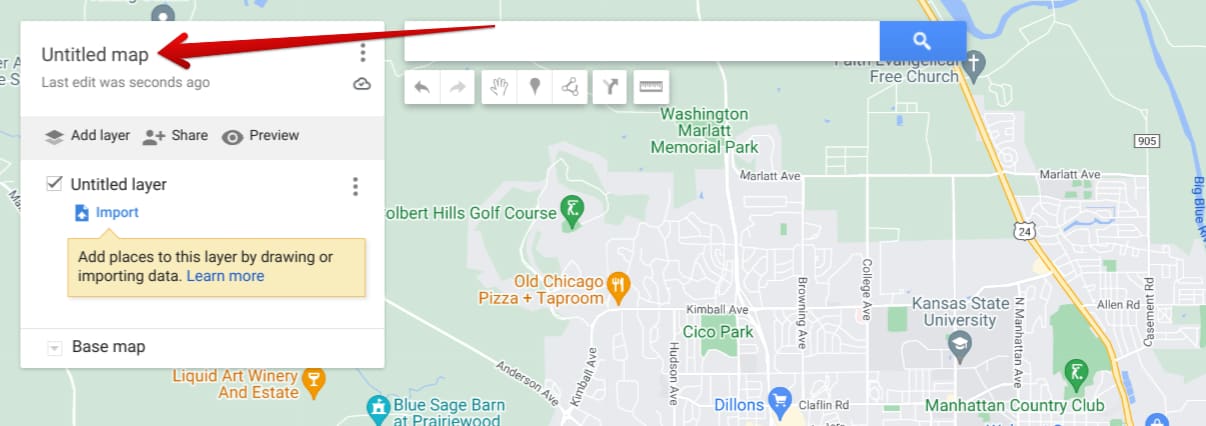
Renaming the custom map and adding a description
After renaming the map, you can adjust the base map’s view type. Quite generously, Google Maps offers multiple options, making it possible to visualize the custom map just the way you want. The available options in this regard include Map, Satellite, Terrain, Light Political, Mono City, Simple Atlas, Dark Landmass, Whitewater, and Dark Landmass.
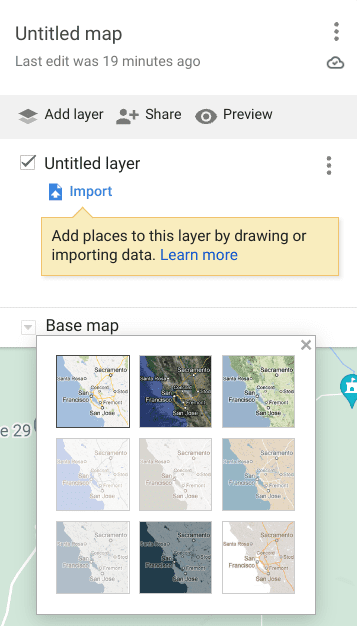
Selecting a base map
After you’ve picked the base map you wish to use with your custom map, the next step is to turn toward the “Layers” feature in Google Maps. It’s possible to use multiple layers in your custom map and fill each layer with different components to make it of the best use to you. First, you need to click the “Add layer” button to do exactly what the feature depicts.
The custom map page will start users with what it refers to as an “Untitled layer.” This baseline layer functions as a default, so feel free to customize it per your requirement. However, if you’d like to separate your additions to the custom map, adding more layers is a great option to designate particular distinctions. Thankfully, adding a new layer is as simple as ABC in Google Maps.
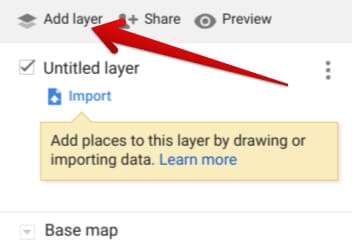
Adding a new layer in the Google Maps custom map
In addition, you can also rename your personally created layers in addition to renaming the custom map itself. Click on the three dots that are spaced together vertically and select the “Rename this layer” option afterward. Type in the name of the layer next, and you’ll be done shortly.
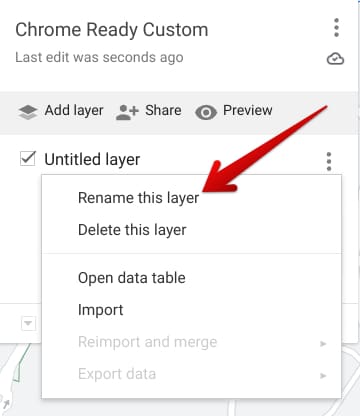
Renaming a layer
It’s worth mentioning that you can import data for created layers in the custom map from your PC’s storage. That’s another convenient way of quickly transitioning to a new device if you’ve already gone through the work.
Next, it’s imperative that you fully understand the different components of the custom map that help you add more depth to your drawing. Let’s break these components down one by one so you know which ones are the most useful in filling up a custom map in Google Maps.
Select items

“Select items” component
The “Select items” feature is a vital custom map component that will allow you to interact with the rest of the components in your created custom map. Using the “Select items” tool, it’ll be made possible to edit all the “Add marker,” “Draw a line,” “Add directions,” and even “Measure distance and areas” components. It’s already selected by default and won’t be changed unless you click on another component in Google Maps.
Add marker

“Add marker” component
The following custom map component is called “Add marker,” and it is used to designate points of interest on your map. It’s one of the essential tools available at one’s disposal in Google Maps. After adding a marker to a suitable place on the map, you can make it stand out more by adding descriptions. Not just that, but the “Add marker” feature is flexible enough for you to customize its style by using different icons and changing colors.
Finding a spot on the base map where you will add the marker is critical. Make sure you have found the right area before proceeding with it. Once done, click on the “Add marker” icon, as seen in the screenshot above, to bring up the feature’s dedicated cursor. You can now browse the map and place the marker anywhere you deem fit, whether placing one to remind you of a pothole on the road or anything else.
Once you’ve placed the marker, you’ll see that multiple additional options appear subsequently for the map component. The developers have decided to tune the overall functionality of this tool in the custom map space. It’s possible to add images and even videos to go along with the marker, not to mention specifying directions. Experiment with the options available, and you’ll be good to go.
Draw a line

“Draw line” component
Another highly convenient custom map component in Google Maps is drawing a line. It allows you to create lines and even join them together to form a proper shape. Each shape will consist of points, which can be further expanded to form a network of lines. If you wish to lay something out for a friend to explain directions, the “Draw line” component can be the right choice.
In addition, other use cases for the “Draw line” component include adding driving, biking, and walking routes. The latter part of this tool’s functionality is nothing but thoughtful. It lets you enjoy a bird’s eye view of your city and plan how you’re about to go on a trip. Laying out walking and biking routes, in specific, is sure to prevent you from falling into unwanted trouble and define a pathway for you to get a workout in.
Add directions

“Add directions” component
The second-last component that can help you make your custom map more defined is centered on adding directions to your custom map in Google Maps. As soon as you click on this feature, a menu will appear on the side panel to the left, asking you to specify the starting address and the destination. You can fill in points A and B to designate directions for your convenience.
It’s possible to add more directions, so if you’d like to plan a trip, that can be easily made possible through the “Add directions” component.
Measure distance and areas

“Measure distance and areas” component
Last but not least, we’ve got the “Measure distance and areas” tool to factor in, and it’s pretty useful when you need to calculate how far across is a specific location. The component is suitable for people who like to plan their walks and maintain things adequately. Tap on the component once and then take your cursor to the map area. Once done, you can click on any location on your custom map and pinpoint one part of the measurement.
You can click on another area to calculate the distance, and the measurement will be displayed on the screen. The best part is that this tool can calculate the distance between multiple points, not just one.
How to save your custom map and share it
Thanks to Google’s remote server technology, you won’t need to save your custom map. Instead, Google Maps will take care of that simultaneously for you and keep auto-saving as you go along with your edits. You can even see the “Last edit was seconds ago” label for peace of mind.
That said, sharing your custom map in Google Maps is another story. For this purpose, you will click on the visible “Share” button to proceed.
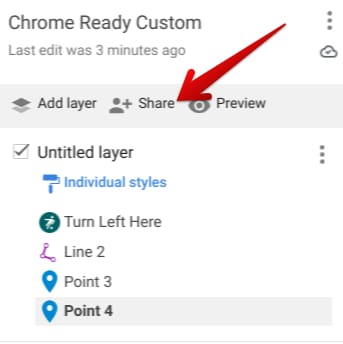
Sharing the custom map
After clicking the “Share” button, a menu will appear on the screen, allowing you to either copy the link to your custom map or share your edit on Google Drive—whatever works for you.
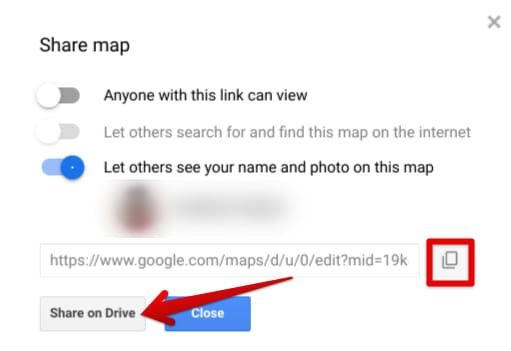
Shareability features
That’s all there is to know about creating custom maps in Google Maps. Thanks for reading!
Conclusion
Google sure knows how to keep its user base hooked and content, thanks to the swath of different apps and programs the company offers daily. It has even created its operating system called ChromeOS, which comes pre-loaded on specific devices called Chromebooks. To highlight one application clearly, Google Maps is such a program that has made the lives of billions worldwide more accessible and productive.
It even introduces a custom map functionality that lets one own a map, thereby making it possible to traverse their area of residence with personalized instructions and settings. In this guide, we’ve gone over the essential details that will help you learn how to create a custom map in Google Maps. Please let us know in the comments section if this guide resolves your queries.
We would love to read your feedback!
- Recommended article: How to log out of Facebook on all your devices.
