Let’s face it. Everyone is time-strapped in the day and age we live in today, mainly due to the hustle culture kicking in and people trying to focus on their goals more than ever. If you find yourself in a similar situation, you already realize how valuable time-saving measures can be, primarily when you’ve based your work on the internet with your Chromebook.
In this guide, we’ll talk about some of the most convenient shortcuts you can employ in ChromeOS to get around the operating system faster and make your Chrome browsing experience more efficient. Let’s dive into these tips with no further ado and help you realize the true potential of your Chromebook.
- In the meantime: Top 10 cool Chromebook usage tips and tricks you should know.
10 of the best time-saving shortcuts to use on ChromeOS
The following is our round-up of all those tips and tricks that can help you save time and boost your functional capacity day in and day out. Make sure to replicate all of these shortcuts for the best results.
1. Toggle on the Overview button
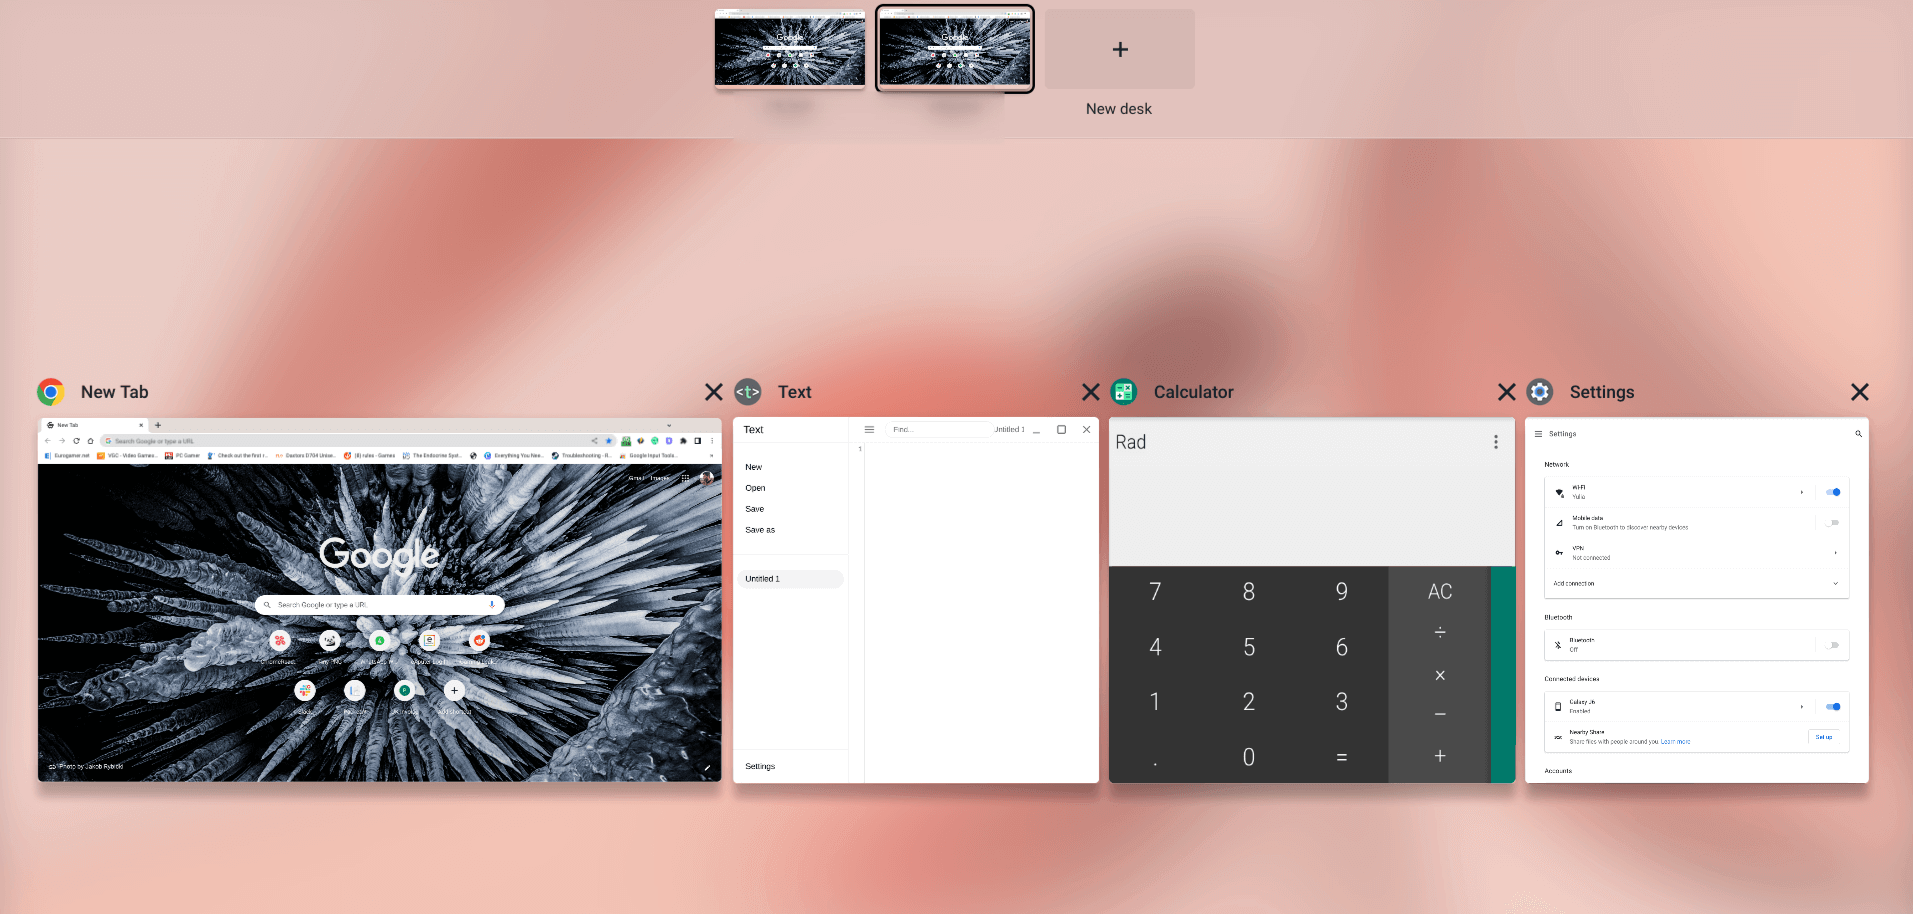
One of the first tips that can help you save time and dish out more productivity from your side pertains to toggling on a specific “Overview” button. In case you’re not aware of this already, there is an Overview key on your Chromebook’s keyboard that you can press to instantly bring up all of the opened windows on the screen.
While the latter is an easy way of getting yourself up to speed with whatever that is going on with your desktop, there’s another method to employ here that can bring you faster results. There’s an experimental Chrome flag that you can enable on your Chromebook in this regard.
It allows you to add a dedicated button for the Overview function beside the Status Tray section of the Chrome interface, where one can observe the time, Wi-Fi icon, notification count, and the remaining battery. To toggle the button on, copy the following address and paste it into the URL bar of your Chrome browser. Press the “Enter” key afterward.
chrome://flags#ash-overview-button
Doing so will open a new window on your end, namely Flags. Here’s where you’ll be enabling the feature in question. Click on the toggle right beside the “Overview button at the status area” and then select “Enabled” to instruct the system to make the relevant change.

Enabling the “Overview” button for the status bar
You will be asked to restart your device to apply the changes made. Use the prompt at the bottom of the Flags window to reboot the Chromebook instantly.

Restarting the device
As soon as the device boots back on, you’ll observe the Overview button now appearing at the far right of your Status Tray section. Click on it and embrace convenience like never before.

The “Overview” button alongside the Chrome OS status bar
It’s worth mentioning that you can tap into the Overview mode just by swiping three fingers up on your trackpad. Doing so yields similar results.

The ChromeOS Overview mode
2. Switch between opened tabs effortlessly
If there’s one time-saving shortcut here that has managed to make our job much easier, then it’s undoubtedly the speedy innate tab-switching functionality of Chromebooks. As opposed to taking your cursor up and above the different tabs on the Chrome browser and then clicking on them to open, there’s a simple trick that needs to come to light here.
Your Chromebook’s trackpad is more capable than you think. You can use it to switch from one Chrome tab to the other on Google Chrome painlessly. All you need to do is swipe three fingers horizontally, either in the left or right direction. Doing so will immediately make you switch to the tab respectively.
The quick process has become our go-to time-saving shortcut to employ daily. The moment you get the hang of this approach to switching to different tabs, there’s just no going back to regular methods—we can assure you of that, dear reader!
3. Utilize virtual desks

Virtual desks in a Chromebook
Virtual disks are additional desktops on ChromeOS, allowing you to dedicate different workspaces and divide your focus in multiple windows. To create a virtual desk, you can press the “Overview” key on your keyboard and then click on the “+” icon at the top of the subsequent appearing screen, and that’ll be it.
We recommend utilizing virtual desks because of the flexible nature of this core ChromeOS feature. Virtual desks will prove to be a boon for you if you’re an individual who always has multiple projects to work on. By creating these desks on your Chromebook, you can specify workspaces without ever closing them down.
It’s even possible to rename these extra desktops to whatever you want. In this manner, you don’t have to lose focus and start a new project every time you work on a different one. This is contrary to what you’d be currently working on and how shutting it down would cost you extra time.
Moreover, there’s even a trackpad shortcut to help you switch from one virtual desk to the other. You’ll need to perform a four-finger swipe in either direction to make the transition happen seamlessly. We highly encourage utilizing the efficiency of virtual desks to take things to the next level on your Chromebook.
- If you want a more detailed account on the ChromeOS virtual desks, feel free to check out the interlinked guide.
4. Master the best keyboard shortcuts
Keyboard shortcuts are all the rage these days, quite honestly. Nothing makes you as productive as knowing how to get around the operating system faster than ever. Fortunately, ChromeOS is home to some of the best keyboard shortcuts and then some.
It allows one to boost their work rate by applying these time-saving measures. Keyboard shortcuts warrant you to keep your fingers on the keyboard and not take one of your hands off to mount a mouse.
The most noteworthy keyboard shortcuts we have used since day one are listed as follows. Remember, practice makes a man perfect, so even if you’re relatively new to keyboard shortcuts, ensure you’re employing them consistently to get a better hang of them soon.
- Ctrl + N: Opens a new window.
- Ctrl + T: Opens a new Chrome tab. Works inside the Crostini Linux terminal as well.
- Ctrl + W: Shuts down a window instantly.
- Ctrl + L: Takes the text cursor straight to the Chrome browser’s address bar, allowing one to proceed seamlessly.
- Ctrl + C: The default command for copying text, images, documents, or everything else.
- Ctrl + V: The default command for pasting the copied item.
- Alt + Enter: Opens your link in the address bar in a new tab instead of loading it in the same tab.
- Ctrl + (+): Zooms in on a page.
- Ctrl + (-): Zooms out on a page.
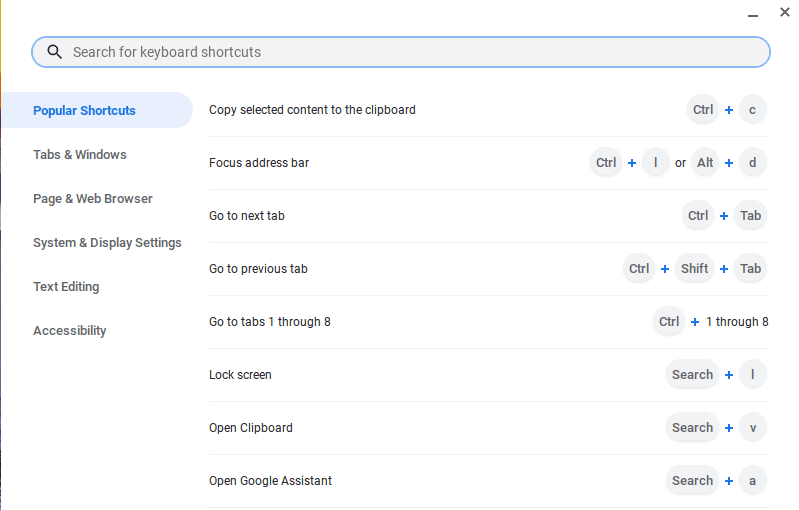
To realize the full extent of keyboard shortcuts on a Chromebook, you can press “Ctrl,” “Alt,” and “/” together to bring up a dedicated window. There, you can visualize all the keyboard-oriented shortcuts that are available to use on ChromeOS. This is one of the most fundamental measures that save you time while working with a Chromebook.

The keyboard shortcuts window in ChromeOS
5. Open pages in new tabs instantly with a three-finger tap
Another classy way of saving those precious seconds and ensuring that your workflow continues in a straight line, you can perform a technique that will help you open pages in a new tab instantly. Note that this significantly differs from the “Alt + Enter” shortcut described above.
The latter pertains to the address bar only, whereas the method we’re on about here can be applied to any link you see on pages. The gist is that you must perform a single three-finger tap on any link to ensure it automatically starts loading up in a new tab.
Take three fingers and use them to tap on your Chromebook’s trackpad in tandem to make this trick work. It shouldn’t be too difficult to get the hang of, primarily if you practice frequently.
6. Take quick screenshots
In our opinion, ChromeOS has one of the fastest built-in screenshot tools as an operating system. Coming in as a direct competitor to the snipping tool that you see on Windows, screen-capturing has never been easier on Chromebooks. It’s worth mentioning that this feature wasn’t something that Chromebooks shipped with at its inception.
Instead, native screenshot-taking functionality only arrived at the ChromeOS front a couple of years back. To utilize it, press “Ctrl” followed by the “Show Windows” key. The latter is shaped like a rectangle with three horizontal lines beside it. A screenshot will be taken immediately as soon as you execute the shortcut combination.
However, if you’d like more control over the way you’re taking a screen grab, add “Shift” to the combo of “Ctrl” and “Show Windows,” and you’ll be shown a dedicated menu afterward. This is where you can customize your screenshots. Your available options in this regard include “Full-screen screenshot,” “Partial screenshot,” and “Window screenshot.”
Even the top 10 screenshot tools for Chromebook can’t compare to the simplicity and speed of the in-built screenshot tool, although if someone would like more features in that respect, they should probably seek the former.
Ever since we discovered this neat trick, our productivity has improved substantially. It’s certainly a step up from taking a regular screenshot on Google Chrome, although there are ways to uplift your experience on that front as well.
- If you wish to know more about capturing your Chromebook’s screen, here is Chrome Ready’s ultimate guide to taking screenshots on ChromeOS.
7. Make the best of the ChromeOS clipboard
The ChromeOS clipboard isn’t much, but it’s doing honest work. The feature is a pretty handy addition to the overall skill set of Chromebooks. Even though it doesn’t remember a ton of your last copied links and other items, it’s still practically useful when it boils down to it.
To make it appear on the screen, press the “Search” and “V” keys together, and that’ll do the trick. The ChromeOS clipboard now remembers your last five copied links or pieces of text. Here’s a screenshot of what it looks like.

The ChromeOS clipboard
To use any copied items in the clipboard, click on them, and they’ll be pasted to your text box accordingly. It’s as effortless as that.
- If you’ve tried the ChromeOS clipboard and found it inadequate for your requirements, here are the 5 best Chromebook clipboard managers to maximize productivity.
8. Learn how to split your Chromebook screen
Splitting your Chromebook’s screen equals being able to work on multiple things at once, similar to the agenda of virtual desks. Fortunately, there is a variety of different ways you can partition the screen of a Chromebook. One of them involves a keyboard shortcut combination, namely “Alt,” followed by pressing either “[” or “].”
Pressing “Alt” and “[” together is going to split your screen in half and move it to the left side of the screen. As you do this, you can open another window and press “Alt” and “]” together to partition it to the right. That way, you now have two windows resized to fit one display, making it possible for a heightened level of productivity to kick into motion.
Furthermore, there is another way to achieve the same results as well, and this is done mainly through the mouse by clicking and holding the “Minimize” button on the window and then moving the cursor in either direction. Learning how to split screen on a Chromebook and employing it in the right situations is a wise way forward.
9. Pin your most-used apps to the shelf
If you didn’t know about this before, the ChromeOS shelf that rests at the bottom of the operating system’s user interface by default isn’t there to serve an inanimate purpose. Instead, this specific area can effectively pin your most-used apps for better access.
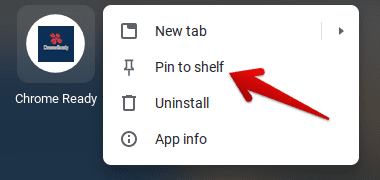
To pin an app to your Chromebook’s shelf area, hover over any app in the launcher section and double-tap on it. Once done, the option to pin the app should pop right up. You can click on the “Pin to shelf” option afterward to finalize the process.
The procedure also works on websites, so before you get into that yourself, it’s worth checking out our guide on adding a website to the Chromebook shelf for a detailed tutorial.

Pinning Chrome Ready shortcut to the shelf
After you’ve pinned the item to your shelf, you can move it around on the shelf by clicking and dragging across the space. This is to arrange your apps in a specific order, so you can organize your Chromebook’s workspace environment the way you want.
10. Restore tabs that you’ve just shut down
Last but not least, it’s imperative to know how to recover your recently closed Chrome tabs so that whenever something unexpected goes down, you’re already well-prepared to tackle the surfacing bother. The shortcut key combination that will let you accomplish this is something along the lines of,
Ctrl + Shift + N
You may test the functional capacity of this shortcut by first opening multiple tabs on your Chromebook and then removing them all from the face of the device. You can click on the “Cross” button in the upper-right section of the opened window to proceed on that front. Once you’ve shut your tabs down, initiate the recovery with the shortcut above.
Your opened tabs are sure to be restored there and then, warranting no further step for users. Tab recovery in Google Chrome is a handy feature to be wary of; you never know precisely when you might need it.
Conclusion
This guide has looked at some of the most easily applicable shortcuts on a Chromebook. These will be utterly time-saving for you and refine your user experience while working with the operating system. Please let us know in the comments section ahead if you benefitted in any way from this guide.
As always, Chrome Ready wishes you good luck!
