In the digitally connected world that we live in today, video calling solutions are one of the most helpful computer programs. In that domain, we have several options making the frontlines, including the likes of Zoom, Skype, and, of course, Google’s mainline video conferencing program called Meet or Google Meet. However, little do many people know; Meet is a feature-rich platform that can be benefitted from in a highly productive manner if you’re cautious enough to do that.
The thing is that specific tips and tricks relating to Google Meet offer the best when it boils down to usability. In this article, we’ll be detailing 10 tips for a practical Google Meet experience so that you can take your video conferences to the next level from here on out. In the meantime, Google Meet lets you join calls from Google Docs, Sheets, and Slides, which is another part to be wary of.
10 of the most effective tips for the ultimate Google Meet experience
We will now be enlisting noteworthy tips and hacks for you to follow and start utilizing to make the rest of your time with Google Meet spent brilliantly. Please make sure to apply each tip for nothing but the best results.
1. Personalize the background of your video call
In recent times, Google Meet has allowed people to switch up how their background looks while video conferencing. The developers have seemingly won the hearts of millions across the board with the promulgation of this standard of functionality. Not everyone keeps organized at all times, and when you have to attend an important meeting, but the room behind you is a mess, background customization on Meet can be a lifesaver.
The best part is that you can not only blur the background of your Google Meet video call but also switch it up for something more exciting. Head to the official Google Meet page and click “Start an instant meeting.”
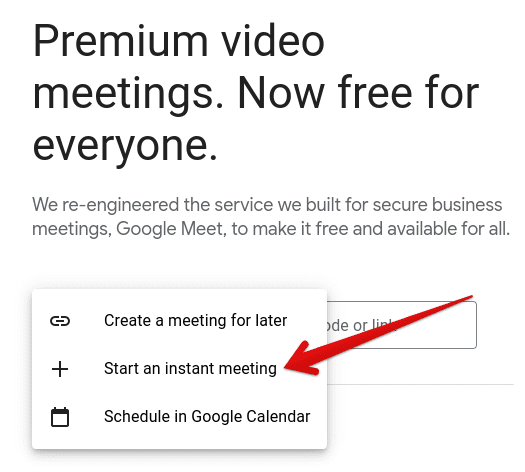
Creating a new meeting on Meet
After getting into the video call interface in Google Meet, you can proceed toward altering your background. To begin, click the “More actions” button to bring up more options on the screen. The latter is shaped like three vertical dots placed together nearby and rests right beside the red-colored “Hang up” button. Right afterward, select the “Apply visual effects” button to bring up a dedicated menu.
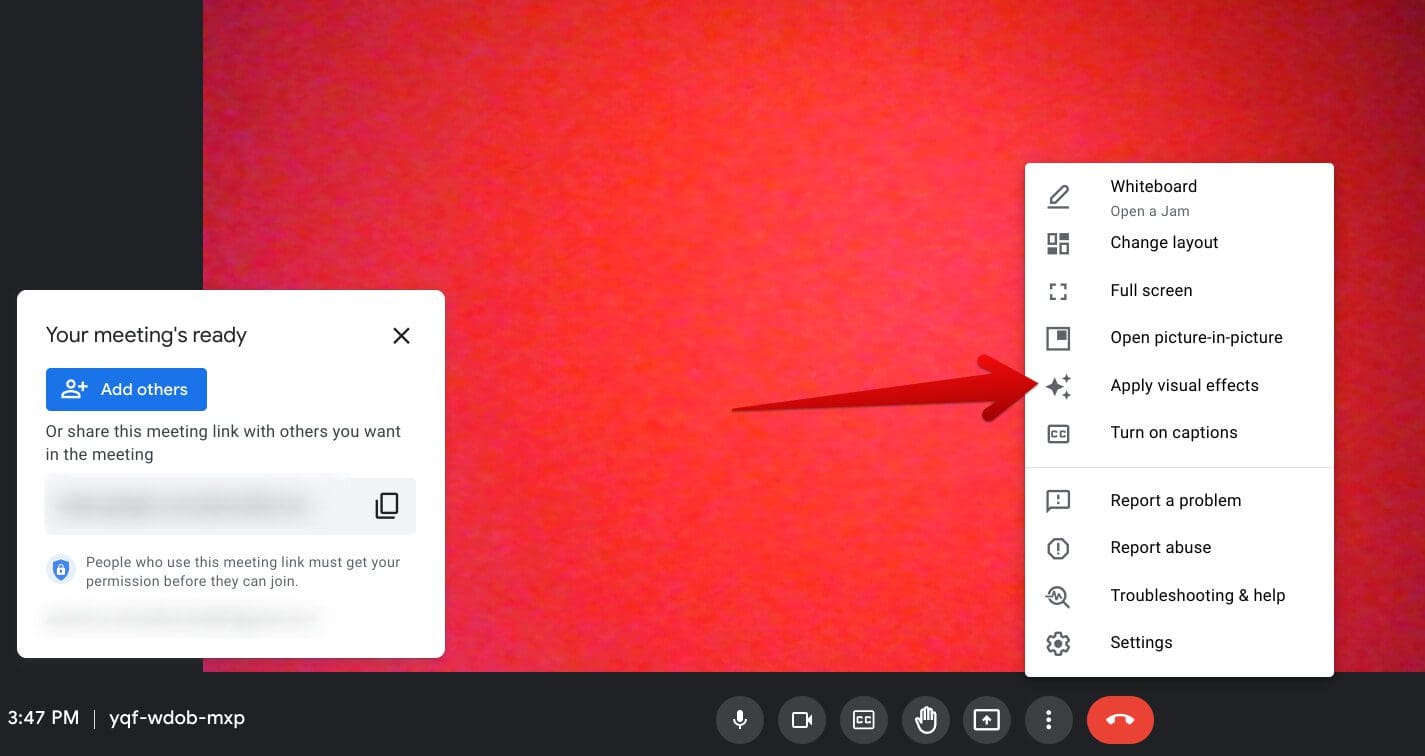
Clicking on “Apply visual effects.”
This menu we’re talking about will cover all you need to tweak your Meet video call’s background with. You’ll be able to either blur your background or, just as the name of the section suggests, apply visual effects to the backdrop so it appears altered to you and your audience. Underneath the “No effect and blur” section, you can determine how focused you want your blur to appear, whether that is a slight blur or a heavy blur.
Moreover, you can also choose from the wide range of backgrounds that Google Meet offers by default to its users. From fairy cottages, libraries, and spaceships to beaches, cabins, and cafe settings, there are multiple options to pick and follow through with your call. Furthermore, you’ll also find the “Filters” section at the very end of the area. Here, various augmented reality add-ons are available to make you stand out.
However, most of these are best utilized for comical purposes, so don’t attend an important business meeting with a cat filter on. With that said, if you use Google Meet to call your friends and family, using any of the available filters is a great way to cheer things up and make everyone more lively around you.
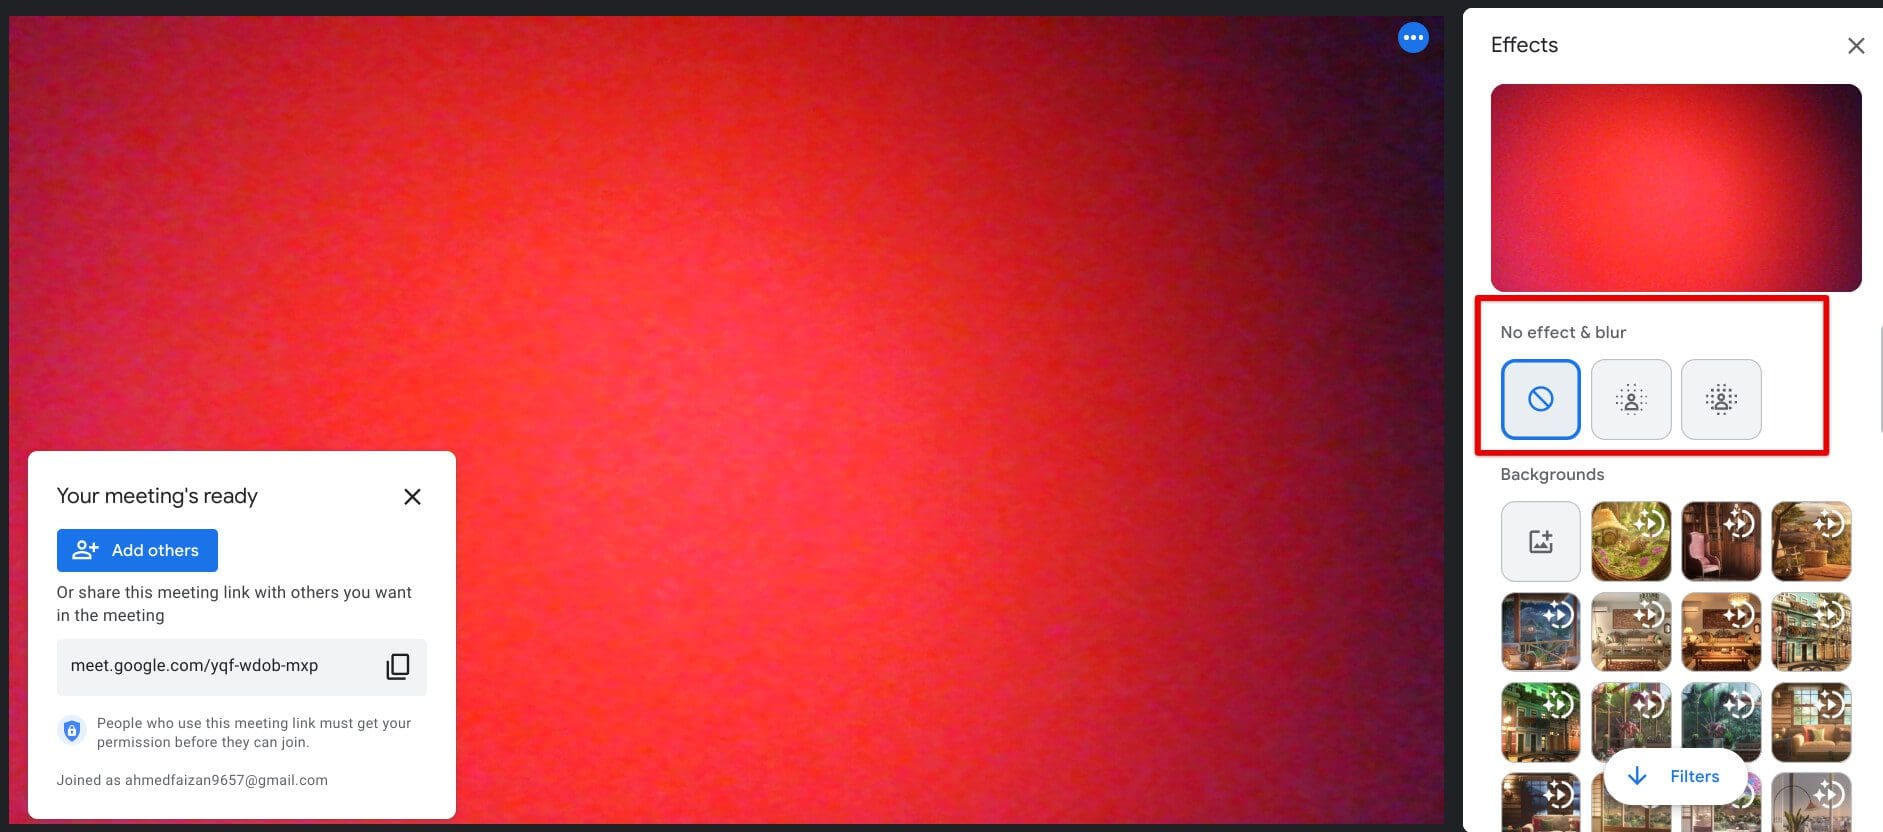
Changing the background of the Google Meet conference
2. Get the Google Meet Enhancement Suite
Another tip for a great Google Meet experience relates to the installation of a high-quality Meet extension. This all-in-one add-on is something that uplifts the way you use this already well-established video conferencing software. The purpose of the Google Meet Enhancement Suite, as you might have taken the hint by reading its name up until now, is to enable many extra features in Meet. The downloadable tool has more than 200,000 users and a 4/5 rating on the Web Store.
To get started, you will first need to add the extension to the Chrome browser. Visit this direct link to get straight to the add-on at hand. Once there, click the “Add to Chrome” button and follow the subsequent on-screen prompts to install the Google Meet Enhancement Suite. After the installation concludes, you will need to start up Google Meet.

Adding the Google Meet Enhancement Suite to Chrome
As soon as you’re done adding the Enhancement Suite to Google Meet, you can next fire up the software on your Chrome browser to test its functioning capacity. Let’s give a brief overview of the Google Meet Enhancement Suite to hint at how feature-rich the extension truly is. Right off the bat, it offers the ability to “auto-join” and “quick leave” meetings, not to mention allowing you to enable and disable Meet’s native chime-rining feature.
In addition, there’s a “Pro” version that Google Meet has up for grabs, making it possible to unlock 20 additional Meet features that include auto-minimizing videos, automatically recording the conference call, and even sorting the participant list in specific orders. There’s even a tool that will let you customize the push-to-talk hotkey, so investing in Enhancement’s Suite Meet Pro is a decision worth taking.
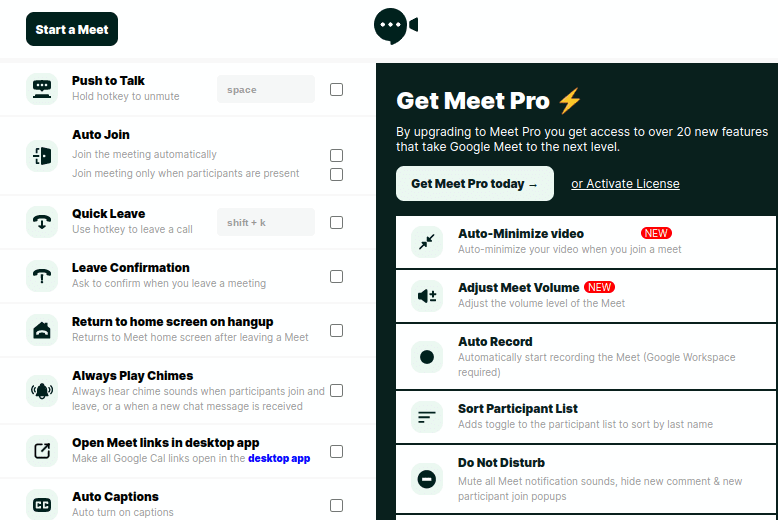
Google Meet Enhancement Suite in action
3. Use the “Mute” feature where needed
Did you know that it was possible to mute other participants in a Google Meet call whenever you needed to? A quick and easy way to take care of this is by first clicking on the “Show everyone” button in the bottom-right section of the Meet interface. Clicking on it should reveal a swath of more options on your end, thereby making it possible mute someone else.
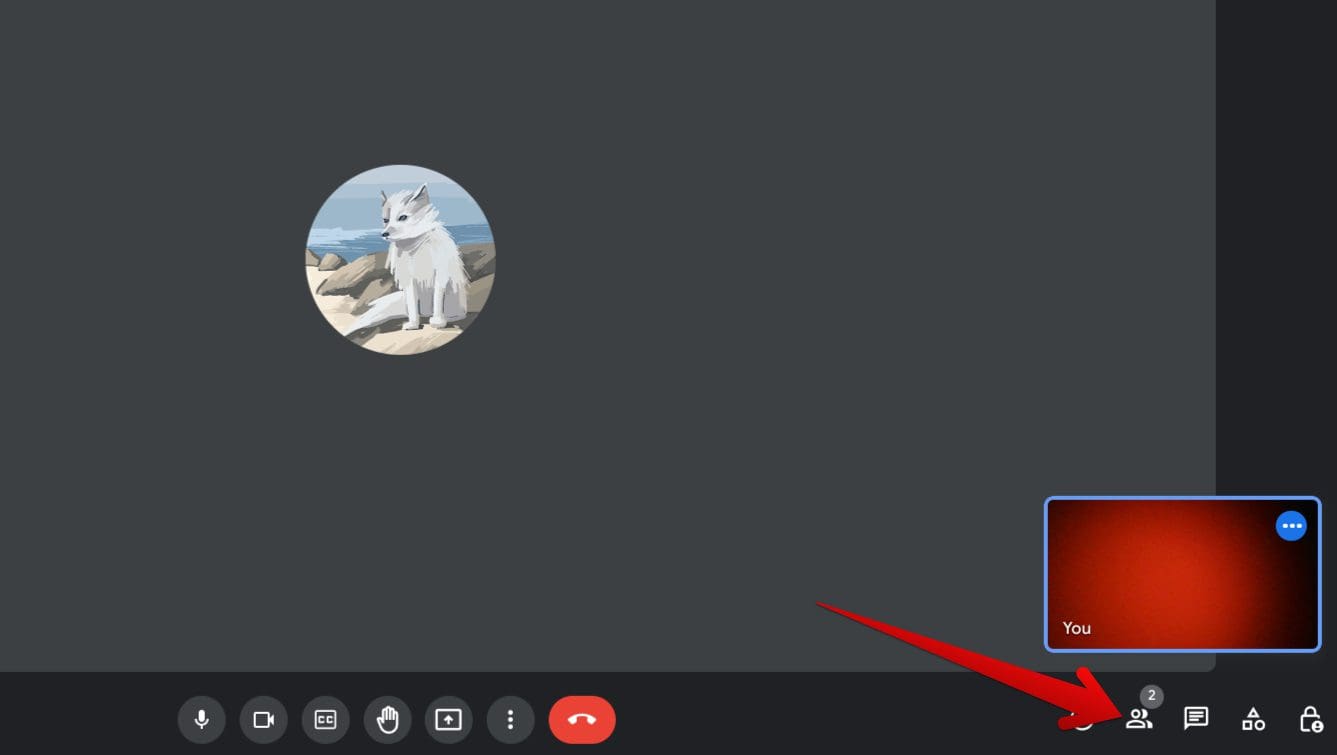
Clicking on the “Show everyone” button
For this to work, however, the person you’re trying to mute should already have their mic unmuted. That is to say; you cannot unmute other people in a Google Meet call. Otherwise, it would have been a thorough invasion of privacy. So, click on the mic button in the screenshot below to get to the next step.
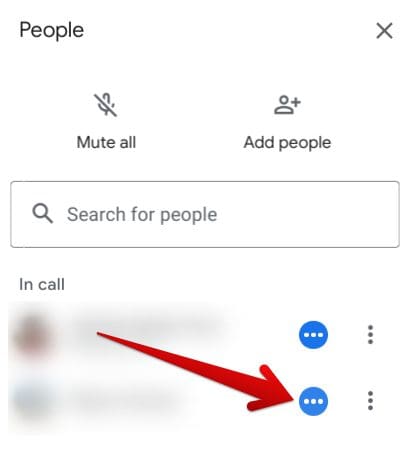
Clicking on the mic button
Completing the previous step is going to lead you to the following prompt. You will be notified once that the person whose name you’ve clicked on will be muted upon confirmation. Confirm the prompt by clicking on the “Mute” button, and you’ll have it there.
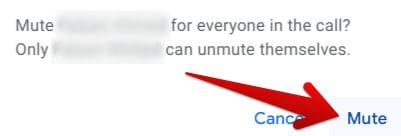
Muting a participant in Meet
4. Test your mic and camera before joining
Google Meet is pretty effective in this regard in that it lets users prepare before joining a Google Meet call on an invitation of someone else. Not only does it spare a moment before attending a video conference so you can benefit from a preview mode, but there’s also an in-built mic and camera test that will allow you to gain the upper hand. That way, you can avoid potential problems from the get-go in terms of not having an optimal Meet experience.
The testing feature works only when you’re joining someone else’s video call, so be wary of that. You can move forward with the testing feature as soon as you enter the code and arrive at the pre-launch screen. Click on the “Check your audio and video” button to take things ahead.
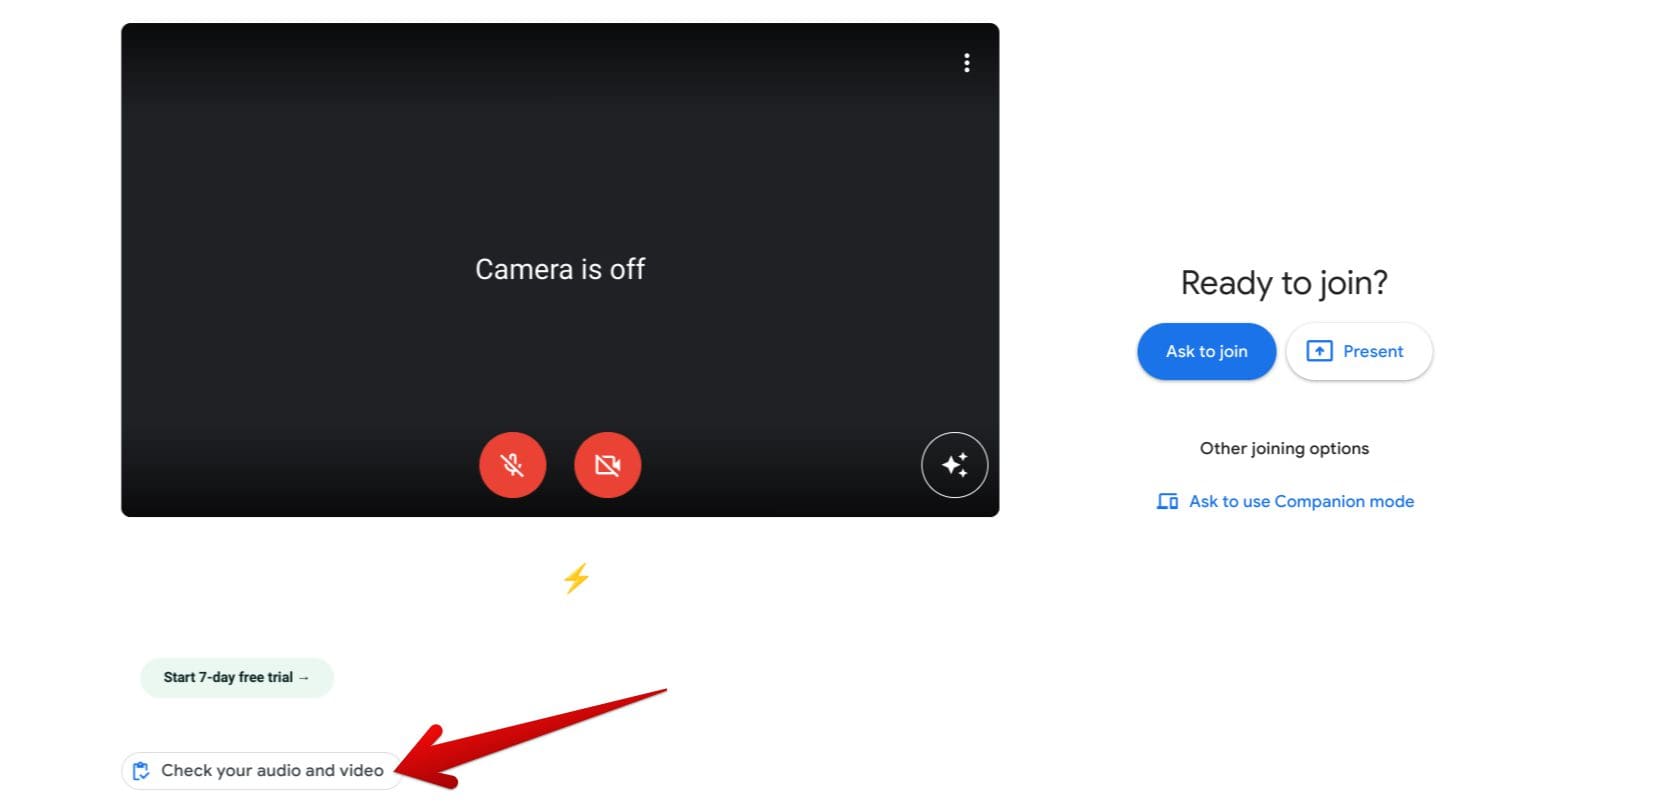
Testing mic and camera before joining a Meet call
After clicking on “Check your audio and video,” a window will appear on your end. This will be where you’ll capture any issues with your mic and camera components and then diagnose them immediately. You still need to complete one more step to kick into motion.
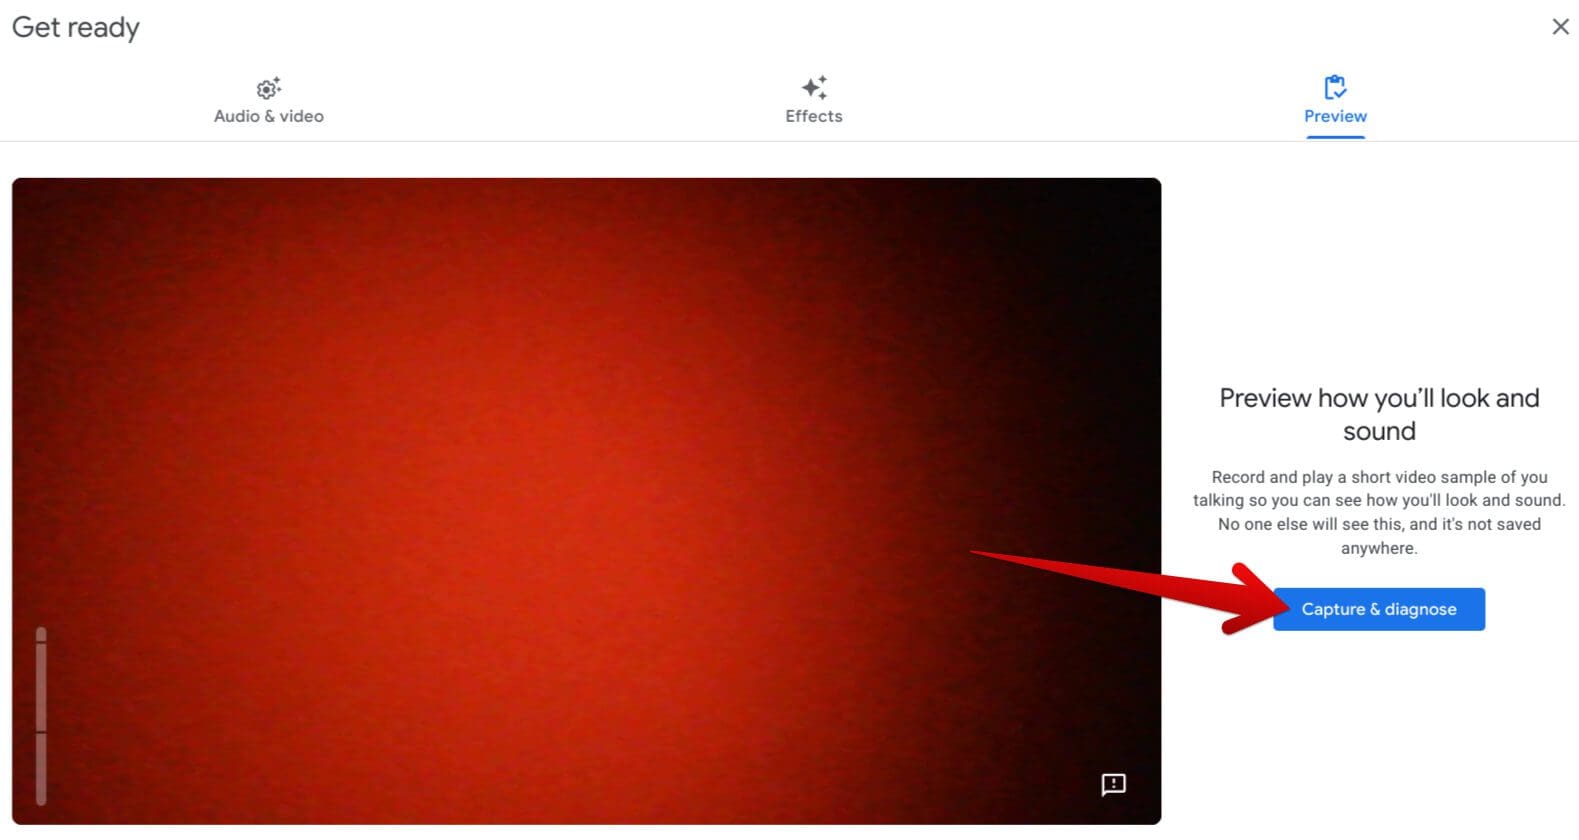
Commencing the mic and camera test on Meet
After clicking on “Capture and diagnose,” you next need to wait until Meet sorts the tests. You’ll be shown your results at no more than a moment’s notice. The “Your results” section on the side of the screen will detail all that you need to know in this regard.
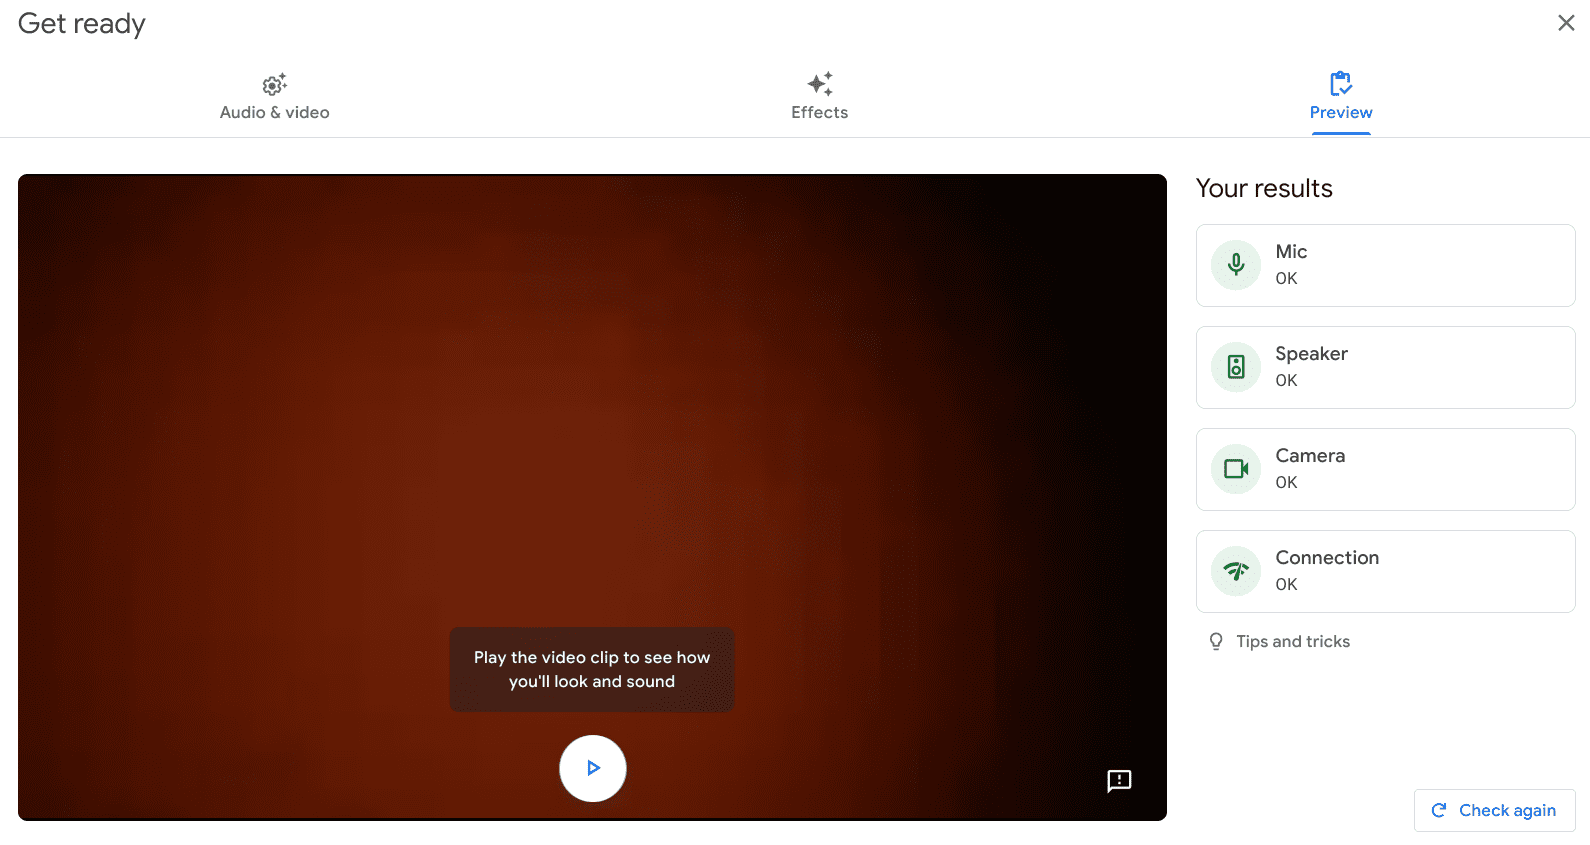
Testing successful
5. Switch up Meet’s tab arrangement
Another great way that you can use to elevate your Google Meet experience is by changing the layout of the tiles that you see on the screen. That way, if you ever get to host a sizable audience, you’ll be able to increase your visibility and better see everyone around you effectively. To begin, click on the “More options” button within your Meet interface and select the “Change layout” feature afterward.
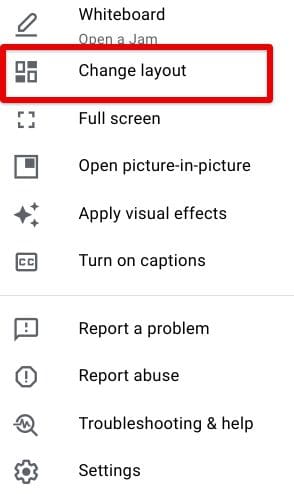
Clicking on “Change layout”
After clicking the “Change layout” button, choose what you’d prefer to go with out of the available options. You can opt for “Auto,” “Tiled,” “Spotlight,” and “Sidebar.” Each setting has its unique way of making the tiles appear on the screen, and given the illustration right alongside each entry; it’s easy to discern what option will do for you.
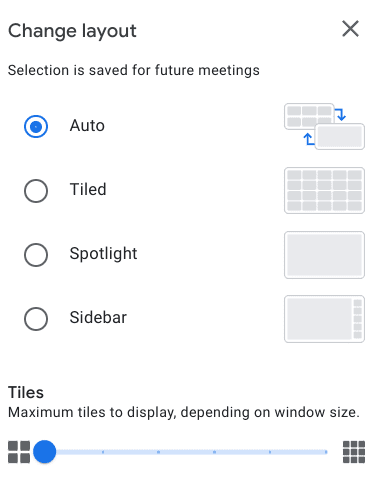
Changing the layout of the Meet tab
6. Adjust host settings
When you’re hosting a meeting on Meet, tweak the dedicated “host” settings to experience the best usability of video conferencing with others on your end. To begin, click on the “Host controls” button, which is situated on the far right of your Meet’s interface window. In addition, the button is shaped like a lock with a small-sized default profile icon on its lower end.
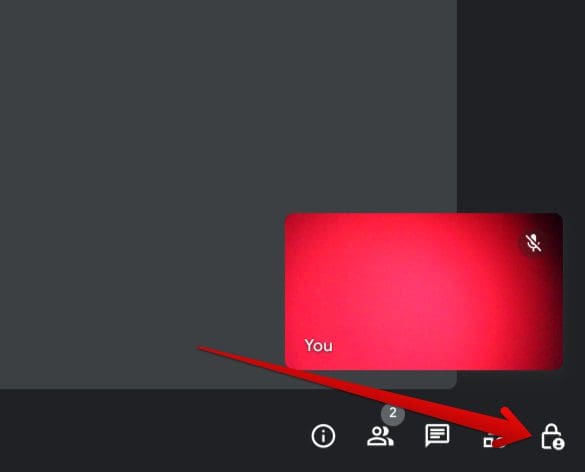
Clicking on the “Host controls” button
After clicking on “Host controls,” a menu will pop up on your end, allowing you to adjust several host controls that ultimately improve your Meet user experience. You must first enable the parent “Host management” toggle to make the other options pop up. After that, you can allow or disallow your joining participants to share their screens, send chat messages, and even turn on their microphones or video.
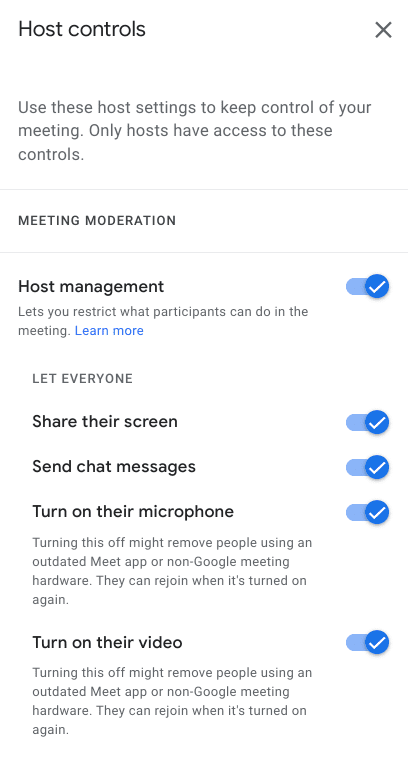
Host controls in Google Meet
7. Utilize the “Cast” functionality
Google Meet has strong cast features, allowing users to hook up their video conference connection to the big screen. In technical terms, supported devices such as smart TVs or other compatible tech gadgets such as Google’s Chromecast can help you get the job done in this regard. That way, you won’t be restricted to hosting your meeting on your laptop or PC’s screen. Instead, you can use an external monitor to magnify the scale of your meeting.
Get started by clicking on the same “More options” button in your Meet’s interface and continue by selecting the “Cast” feature. If that does not pop up, please acknowledge that you must connect a compatible device to your PC first. An alternative measure is to employ one of the in-built “Cast” features of Google Chrome. Click on the “Customize and control Google Chrome” button and then select “Cast” over the meeting window to get started.
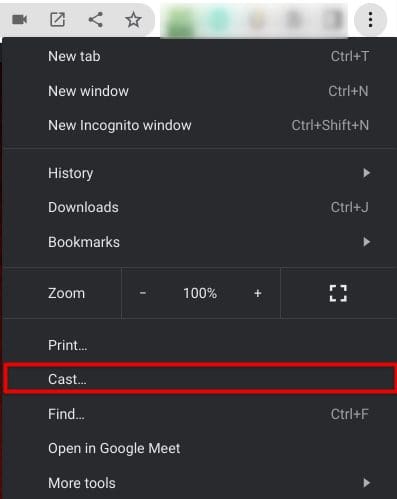
Using Chrome’s “Cast” feature
Upon clicking on “Cast,” a menu will appear in that area, allowing the browser to search for compatible devices so that the Cast functionality can be followed through with. Next, choose the device you’d like to transition to; that’ll do the trick. It’s as simple as that moving forward.
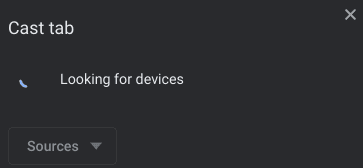
The “Cast” feature scanning for devices
8. Focus on whoever is speaking with the “Pin” tool
Next up, we’d like to nudge you toward the added ability of “pinning” someone during a Google Meet conference call. This effectively ensures you don’t lose someone of considerable significance in a large-format Google Meet call. You can painlessly employ the “Pin” feature to make anyone come to the screen front and center.
Hover over the tile of the person whose tile you wish to pin, and an option to do that should appear accordingly. Once done, click on the “Pin” button, which will be taken care of well.

Pinning a person in Google Meet
9. Use live captions wherever possible
This second-last tip that we’d like to highlight is nothing but intuitive. Similar to how you toggle on subtitles when watching television shows and movies, a built-in functionality lets you turn on live captions during a Meet conference. Doing so will help display captions at the bottom of the screen in real-time as the other person speaks or you conversate with your participants.
To begin, click the “CC” button beside the video toggle. The latter is dedicated to living captions solely. An alternative way of using live captions is to press the “C” key on your keyboard, so it acts as a hotkey for the tool at hand and enables it immediately.
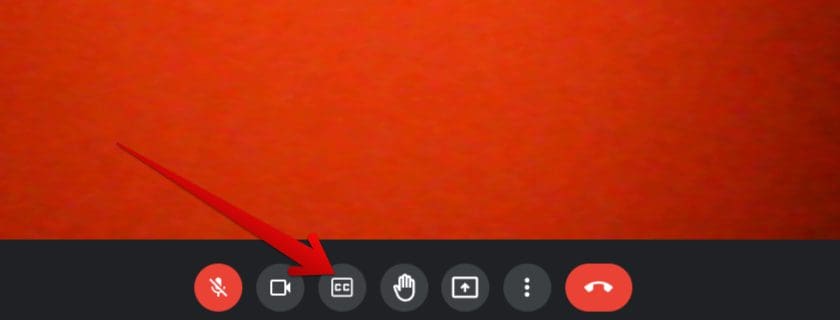
Enabling live captions in Google Meet
Once you turn the feature on, anyone who speaks will have their audio transcripted in live captions.

Live captions in action
10. Make sure you’re using the best video resolution
Often, we do not realize it, but the video resolution that our camera uses on a device isn’t tuned to show the best possible quality. We recommend shedding some light on this instance and determining whether that is the case. Begin by clicking on the “More options” button in your video call’s main screen and selecting the “Settings” option.
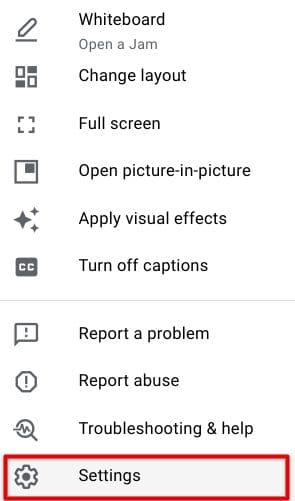
Clicking on the “Settings” button
After clicking on “Settings,” the next step is to select “Video” from the sidebar. After that, ensure your “Send resolution” and “Recieve resolution” are set to the highest available resolution for the best results.
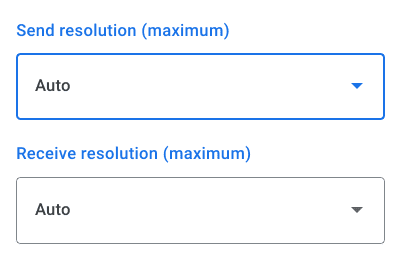
Selecting the highest available resolution on Google Meet
Bonus tip: Enable the lighting feature for better video quality
To top things off with a bonus, there’s an added feature within the “Video” portion of your Google Meet’s “Settings” that can help your background quality stand out when holding conferences in dimly lit environments. Follow the instructions outlined in the previous section to get to the “Video” department. Once you’re there, enable the toggle beside “Adjust video lighting,” and that’ll be it.
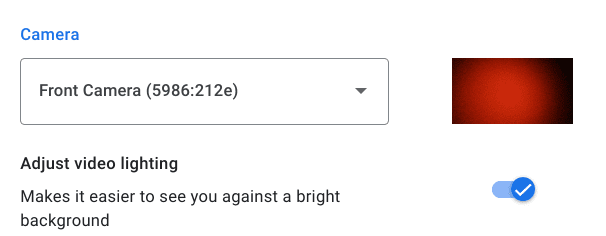
Enabling the relevant feature
Conclusion
Google Meet is one of the most convenient video conferencing software ever coming out, offering a robust competitive solution to businesses, enterprises, and individuals worldwide. It’s loaded to the brim with features and works on the web on any PC, including Chromebooks and Macbooks while offering mobile operating system users a rapid gateway to access the application.
Since Google Meet is a comprehensive program, it helps you stay ahead of the curve with various tips and tricks you can employ while using the software. In this guide, we’ve taken a close, hard look at just that, detailing some of the most helpful information for aspiring Google Meet users to benefit from. Please let us know in the comments section if you found the write-up useful.
