Chromebooks are highly accessible machines that seem to sport more speed, stability, and, most importantly, security than their counterparts. From being able to work with the Google Play Store to featuring Linux apps to go alongside ChromeOS, there’s just no way a Chromebook cannot appeal — to some extent — to a modern-day computer user in 2022.
As for the Chrome browser, this high-quality internet surfer is one of the cornerstones of a Chromebook. If you’ve been meaning to enhance your Google Chrome user experience, our advice is to turn to the usage of bookmarks day in and day out. Oh, what’s that? You’re not so sure about this functionality on your end?
In that case, no need to worry. This guide will cover everything you need to know about this essential Chrome tool, including how to add, delete, and manage bookmarks on a Chromebook. So let’s dive into the tutorial straight away.
- Similar read from Chrome Ready: How to use the side panel to manage bookmarks in Google Chrome.
What are bookmarks, and why should you use them?
Bookmarks are originally derived from instances where you place a small-scale random material-made script inside a book on a specific page. In these cases, the purpose of a bookmark is to help you remember a particular page, so you can continue reading right where you left off.
To talk about PC bookmarks now, think of these as means of returning to your favorite websites quickly with zero extra steps in between. Bookmarks feature a bar at the top of the Chrome browser interface called the “Bookmarks bar.” It can be toggled on by pressing and holding “Ctrl” and “Shift” and then following it up with the “B” key.

Bookmarks bar in Chrome
That is a quick and easy way to get right into using bookmarks. Instead of typing the address of your most visited sites, you can rely on bookmarks to get you straight to the site of interest. The best part is that you can add as many bookmarks as you want and even create folders within the “Bookmark manager” section to sort and organize your bookmarks.
With all of the above being said and done, there’s more to this utility than what meets the eye. The following section will take care of that and discuss bookmarks in detail, starting with how to add bookmarks and finishing with their management.
- A touch of customization: How to customize Google Chrome toolbar.
Utilizing bookmarks on ChromeOS
There are multiple aspects of the bookmark feature in the Google Chrome browser, but talking about them all in one go is unlikely to clarify the explanation. That is why we’ll be breaking up the most significant sections associated with utilizing the bookmark functionality for better readability.
- Do check out: How to import bookmarks on a Chromebook.
How to add bookmarks on a Chromebook
Adding bookmarks to your Google Chrome browser on a Chromebook is an utterly simple task. You must first visit a website you wish to bookmark and then choose one of the three options to bookmark it on Chrome. It’s genuinely a straightforward process.
The primary method to bookmark any tab, page, or website is to click on the star-shaped icon next to the “Share this page” button on your open tab’s address bar.
Bookmarks button in Chrome’s address bar
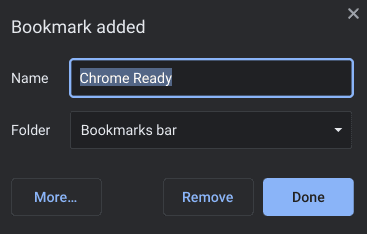
After clicking on the star-shaped “Bookmark this tab” button, a menu will pop up in that space, allowing you to add the bookmark to your Chrome browser painlessly. Next, you will observe a couple more options within the same menu, making it possible to specify the folder where the bookmark will go. Once finished, click on “Done” to top it off.

Adding a bookmark to Google Chrome
That’s one way covered about learning how to add a bookmark to your Chrome browser. However, if you’d like to make it even easier to add bookmarks while using your Chromebook, feel free to use the shortcut key combination of “Ctrl” and “D” to instantly bring up the same menu as above and instantly create a new bookmark.
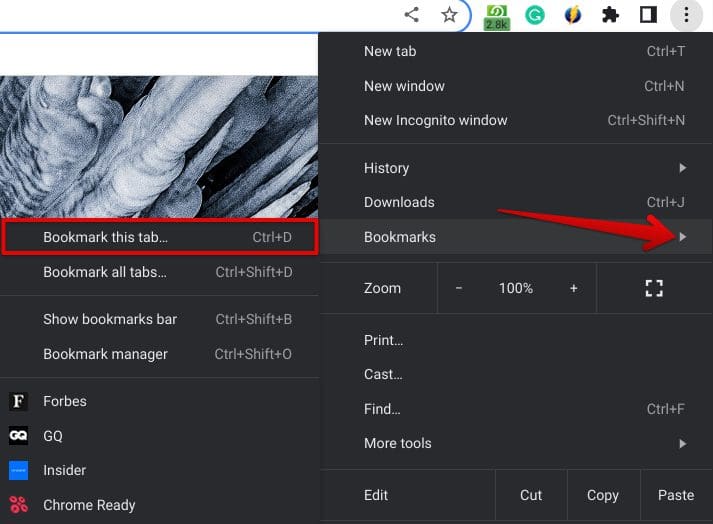
However, there’s another way to help you achieve the same results, and it’s oriented toward using the “Customize and control Google Chrome” button, which sits in the top-right corner of the Chrome browser’s interface.

Clicking on the “Customize and control Google Chrome” button
Once done, a swath of additional options should pop right up. Hover over the “Bookmarks” section and click on the “Bookmark this tab option.” Doing so will bookmark whatever website you’re on without breaking a sweat.

Bookmarking a tab on Google Chrome
That is all you need to know about adding a bookmark to your Chrome browser on ChromeOS. We’re far from done yet, as we still need to learn how to delete bookmarks. Let’s get on with that in the following section.
How to delete bookmarks on a Chromebook
Adding bookmarks is good and all, but you also need to know how to delete them when it comes down to managing your bookmarks section for the best results. Again, there are multiple ways to remove existing bookmarks on your Chromebook.
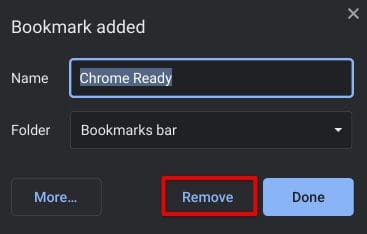
One of the first methods you can use revolves around utilizing the “Ctrl” and “D” shortcut keys on a page that has already been bookmarked. Once you execute the shortcut key combo, the same “Bookmark added” pop-up should surface on the screen, but you’ll be concerned with erasing it from now on. Click on “Remove” to delete the bookmark.

Removing a bookmark
Another way is to head to the bookmarks manager section and cherry-pick your selections. We recommend using this method to be more productive in removing unwanted bookmarks. The following excerpt will expand on that and provide more in-depth details, so let’s dive straight into it.
How to manage bookmarks on a Chromebook
Now that you’ve learned how to add and delete bookmarks on a Chromebook, you can kick things up a notch and delve into some of the advanced settings that the bookmarks feature on ChromeOS has to offer. All you need to do is head over to the “Bookmark manager” section on your Chrome browser, which will set you up to manage your bookmarks afterward.
You can do this by clicking on the “Customize and control Google Chrome” button and then hovering over the “Bookmarks section. The option to access the “Bookmark manager” should appear subsequently. Click on it to proceed. Alternatively, you can also use the shortcut key combination of “Ctrl,” “Shift,” and “O” to launch the managerial area afterward.

Clicking on “Bookmark manager”
Doing that should open the following screen on your end. Here, you can manage your bookmarks by deleting, importing, exporting, editing, copying their URL addresses, and creating folders to arrange them in a specific order. This feature-rich section of the Chrome browser is all you need to acquaint yourself with for the best results.

Google Chrome’s “Bookmark manager” section
To get started with some of the major managerial features, click on the “Organize” button in the top-right corner of the “Bookmarks” page. Several options will surface on your screen accordingly. From here, you may as well import bookmarks on a Chromebook and even choose to export Google Chrome browser bookmarks—the choice is yours.

Managerial features on the “Bookmarks” page
Moreover, there’s also the added functionality of adding new bookmarks to the Chrome browser here, but that method will pertain to a more manual approach. You will need to enter the website URL yourself, should you choose to opt for this route. We recommend against it, however, since the techniques above are much better suited to the task at hand.
If you want to sort your bookmarks in a more organized manner, the option to create folders will be available here too. Click on the “Add new folder” button to bring a dedicated menu up and follow the on-screen instructions accordingly.
Last but not least, the “Bookmarks” page also lets you work on a single bookmark. Apart from cutting, copying, and pasting a bookmark link, you can edit a bookmark to alter its URL or name and even delete it if necessary. Click on the “More actions” button beside the bookmark to reveal a list of options on the screen.

Managing a single bookmark
That’s all there is to know about adding, deleting, and managing bookmarks on a Chromebook, so you shouldn’t need another tutorial to facilitate your progress. It’s high time to conclude the article at this point.
Conclusion
With a wide range of accessibility tools and features, ChromeOS has exceeded all expectations a decade after its initial inception. Chromebooks are fast, simple, and secure machines that can run software like WordPress, Kali Linux, and even OpenShot Video Editor—to name a few.
In this guide, we’ve covered one particular facet of a Chromebook’s Chrome browser, which pertains to all things bookmarks. A bookmark is a handy utility that gets us to our favorite websites in no more than a moment, and the best part is this nifty tool can be managed to a full extent on ChromeOS.
Do let us know whether you found this guide helpful for your cause. As always, Chrome Ready wishes you good luck!
