Chromebooks are utterly capable machines built with the founding principles of speed, stability, and security. Since the promulgation of ChromeOS in 2011, developers have been hard at work trying to create the ultimate user experience for Chromebook owners.
Apart from these high-quality tips for first-time Chromebook users, there are certain tricks and hacks that you’ll find fantastic to employ daily. This guide will go through the top 10 excellent Chromebook usage tips and tricks you should know to get the most out of your device.
Let’s get started with no further ado.
- Follow-up read: Top 20 Chromebook Tips and Tricks.
10 of the coolest Chromebook usage tips and tricks to know about
The following is our round-up of 10 cool Chromebook tips and hacks that can help you gain the upper hand in the day-to-day usability of your device. Make sure to read until the end for the best results.
- Recommended by Chrome Ready: 10 tips for faster browsing with Google Chrome.
1. Use trackpad gestures for seamless navigation
The trackpad is one of the most glaring superpowers for a Chromebook sports day in and day out. Not only does it replicate the functioning of a mouse, but there are more features to this crucial device component than what initially meets the eye.
ChromeOS makes it possible to benefit from various trackpad gestures, contributing to faster operating system navigation. In our detailed guide on fast Chromebooks, we go over multiple factors that can deliver guaranteed results in speeding up your browsing on a Chromebook.
However, what we’re talking about here goes beyond the usual tips and tricks. It turns out that Chromebooks allow their user base to delve into multiple trackpad gestures and shortcuts that, in turn, offer a seamless user experience.
Here’s an overview of some of the best trackpad shortcuts you can start using on your Chromebook and look fabulous while pulling them off.
- Enter Overview mode: The Overview mode can be employed by swiping three fingers on the trackpad.
- Switch from one opened Chrome tab to the next: You can switch from one Chrome tab to another by swiping left or right with three fingers on the trackpad
- Go to the previous or the following page: It’s easy to go to the next or previous page by swiping two fingers in the left or right direction on the trackpad.
- Open link in a new tab: Hover your cursor over any link and tap on it with three fingers to open the link in a new tab.
- Transition to another desk: Swipe four fingers in the left or right direction, depending on the location of your virtual desk, to switch to it seamlessly.
For a more detailed account of these time-saving trackpad gestures, we highly recommend checking out our in-depth guide on multitasking like a pro on Chromebooks.
- Related read: 10 Things you might not know about Chromebooks.
2. Harness the convenience of Google Assistant
Google has facilitated every Chromebook with its very own virtual handyman, or should we say handywoman. Google Assistant is an AI-powered tool that can handle several of the device’s daily tasks. We’re pretty sure you’re already acquainted with the functionality on your Android smartphone.
Right off the bat, you should first be concerning yourself with enabling Assistant on your Chromebook if you haven’t done that already. As soon as you take care of that, you’ll need to be indulging in the effective use of Google Assistant. Check out our thorough write-up on that front for the best results.
It’s undoubtedly excellent for you to voice control your Chromebook for getting a whole variety of things done across the board, including playing songs, and YouTube videos, opening and shutting down apps, setting reminders and alarm clocks, letting Assistant find your Android phone, and even checking the weather.
Moreover, to highlight other noteworthy Assistant features, you can even get the virtual jack of all trades to play relaxing audio. Whether you need to take a breather or sit back and unwind for half an hour, Assistant has a host of audio tune selections that will work like a charm on your end.
Last, don’t forget to perform basic Chromebook actions, such as lowering or increasing your volume, with an Assistant by your side. That way, you may not have to use your keyboard often. Just make sure you’ve set up the functionality before trying to utilize it fully.
3. Learn to split your Chromebook’s screen
Another cool tip that we think can switch up how you use Chromebooks is splitting your screen into different parts. Although a much-needed functionality called “Partial split” is on its way to ChromeOS in one of the upcoming iterations of the operating system, there’s still an easy-to-grasp method for creating portions on your screen.
All you need to do is take your cursor over to the “Restore” button on any opened window on your Chromebook. Once done, you should be able to click and hold the click button to bring up more options on the screen. From that point onward, you can take your opened window to the left side of the screen or the right.

Splitting the screen on ChromeOS
Once you have one window set up in one direction using the method explained above, you can easily repeat the process with one more window, so two different windows are accessible on your end. An alternative approach to this is by pressing the “Alt” key followed by pressing “[” or “].” Selecting either bracket will push your window to that side respectively.
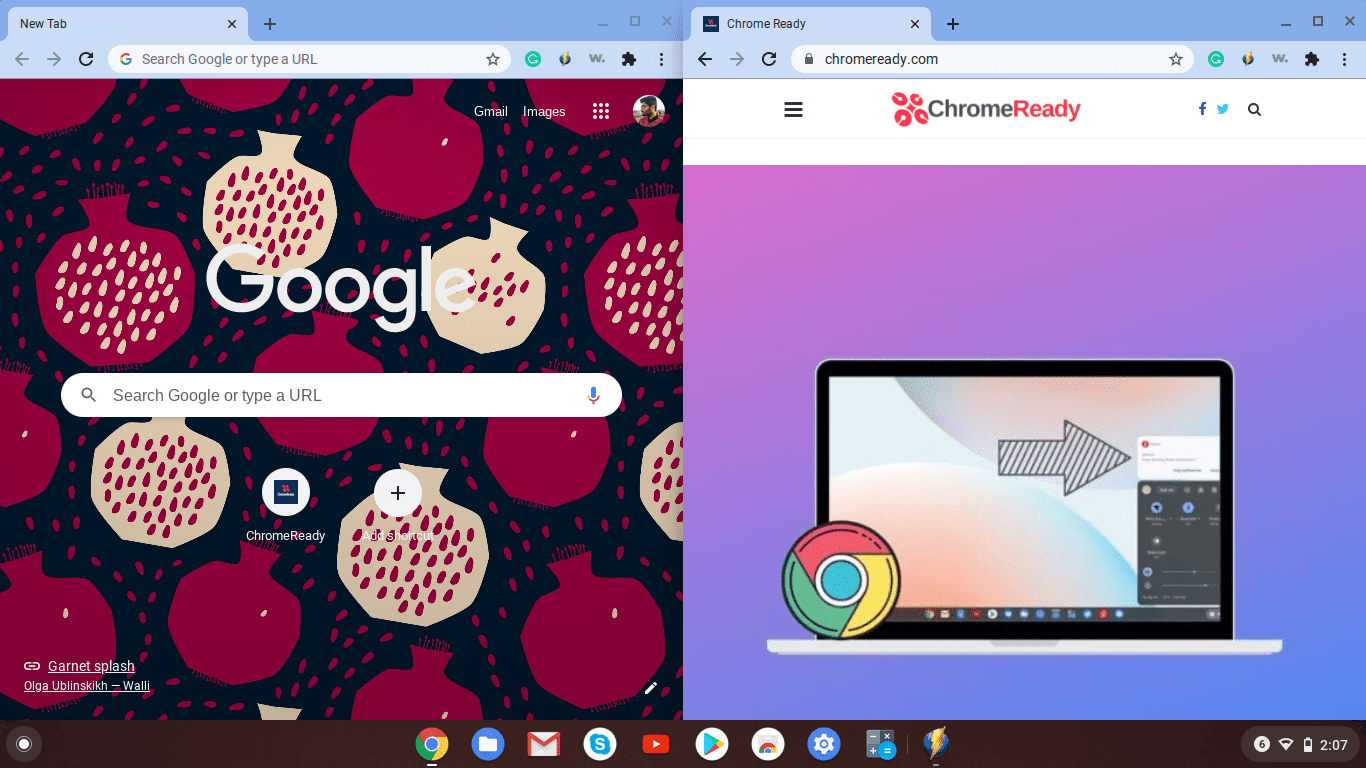
The split-screen feature on a Chromebook
- For more details on getting this done, we highly recommend checking out our complete guide on how to split screen on a Chromebook.
4. Switch up the location of the ChromeOS shelf
Another excellent tip you can employ on your end to make your Chromebook’s desktop look a tad different than the rest is switching up the shelf feature’s location. The latter is that distinct panel that sits at the bottom of the ChromeOS interface, allowing one seamless access to some of the major apps of your Chromebook.
However, little do many know that the default location of the ChromeOS shelf, which is right at the very bottom of the operating system’s user interface, can be switched up.
All you need to do is right-click anywhere on the home screen of your Chromebook and that’ll make a couple of options appear on your end. Hover over “Shelf position” and select your shelf’s new location by either selecting “Left” or “Right.”
The entirety of the operation shouldn’t take more than a few seconds. Enjoy your Chromebook’s home screen looking all different afterward!
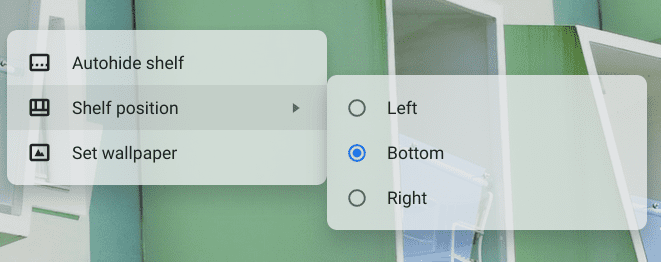
Changing the shelf position
5. Multitask with virtual desks

Closing a virtual desk on ChromeOS
Employing the use of virtual desks is something that we can recommend to anyone who wishes to push out maximum levels of productivity on their Chromebook. The feature in question is quite adept at holding different windows open at once while allowing users to switch from one desk to another in a lightning-quick manner.
Apart from swiping three fingers up on your Chromebook’s trackpad or pressing the “Show Windows” key on your keyboard, you can painlessly swipe four fingers in the left or right direction on the trackpad to switch from one virtual desk to the other. The transition that takes place is flat-out seamless. Do try this tip right out the gate with your Chromebook.
Thankfully, the developers up high have been paying attention to virtual desks as early as ChromeOS 78. Several newer versions of the operating system later, virtual desks continue to be a top-notch feature of Chromebooks, further facilitated by the “Overview” tool that can be toggled on using a distinctive Chrome flag.
As for further updates toward virtual desks, both ChromeOS 105 and ChromeOS 107 have improved the functionality in question, making it one of the most stand-out features your Chromebook can offer.
- If your interest is piqued and you wish to know more, check out our complete guide on using the updated ChromeOS virtual desks.
6. Utilize the launcher
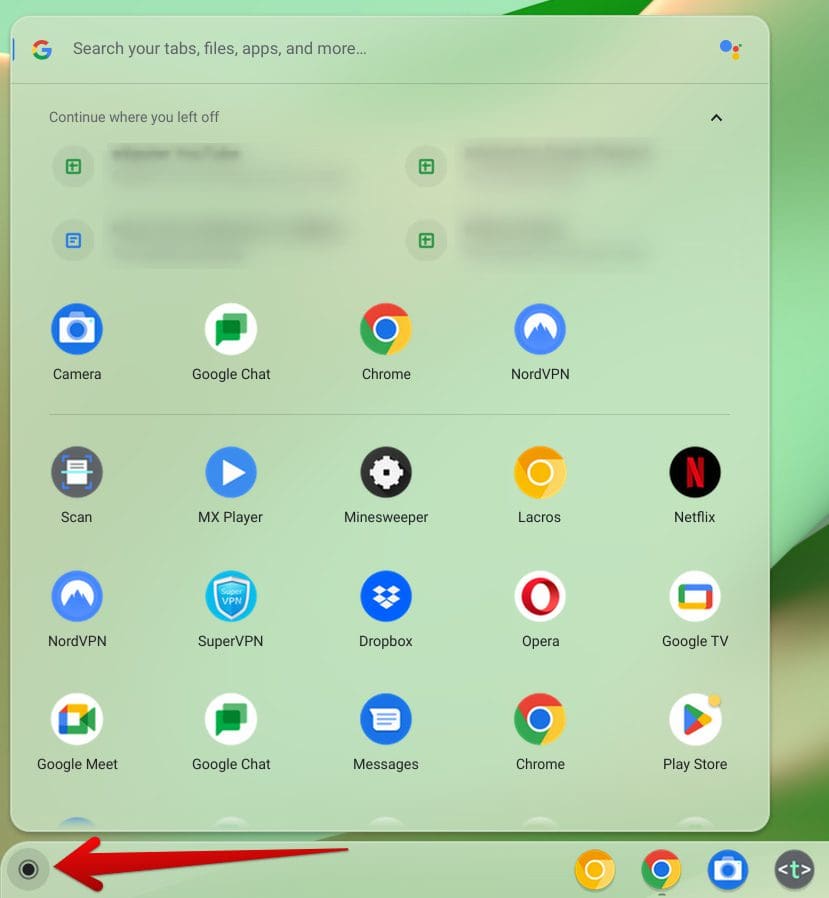
ChromeOS launcher area
The ChromeOS launcher is not the same as it used to be, especially if you trace its features to a couple of years back. Today, your Chromebook’s launcher tool can resolve simple queries in the blink of an eye. Try putting it to the test and ask it to resolve a mathematical equation for you or, perhaps, inquire about the weather.
You can use the launcher to get around your Chromebook better alongside all these possibilities. The feature in question brings forth a quick way of searching for files stored on your Chromebook or tucked away in cloud storage online, whether they be documents, media, or any other file type.
The launcher also serves as an app tray for your Chromebook, allowing you to look for and launch installed applications effortlessly. Moreover, the launcher has been upgraded with new search functions too. It can show you a brief preview of your query without loading the page.
7. Invert colors on ChromeOS
Don’t have a specialized dark mode on a particular website? No need to fret. There’s quite a manual way of enjoying some semblance of a dark mode on your Chromebook with one of the most notable ChromeOS accessibility features and tools.
The functionality in question can be accessed quickly by clicking on the System Tray area. You can see the time along with the battery and Wi-Fi signals in the bottom-right corner of the ChromeOS user interface. Once done, a swath of options should pop up in that area, allowing you to further the procedure by clicking on “Accessibility.”
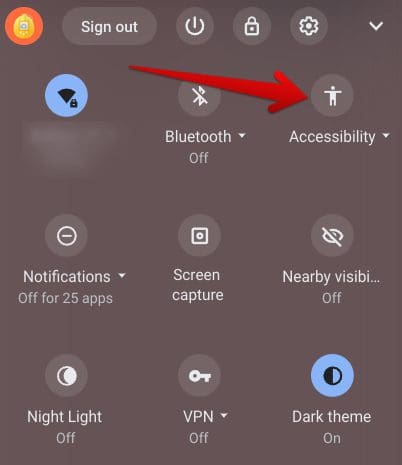
Clicking on the “Accessibility” area
The next step is to click on the “Color inversion” feature after selecting “Accessibility.” That should do the trick for you right afterward. So enjoy this self-help dark mode on your Chromebook moving forward. It will sometimes feel a little off, but you can certainly get used to functioning like this, provided you’re utilizing it consistently.
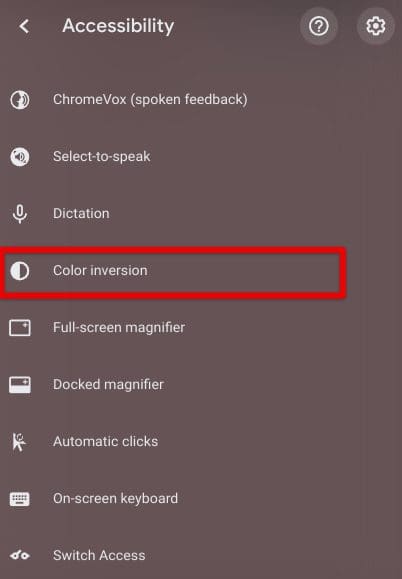
Inverting your ChromeOS colors
8. Try automatic clicks
If your Chromebook’s trackpad ever messes up or doesn’t work up to the mark, you can employ a neat, native functionality called “Automatic clicks” to make your cursor do all the handiwork for you.
Simply venture to the same area above by accessing the System Tray and probing the “Accessibility” region. Once done, scroll down if you have to and click on the “Automatic clicks” option, as shown in the screenshot below.
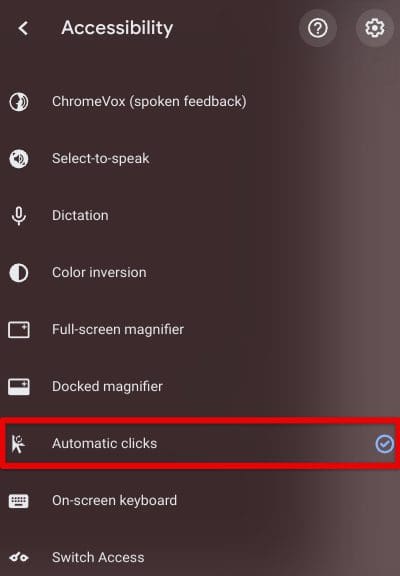
Selecting the “Automatic clicks” feature
While taking care of that will enable the “Automatic clicks” feature, we recommend clicking on the cog-shaped “Settings” icon to explore the functionality at hand more in-depth.
Clicking on the “Accessibility Settings” icon
In the latest system update, Chromebooks seem to have their “Accessibility” section sorted, organized, and arranged. After completing the previous step, you must click on the “Cursor and touchpad” section to move forward.
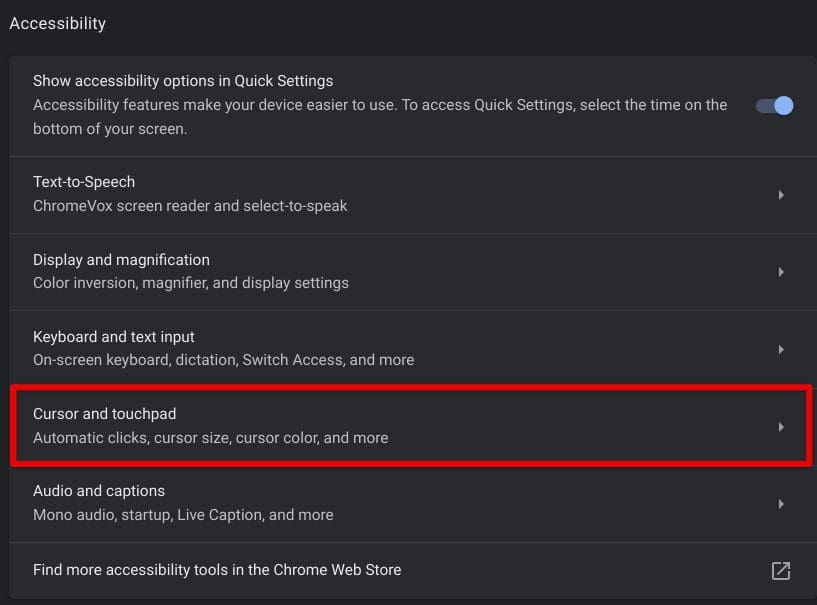
Clicking on the “Cursor and touchpad” section
Finally, after completing the previous step, you’ll arrive at the distinct “Automatic clicks” section on your Chromebook. It would be best if you looked at all the facilitating options available concerning utilizing the functionality in the best possible manner.
You can adjust the delay before click time and specify the cursor area size to better use “Automatic clicks.” This nifty feature can help you avoid clicking on your Chromebook’s trackpad or an external mouse when you’re not feeling like it.
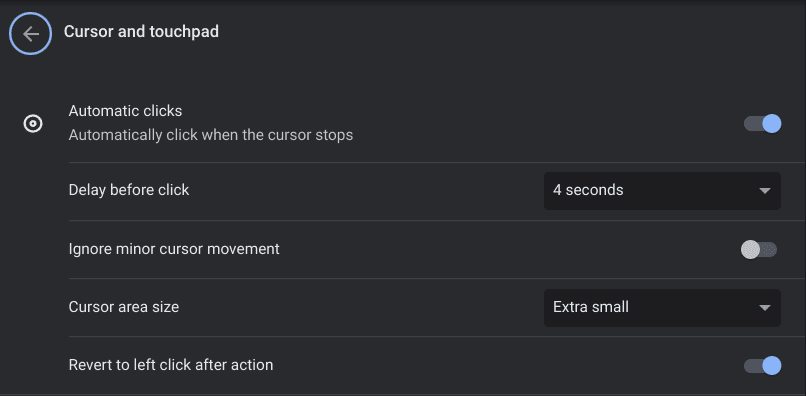
“Automatic clicks” section
9. Use docked magnifier for screen magnification
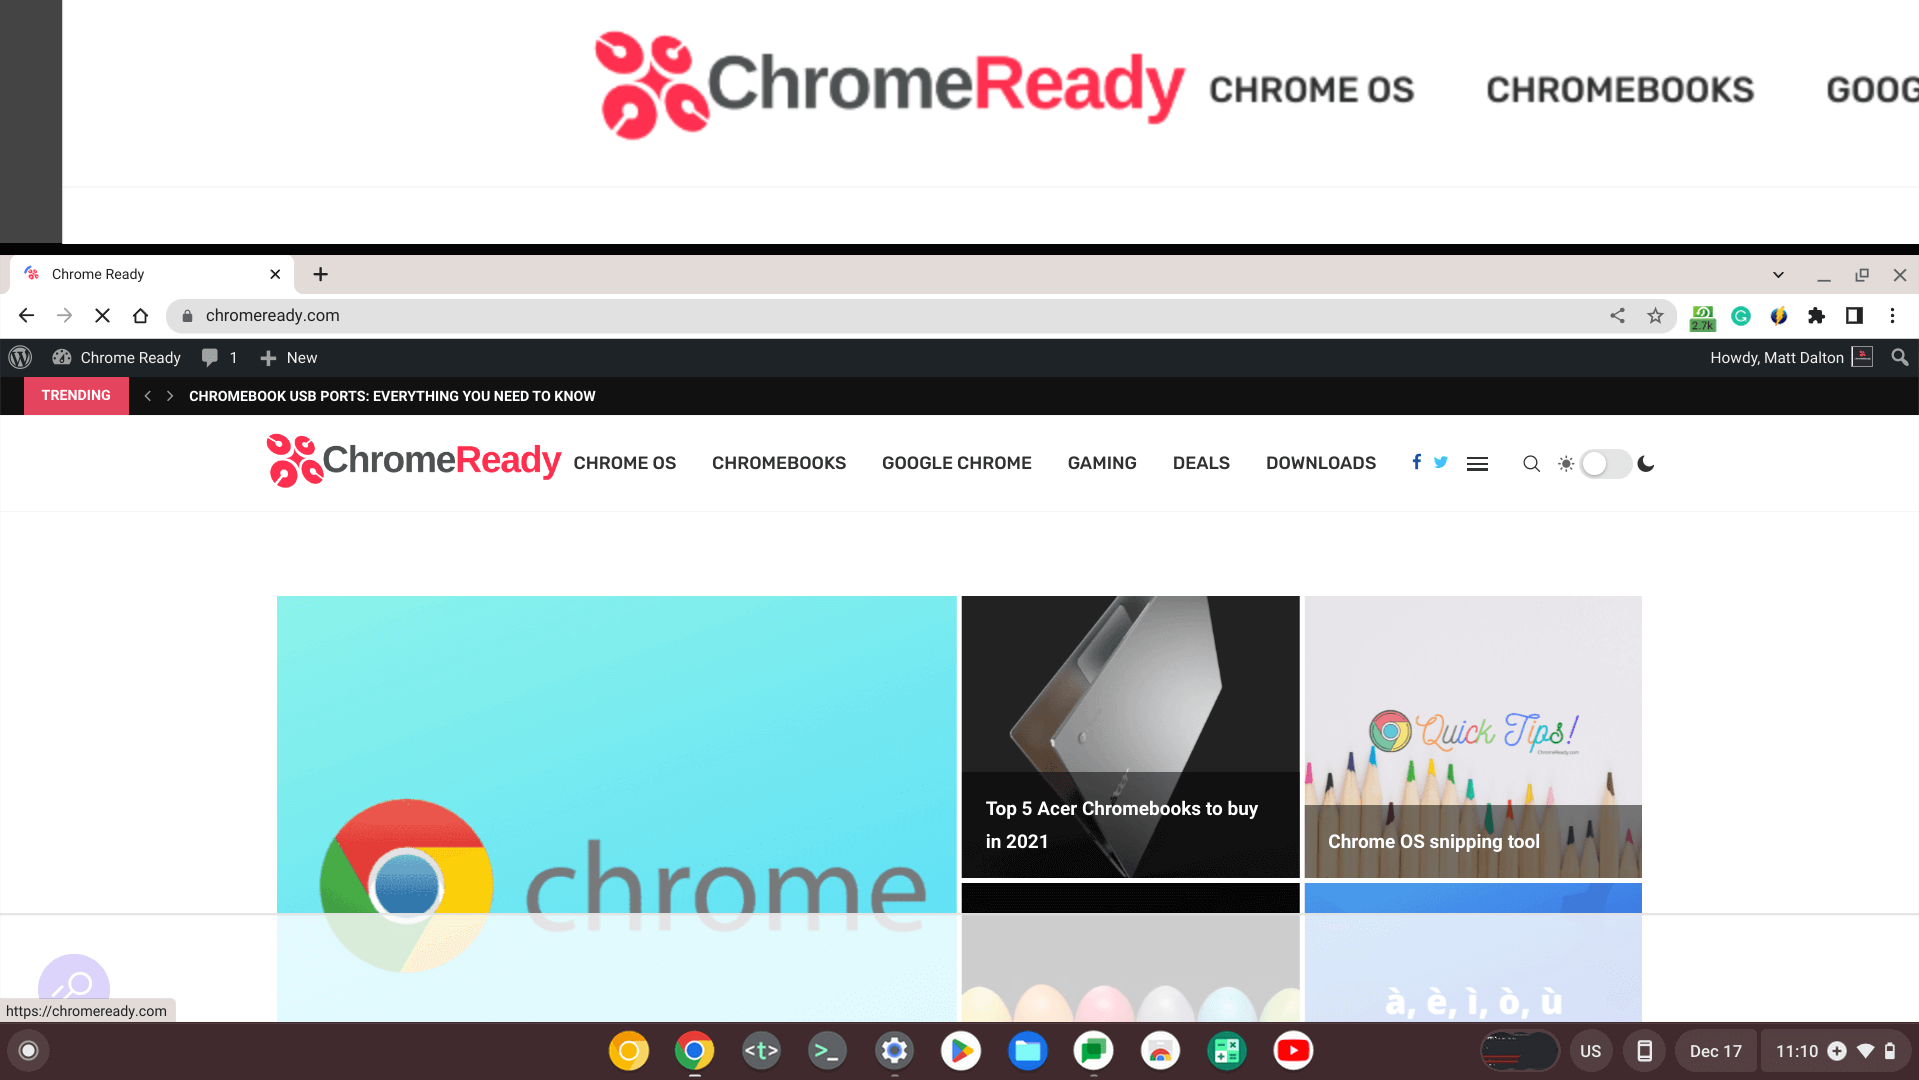
Docked magnifier in action on ChromeOS
Another cool tip you can use to experience a novel side of ChromeOS revolves around toggling on a functionality called “Docked magnification.” The latter is a tool that can help you magnify the text on your screen while retaining some portion of it as outright normal.
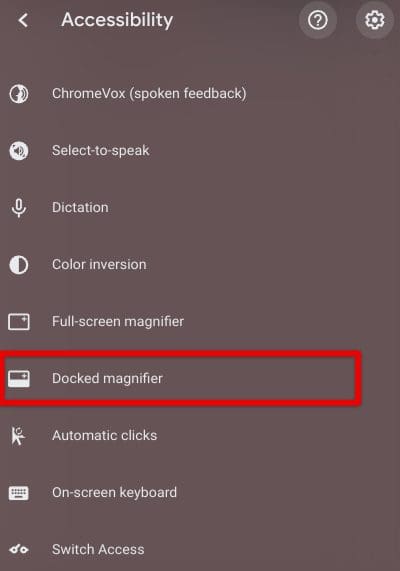
Enabling the “Docked magnifier” feature
In doing so, you can split the screen midway and enjoy one part that offers an in-depth zoom, whereas the lower portion of the screen will remain unmagnified. The entirety of the functionality looks quite lovely and can help people with a visual impairment of some sort.
To enable the “Docked magnifier” feature, head to the “Accessibility” section again, similar to what you did in the previous two tips, and click on the tool’s name. Your screen should divide itself into two portions automatically. Feel free to adjust the size of the two portions with the help of the middle line. Use your cursor to resize the two parts.
10. Take lightning-quick screenshots with the in-built screenshot tool
Just like the in-built screenshot tool app of Windows, ChromeOS also comprises a snipping tool and it’s all about capturing the contents of your screen eloquently. Out of all the various screenshot tools present at the disposal of a Chromebook, the in-built pertinent tool of these sleek devices is heavily preferred by many.
The reason for this is the latter’s speed and simplicity. All you need to do to take a screenshot on the fly with its help is press the “Ctrl” and “Show Windows” keys together, and that’ll do the trick. However, if you’re after more advanced controls, throw “Shift” in this shortcut key combination, and you’ll observe a menu appear on the screen while dimming the backdrop.
Here, you can choose to take different types of screenshots, and even screen record them on your Chromebook. The interface is lightning-quick and seems to improve consistently month in and month out. Whether you’re new to Chromebooks or someone who’s become a hardened veteran, the in-built screenshot tool is a must-utilize.
Conclusion
Chromebooks are some of the speediest devices you’ll ever get to use in the day and age we live in today. These machines are loaded with accessibility tools and features from top to bottom, making it possible to put Chromebooks to good use in various domains, such as business and education.
In this guide, we’ve doled out some of the coolest Chromebook usage tips and tricks you should know about if you’re a ChromeOS user. So do let us know in the comments section whether the tutorial helped you the most. As always, Chrome Ready wishes you good luck!
- Before you leave: How to enable GPU acceleration for your Chromebook’s Linux.
