The latest Chrome stable release is Chrome 108, and you can only gauge how far has this internet browser come during all this time. From viewing and editing saved credit cards to using multiple profiles simultaneously in the net surfer, Chrome has several functions that highlight its dominance in the competition.
This guide will highlight a specific portion of the Chrome browser’s customizability. Since users already know how to customize the New Tab background on Google Chrome, it pays off to learn how to customize the Google Chrome toolbar. Doing so can yield convenience for users and allow them to get more out of the Chrome browser in the coming days. Let’s dive into more detail on this without wasting any further time.
- Check out next: How to take a screenshot on Google Chrome.
What is the Google Chrome toolbar?
Out of all the different components that constitute the graphical interface of Google Chrome, there exists the toolbar area just as well that you can focus on and become more productive in your functional capacity. If you are typically well-versed with software such as Microsoft Word, Microsoft Excel, and Microsoft PowerPoint, you will observe the presence of a toolbar in all these applications that comprise functions such as File, Edit, View, Insert, and others.
That’s usually what one would think of when referring to the toolbar of any software. With that said, on Chrome’s side of things, the toolbar is a bit different. Two various toolbars exist in Chrome, each of them sporting a dedicated function. The first toolbar is called the “extensions toolbar,” whereas the other is called the “bookmarks bar.” There’s also the main address bar in Chrome that you can tend to, and we’ll be getting more into it later.

Chrome Toolbars – Extension Toolbar (Red) and Bookmarks bar (Green)
Therefore, you don’t get a single toolbar in Chrome that takes care of the critical processes of the internet browser. Instead of that, Chrome’s functionality is divided into multiple aspects. Others see this as an inconvenience, while most network world views the instance as rightfully placed. Another part that you have to be wary of is that the different toolbars in Chrome are only customizable to a certain extent.
Although some modifications come across as handy, Chrome notably lacks in the domain of toolbar customization. With that being said, there are still ways to tune the Chrome browser’s multiple toolbars in a way that you potentially become more productive at your craft. Furthermore, some of the added adjustments we’ll be getting into can help you navigate the wide interweb quite easily.
Now that you know the ideology of toolbars in Google Chrome, we’ll continue by discussing how you can customize it to your liking.
Best ways to customize the toolbar in Google Chrome
The following subheadings will make it easy for you to understand what type of Google Chrome toolbar can be customized and to what extent. Do follow them one by one until the end for combined results.
1. Make more extension icons appear in the Chrome toolbar
One of the first ways to make Google Chrome’s toolbar more efficient is by tending to the extension toolbar first. This particular component of the Chrome browser’s interface is located in the top-right section of the screen. This is where you’ll find some of your downloaded extensions pinned to the toolbar. To step things up, you can change the toolbar by adding and removing existing extension icons.
This also comes across as an error fix where you can get missing extension icons back on the extensions toolbar. Get started by heading to this area beside the “Customize and control Google Chrome” button. As soon as you’re there, click on the main “Extension” button, as shown in the screenshot below. Doing so will reveal all the extensions downloaded on your Chrome browser.

Clicking on the main “Extension” button
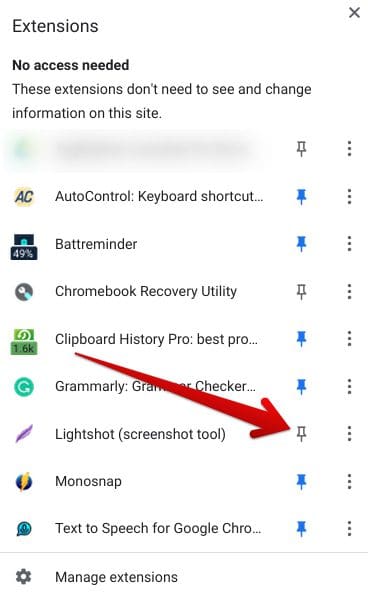
After completing the previous step, a menu containing all the add-ons you’ve installed on the device will appear. Your task is to click on the “Pin” button beside every extension you wish to add to the extensions toolbar in Chrome. It’s easy to get that done once you know what to click on. Repeat the procedure as often as needed, and that’ll take care of customizing the Google Chrome toolbar in this manner.

Adding the extension to the toolbar
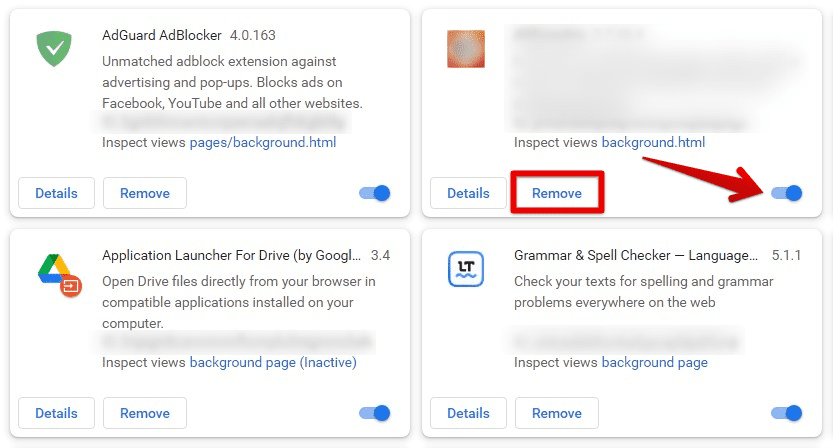
Now, to add some extra information, you can click on the “Manage extensions” button at the bottom of the sub-menu containing all your extensions, and that will take you straight to the extension manager page on Google Chrome. You can disable, remove, or repair extensions and check them for any impending details. The following screenshot shows you what to click on if you intend to remove an extension from your Chrome browser.

Removing suspicious or harmful extensions
2. Utilize the bookmarks toolbar

Bookmarks toolbar in Chrome
The bookmarks toolbar is another Google Chrome toolbar that you can use. It’s easy to toggle this feature on with the help of the “Ctrl,” “Shift,” and “B” keys. Try it on your end and watch the transition happen. Moreover, the bookmarks toolbar can be managed quickly so that you can customize the Google Chrome toolbar. To get started, press “Ctrl,” “Shift,” and “O” together while having the Chrome browser opened up, and you’ll promptly open the bookmarks manager area.
Once there, you can manage your bookmarks to ascertain which ones appear on the bookmarks toolbar. Next, delete the bookmarks you no longer need by clicking on the “Options” button beside each entry. Once done, several buttons will appear on your end. You can then choose to manage your bookmark effortlessly.
If the bookmarks toolbar goes missing, you know how to sort it out immediately. You can access the bookmarks section from the “Customize and control Google Chrome” area as well, right alongside pressing “Ctrl,” “Shift,” and “O” together.
To create new bookmarks for the website of your choice, go ahead and press “Ctrl” and “D” together on any page to bookmark it right away. That specific page will then continue appearing on the bookmarks toolbar, letting you customize it.
3. Download a Chrome Web Store to customize Chrome’s toolbar
If you wish to integrate the extensions toolbar with the bookmarks toolbar, so you don’t have to rely on the latter, a Chrome Web Store extension can help you profoundly. The add-on’s name is Bookmark Icon, and its job is to display all of your available bookmarks in the extensions area. It’s a featured application meant to bump up users’ productivity considerably.
Head to this link and download the Bookmark Icon extension from its official Chrome Web Store installation page. Then, click the “Add to Chrome” button to start. You will need to confirm a subsequent prompt, so bear that in mind.
Adding Bookmark Icon to Chrome
Once the application finishes installing, launch it from your extensions toolbar and enjoy unrivaled convenience from here on out. This is what the interface of the add-on looks like on Google Chrome. Your bookmarks will appear in the respective folders you’ve sorted them in.
Bookmark Icon on the Chrome browser
That’s for all the various ways you can customize the Google Chrome toolbar. Thanks for reading!
Conclusion
We have learned how one can customize the toolbar in Google Chrome. Unfortunately, there isn’t much that the Chrome browser offers in this regard right out the gate, so we have to rely on specific Chrome Web Store extensions to get the job done. PleaseNevertheless, do let us know in the comments section if you found this guide helpful and convenient. We would love to read your feedback!

