If you mean to get around the internet faster with most of the tedious processes, such as putting in your credentials on sign-in screens being automated, Autofill data will help you a great deal. In this guide, we will learn how to access and change your Google Chrome Autofill settings, so you can get past those credential screens seamlessly without ever having to type in your Autofill data ever again manually.
What are Autofill settings in Google Chrome?
Imagine there’s a web portal to one of your most visited sites, and you have to sign into it for things to proceed. You have to access this website almost ten times a day, and each time you do, you’ll have to put in that sign-in information each time. That is where Autofill comes in. Just as the title of this function gives off its meaning, Autofill lets you automatically fill in blanks when trying to log into a website.
Over time, Autofill has become particularly advanced. It can now even suggest strong passwords to users when it detects that a new account is being made. Besides that, the Autofill functionality’s primary purpose is to ensure that you never have to enter tedious information about your login data repeatedly. The Chrome browser even has a dedicated section of “Autofill” in its “Settings” that you can explore painlessly.
All you need to do to follow up with that is to go to Chrome’s “Settings” section and click on “Autofill” in the sidebar. From there on out, you can easily tweak Autofill settings on Google Chrome. One of the significant advantages of doing this is that you’ll experience customized usability that matches your preferences: some practical ways to do this include adding or removing passwords, enabling auto sign-in, and more.
Changing Google Chrome’s Autofill settings
Google Chrome is a user-friendly internet browser with most of its processes in an easy-to-understand format. You can quickly head to the “Settings” section in Chrome and then access “Autofill” from the sidebar to the left. As soon as that is taken care of, the rest of the procedure is self-explanatory.
This cannot be all you can do, so let’s break the necessary steps down with the help of the following instructions. Follow the steps below to learn how to access and change Chrome’s Autofill settings easily.
1. The first step after launching the internet browser is to open Google Chrome’s “Settings” by clicking on the “Customize and control Google Chrome” button in the top-right corner of the screen.
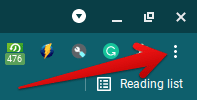
Customizing Google Chrome
2. Right after that, a list of whole options will appear on the screen, allowing you to click on the “Settings” portion to move forward.
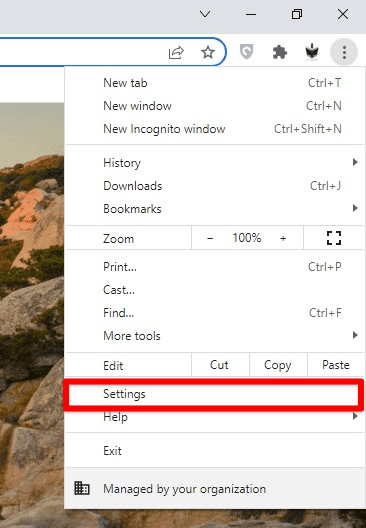
Opening Google Chrome’s settings
3. Completing the previous step will take you to the “Settings” area in Google Chrome. Here, you will need to click on “Autofill” in the sidebar to the left.
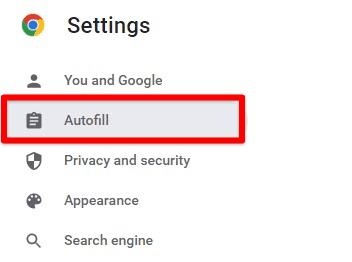
Clicking on the “Autofill” tab
4. Clicking on “Autofill,” as shown above, will take you straight to the Autofill section in Google Chrome, making it possible to access and change Autofill settings affiliated with your internet browser. Here, you can primarily get inside three major subsections to further delve into the main Autofill settings in Chrome.
We will break down each of these sections, so you can better understand how to change their options. Check out the following screenshot to know what these main settings are. “Password Manager,” “Payment methods,” and “Addresses and more” are all that you will be checking out.
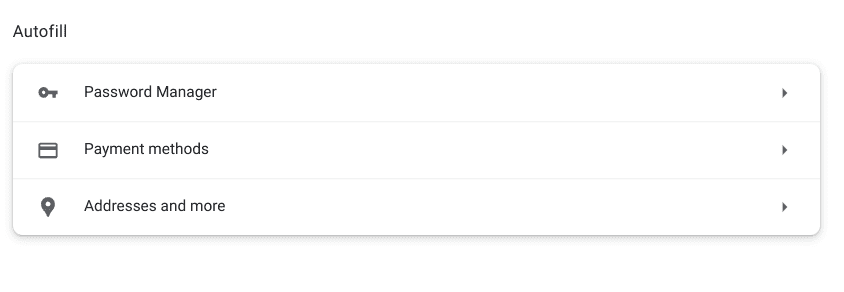
Major Autofill settings
Password Manager
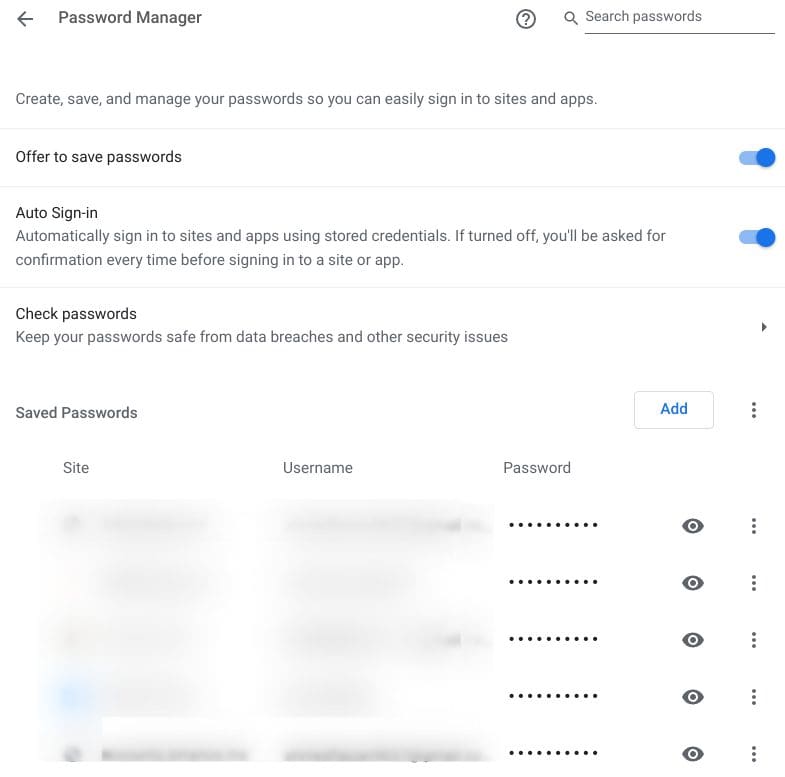
Password Manager section of Chrome’s Autofill settings
The first section you need to enter is the “Password Manager” area of Chrome’s Autofill settings. This is one of the significant components of the Autofill functionality in the Chrome browser, making it easy for users to enter both their email addresses and passwords on any sign-in page without any extra effort. Here, you can change the most basic Autofill setting: adding, removing, and updating passwords.
This will be done with the help of the “Options” button located right beside every email address and password entry. Upon clicking on it, three options will appear, “Edit password,” “Copy password,” and “Delete.” If a password needs an update, you can painlessly get that done from here. However, Chrome also provides a way to automatically update your passwords whenever you change them on a login page.
A prompt appears at the browser’s interface’s top-right area, bringing the option of doing that painlessly. Except for that, the “Add” button in the Password Manager area will help you create new passwords to automate Chrome’s working. It’s pretty easy to understand the various operations in the Password Manager here, and there are extra toggles to look into.
For instance, the first option you can tweak is “Offer to save passwords.” With this feature disabled, Chrome will never ask you to save your passwords automatically whenever you sign in on a new website with an account you haven’t used before. Next, there’s the “Auto Sign-In” function which happens to be one of the cornerstones of the Password Manager functionality.
If you enable this feature, Chrome won’t ask for confirmation before providing your login credentials on web pages. Therefore, you can set yourself up for seamless access to your accounts this way. Last but not least, the “Check passwords” function is highly advanced and helps you determine whether any saved passwords have been compromised in a data breach.
Chrome runs checks and scans to confirm this, and if any threat is detected, it relays the information to the user so necessary action can be taken and the password can be changed. It’s a highly innovative feature that can often turn the tides for you in terms of getting hacked or anything similar. This is all that the Password Manager section can offer for changing Autofill settings. Let us now talk about the next tab, which happens to be “Payment methods.”
Payment methods
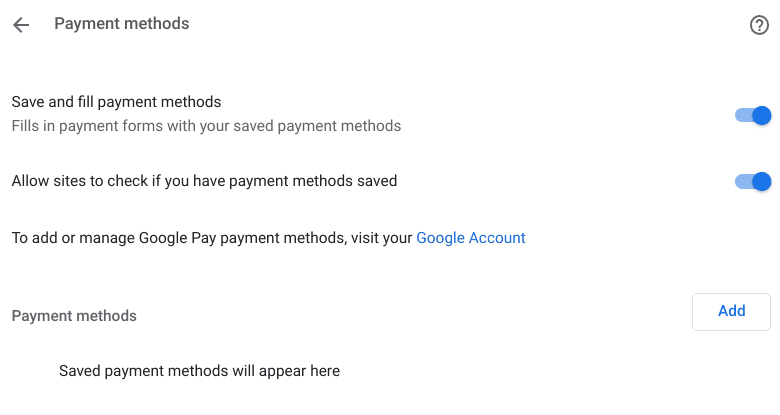
Payment methods
The “Payment methods” area is an easily accessible feature to view, edit, and manage your saved credit cards. A link takes you directly to the Google Pay domain if you want to sort that out separately. Similar to how the Password Manager function operates, the Payment methods section presents multiple toggles for you to view and change as per your requirement. One of these toggles is “Save and fill payment methods.”
This is the primary tool that ensures you get a pop-up prompt that offers to save your credit card information whenever you’re using it to make a purchase online. The quick and seamless feature requires only one click to follow through. Next up, there’s “Allow sites to check if you have payment methods saved,” and it’s convenient unless you have growing privacy concerns.
If you keep this feature toggled on, every site will have access to your credit card information, but not in a threatening way. The access will be strictly limited to knowing whether credit cards exist on your Chrome browser. That way, when you try to purchase through one of these sites, you’ll be seamlessly able to fetch all your credit card credentials in a matter of seconds.
Lastly, the “Add” button allows you to save your credit cards manually or update them whenever necessary. Next, we will move on to the third and final way of changing your Autofill settings in Google Chrome.
Addresses and more
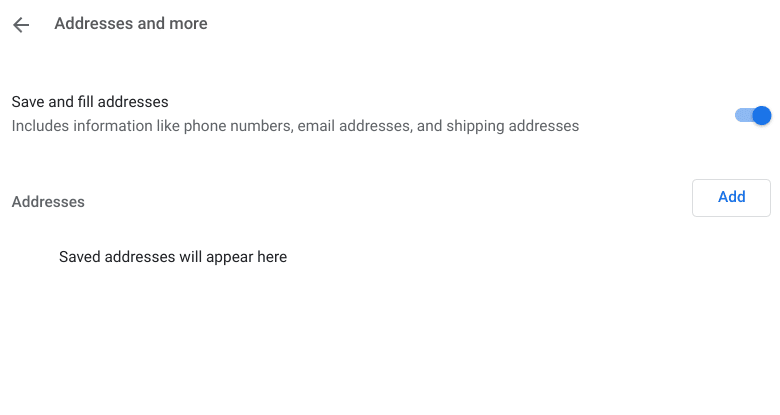
Addresses and more
Although not as sensitive as the rest of its two counterparts, the “Addresses and more” feature revolves around saving your various addresses in the Chrome browser. You can toggle on “Save and fill addresses,” which will help you store phone numbers, emails, and shipping addresses in Google Chrome. Lastly, the “Add” button will allow you manually make these changes.
That’s all there is to know about how to change Autofill settings in Google Chrome. Thanks for reading!
Conclusion
From getting full battery alerts in Google Chrome to disabling the keyboard shortcuts in Chrome, there are numerous ways to stay in control of your favorite internet browser’s accessibility features. Google has made its mainline internet crawler stand out from the competition and implemented state-of-the-art functions to keep users hooked to the platform, such as the Task Manager that lets you analyze and sort system performance on your device.
In this guide, we have learned how to use the Autofill data correctly and change its settings in Google Chrome. Autofill data relates to all the sign-in data that comes in handy when trying to get past login screens as quickly as possible. However, ensuring that the relevant settings of this Chrome functionality are kept in check will make your browsing experience as optimal as possible. Please let us know in the comments section whether this guide helped you.
- Read next: How to remotely sign out of Google Drive.
