Google Chrome is one of the world’s most advanced internet browsers that plays a significant role in ensuring maximum usability for its vast customer base. One of Chrome’s many features mainly falls under the “Site Settings” domain and is used to provide location-based access to different websites. On the front, this seems like a high-quality feature that caters to improved user experience for millions of people around the globe.
However, many would see quite the opposite in this scenario, understanding that their privacy could be at risk in the wake of Chrome accessing the geographic location of a particular person. Somewhere along those lines, privacy concerns arise, and many jump to holding out on using this functionality. For those who are intrigued, this guide will explain how to change your location settings on Google Chrome to manage location tracking. Let’s jump into the tutorial right away.
- Currently trending: How to install and uninstall Google Chrome on your Windows PC.
What is the benefit of sharing your location in Chrome?
While Google Chrome shares many features and functionalities with its users, the location tracking tool was only recently added. The primary benefit of providing locational access to websites is that they can get back to you with the best results that suit your preferences. For instance, the Google search engine has automatic access to your location as the feature is turned on by default.
If you type the word “Restaurants” in Google and press the “Enter” key, you’ll be automatically shown all eat-out spots in your vicinity. This is an example of one of the significant benefits of sharing your location in Chrome. Users love getting personalized results, and this functionality gets them just that. You’re more prone to get helpful information from a specific site if you are willing to share your location with it.
That’s just about it as far as the pros of the matter at hand are concerned. Now, if you’d want to delve into the flip side of it, you should start by looking at the invasion of your privacy dealt with by the location tracking functionality. Although Google remains transparent on the way it shares your location with sites, which is mediated with the help of Google Location Services for getting an estimate of your location, it’s recommended to read the particular site’s privacy policy.
That way, you’d be far away from putting yourself in privacy concerns, especially if you understand the other website’s intentions with using your location. However, if you’d still like to be in utmost control of your location, there’s a way to manage location tracking in Google Chrome, and the next section will talk about that. So keep on reading until the end for the most favorable results.
Managing location tracking in Google Chrome by changing location settings
Google Chrome, fortunately, makes it easy to manage location tracking by changing your location settings. All you need to do is open up the “Site Settings” section in Chrome, and you’ll find it easy to move forward with things from that point onward. The “Location” factor falls in the permission section of a site that you can easily tweak. It’s alongside cookies, a microphone, JavaScript, a camera, motion sensors, images, ads, sound, notifications, and pop-ups.
All of these reside in the “Site Settings” area of your Google Chrome’s main “Settings” space. From there, you can manage your location settings, and the browser will carefully follow your directions from that point onward. It’s easy to get there and even pursue alternative measures to accomplish the task. For instance, the “Lock” icon in the Chrome browser’s address bar depicts the “View site information” area.
You automatically get taken to the setting at hand if you click on it. However, that will only allow you to manage the location settings of that particular website and not the rest. That is why we’d recommend tending to the mainline settings area of the Chrome browser to make sure one preference input gets applied across every site you visit. The following steps are going to guide you further from here on out.
1. The first step after opening the internet browser in question is to open Google Chrome’s “Settings.” You’ll do this by first clicking on the “Customize and control Google Chrome” button in the screen’s upper-right corner and then selecting the “Settings” button. Check out the following screenshot to learn how to do this effectively.
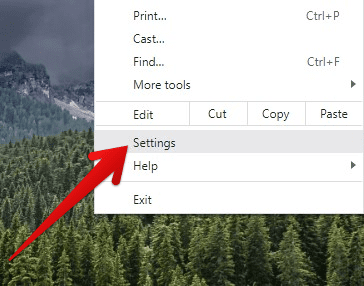
Opening Google Chrome’s settings
2. After opening the browser’s “Settings,” you will need to focus on the sidebar to the left side of the screen. Your focus here is to select the “Privacy and security” section. That should take you to the next step quickly. The following screenshot should be able to guide you further from here on out.
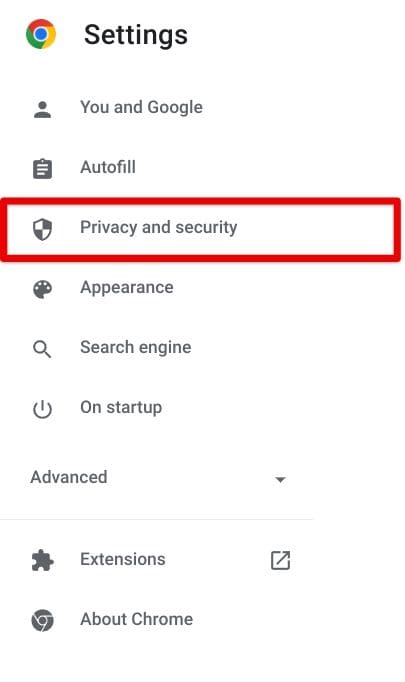
Clicking on “Privacy and security”
3. Right after the previous step, you will be tasked with clicking on the “Site Settings” section in the middle of the screen, now that you’re redirected to the “Privacy and security” portion of Chrome’s settings. The screenshot below should make it clear where to click on it now.
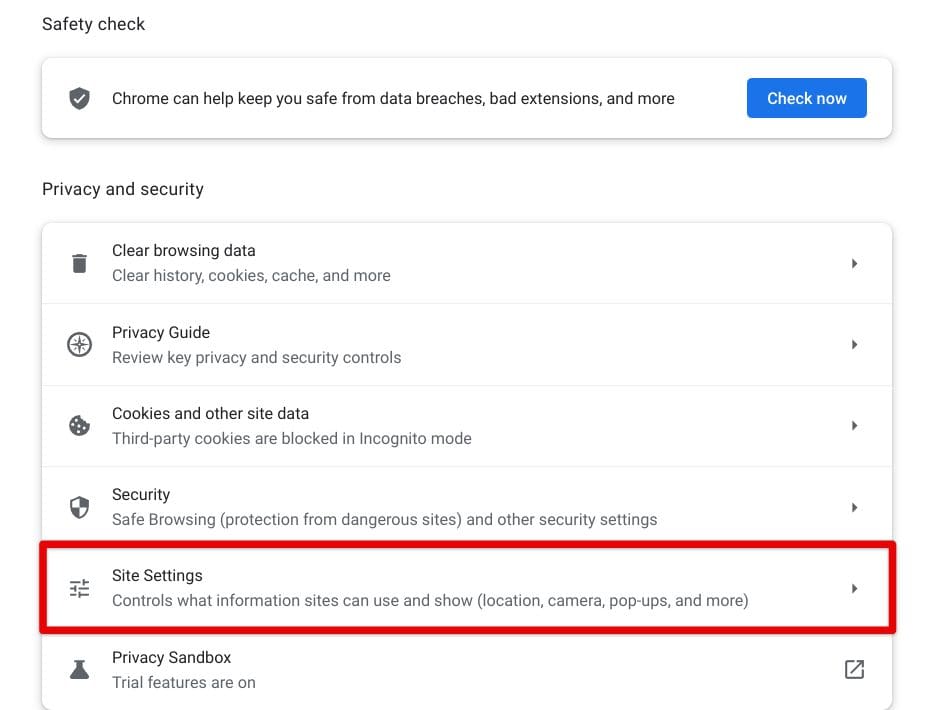
Opening “Site Settings”
4. After entering the “Site Settings” section, you will next need to scroll down until you find “Location” under the “Permissions” area. It should be pretty easy to spot, given how the feature is the first entry down the list of potential permissions in the Chrome browser. Again, the screenshot below should sum up what you need to do. The description of the “Location” button will read, “Sites can ask for your location.”
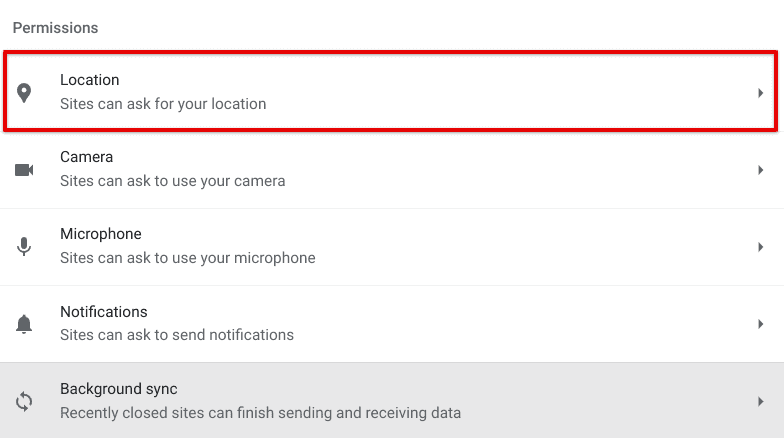
Clicking on the “Location” area
5. This step is where you will manage your location settings in Google Chrome to manage location-tracking. Here, the primary location permission will be available for you to tweak. You can set it to “Sites can ask for your location” or “Don’t allow sites to see your location,” depending on your preference. As we have iterated in one of the previous sections, there are certain benefits of letting a site view your location. You can get curated results that way.
However, at the end of the day, it’s your choice whether you wish to follow through with it. You can choose any of the two options and go about your day now that you know exactly how to manage your location settings in Chrome. If you would not mind not getting personalized content for yourself, it’s recommended to keep the location tracking feature disabled by default. But if the matter doesn’t seem like a big deal to you, maintaining location service enabled can do you good.
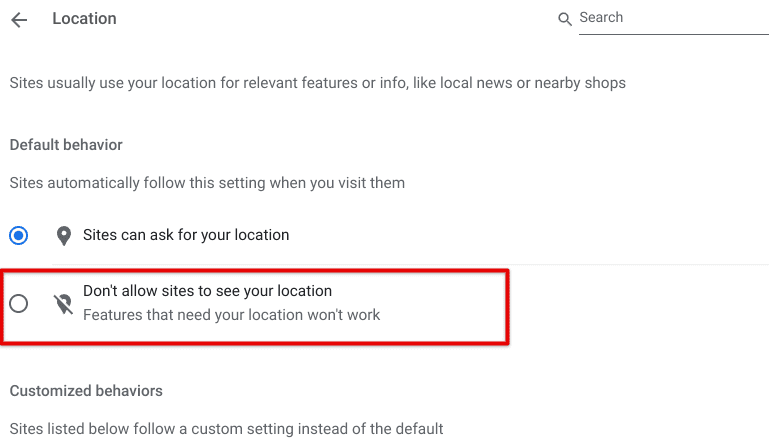
Selecting the “Don’t allow sites to see your location” option
6. With that being said and done, there’s a piece of advice that we’d like to offer to you. This can help you efficiently keep tabs under location tracking in Google Chrome. For this to occur correctly, you first must select “Sites can ask for your location.” Then, after you head to a website that possibly asks for location tracking, you can choose to accept or deny.
If you end up denying the request that a website makes in terms of asking you for your location, then that domain will end up in the “Not allowed to see your location” subheading in the main “Customized behaviors” area of your “Location” settings in Google Chrome. Here, you’ll also be able to visualize those websites that have access to track you by location.
The best part is that you can tweak the location access alongside the rest of the permissions a potential website can require from an end-user from right within the “Customized behaviors” section without ever needing to dive into extra steps. Click on the arrow that you see to the side, which will take you to the mainline “Permissions” section of that domain, where location, among other options, will be available for you to adjust.
Last but not least, you can delete the specified domains from your “Customized behaviors” list so you can start afresh whenever you visit these websites.
Managing location tracking in Chrome with advanced mechanics
That’s all there is to learn about the location tracking feature in Google Chrome’s “Location” settings. You have now gone past the essential steps that teach you the ins and outs of this specific sector of using the Chrome browser. Thanks for reading!
Conclusion
From disabling Google Chrome keyboard shortcuts to employing the browser’s Task Manager, there are multiple accessibility features that Chrome offers to its users. One of them includes being able to remove your Google account, although we think that you won’t need to do that unless you’re trying to fix an error, like when you’re dealing with an unresponsive Google Chrome. There are specific measures to get Chrome back up to speed in cases like those.
In this guide, we have learned how you can manage location settings on Google Chrome to manage location tracking whenever you’re browsing the web. It’s an excellent feature to be wary of, especially if you ever feel uncomfortable with Chrome trying to provide access to certain websites when you don’t want it to. Please let us know in the comments section if the tutorial above helped you. We would love to read your feedback!
