Google’s suite of desktop productivity applications strongly rivals the dominant reign of Microsoft Office. The latter comprises Microsoft Word, Microsoft Excel, and Microsoft PowerPoint. All three have been running great since the 1980s and have received multiple upgrades and improvements over time. However, Google has also launched its line-up of productivity-centric products called Google Workspace, and it’s pretty rich with features.
To talk about one of the significant constituents of Google Workspace, we’ve got Google Sheets to rely on. From the People Chips feature and sorting by color to the ImportXML functionality, Sheets is a highly convenient modern-day tool. It even allows one to make budget spreadsheets, so their finances can be put under check. This guide will show you how to do just that in an easy-to-grasp format. So keep on reading for a detailed tutorial that covers all things related to budget spreadsheets.
Making a budget spreadsheet in Google Sheets
While Google Sheets potentially features a countless number of ways in for formatting sheets and such, we’ll be sticking to a simple method in terms of fully functional budget spreadsheet creation. We’ll walk you through the necessary thing to do in a step-by-step manner so that you can understand the requirements of the operation effortlessly. Let’s begin right away.
1. Open Google Sheets
To begin with the creation of a budget spreadsheet, you will first need to open Google Sheets. This can be done simply by heading to the official Google Sheets website and clicking on “Go to Sheets.” Doing so will take you straight to the web-based editor of Google Sheets, and you should have completed the first step.

Opening the Google Sheets web editor
2. Specify primary information for budget creation
After opening up the Google Sheets editor, you’re going to take a minute now and think of the vast components that constitute your budget every month. To create a budget spreadsheet, you must write down and enter all your income, expenditures, and another spending. Please remember that this is one of the most important steps out of all the instructions you’ll need to follow here.
Let’s begin with something simple. We can first write our “Income” in the budget spreadsheet, so we can know how much money is coming into your household every month. It’s highly recommended that your first section with the Google Sheets editor is “Income” because that will help us develop a baseline for correctly referencing future entries.
Now, the Income section should be bolded by either pressing “Ctrl” and “B” on the keyboard together or clicking on the “Bold” icon in the toolbar above. This is so you can tell the difference between the main heading and related subheadings. Directly under “Income,” you can mention your side hustles or anything else that makes you extra money.
To put it simply, you’ll need to be wary of every dollar you make to create a budget spreadsheet that’s as effective as possible. After you’re done adding in different ways of making money, write in Total by the end. Check out the following screenshot.
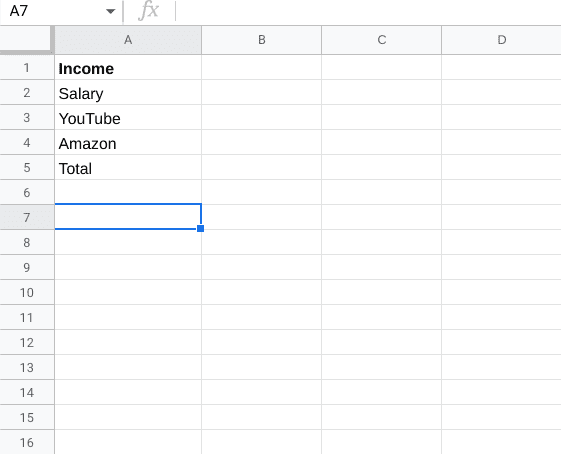
Creating an Income section in Google Sheets first
After writing off your sources of income first, let’s now cover your expenses. Skip one row after writing the Total shown in the screenshot above and write in bold “Expenses.” These expenses should be centered on fixed spending, meaning that this is the money you’ll need to pay every month, no matter what. A few examples of this section would be “Rent,” “Bills,” and “Netflix subscriptions.” Do write “Total” just like before for this section as well.
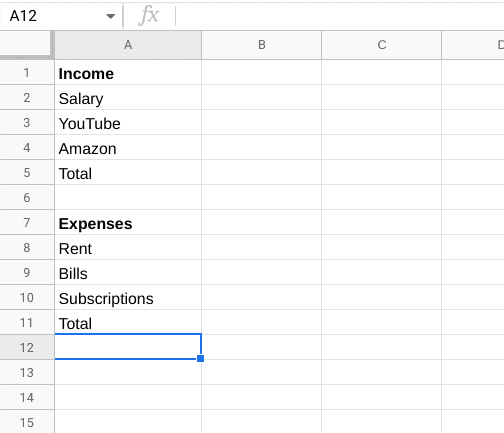
Creating the “Expenses” section
After creating the “Expenses” section, you can move toward the “Savings” you have each month. Similar to how you did the previous two sections, write “Savings” in bold in the spreadsheet and write down all your sources of savings that you’re invested in to make things clear moving forward. Creating this section will help you visualize the amount of money you’ll be saving each month so that you can plan your finances accordingly in the coming months and years.
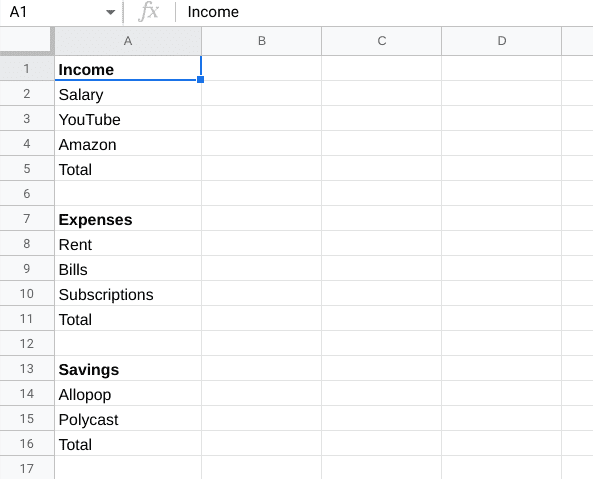
Creating the “Savings” section
That covers the “Savings” part, but we’re still not done with filling up our other essential entries. You next need to specify “Other Spending,” which should be unnecessary extra expenditures. Still, you have them anyway, such as eating out in restaurants, shopping, buying something, and anything similar. It’s an important parameter that you have to take into consideration before finalizing your budget spreadsheet. Don’t forget to add a “Total” in here too.
After adding the “Other Spending” section, you must add “Total Expenditure.” This will be the sum of your “Other Spending” and your “Expenses” areas. “Total Expenditure” will help you determine how much money exactly is being spent every month. At long last, you’re going to add a “Net Total” section which will be the difference between your total income and the “Total Expenditure” section.
Adding in the latter is necessary to determine how much money is saved from your total income. By now, here’s what your budget spreadsheet should look like.
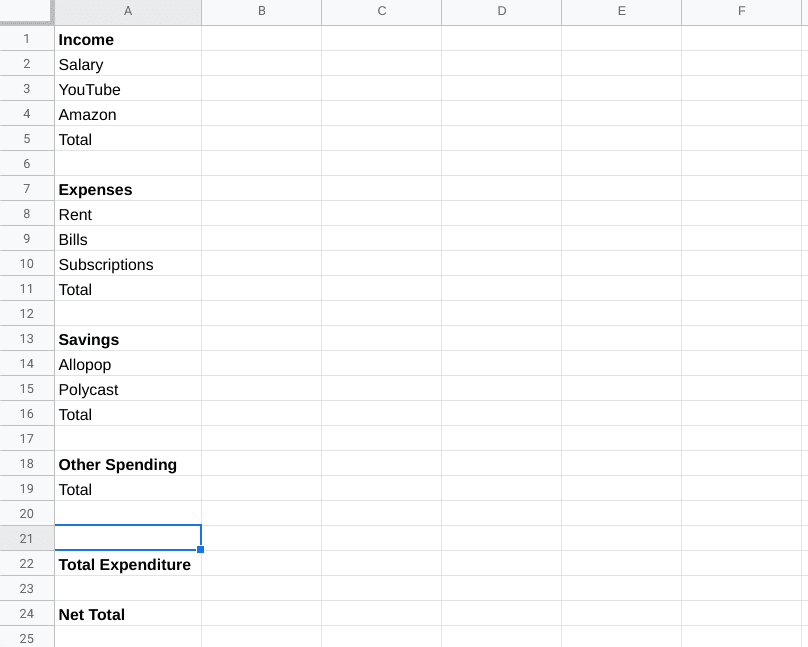
Budget spreadsheet initial presentation
We now have the second step all covered for creating a budget spreadsheet in Google Sheets. If you have followed the steps currently up until now, continue reading from the following section.
3. Color code your entries
Next is a fun part about creating a budget spreadsheet in Google Sheets. To improve visibility and be able to tell the difference between one section and the next, you should fill each dedication section that we’ve talked about creating above with some distinct color.
For instance, you can fill your “Income” section with the blue color filling, while the “Expenses” section can use another color. The following screenshot should serve as an inspiration on how you can go about color coding your entries correctly. Notice how we’ve given a different color to each entry on the budget spreadsheet ahead. This is what you should follow on your end too.
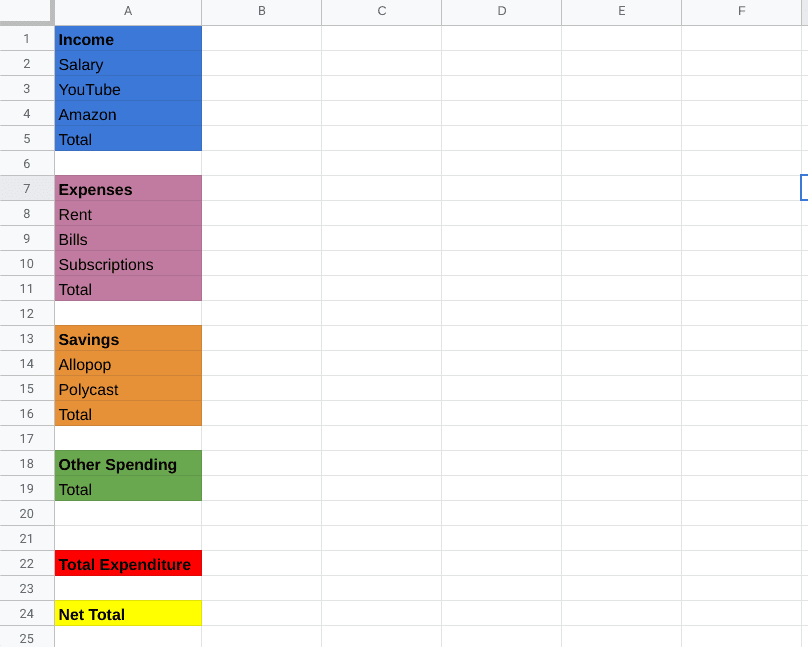
Color coding the different sections for the budget spreadsheet
4. Fill up the sections for each entry to create the budget
What we have now is yet another critical step that you have to get into. In this step, you will fill in all the sections you created in the budget spreadsheet above. Take a deep breath and make sure that your entries are accurate. Start with the first section, “Income,” and continue to “Other Spending.”
Do take care of the instance that you have entered relevant information under the latter section, such as “Restaurants,” “Shopping,” and others as per the requirement. However, don’t add in the “Total” section yet. We will cater to this particular part in the next major step. There’s a command in Google Sheets that will instantly help us take care of this matter with unrivaled convenience.
Here’s a screenshot from our end to show you what your budget spreadsheet should look like in Sheets. Notice how we’ve left out the “Total” entry for each section and have only filled in the rest of the relevant entries. Please make sure you’re replicating the same type of cells, more or less or even better, based on your preferences.
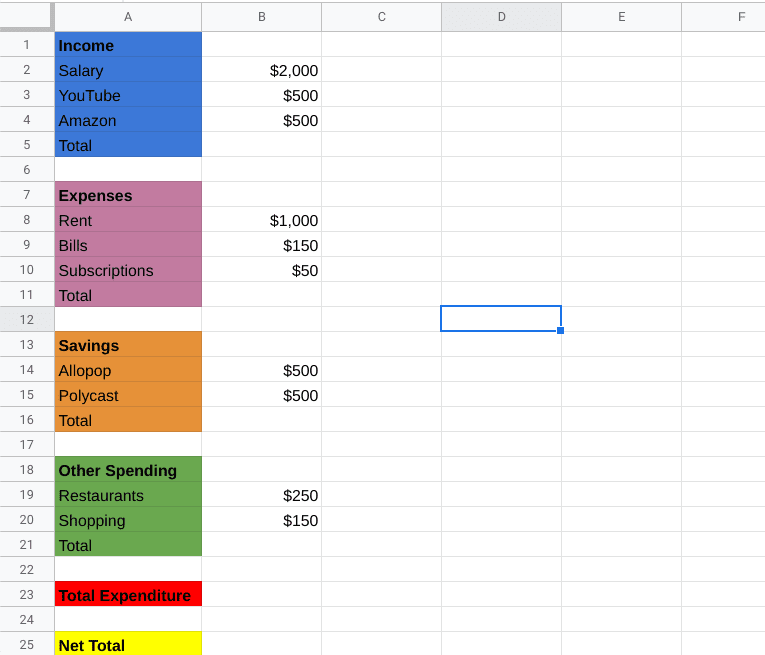
Entering the relevant information for the monthly budget
5. Format your budget
Finally, here is the last part of how to create a budget spreadsheet in Google Sheets that you should be replicating on your end for the most desirable results. We’re no experts when it comes to the ins and outs of Google Sheets, and to be fair, there’s no need to be one as well if you’re looking to create a highly convenient, simple budget spreadsheet for yourself to manage your finances and keep your spending in check.
Google Sheets is known to be rich with different commands that you can use to get around its user interface profoundly and be better able to format your document. However, there are only two commands we will need to familiarize ourselves with within the context of creating a budget spreadsheet: SUM and MINUS. These two utilities will help us create an uncomplicated spreadsheet for the days to come.
SUM is the sum of different entries in a cell that we will need to accumulate our expenses and get the value of all those “Total” entries you’ve left in your sheet. As for MINUS, this will be the difference we will use to calculate between “Total Expenditure” and “Net Total.” Sounds pretty simple, right? Well, let us now dive into the practicality of it.
To use a command, type in the “=” symbol and enter the command’s name. Once done, press the “Tab” or the “Enter” key to get to the next step. After typing in the correct command to use the SUM function, you should see it on your screen.
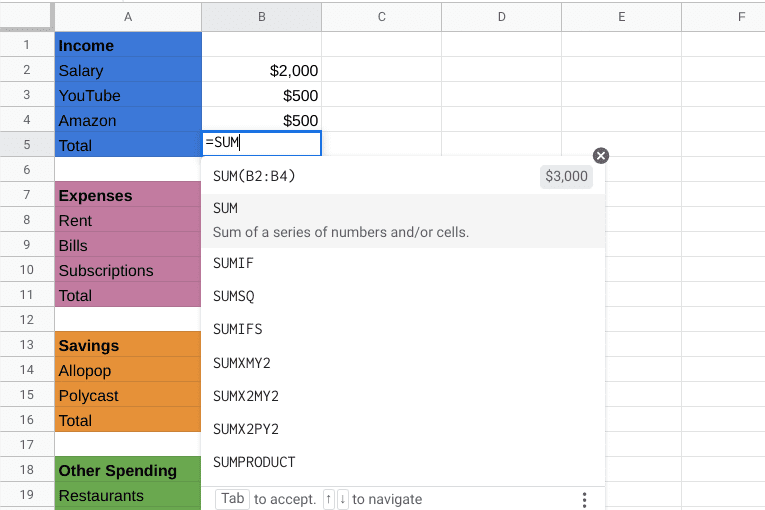
Using the SUM function for budget creation in Google Sheets
After confirming the SUM function, you will need to select the cells from which you want to get the total amount. For example, in the screenshot above, we’ve got the “Salary,” “YouTube,” and “Amazon” cells filled out.
After entering the SUM function, you can use your cursor to select the cell containing your “Salary” amount and then drag it down to “Amazon.” All these cells will be chosen for the SUM function, which is still in continuation.
Take a look at the screenshot below for a better understanding. Note how we’ve selected the cells B2 to B4 so it gets entered with the SUM function correctly. The total, in this case, now amounts to $3000.
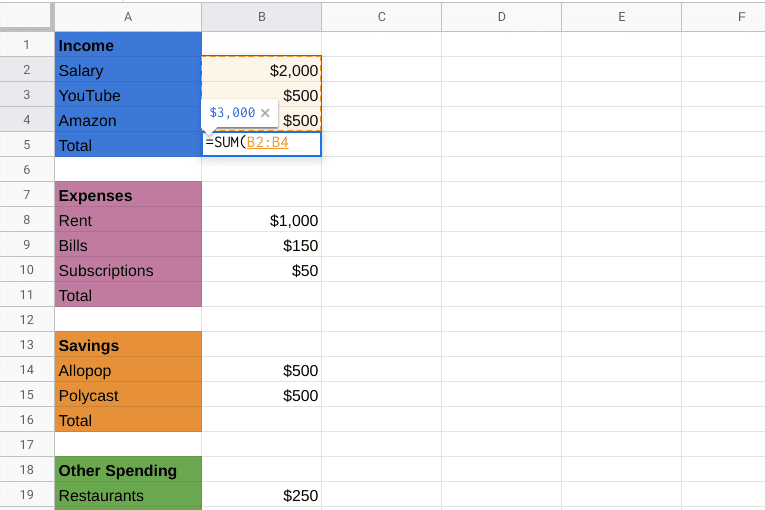
Total created for the “Income” section
You will now repeat the process for the rest of the sections you’ve prepared in this Google Sheets document. In our case, the remaining areas that are left to be tended to include “Expenses,” “Savings,” and “Other Spending.” After using the same SUM function, we get the total for each relevant section. It should be pretty easy to follow.
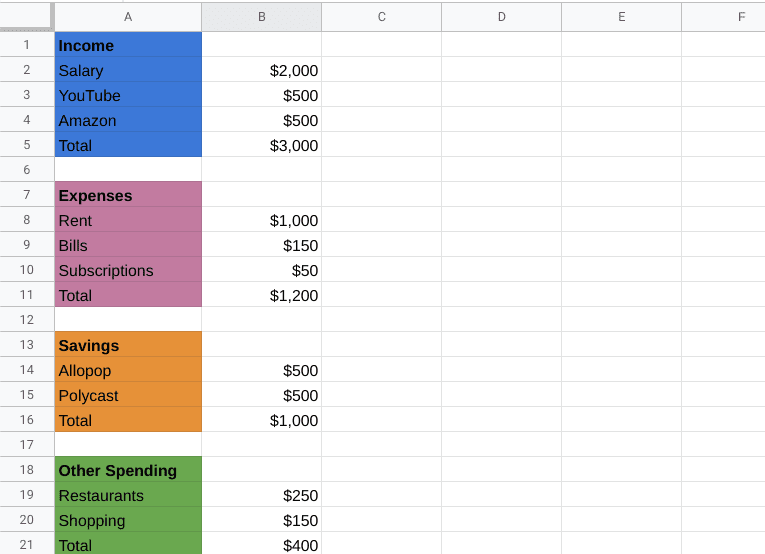
Total created for each section
Next, you will need to enter the “Total Expenditure” section that you created. Here, the SUM function will be employed again, but the cells that will be included via the function will be the “Total” sections under “Expenses” and “Other Spending.”
Right beside the “Total Expenditure” cell, type in “=SUM” to get the relevant function, and then select these particular cells so the totals of those are added to “Total Expenditure.”
You can also enter the names of the cells manually if you struggle with using the cursor to get that done. You’ll separate each cell with a comma and enter its name, so the entire command looks like “=SUM(B11, B21).” Of course, your entry can look vastly different.
Right after you sort out “Total Expenditure,” you will need to top things off by catering to the “Net Total” section you created earlier. As iterated before, the second primary function you will employ to create a quality budget spreadsheet in Google Sheets is MINUS.
You will now use this function to calculate the difference between your total income and your total expenditure. Type in “=MINUS” to bring up the command, and then type in the name of the relevant cells. In our case, the command comes out as “=MINUS(B5, B23).”
As soon as you press the “Enter” key, the result will kick into action. So finally, here’s what you should see on the screen now. According to this formula, you should know how much money gets spent from your side and how much you save.
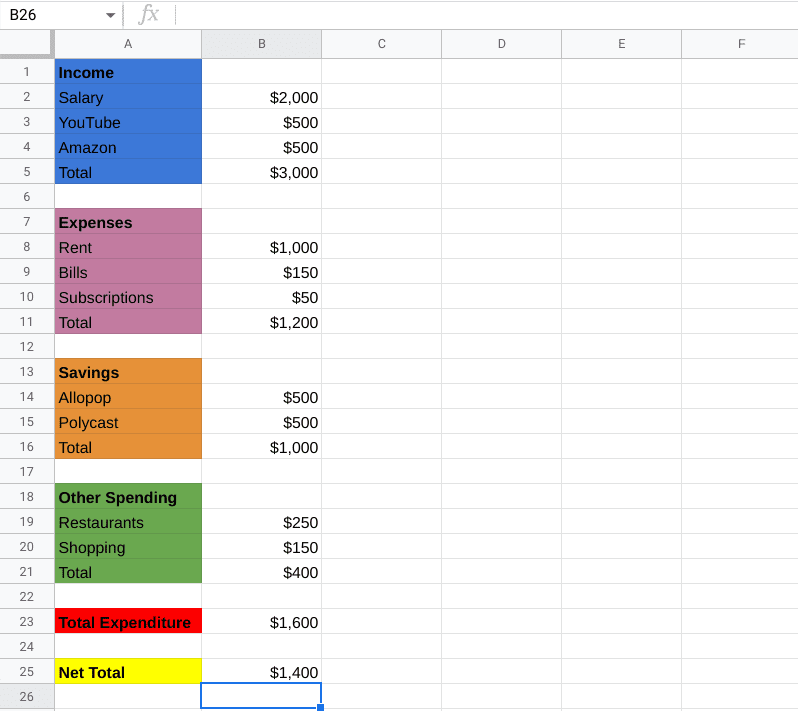
Budget spreadsheet created in Google Sheets
Conclusion
In this comprehensive guide, we’ve looked at creating budget spreadsheets in Google Sheets. As you can understand from the previous section, the task at hand isn’t all that easy, but with the correct standard of instructions, you’ll now be able to manage your finances better. Please let us know whether you found this guide helpful in the comments section ahead. We would love to read your feedback!
- Read more: How to use Google Drive without a Gmail ID.
