You’re not alone if you have been meaning to learn how to take screenshots on Google Chrome. Taking screengrabs and capturing Chrome’s interface screen has become a norm in these times, whether the purpose is annotation, illustration, or delivering a tutorial. Thankfully, Chrome comprises an in-built screenshot tool you can enjoy natively, but there are other ways to go about this operation. So please keep reading to learn all you need to know about it.
Google Chrome has made fantastic progress since it was first released in 2008. Today, this software stands unmatched as the most popular internet browser in the world, known to come loaded with features from top to bottom, such as JavaScript, Task Manager, and plenty of other tools and functions. In addition, users can also choose to view and manage their saved credit cards in Chrome, should they decide to keep their security credentials in check.
We will explore screenshot-taking on the Chrome browser in multiple ways. So let’s begin without wasting any further time.
For Beginners: What is a screenshot, and why is it important?
If you look at this word in a little more detail, you’ll notice that it’s made up of two words: Screen and shot. Therefore, the term “screenshot” refers to capturing the contents of your screen in the form, shape, and size you’re viewing it in real-time. That way, if there’s anything of significant worth, you can keep a record of it on your computer, similar to how Google Photos and Google Drive offer their various services to users.
Screenshots also have other names, one of which we’ve already iterated in the title. Some like to call screenshots screencaps and screengrabs. The phenomenon is as common on mobile operating systems as on desktops, such as Windows, Mac, and Chrome OS. Therefore, the intention here is to capture all that is present on your screen, so a copy of it is stored on your device for reference purposes or later use.
In addition, there are multiple other scenarios where screenshots can come in handy. One of them is an error message display seemingly popped up on your device. To report it to IT officials so they can investigate the matter further, you will need a screenshot of the error prompt, so that is where this functionality will step in. Some other use cases include sending feedback to co-workers and making a humorous meme.
Another important reason to justify using a screenshot is to explain something clearly by annotating your photo. That way, you can help people struggling with a particular facet of using software or a PC. Luckily, the internet is full of different ways to take a screenshot. Some dedicated applications and tools will help you get the better of this.
Now that you know the multiple use cases of a screenshot, so you recognize its importance let’s get to the section where we talk about how to take a proper screenshot on Google Chrome.
Taking screenshots in Google Chrome
There are two significant ways you can take screenshots in Google Chrome. One of them is all about using Chrome’s built-in functionality to take screenshots, while the other technique is reliant on a third-party extension or tool. We’ll discuss these variants in dedicated sections, so you won’t have trouble replicating them. So let’s start right away.
Method 1. Using Chrome’s built-in tool for taking screenshots
The first method to take a screenshot on Google Chrome exists within the browser. All you need to do is click on the “Customize and control Google Chrome” button in the top-right corner of the screen to expand the area. Then, you’ll have to move your cursor over “More tools” to finally click on “Take screenshot.” The deed will be done as soon as you click on the latter.
The following steps will explain with images how this will be completed. Make sure to follow it until the end for the best results.
1. The first step is to click the “Customize and control Google Chrome” button, as shown in the screenshot ahead.
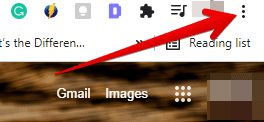
Clicking on the “Customize and control Google Chrome” button
2. After that, hover over the “More tools” option to reveal more in that relevant space. Next, click on “Take screenshot” to finalize the process.
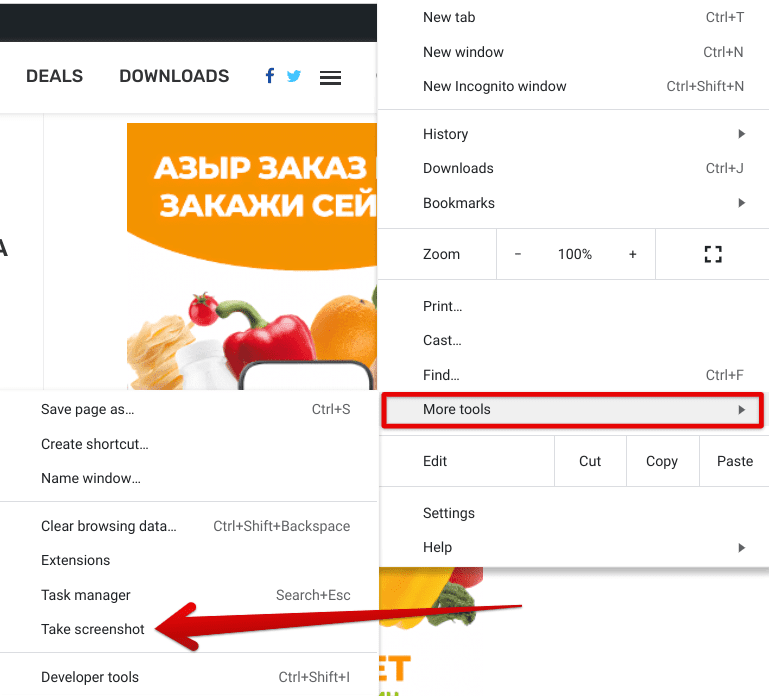
Taking a screenshot on Google Chrome
That’s about it! After clicking on “Take screenshot,” Google Chrome will instantly take a screengrab of the contents you see on the screen. Make sure you’re employing this trick on the page you wish to take the screenshot for the most favorable results.

Screenshot taken through Chrome’s built-in tool
Let us now look at the following potential method you can use for taking screenshots on Google Chrome. Do note that this one revolves around the usage of a Chrome Web Store extension.
Method 2. Downloading a Chrome Web Store extension for taking screenshots
As opposed to the in-built method of using the Chrome browser for taking screenshots, the Chrome Web Store also serves as a high-quality source for getting the job done quickly. For this purpose, we have the privilege of downloading and installing an extension called Monosnap to help us take screenshots in Chrome and even go beyond its normal functioning. Without any further delay, let’s show you how to install the application on your device.
The following steps are going to take it from here.
1. Begin by heading to your device’s Chrome Web Store. Use this direct link as a shortcut to get straight to the storefront. Once the Chrome Web Store runs, use the web application’s search bar to look for Monosnap. Type in the following and press the “Enter” key to go ahead.

Searching for Monosnap on the Chrome Web Store
3. You’ll get the search results after pressing the “Enter” key. Once done, click on “Monosnap,” as shown in the screenshot below. Doing so will take you to the next step.

Selecting the Monosnap extension
4. Completing the previous step should take you directly to the installation page of Monosnap. Continue by clicking on “Add to Chrome.” Doing so is bound to take you to the next step.

Adding Monosnap to Chrome
5. The confirmation prompt will ask whether you want to proceed with the extension installation. Click on “Add extension,” and you will be all good to go.

Confirming the installation
6. The system will now process the installation and check everything necessary in the meantime. After a brief moment, you will have the Monosnap extension installed on the Chrome browser. This process won’t take more than a few minutes, so keep your expectations accordingly. Once the extension is installed, you’ll be notified by a prompt appearing from the browser window’s top-right area. Check out the following screenshot for more information on this.

Monosnap extension installed
That’s about it for installing Monosnap on your Chrome browser, so pat yourself on the back! Now, let’s move on to the functional part of this procedure and talk you through the screenshot-taking process of the extension we’ve installed here.
As iterated earlier, operating Monosnap is a walk in the park, given the extension’s high-quality feature of capturing screenshots for you on the go. Start the process by clicking on the extension icon in the toolbar, as shown below.

Clicking on the Monosnap extension icon
Multiple options will appear on the Chrome browser screen as soon as you do that. Then, depending on the screenshot you wish to take, you can choose any of the features you see on your end. The primary way of taking a screenshot through the Monosnap extension is by clicking on “Capture desktop.” Monosnap will take a photo of your desktop as soon as you select the feature.
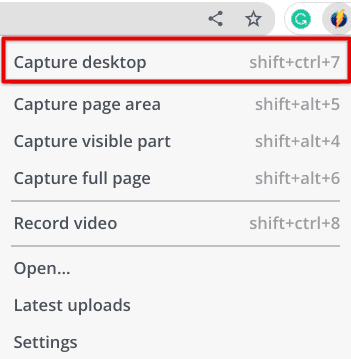
Capturing desktop with the Monosnap extension
That’s all there is to know about taking a screenshot on Google Chrome via Monosnap. You have now successfully learned the best two methods available for Chrome users to accomplish the task at hand.

Chrome Ready desktop screenshot by Monosnap
Before we conclude the article though, it’s worth talking about why you should pick Monosnap over the in-built Google Chrome screenshot tool in specific scenarios. First, it is more feature-filled than the latter because it allows you to draw over an image in annotating your screenshot. Let’s take a better look at this phenomenon with the screenshot ahead.
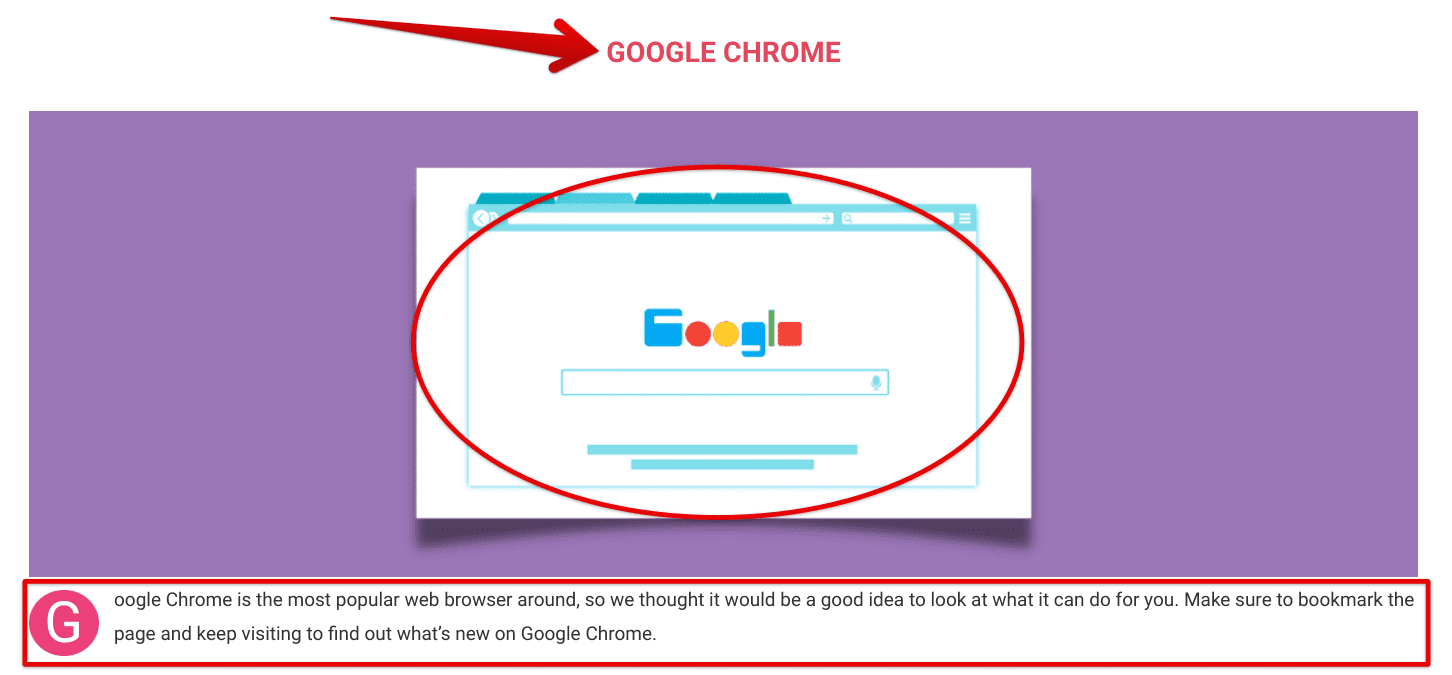
Annotation features of Monosnap illustrated
The photo above features a brief highlight of the annotation tools present in Monosnap. As you can understand from the picture, you can use arrows, rectangles, and circles to draw on images to make them more illustrative and employ advanced features such as the Monosnap blur tool to hide unimportant information. It’s a high-quality extension that makes it possible to do more than take a screenshot, which is all the Chrome in-built screenshot tool is about.
Other than that, there are various ways that you can use to take a screenshot in Monosnap as well. The following bullet point list talks about what these methods are.
- Capture desktop: This method of taking a screenshot captures all you see on your PC’s desktop, including the contents of the Chrome browser and your operating system’s user interface.
- Capture page area: The “Page area” tool is the most helpful when it comes down to capturing a specific region on the screen. By clicking on this option once, a different cursor will appear on your end. You will now click, hold, and drag your mouse over to the section you wish to take a screenshot of and let off the click. That’s going to do the trick for you.
- Capture visible part: This specific option takes a screenshot of your Google Chrome browser’s opened tab. No operating system’s user interface elements are made prevalent via “Capture visible part.”
- Capture full page: At last, the “Capture full page” feature is an all-inclusive way of taking a screenshot. It begins from the top of the page you have opened on your end and continues to the bottom when you get it to work. As a result, you get a full-page screenshot that excludes your system elements.
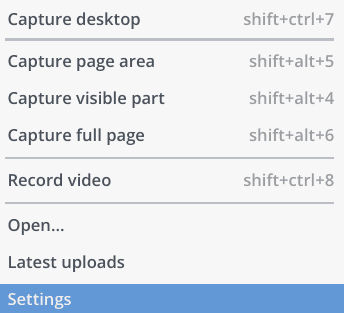
All the different ways of taking a screenshot in Monosnap
As for the cherry on top, Monosnap even features a native screen recorder too. This is a 2-in-1 feature that lets you enjoy taking screenshots and recording the contents on the screen for you as you intend to explain to someone concerning a particular process. Again, you won’t have this level of convenience with the in-built Google Chrome screenshot feature. It doesn’t even add more ways to take a screenshot, let alone provide you with a screen recorder.
However, that isn’t to undermine the far-flung capability of the latter though. If you do not want to download an external extension to achieve the task at hand, you can always rely on the built-in screenshot tool of the Chrome browser to diligently take care of your photo-snapping requirements. Now that you know the ins and outs of both available options, it’s high time to conclude with this write-up.
Conclusion
We have discussed two different methods of capturing a screenshot on Google Chrome. Moreover, we have also talked about some essential parameters concerning screenshots in the context of their significance in modern-day computing. Do let us know whether you found this guide useful for your cause. We love using Monosnap for all the additional annotation features it offers to its users. We would love to read your feedback!
- An interesting article: 10 things you need to know about Chrome DevTools.
