Default apps are built to negate perplexing scenarios. This guide will discuss an easy-to-understand method to make Google Chrome the default browser on your Windows PC. In addition, we will also go over the main advantages of why you would want to do this to clear things up. Keep on reading until the end of this guide for the best results. Also, consider reading how to use the Site Search feature in Google Chrome.
- Check out another article: How to remotely sign out of Google Drive.
Why should you make Chrome your default browser on a Windows PC?
It’s no secret that various people have different preferences in multiple aspects of life, whether that’s food, tech, or anything else. On Windows PCs, multiple other browsers exist, but not all of them are products that a single individual will use daily. That is where default applications come in, so whenever you’re trying to start something, and you need a specific application for it to happen, your operating system won’t confuse you by displaying options on your screen.
Instead, if you already have a default application set for that specific purpose, you’ll be up and running with your task in no time. The same goes for video editors, music apps, and Windows PCs. To talk about Google Chrome, it’s just the most convenient internet browser out there that comes built-in on most modern-day devices, such as Android smartphones, Windows PCs, and even Chromebooks.
If one’s job or work revolves around internet usage, then a preferred choice of internet browser has to be specified. Otherwise, whenever you open a file on your Windows PC that will have you going online afterward, you must go through a couple of extra steps that will undoubtedly take up some time. If you don’t want that, it’s best to designate a default application beforehand, and that’s what the Google Chrome browser is all about.
Other than this main functionality, making Chrome your default browser on a Windows PC gives you the added flexibility of signing in with your Google account, so all of your data, such as saved preferences and settings, contacts, autofill data, and other information gets either backed up or synced on the device. This is one of the many reasons you should make Chrome your default browser on a Windows PC.
Lastly, if you don’t set a default app for your internet browser, you’ll be faced with a pop-up each time you try firing up a browser on your Windows PC. To avoid that, it’s much better to designate a default application for the purpose at hand, so you can ensure that your browsing remains seamless for the days to come.
Now that you’re getting steered in the right direction, you should be able to follow through with the process we’ve outlined. The detailed section below will teach you how to make Google Chrome the default browser on a Windows PC.
Making Google Chrome your default browser on a Windows PC
The process of setting the Google Chrome application as your default browser is nothing but straightforward. It would be best if you pulled the right strings here, and you’ll be done in no time. It’s just required to go into your Windows PC’s “Settings” app, dig up the “Default apps” section, and under the browser space, choose “Google Chrome” as your default application, and you will be good to go. Of course, this isn’t cut if you’re a new user, so we’ll break it down.
Please apply the following steps on your end.
1. The first step is to open the “Settings” system utility on your Windows PC. This step can be completed in multiple ways, such as launching the app from the Taskbar or searching for “Settings,” specifically using the Windows Search bar. Check out the screenshot below for a visual illustration of how it’s done.
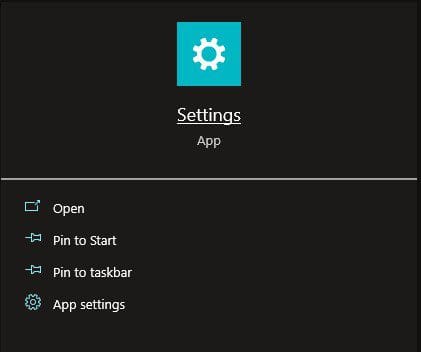
Opening Windows settings
2. After opening your Windows PC’s “Settings,” you can click on the “System” option next to continue. The option in question should look something like what you see in the screenshot below.
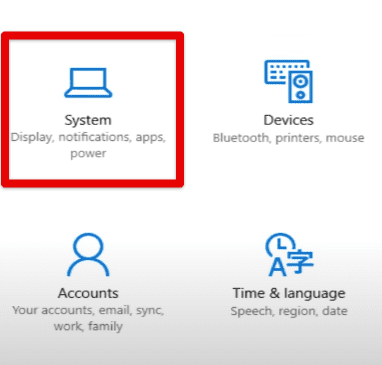
Choosing “System” settings
3. After the previous step, you will next be required to click on the “Default apps” section in the sidebar to the left side of the screen. Make sure you follow the visual illustration of the image below to learn what to do here.
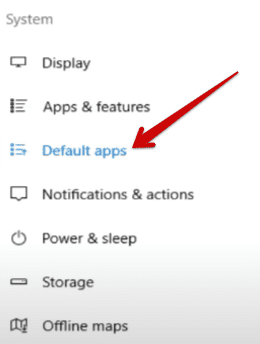
Clicking on “Default” apps
4. After clicking on the “Default apps” button, you will be taken to the relevant section on the right side of the screen. You will need to scroll down until you find the “Web browser” button. Click on the currently available option, such as Microsoft Edge, as seen in the screenshot below, to continue to the next step.

Selecting the “Web browser” option
5. After clicking on the web browser that was currently selected as default, you will next observe a menu appearing on the screen. This section will allow you to choose the next default app you want to set as your internet browser. You know what to select from here on out. Simply scroll down until you see Google Chrome and click on it. That’s going to do the trick for you.
- Note: You might observe another prompt appearing on the screen, asking you to switch to Microsoft Edge as your new default browser. The menu can be pretty convincing since it’ll state that Edge has a band of new features. If you still wish to stick with Chrome, you can click on the “Switch anyway” button, and that will make things come to a close.
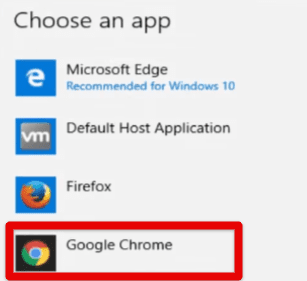
Choosing Google Chrome as the default browser
That’s all you need to know about switching to Chrome as the new default browser on your Windows PC. The process was straightforward to follow, and given the ease of use of the Windows 10 operating system in general, we don’t reckon you will have to struggle with this stuff. Now, whenever you try opening a file from your Windows PC, no other browser other than Google Chrome will pop up.
That is one of the many convenient parts of setting Chrome as a default that we discussed earlier. So prepare to welcome a world of convenience as you glide through Google Chrome with the utmost ease. We will now have to conclude the article. Thanks for reading!
Conclusion
We’ve considered the benefit of making your apps default on a Windows PC. As we have iterated above, having a specific software that provides a particular functionality always bodes well for your user experience. If you’re a Chrome user, you should take care of this facet before anything else. Do let us know in the comments section below if you managed to get the job done using this tutorial.
We would love to read your feedback!
- Recommended: The 5 best Chrome extensions for students.
