If you struggle with Drive now and then regarding its manageability, we can surely understand where you are coming from. Especially if you’re a paid Google One member, keeping things in order can soon get complicated when the mess starts to clutter up. In case you need organizing tips, this article by Chrome Ready has you covered. This comprehensive tutorial will teach easy steps to organize your Google Drive account.
- Also Read: How to use Google Drive tags to organize files.
How to organize your Google Drive account
There are several ways you can manage your Google Drive account, but we will only be talking about the easiest to perform and the best ones here while bearing in mind the average Drive user. Make sure to check this section out until the end for favorable results.
1. Use the proper sorting method
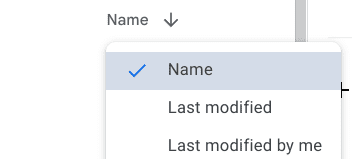
Sorting files in Google Drive
One of the first beginner’s mistakes that people usually make when trying out Google Drive is that they do not sort their files correctly. That is not how you should be using Google Drive. A good practice in this regard is to use the specified button and look for your files in the order you want them laid out in the user interface. Presently, Drive allows you to choose one out of three different options to list your files accordingly.
These three options are”Name,” “Last modified,” and “Date.” All of these serve a particular function and can be used to sort your files out in a similar manner. For instance, we like to know what file was worked upon the last time our Drive account was fired up. The “Last Modified” option suits the use case well in this scenario. You will need to evaluate a similar understanding for yourself as well.
Often, files are left unsupervised without any proper assortment. The least you can do is use the “Name” sorting order, so each file is arranged based on its initials. That is, in our opinion, one of the best ways for newcomers to familiarize themselves with Drive.
2. Keep your files in distinctive folders
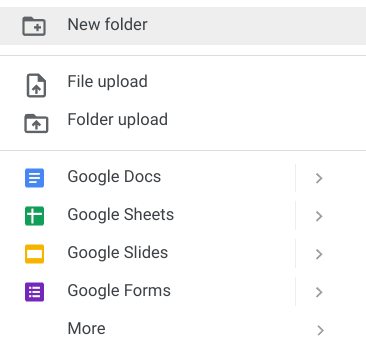
Creating a new folder in Drive
If you wish to improve the way you use Google Drive, you will need to add some folders to your account, each serving a specific purpose. For instance, you can keep your spreadsheets and documents in one folder while all your photos, videos, and audio files will go in another folder. That way, it will become much easier for you to group similar data and keep the rest of your media elsewhere.
It’s straightforward to create a new folder in Google Drive. All you have to do is right-click on any empty space within the Drive interface and then choose the “New folder” option. Once you are done there, a prompt will appear on your screen, allowing you to name the folder whatever you want.
We advise being strategic about this and picking something you know will come in handy later. This is a profound and easy method to organize your Google Drive account.
3. Rename folders of interest
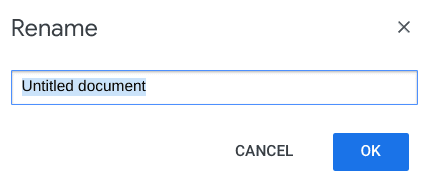
Renaming a document in Drive
We have indeed cast a lens on creating new folders and naming them useful, but what about the folders already present on your Google Drive account? You will need to step up and make dedicated changes to organize Drive and create room for productivity to flow. Right-click on any folder that exists and then choose the “Rename” option. Doing so will bring up a text box and allow you to pick the right name for the folder.
Please be careful with what you’re going to rename this folder to. Please think of the rest of the folders you have created and contemplate their purpose. Doing so will help you make a firm decision and let you tweak your selections accordingly. You can create new folders if all the existing ones are currently occupied with the right type of content. Trial and error will help you succeed in this domain, and there is no doubt about that.
4. Add files with the sidebar
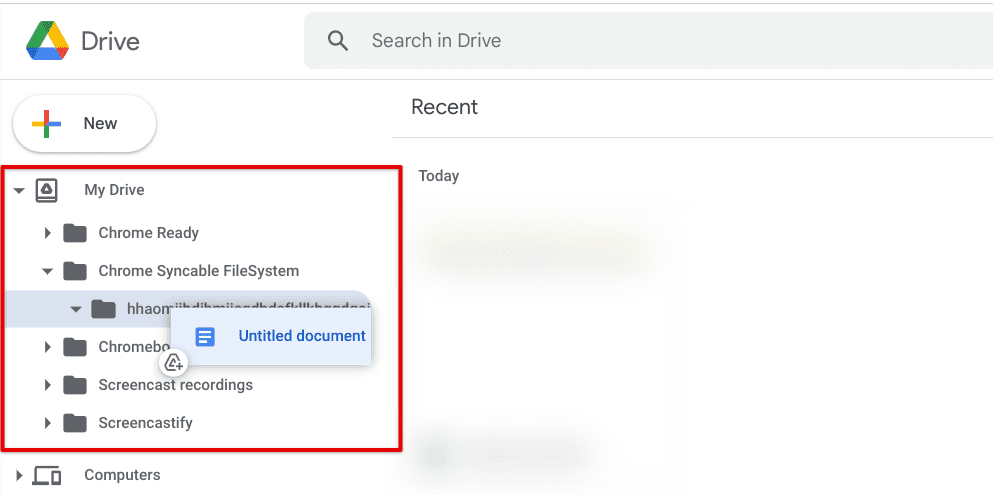
Using the sidebar to sort files
An easy way to add files to existing folders in Google Drive is by utilizing the convenience of the ever-helpful drag-and-drop method. You can drag and drop your existing files to the folders on the sidebar on the left-hand side of the screen. This will be done by first clicking and holding the file in the middle of your Google Drive interface and then dragging it across to the folder on the left sidebar.
Make sure to drag the file and let go while hovering over the desired folder. You should already take care of this by clicking on the dropdown arrow in the sidebar, so all your created folders in Google Drive are up and ready to go. As soon as that is dealt with, you should be able to harness the functioning of the sidebar for the days to come. It’s practically as easy as that to get your files in order when you’ve got that sleek functionality looking out for you like this.
5. Try out the advanced search bar

Advanced search bar in Google Drive
We have now got something compelling to look into, and it will take care of your managerial capability in Google Drive. Organizing your files and folders can become relatively painless if you learn how to use this highly advanced search bar in the cloud-based storage app. As you can comprehend from the screenshot above, there are various metrics that you can take control of and then search for particular files accordingly.
There are documents, spreadsheets, presentations, forms, folders, PDFs, videos, images, and other parameters. You can click on the “Show search options” to bring up even more settings and options to tweak, such as “Type,” “Owner,” “Has the words,” “Item name,” “Location,” “Date modified,” Approvals” if you use a shared Drive account, and several other metrics too. The advanced search bar is one of the most thoughtful features in Drive that can help you organize your files.
Most users struggle with finding relevant data after using Google Drive for several years especially paid customers with extra storage. After using the search bar to discover your lost files, you can employ the rest of the tips to manage and organize them constructively. You will have to refine your searches according to your search terms, and you will be good to go.
6. Color code folders to improve viewability
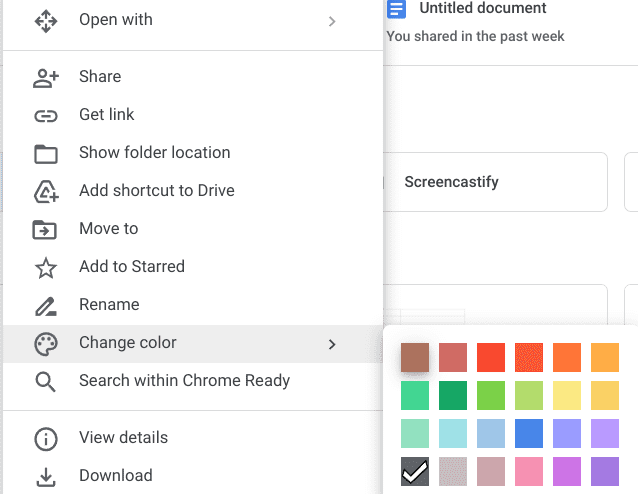
Color coding in Google Drive
Complimenting the first two easy steps toward organizing your Google Drive account is the color coding option that lets you designate specific colors to your folders. This is yet another handy visibility-oriented trick that can improve how you interact with your folders. To color code your folders and make them stand out, right-click on any folder to bring up the list of associated options.
Hover over “Change color” next and choose from the various colors available to color code the folder. Notice that the feature in question does not work on individual files, and you can only color code folders. In our opinion, color-coding files can confuse you and make things a lot more complicated. Therefore, this is one of the best easy steps to organize your Google Drive.
By ensuring every folder has a dedicated color code, you’ll give structure to your Drive account, which is undoubtedly what you should be after.
7. Use the “Star” feature for important files
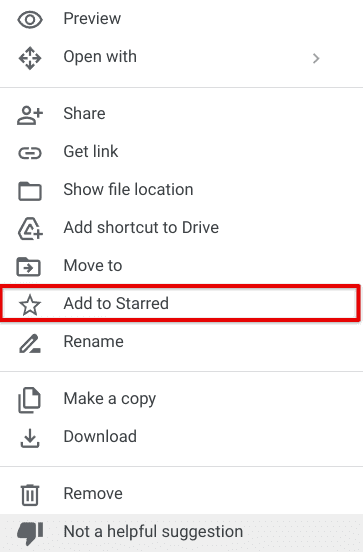
Starring a file in Google Drive
It is no understatement when people say that Google Drive is loaded to the brim with features. The latter is true because Google’s cloud-based storage subscription service has its fair share of tools and functionalities. It even comprises this “Star” feature that lets you mark essential files and folders, so all that content is kept separately. When you pull this off, you create a distinctive section in your Drive account for better access.
People with documents, files, or any other form of media that they must regularly check and view will certainly find this feature very convincing. Starring a file is plain and straightforward as well. All you need to do is click on the file once and then select the “Options” button in the top-half section of Drive’s user interface. Once done, select “Star,” and you’ll be good to go.
Conclusion
Google Drive is a popular cloud storage platform known for its easy-to-use user interface and robust security. However, like any other media storage app, you can get easily disoriented on reserving your space and managing your saved items correctly if you’re not using the right techniques. Even with the free 15 GB free storage, finding what you’re looking for past all the junk folders and files can sometimes become cumbersome.
Hence, the purpose of this guide was to teach you easy steps to organize your Google Drive account, so we’re hoping managing and holding up well on your end isn’t going to be a struggle anymore. Still, we’d like you to comment below and let us know of any tips and tricks we missed. Your feedback will be much appreciated. Thanks for reading!
