Google Chrome is a consistently updated software, made quicker, faster, and better with each stable update release. However, if there’s one reasonably hidden feature in the Chrome browser that can certainly upscale the way you use the internet surfer, it’s Site Search. Read on as we explore this functionality and how you can understand its usage in no time.
Chromebooks have been keeping it real for a decade or so now, offering its user base a wide range of accessibility tools, features, and the added expanse of Google Play Store and Linux. ChromeOS relies on Google Chrome to take care of its web-based processes, and thankfully, the developers are always hard at work trying to make Chrome a stand-out internet surfer.
With no further ado, let’s talk about the Site Search feature and all it can do for you right away. In the meantime, check out our in-depth tutorial on GPU acceleration in Chrome and how to enable it.
- Recommended read: How do I install ChromeOS on an old laptop?
What is Site Search in Google Chrome?
Google is a prolific search engine that has been around for as long as one can recall. With each month, the developers try to make more improvements to how Google deals with its proprietary software, with Chrome being at the forefront of it all. The main ideology behind the Site Search feature is to make your browsing faster and more seamless.
The best way to define the functionality in question is by assuming a scenario. Let’s say you were looking for a specific article on a website. Usually, you would have to look up the site using your desired search engine, land on the website, and then find the article using the website’s on-page search tool.
As you can comprehend, this encompasses multiple steps and takes a fair bit of time in the grand scheme of things. What if a solution would allow you to search for that article on the desired website using your Chrome’s address bar only? That would be nothing but convenient.
Fortunately, this scenario isn’t just something we can only make up. Google is achieving this functionality with the Chrome browser, titled “Site Search.” Forget about having to look up sites first. You need to enable this feature on Google Chrome and penetrate websites with your searches right from the address bar.
It works on every website with a search bar, such as YouTube and other domains. You can even get it to work on Chrome Ready if you want! Now that you’re all caught up with this functionality’s ins and outs let’s head toward the major part of the article, which is about enabling Chrome’s “Site Search” feature.
How to enable Google Chrome’s Site Search feature
Toggling Google Chrome’s innate ability to conduct an advanced search within websites is nothing but a cakewalk. All you need to do is head over to Chrome’s “Settings,” explore the “Search engine” section from the side panel and then continue to tweak your various “Site Search” options.
Of course, all this is easier said than done, so we’ll be walking you through what to do and what to avoid doing in this case. Follow along with the steps given ahead and learn how to utilize Site Search to the full accordingly.
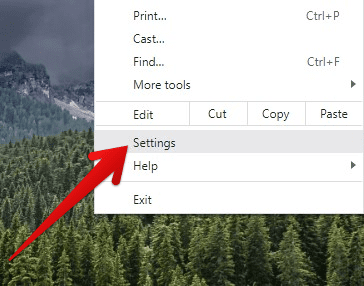
1. The first step after opening the Google Chrome browser is to click the “Customize and control Google Chrome” button, which looks like three vertical dots in the upper-right section of Chrome’s interface. Once done, continue by selecting “Settings” from the subsequently appearing drop-down menu.

Opening Google Chrome’s settings
2. After clicking on “Settings,” a new tab will open up, taking you to Google Chrome’s settings momentarily. From here, click on “Search engine” on the side panel to the right side of the screen. Doing that will redirect you to the “Search engine” space in the middle of the screen. You will now have to click on “Manage search engines and site search.”

Accessing the Site Search section in Chrome
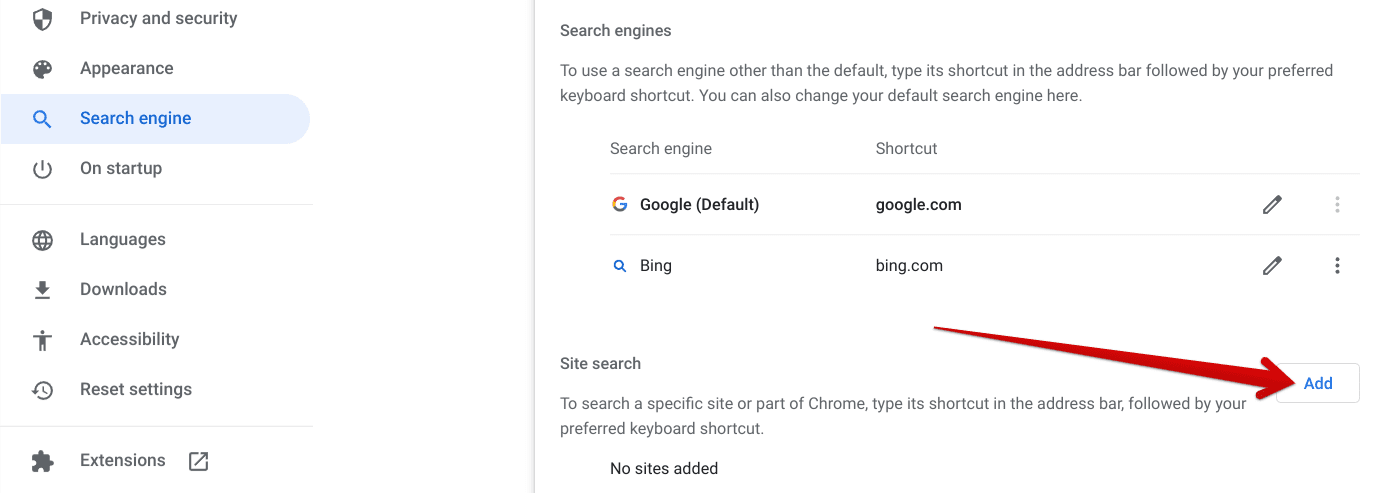
3. As soon as you complete the previous step, you’ll be taken straight to the “Manage search engines and site search” section in Chrome. Once you’re here, scroll down until you find the “Site search.”
Here, you might find that there are currently no websites added to your “Site Search” feature list, so we’ll add some sites to make use of the functionality. Click on “Add” to continue to the next step.

Adding a new site for the Site Search feature
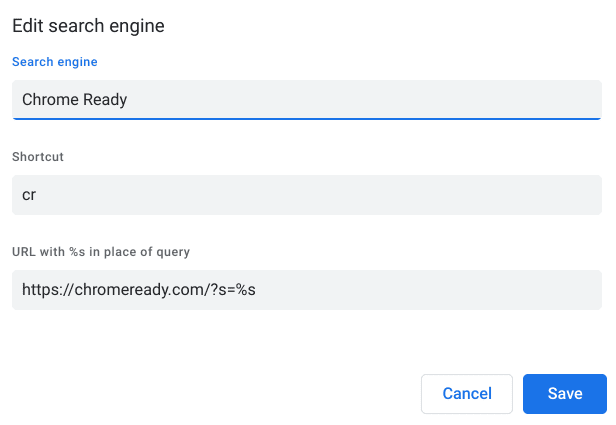
4. After clicking on “Add,” a prompt will appear at the center of your screen, allowing you to further the addition of a website to the “Site Search” feature. Now, you’ll find three major credentials to fill in here: “Search engine,” “Shortcut,” and “URL with %s in place of query.” Check out the screenshot below for a visual illustration of this prompt.

Filling in the Site Search credentials
Of course, grasping what we’ve written in that prompt above can be a little tricky, especially if it’s your first time with the Site Search feature, so let’s explore the three parameters a little more in-depth. On the surface, the credentials might look hard to follow through with, but they’re nothing you can’t take care of.
Search engine
The first parameter you must fill in with the Site Search feature is called “Search engine.” Here, you’ll name the website for which you’re creating the Site Search shortcut for. You can practically put anything here, but sticking to what the website is called is probably the logical choice.
In the screenshot above, we’ve created a Site Search feature for Chrome Ready. We could’ve named the site anything with the “Search engine” blank for fun. However, stating the name of the site as it helps clear up potential confusion. Let’s move on to what “Shortcut” means now.
Shortcut
The second parameter that needs to be ticked off is probably the second most important metric here. If you’re trying to create a Site Search shortcut for Chrome Ready, you can put the site’s initials in the “Shortcut” blank.
For instance, if you write “cr” as your “Shortcut,” you will be able to make the Site Search feature active in your address bar as soon as you type “cr.” Check out the screenshot below for a better understanding of what we’re talking about here.

Shortcut initials for Chrome Ready
The primary purpose of the “Shortcut” parameter is to quickly help you get to the central portion of the Site Search feature’s functionality, which is made available by pressing the “Tab” key on your Chromebook’s keyboard. Let us proceed with the most complicated part of setting up the Site Search feature. First, let’s see how you can conquer it.
URL with %s in place of query
The last portion that allows you to set up Site Search in Google Chrome successfully is placing the URL of the website you want to create this time-saving shortcut for. However, things aren’t that simple to follow through with. You will grab the URL but with a slightly different variation.
The gist of it is that you first need to head over to the website where you want to create the Site Search shortcut for. Once you’re there, use the site’s search bar to look for anything. Let’s type the word “ChromeOS” in Chrome Ready’s search bar to help explain how this will play out.

Typing in “ChromeOS” using the website’s search bar
After typing in your search term, or query — as the browser likes to term it — you will be redirected to the search results page. You’ll now copy the URL of this exact page and paste it in the “URL with %s in place of query.” In our case, this is what the URL of the search results page looks like.
Remember that the website you’ll want to create a Site Search shortcut will feature a similar URL, minus the apparent changes in the website’s name.
https://chromeready.com/?s=ChromeOS
Now, our focus on this URL is the very end portion of it—”ChromeOS.” This is the query in your URL, and we will replace it with “%s” in the relevant blank of your Site Search feature setup. Now, go back to the prompt and use the following URL to understand how you’ll get this done. Clearly, we’ve got “%s” instead of “ChromeOS.”

Using the correct parameter
- If there are more terms in your URL after the query part, leave them be and only take out the query in favor of “%s.”
You should now have replicated the process successfully on your end. Click on the “Save” button once you’re done, and that’ll be it. Now onto the most critical and final portion of using the Site Search feature, which is its functionality.
Using the Site Search feature in Google Chrome
Now that you’ve taken care of the hard part, it’s high time to enjoy the convenience posed by the Site Search feature. Head to your address bar and type in what you set as “Shortcut” for the site. In our case, it was “cr,” so we’ll use this to trigger the functionality in question.
Once done, the direct link for digging up search results will appear on your end, but you do need to hit the “Tab” key on your keyboard to switch to writing your query. Here’s what the URL will appear on your end when you’ve pressed “Tab.”
As you can comprehend, the term in the URL bar will turn blue, affirming that you’re now using the Site Search feature. Type in anything you would like to search your site for, such as Google Assistant, and press the “Enter” key. That should do it for you without breaking a sweat.

The Site Search feature in action
At this stage, all you have to do is type in your query, and the next page you’ll see will be that of the website in question with dug-up search results.
You’ll automatically observe how convenient and facile your time spent online has just become right after the correct implementation of the Site Search feature. We typed in “How to maintain a Chromebook” in the modified address bar, which is what we got as a result. There’s just no doubting the efficacy of Site Search in Google Chrome.

Search results from the Search Site feature
That’s all we have to share with you today as we conclude this write-up. Hopefully, you have imparted useful knowledge here that will be useful for your days ahead.
Conclusion
In this guide, we’ve talked about a high-quality Chrome feature that will make your search results seamless and quicker than ever before. Feel free to use it to good use, as you’ve probably learned the ins and outs of utilizing the Site Search functionality. But do let us know in the comments section whether you’ve found the guide helpful for your cause.
As always, Chrome Ready wishes you good luck!
- Before you go: How to remove a Google account from Chrome.
