From importing and exporting passwords in Google Chrome to using simultaneous profiles with the famed internet surfer, there’s a lot you can do with Google’s front-running web crawling software. It’s well-established and has received updates, bug fixes, and other improvements consistently, so it’s performing at a full-blown pace now. However, there are some instances where we can see that the developers of Chrome are also human, just like the rest of us.
Thanks to its slew of features, Google Chrome might be the most popular browser in the world, but it’s still not exempt from running into everyday performance issues. Often, the unresponsive behavior of the web crawler will make you want to pull out your hair in frustration, but this guide will ensure it does not come to that. Here’s how to deal with an unresponsive Google Chrome on your end, so you can fix the problem as soon as it pops up.
Best ways to deal with an unresponsive Google Chrome
There are multiple reasons for the Chrome browser not responding and behaving unusually. Still, the potential solutions we’ll cover will ensure that most of the possible grounds are covered extensively. We advise reading until the very end for nothing but the most favorable results. Each subsection will also explain why the issue occurred, so you’ll find it easier to crack the code next time your Google Chrome decides to give you issues.
Method 1. Restart your device
Before delving into anything complicated on your side, we highly recommend restarting your Chrome browser to check if that can bring any valuable results. Often, we forget to restart our PCs, laptops, etc., and make them resort to their “sleep mode.” There’s no doubt that this can, as a result, turn out to be productive for us, saving those precious seconds that a full-fledged boot-up takes, but to talk on behalf of the PC is not a wise thing to do.
That is to say, the Chrome browser and your operating system can start gathering and using an awful ton of memory and other essential system resources. In doing so, Google Chrome poses a risk of depreciating performance and, therefore, puts up much trouble for the person trying to get the better of rising Chrome issues. The major takeaway from this section is that you should develop a habit of restarting your device now and then.
For now, go ahead and reboot the PC on which the Chrome browser is acting up. An added plus would be to unplug the power cable from the PC and let it rest for 10 minutes in case you’re not using a laptop. Once done, boot the device back on and try using Google Chrome. You should be met with positive results in case the origin of the Chrome browser’s unresponsive issue isn’t anything complicated.
However, keep reading to try other potential solutions if restarting your device doesn’t pay off. We’ve got plenty of other things to try.
Method 2. Check for Google Chrome updates
The second method to fix your unresponsive browser is to check for Google Chrome updates. This is an essential facet of the Chrome browser’s working mechanism where you’re skipping something crucial regarding the internet surfer. Consistent updates are the sole factor that has kept Google Chrome booming with success all these years.
What usually happens is that the developer releases fresh patches, feature additions, and other improvements for the browser so that it keeps on working just like it was intended to. In cases like that, if you’re ignoring those update prompts instead, things might not work out so well for you. First, the Chrome browser downloads updates automatically, so no mechanical effort is required.
However, what warrants you to pay due attention to the scenario in question is the incorporation end of the update, which demands a fair bit of focus. Until the Chrome browser restarts, no new updates will be slapped onto the browser. In this case, you will be prompted to restart Google Chrome if you’re on a Chromebook. If you are using a Windows PC, the “Customize and control Google Chrome” button in the top-right corner will explicitly state “Update.”
It’s pretty hard to miss, so you shouldn’t be avoiding regular updates for your Chrome browser. If you’d like some help getting to the bottom of what we’ve got here, read our tutorial on how to check the Google Chrome version and update it. The instructions provided there are bound to sort you out, but if we were to talk about the gist of it, you need to go into your Chrome browser’s “Settings,” click on “About Chrome” in the side panel to the left, and view updates from there.
If there’s an update available for the browser at that moment, it will start downloading automatically. However, in some instances, you will need to click on the “Check for updates” button to kickstart the procedure. The following screenshot and the interlinked guide should clear things up for you. After updating Google Chrome to the latest version, try using it to confirm whether it’s still unresponsive.

Google Chrome downloading the latest updates
You should be able to use Chrome just fine now, having gone through a proper update process. If the browser still makes you trouble, keep reading to discover what to do next.
Method 3. Clear your browsing history, cache, and cookies
If you’ve had your particular PC for a long time now, there is a chance that it has gathered up heaps of browsing history, cache, and cookies. If this turns out to be the case for you, in truth, then you’ve already got the answer as to why your Chrome browser is unresponsive. All you need to do in this case is access the “History” section of the application and confirm to clear the browsing history.
Cookies, cache, and other relevant data will follow right alongside the deletion of the history, so you won’t have to dig those parameters out yourself. Go forth with the procedure by clicking on the vertical ellipsis button within the Google Chrome interface and selecting “History.” Check out the screenshot below for a visual explanation of getting this done. Alternatively, you can also use the “Ctrl” and “H” keys to fire up the “History” area instantly, just as well.
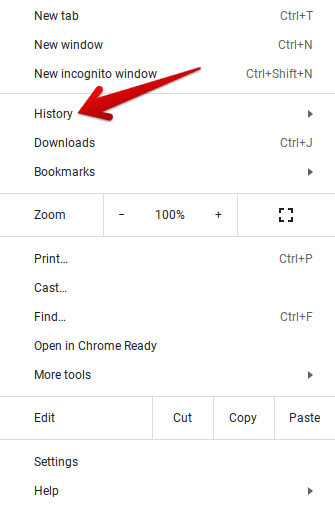
Clicking on “History”
Once done, a new tab will appear on your Chrome browser, and this is where you’ll be deleting your browsing history, caches, and cookies. Click on the “Clear browsing data” button on the left side of this page, and you’ll easily be able to go forward with the process. The screenshot below should show you where this button is clearly.
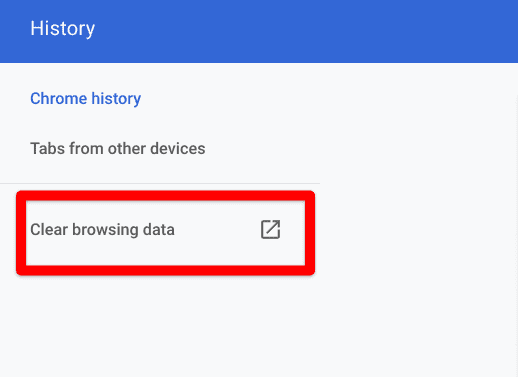
Clicking on “Clear browsing data”
Completing the previous step will open up a new small-scale window, allowing you to clear the browsing history, download history, cookies, and other site data and cached images along with files. However, all this won’t be under the “Basic” tab. You must click on “Advanced” before you can tweak anything of the latter. If you’d like to keep your passwords and other sign-in data along with autofill form data, you may untick the appropriate options, as shown in the screenshot below.
Moreover, the “Time range” should be set to “All time” if you hope to get the best results out of this measure. Select the critical parameters and then click “Clear data,” You should be done in a couple of minutes.
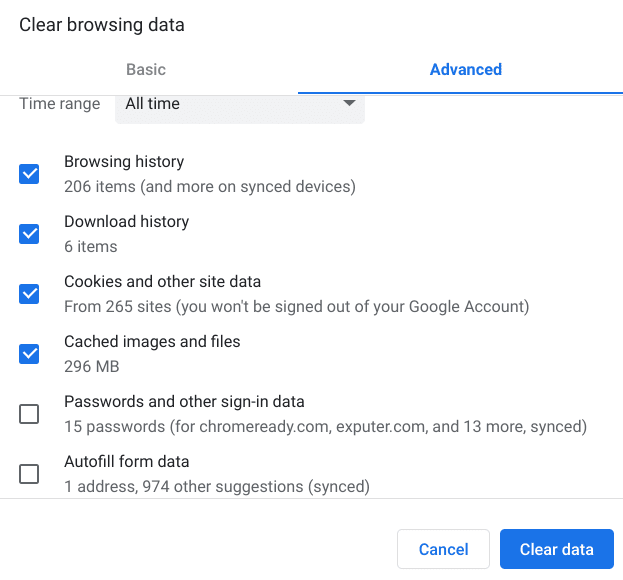
Advanced browser history clearing settings
After clearing your browsing data, cache, and cookies, restart Chrome and gauge whether it’s still unresponsive. There’s a solid chance that Chrome has returned to its original stature, but if the world’s most popular browser is still doing you wrongly, keep reading to try other techniques and tricks.
- For more details and instructions, check out our complete guide on how to check and clear the browsing history on Google Chrome.
Method 4. Block third-party cookies
There’s a slim chance that the culprits behind decreased Chrome browser performance are third-party cookies. To ensure whether this remains to be the case or not, head over to Chrome’s “Settings,” click on “Privacy and security” on the side panel to the left, and proceed by choosing “Cookies and other site data” from the list of options present in that section. The screenshot below should be able to help you out here.
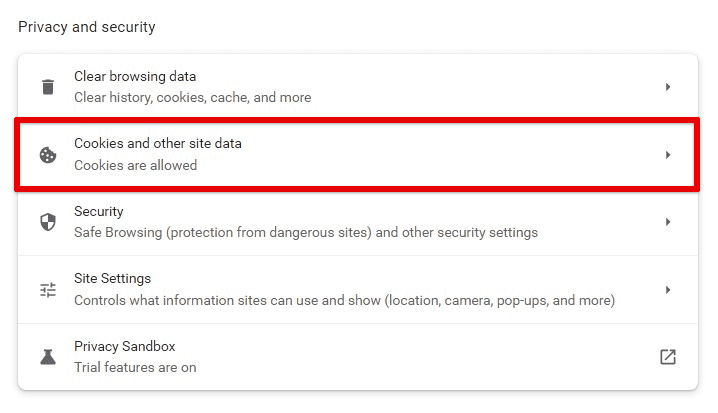
Clicking on “Cookies and other site data”
The moment you’ve come past the previous step, the next step is to choose the option “Block third-party cookies.” Doing so should relieve some performance levels of the Chrome browser and hopefully give it the push it needs to return to its normal working capacity.
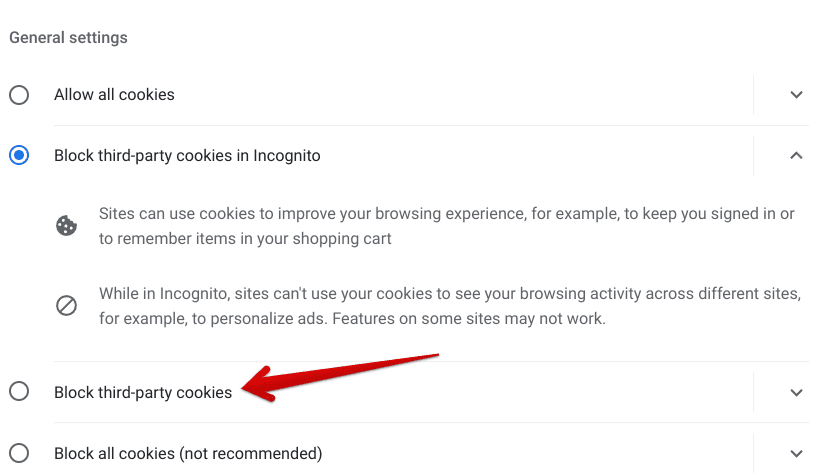
Blocking third-party cookies on Chrome
After completing this step, shut down Chrome and relaunch it. Try visiting the websites that previously couldn’t be properly attended to and confirm whether the Chrome browser is still not working as it should. If there are still issues, we believe the following method can finally sort things out for you if applicable.
Method 5. Toggle off hardware acceleration
A neat trick resides in Google Chrome, and it’s called “Hardware acceleration.” This functionality takes the significant processing burden off of the CPU and shares some of it with your device’s GPU so that processes can be loaded faster and web pages appear on your Chrome swiftly. It’s a nifty feature that can improve your Chrome browser’s performance seamlessly for the majority of the time, but there are cases where hardware acceleration does more harm than good.
To ensure that the hardware acceleration feature isn’t the cause of all this trouble, open your Chrome browser’s “Settings” and head over to the “System” section from the side panel. That’s where you’ll find the “Use hardware acceleration when available” functionality. Disable the toggle to bar its functioning on your PC. Restart Chrome afterward and try relaunching it to see if the browser finally works now.
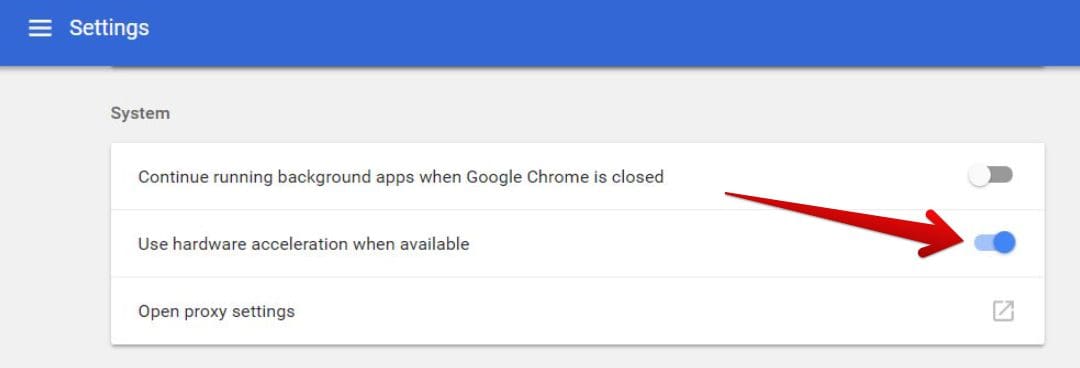
Disabling hardware acceleration
There’s a good chance you’ll be able to browse the internet just fine now, given that you’ve disabled hardware or GPU acceleration on the device. However, even if the rare case is that you’re still experiencing the pangs of an unresponsive Google Chrome, here’s how you can take things further from this point on.
Method 6. Disable faulty Google Chrome extensions
The sixth potential method to help us find our way with Chrome again relates to the various Chrome Web Store extensions and add-ons you’ve downloaded on the Chrome browser repeatedly. It’s a commonplace to have some of these long-existing extensions corrupt or cause Chrome issues in some manner or form. The scenario is exacerbated if you have a ton of add-ons installed on your end because the problem becomes prolific that way.
Managing extensions on Google Chrome due to these possible scenarios is the best way to keep things in check and prevent an extension from barring you from having the core Chrome browser experience. Go into the “Extensions” section of the browser by using the “Customize and control Google Chrome” button in the top-right corner of the screen. The following screenshot should guide you on what to do.
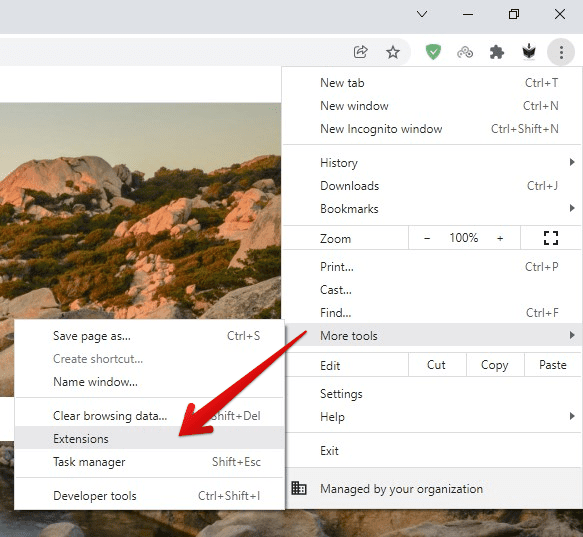
Extensions under more tools
As soon as the “Extensions” section is up and running on your end, you’ll have to indulge in trial and error next. The toggle icon beneath every installed extension will help you enable or disable it, depending on its current status. Disable all extensions for now and restart your Chrome browser. Try using Google Chrome afterward and gauge how it performs. If it’s not unresponsive anymore, then it’s confirmed that one of your installed extensions is the culprit here.

Disabling a Google Chrome extension
We recommend uninstalling extensions that you no longer need for de-cluttering your environment. Once done, enable needed add-ons one by one to determine which one of them is causing retarded Chrome performance. You should be able to pinpoint the lousy extension sooner or later. In case you still haven’t been able to resolve Chrome’s performance issue, keep on reading and try more potential solutions.
Method 7. Find and remove harmful software
Another feature in Chrome can automate the process of finding harmful software installed somewhere on your PC and removing it for you. Get this into motion by accessing Chrome’s “Settings” and following up by choosing the “Reset and clean up option” under the “Advanced” tab on the side panel to the left. Once done, you should be able to visualize the “Find harmful software” feature on your end. Click on “Find,” as shown in the screenshot below, to get started.

Finding harmful software in Chrome
Clicking on “Find” should commence the process for you automatically. You may choose to report details to Google about this harmful software too. Once the search results start coming in, you can remove the harmful software if one has been found. Follow through with it accordingly for the best results. However, in case the problem still isn’t resolved, it appears you will need to pursue other methods.
Method 8. Update your operating system
Right alongside updating the Google Chrome browser is something of a bigger scale, one that relates to the operating system on which you’re using the internet surfer. In some cases, an upcoming system update is barring Chrome from running optimally, and if this is the scenario for you, no other tip or trick will do the job unless the root of the issue is dealt with.
Therefore, if you are using Chrome on a Windows PC, we highly recommend completing a system update, provided that one is available. Go into your PC’s “Settings” app, head to “Updates and Security,” and confirm update availability. If the system returns to you with a workable development, don’t waste a second in not proceeding with the update.
Once the update finishes downloading, wait for the installation to take effect. Restart the PC for good measure when you’re done with the procedure. Doing so should potentially set up your Chrome browser for success. Moving forward, you will hopefully free yourself from the worry of an unresponsive Google Chrome. Try launching the application to see if it works properly now.
However, if updating your operating system hasn’t paid off either, it appears you’ve only got one final potential solution to try out. That is all about reinstalling the Chrome browser.
Method 9. Reinstall the Chrome browser
If nothing else has worked so far in tweaking the Chrome browser to a point where it works just as intended, we recommend reinstalling Google Chrome altogether. If you’re on a Windows PC, search for the “Remove apps and programs” section with the help of your Windows search bar. Once the search result pops up, click on it to get straight to the relevant space. As soon as you’re there, scroll down the list of installed apps and select “Google Chrome.”
After clicking on it once, the “Uninstall” button should surface on your end. Remove the Chrome browser with the help of that button. The uninstallation process should begin in an instant. To re-download the program, head over to the official installation page of Google Chrome and grab the browser from there. Chrome’s installation steps are easy to follow, so that shouldn’t trouble you too much.
There’s a strong likelihood that Google Chrome won’t be unresponsive on your end anymore after completing the reinstallation. Try browsing the internet with it and confirm whether this has turned out to be true.
Conclusion
On infrequent occasions, Chrome won’t work like it’s supposed to, but moments like these are few and far between, and most arise due to the device you’re using the Chrome browser on. Whatever the origin story, we’ve talked about some of the best ways you can deal with an unresponsive Google Chrome. Make sure to let us know in the comments section down below if we happen to miss any solution.
We would love to read your feedback!
- Before you go: How to zoom in and out on the Google Chrome page.
