Have you been meaning to understand the true role of Google Chrome’s Task Manager? You are indeed on the right path to utilizing your computer fully here. Having a firm grip over the Task Manager of the Chrome browser can help you troubleshoot various parts associated with your operating system, speed up the user interface, and even exercise more control over the browser itself. We’ll get into all the related information in this in-depth guide.
We will now learn everything essential about a highly fundamental Chrome feature called Task Manager, so continue reading from the next section for a detailed guide.
What is Google Chrome’s Task Manager?
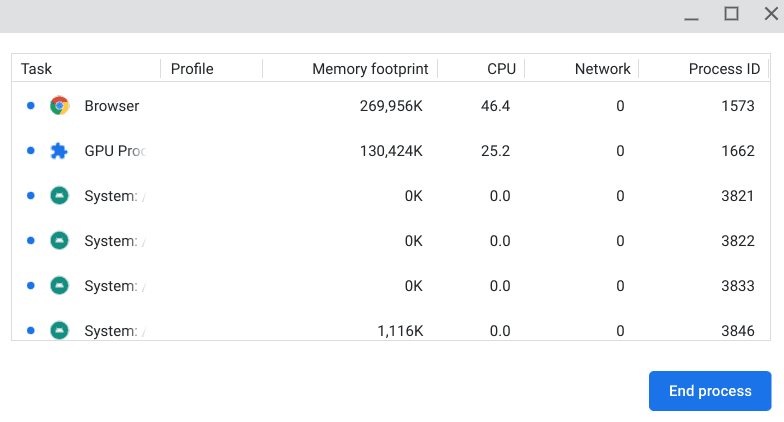
The Google Chrome Task Manager
Let’s break the ice and get one thing clear out of the way. The operating system you’re using, Google Chrome, has the Task Manager utility. However, there’s an option for “Task Manager” in Google Chrome if you look into the “Customize and control Google Chrome” dropdown list of options. So, how can you tell apart from these two? Chrome’s Task Manager opens from the browser, while your device’s Task Manager can be used from the operating system.
The Task Manager strives as a control hub where you can oversee all significant and minor processes running in your device’s background and foreground. That way, you can overview the various applications, programs, and other system-related software functioning concurrently on your PC. Right alongside that, you even get a detailed report of what application is using up how much of your system’s resources.
Therefore, having the Task Manager by your side effectively keeps tabs on your device’s performance. Should something start giving you trouble, you will always have this big utility by your side, warranting a detailed analysis of every Chrome tab up and running on the computer and whether they’re the culprit for degraded performance. With that said, you should know how to utilize the Task Manager effectively to the best possible extent.
Taking care of just that will be the next section in this guide, allowing you to follow through with valuable strategies using Google Chrome’s Task Manager. We highly advise reading until the end from here on out for the best results.
How to use the Task Manager in Google Chrome
The Google Chrome Task Manager can be quite a daunting beast to comprehend if you go ahead and try to make sense of its advanced capabilities. However, for this guide, we’ll keep things simple and oriented around the right track, so you can first grasp the task manager’s most fundamental function before anything else.
We’ll be breaking down the basics of getting to know this handy functionality in multiple sections. From accessing the Task Manager in Google Chrome to ending processes with it, please read on as we explain how an end-user dramatically benefits from this utility.
Accessing the Task Manager
Accessing the Task Manager in the Chrome browser is nothing more than a painless task. You can approach multiple workarounds of firing up the Task Manager in Google Chrome. However, we’ll be going forward with the simplest one for now. To access the Google Chrome Task Manager, click on the “Customize and control Google Chrome” button in the top-right corner of the screen. The icon is shaped like three vertical dots placed together.

Customizing Google Chrome
After clicking the specified button, a whole list of options will appear on the screen. You will need to hover over “More tools” and proceed by clicking on “Task manager” as more features surface. Doing so should fire up the utility in question. It’s just one of the easiest ways of accessing the Task Manager on a Windows PC, Chromebook, or Mac computer.
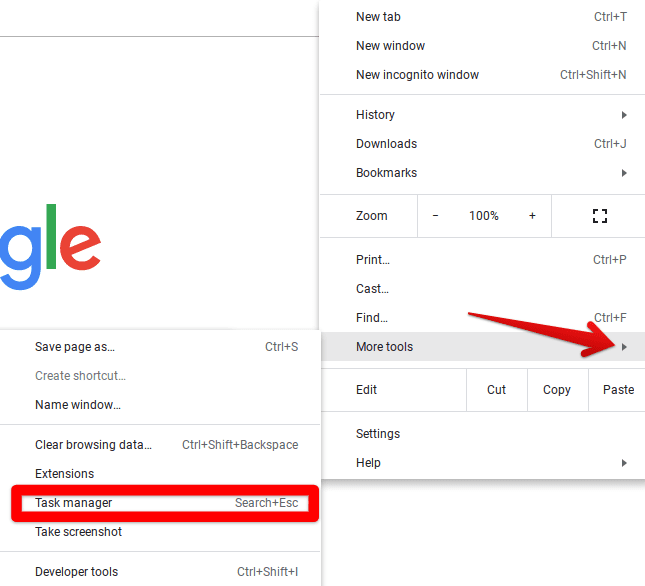
Opening the Task manager
Having the Task Manager all fired up and ready to go on your device.
While the illustration above is the primary method of launching the Task Manager, one more appropriate way is to use the shortcut key combination of “Search” and “Esc” while you are within the Chrome browser. Doing so will offer similar results.
Now that you have the Task Manager ready let’s follow through with the rest of the article and talk about using the feature on your Windows PC or any other device.
Selecting and ending tasks with the Task Manager
After opening the Task Manager, you might be overwhelmed by the sheer number of tasks within the application’s window. We must clarify beforehand that the Task Manager is available on several different operating systems, so the one we’ll be talking about ahead is exclusive to Google Chrome.
The primary function of the Task Manager revolves around the analysis and termination of the various processes occurring on the Chrome browser. If you spot an opened tab running on the device occupying a ton of RAM, storage, or CPU, you can select it by clicking on it first and then choosing “End process” in the bottom right corner of the screen. That is how you’ll use the Task Manager most of the time.
To illustrate this instance with the help of an example. First, select any random task you can visualize on the Task Manager. However, make sure you’re choosing a process that isn’t in use at the moment. Doing so will help potentially avoid any progress loss. For instance, if you’ve got an unwanted extension running on Chrome, you can shut it functioning down as one of Task Manager’s core features.
But first, you must click on it once to get to the next step. In the following screenshot, we’ve selected a random process to help you understand the core concept of the Task Manager here. Therefore, please don’t take it at face value. Instead, click on the desired process once and then continue to the next step to understand what to do next.
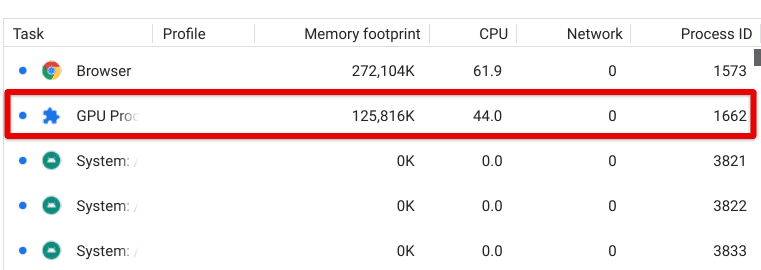
Selecting a task in Chrome’s Task Manager
Next up, you will click on the “End Process” button, as shown in the screenshot below, when you’ve selected a task. This will help shut down the process mentioned above, thereby liberating your device of essentially system resources. It would be best if you were wary that specific programs, in case of abnormal device conditions, will start taking up an awful lot of CPU or memory percentages.
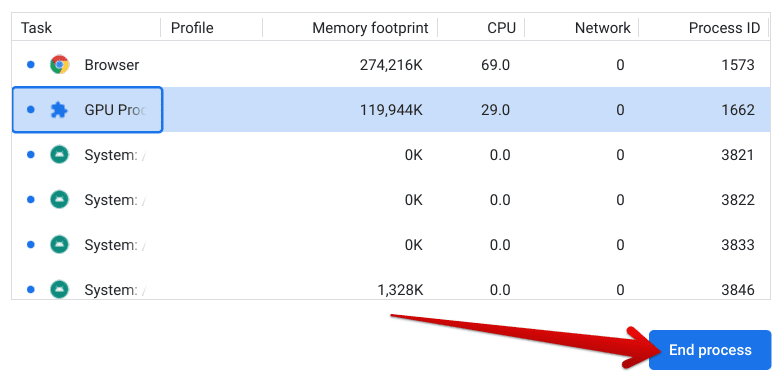
Ending the process in the Chrome Task Manager
In a case like that, you best avoid further issues and terminate the bothersome processes immediately from the Task Manager. This is what the utility in question is best used for, so you can always rely on it in times of need.
Exploring more detail within Chrome’s Task Manager
To now talk about an advanced capability relating to the software, there is a slew of functions and processes that Chrome’s Task Manager can show you.
All you have to do is right-click anywhere within Chrome’s Task Manager, and a list of options will surface on your end. You’ll notice that most of these options will be ticked off already, thereby being present in the Task Manager. However, other functions, such as Swapped memory and Image cache, can be toggled.
In doing so, you can better understand the Task Manager tool and get more involved with it. The host of other visible functions can deeply illustrate all the tasks indulged with Google Chrome, so it’s an appreciable way of interacting with Chrome’s Task Manager like never before. Check out the screenshot below, and you’ll understand what we mean.
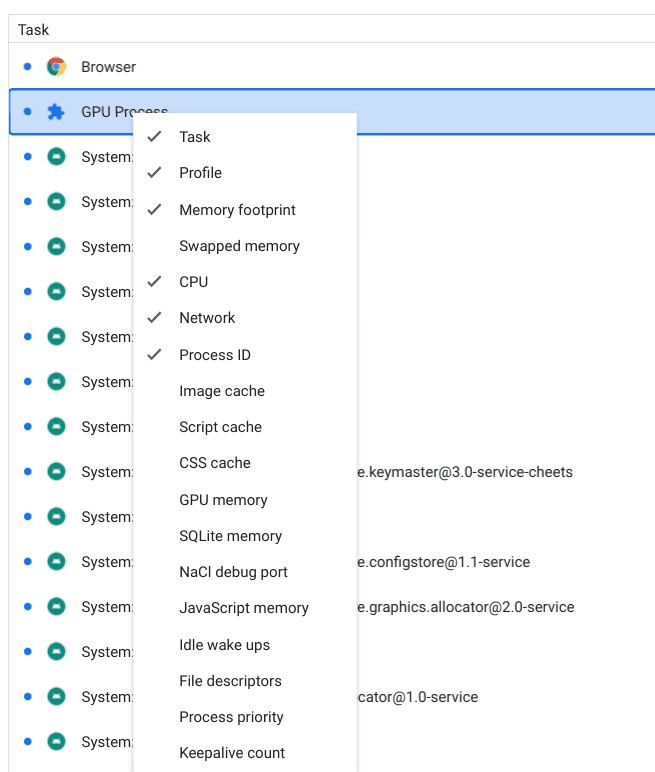
Performing a right-click on Chrome’s Task Manager
There you have it, then! We have dissected the Task Manager in an easy-to-understand format, so you should be all caught up on the tool’s major working capacities by now. The utility is excellent for terminating tasks and processes you would prefer not to run on your device to save on helpful system resources that could be spent elsewhere. It is now time for us to conclude the write-up. Thanks for reading!
Conclusion
In the write-up above, you can determine the best practices for utilizing Google Chrome’s Task Manager to the maximum. This incredibly convenient tool can help you get to the bottom of any related issues in Google Chrome. You can even tweak the visibility of multiple other tasks in Chrome so that you can interact with them accordingly.
Please let us know in the comments section below whether you’ve imparted helpful knowledge from the guide. We would love to read your feedback!
