Learning how to enable JavaSript on Google Chrome is one of the best things to do when you intend to manifest your Chrome browser’s experience fully. Without JavaScript, many of the pages you visit will feel lifeless, considering the importance of the programming language at hand and what it does for various websites. Fret not, though, since we’ll be showing you the ropes here, including the explanation of JavaScript and how to get started on Chrome.
Google Chrome is one of the world’s most popular browsers, if not the most popular one. It first came out in 2008 in its beta phase but was later made stable in December of the same year. Since then, the internet crawler has seemingly taken over the globe with its user-friendliness, speed, and simple mode of operation. It functions with multiple scripts, add-ons, and programming languages such as JavaScript.
Of course, without the added expanse of these tools, Chrome wouldn’t be able to perform at its 100%. Therefore, let’s get to the point in question and talk about all things JavaScript on your Google Chrome browser.
- Recommended: Java programming on Chromebook.
What is JavaScript?
IT experts, programmers, and those who code realize the importance of JavaScript and what it has come to be in 2022. Today, more than 95% of websites incorporate JavaScript in one way or another, alongside the rest of the power players in the industry, such as HTML. JavaScript is often called JS since the latter is its shortened form, so don’t be confused when you hear somebody say JS instead of the whole word “JavaScript.”
It comes with a whole swath of advanced-grade features such as event-driven programming, multiple different programming styles, and even the added ability to deem functions like first-class citizens. Today, every major internet browser, such as Google Chrome, Mozilla Firefox, Safari, Opera, and even Brave Browser, features some semblance of the JavaScript engine for their effective functioning.
That is to say, interactable elements on the browser that require a change within a website page need JavaScript to reply with the correct response. For instance, think of a clickable button such as “Feedback” on a specific site where you click and instantly get a response. Usually, the website says, “Thank you for your feedback!” Imagine if you had to load the page all over again to get a reply from the side of the page.
That would be too inconvenient, wouldn’t it be? That’s why JavaScript engines exist to streamline our networking and make our time spent online smoother and more productive. First, you should know the name of the runtime system of JavaScript, which is Node.js. It’s pretty popular and is interchangeably used with JS, so you should be able to recognize it from this point onward.
However, we don’t see why some people wouldn’t want to turn off JavaScript. After all, it’s the driving force behind the working mechanism of the many advertisements you see while using your browser online. Disabling JavaScript does something in the latter regard, but doing so may also hurt the rest of your browsing experience. Whatever the case, you should know how to toggle this functionality on or off.
With no further ado, therefore, let’s get right into the heart of this article now and talk about a quick and straightforward way of enabling JavaScript on Google Chrome.
Enabling JavaScript on Google Chrome
It’s straightforward to get started with JavaScript on your Chrome browser. All you have to do is venture to the “Settings” section of Chrome, then explore the various “Site Settings.” Out of all the available options, you’ll find one feature relating to JavaScript. After that, you can continue to enter that section and enable JavaScript on Google Chrome. That’s about it for the whole process.
However, we’re not saying goodbye just yet. You still need to be aware of the steps that it will take for one to get through to the JavaScript space on the Google Chrome browser. That is why we have decided to put together the forthcoming guidelines to help you get from points A to B in a highly descriptive manner. Follow the instructions ahead, and you’ll be able to enable JavaScript on Google Chrome in no time.
1. The first step after opening the Chrome browser is to click on the “Customize and control Google Chrome” button in the top-right corner of the screen. Once done, you should be able to access the internet crawler’s “Settings.” Next, click on the button, as shown in the screenshot below.
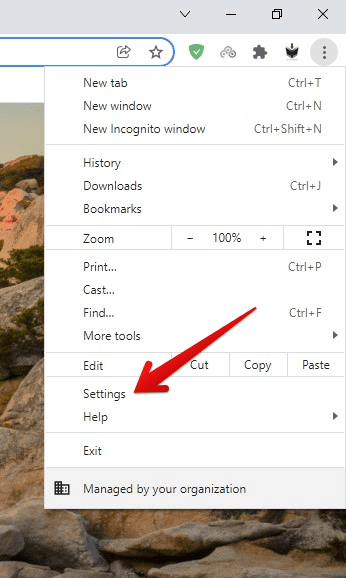
Clicking on the “Settings” button in Google Chrome
2. After accessing Chrome’s “Settings,” your next task will pertain to clicking on “Privacy and security” on the left-hand side of the screen. Check out the screenshot below for a visual illustration of getting this done.
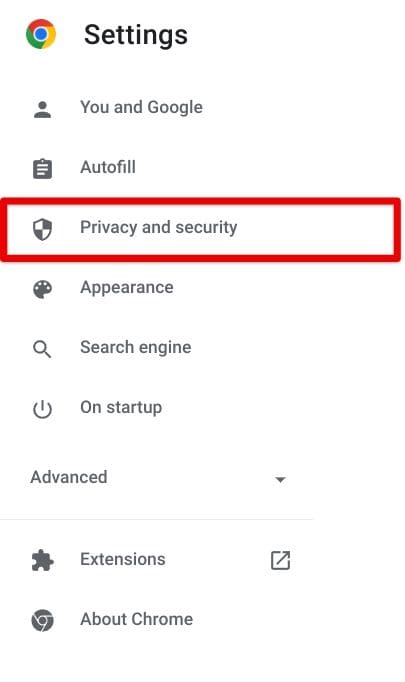
Clicking on “Privacy and security”
3. The “Privacy and security” section will lead us to the next step. After entering this space, you will be required to click on “Site settings.” Look for the area at the bottom half of the screen along the middle length of the visible page. The description of the option reads, “Controls what information sites can use and show.”
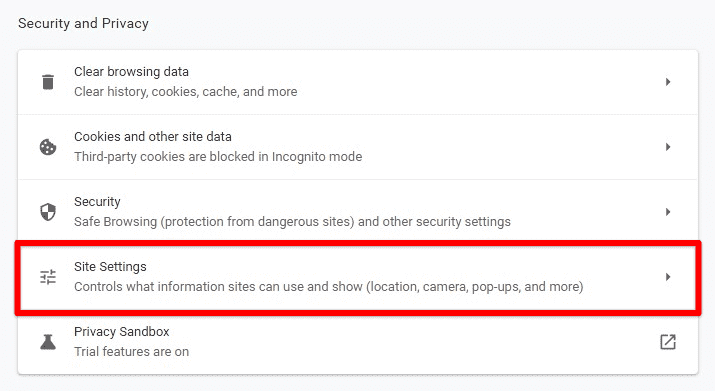
Clicking on “Site settings” next
4. After you click on “Site settings,” the next step will be to scroll down and come across the “JavaScript” option. It will be under the “Content” section of the “Site settings” page. Again, the feature should be easy to spot once you look at the screenshot.
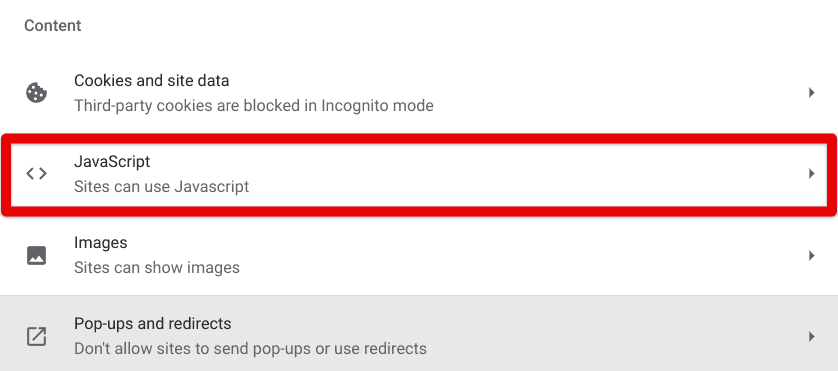
Clicking on “JavaScript”
5. After clicking on “JavaScript,” a whole page dedicated to this neat programming language will manifest, allowing you to tweak the functionality to a reasonable extent and, of course, disable it or enable it. First, if you came to this guide looking for a way to toggle JavaScript on, click on the toggle beside “Sites can use Javascript,” and that will do the trick. Check out the screenshot below to understand what is needed to be done here.
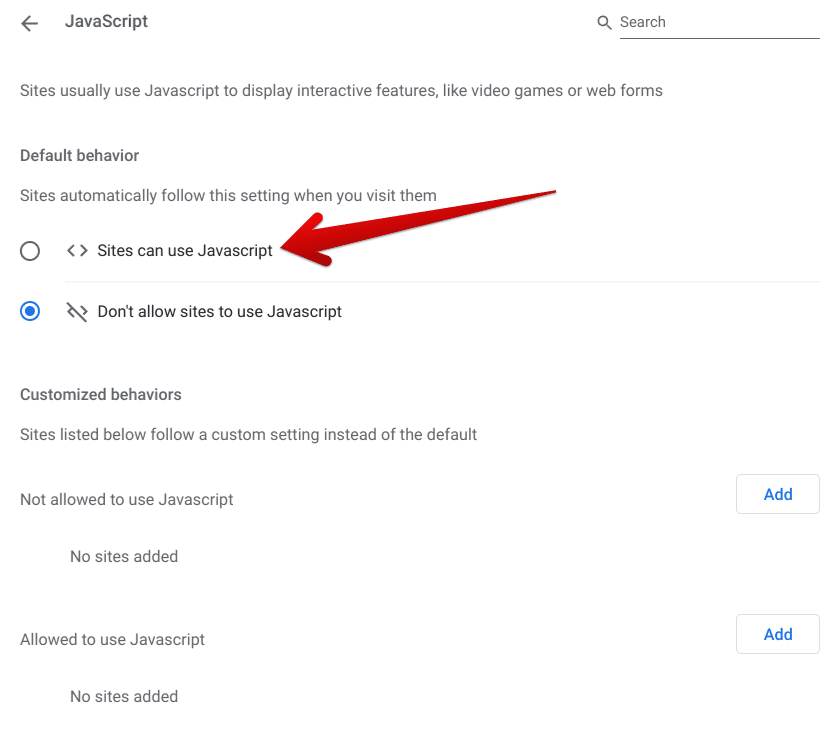
Enabling JavaScript on Google Chrome
After enabling JavaScript on Google Chrome, you shouldn’t just stop immediately. Take a moment to learn the other elements available on this dedicated page, so you can avoid making the same mistake again when disabling Javascript to block advertisements. That is to say, you can easily add sites to a list section here, so the browser knows specific domains that JavaScript shouldn’t be turned on for.
Doing so will help you gain favorable results in the long run. Similar to the “Not allowed to use JavaScript” section, you can also make the best of “Allowed to use Javascript” for the best results. Doing so will allow you to organize better how you browse things online. With all this being said and done, it’s high time to conclude the article.
Conclusion
Google Chrome isn’t out there as the most popular web crawler for no good reason. You could say that Chrome is a celebrity among other internet browsers, such as Mozilla Firefox and Opera. Truth be told upfront, though, there’s just no way Chrome’s simplicity and security standard can be overcome, hence why millions of people choose to opt for it regardless of many other present options.
In this guide, we’ve looked at one of the many instances where Google Chrome offers total control to the person on the other end. Of course, JavaScript is an utterly important programming script that makes our time spent on Chrome more smooth and more optimized. However, for whatever reason, if you’d like to learn how to toggle the functionality on or off, the write-up at hand will continue to serve as a beacon of knowledge for you.
Do let us know in the comments section whether this guide came in useful to you. We would love to read your feedback!
