Google Photos lets you share as well as store photos and videos with several additional features that can make your life easier via quick access and advanced accessibility features; it is the most used feature for IOS and Android worldwide; however, stacking up unnecessary photos can take up extra space and affect your device’s performance.
It’s likely that if you’ve been using Google Photos for a while, you’ve amassed many grainy, outdated photos. Keeping your Google Photos collection clean and tidy is essential since your cloud storage or your device’s performance may get affected, so it’s a good idea to remove blurry photos periodically.
The extra space in your Google Drive can be used for new photos that you intend on keeping for a more extended period, but that’s not the only benefit of getting rid of old images and screenshots. Are you low on Google Drive space? Likewise, getting rid of old, fuzzy photos is a good idea.
The following article will take a detailed look at how you can free up space on your Android, iOS, or even your PC using Google Photos. Since Google has revised its policy for free storage quota from June 1, 2021, freeing up space and removing blurry images that take up unnecessary space or devices is a viable option.
Benefits offered by Google Photos
Here are a few of how Google Photos simplifies the lives of its users,
- It is loaded with options for working with and playing back multimedia files. It can be utilized on any mobile gadget without any hitches. Google Photos is a simple photo-editing tool that doesn’t require special knowledge or skills. It may be used effectively with very little training. Even if they don’t have Google Photos, your friends and family can still view the photos you share.
- You can archive pictures you want to keep but don’t want to look at very often, such as screenshots or receipts. It’s easy to zero in on the precise photo you need. The creation date of a snapshot isn’t crucial. The language in pictures and maps, as well as names, dates, locations, things, and people can all be used in a search.
- Videos, animations, collages, and albums made by users can be downloaded, uploaded, and shared with others. Google Lens has many potential applications, including image recognition, text copying and pasting, text translation from printed materials and digital signage, and scanning QR codes. You may relive every memorable experience in your life with this program.
Why getting rid of blurry photos is necessary?
Whether for work or play, you could use your smartphone’s camera. Those images can quickly rack up storage space on a smartphone without the owner realizing it, and if they’re blurry, that space isn’t being put to good use. When the internal memory of a gadget is complete, its performance degrades. So, how do you react in such a situation? The first step in improving your device’s performance is to clear up space by deleting unnecessary photos.
It’s also crucial to back up your media files, as you can never predict when your gadget will malfunction and wipe all your data and memories. You can do this quickly and easily with Google Photos; however, if blurry photos and undesirable videos are taking up most of your cloud storage, you may not be able to back up as often as you’d want. It’s possible to discard crucial items during the procedure unwittingly. It would help if you began by deleting all the blurry photos and then move on to the rest of the junk.
Change of Google Cloud storage policy
A new Google Photos Storage Policy states that beginning on June 1, 2021, users will only be able to store 15 GB of photos in Google Photos, regardless of when they were first uploaded. Adding new media to your Google account’s backup collection can eliminate your storage capacity. As an example, if you want to back up your films and images, you’ll have to use up a lot of your free, unlimited storage space.
This, however, does not affect the fact that your photos and videos will be backed up regardless of quality, but it does affect the amount of storage space they will use. High-Quality images, formerly in the Standard quality category, are now in the Storage Saver quality tier.
Are you tired of scrolling through your photos?
Many people have complained about going through the entire library and manually selecting photos that are blurry and no longer needed. Here’s some good news! You don’t have to go through your entire library manually, saving you a lot of time and trouble. To discover blurry images, Google Photos saves you the trouble of manually searching through them. Google Photos has an automated feature that takes care of everything for you. The amount of space you can recover by erasing blurry photographs you no longer need is also displayed.
How to delete blurry photos using Google Photos on your smartphone
Follow this step-by-step process to remove any blurry photos using Google Photos on your smartphone without having to go through the trouble of viewing every image and selecting one.
Step 1
- Fire up the Google Photos app on your iPhone or Android mobile device. Select “Account storage” after tapping your profile picture.
- Your remaining Google Drive space and anticipated end date are now summarized. But, again, it is based on your consumption and previous history.
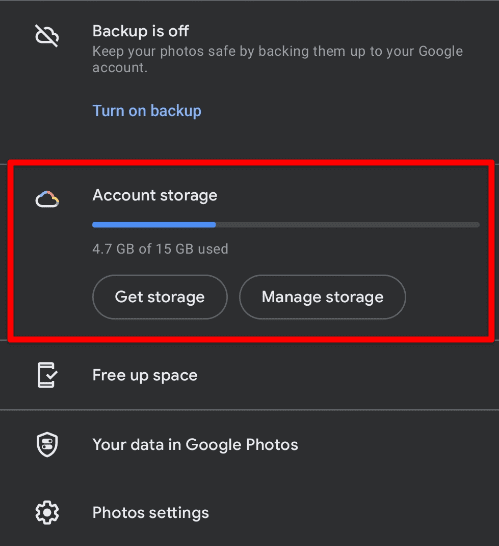
Google Photos account storage
Step 2
- Here you may view the total space taken up by blurry photographs and choose to delete them.
- When you select blurry photographs in Google Photos, the program will show you every photo it has determined to be blurry.
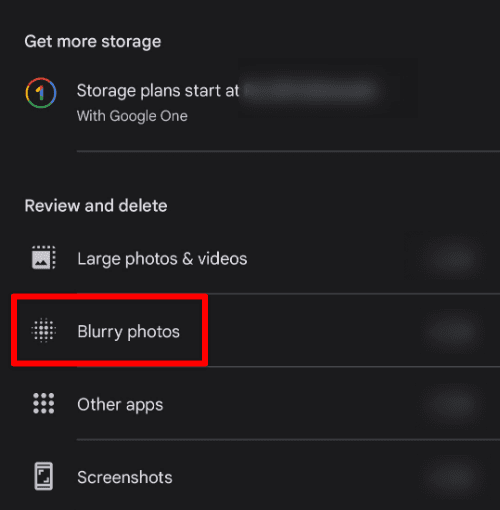
Reviewing Google Photos storage on mobile
Step 3
- Pick out the blurry images you want to get rid of.
- Select the photos you wish to delete, and then select the trash can symbol in the upper right corner. When the confirmation dialogue box appears, tap “Move to trash” once more to finalize your option.
How to delete blurry photos using Google Photos on your PC
Here is a step-by-step guide on how to get rid of blurry images using Google Photos on your PC without having to go through every photo in the library.
Step 1
- The Google Photos website can be accessed from any computer by clicking here. To access your account’s preferences, use the gear icon to the right of your profile picture.
- Choose Manage storage from the screen that opens when you click Settings.
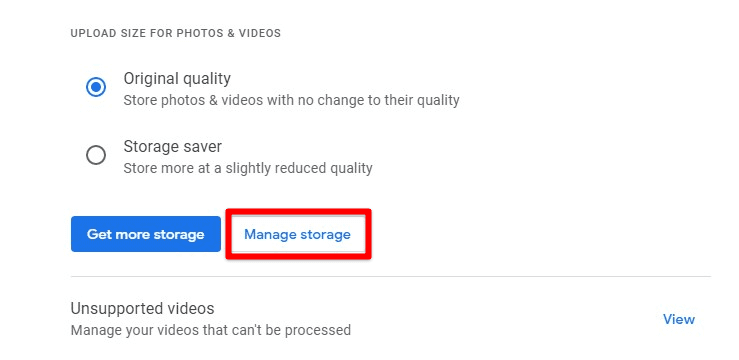
Manage storage
Step 2
- Your Google storage usage history and remaining capacity will now be displayed. If you have any blurry photographs or screenshots in your Google account, you can see how much space they are using up in the Review and Remove area.
- Choose the option that best suits you by clicking either Blurry photographs or Screenshots. Next, choose the blurry images and screenshots you wish to delete.
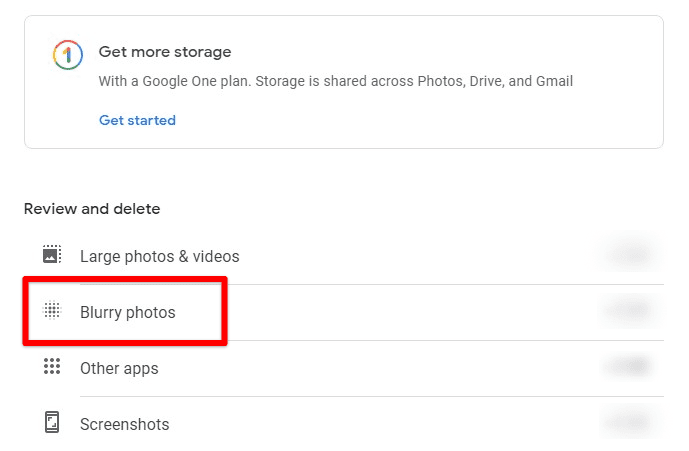
Reviewing Google Photos storage
Step 3
- Select one blurry image or screenshot to eliminate them all. At that point, the “Select all” button should appear in the top right corner. To choose all the blurry images, click on them.
- Select “Move to trash” from the menu at the upper right. Then, click Move to the bin in the confirmation window to finalize your pick.
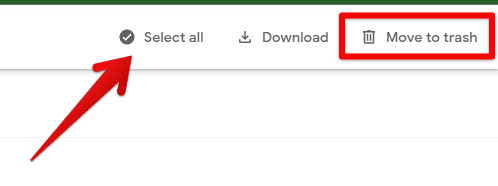
Selecting and deleting blurry photos
Conclusion
While it’s nice that Google Photos is accessible on the go, it’s becoming increasingly challenging to make good use of the limited storage space available. Every day, the importance of having a backup of your photo album grows. Cleansing should be done once a month, or at the very latest, once every three months, to effectively meet this demand. If you’re limited to Google’s free storage, this article helps you better manage your storage, improve device performance, and make the most of your cloud storage.
We have provided a detailed breakdown of managing your Google Photos, including a clear plan for erasing blurry photos that only take up redundant space. Following these instructions won’t have to dig through your entire gallery to get the job done. In addition, managing cloud storage and removing blurry photographs is no longer difficult or time-consuming. As a result, you can save time and effort when backing up your device.
