Google Photos is measuring up to be one of the most solid cloud-based storage platforms in the business, attributing to millions of customers worldwide for all that it does right. It’s a part of the mainline Google One subscription plan offered by the developers, which includes Google Drive. The latter is responsible for handling the majority of your files on remote servers as opposed to Google Photos, which is responsible for the media half only.
Photos is loaded to the brim with functionalities and indeed arrive fully feature-rich. It not only serves as a repository for all things photos, videos, and images in other formats, but it also sports a high-quality, specialized video editor for people to enjoy and implement to take their captures from one level to the next.
One of the features in highlight is portrait depth editing (called the bokeh effect) and Color Pop on Google Photos. Keep reading to learn all you need to know about applying this functionality. We’ll be sure to leave the instructions in an easy-to-understand format.
- Recommended: How to access Google Photos using Mozilla Firefox.
What is Google Photos?
Google Photos is one of the most popular cloud-based storage applications that have allowed a plethora of people worldwide to indulge in a world of convenience like never before. It’s available on various platforms, including Windows, macOS, Chrome OS, Android, and iOS. However, when it comes to its full potential, the app is more suited to mobile operating systems, and you’ll see why in the coming section.
Apart from everything that Google Photos offers in the context of its basic features, there are plenty of premium-grade functionalities too that make the application stand out from the rest of its competition. Some filters only become available when you purchase some plan of Google One, which is an all-in-one subscription service extending toward Google Drive as well.
Now that you have a better idea of what Google Photos is, let us get into the crux of the article and talk about applying the portrait depth editor and the Color Pop features in Google Photos.
Bokeh Effect – What to know before getting started
Before we get into it, though, we must warn you that the portrait depth editor and the Color Pop features do not work on the web-based version of Google Photos. Instead, you will have to turn to your mobile phone to accomplish the task at hand. But even then, your worries are not finished. Only supported devices can manage to get the depth editor effect along with the Color Pop filter to appear.
It appears that iOS devices and Google Pixel phones that have the “Portrait Mode” feature in their respective “Camera” apps can only access the portrait depth editor and Color Pop features. Devices exempt from this particular functionality won’t be able to try out those tools. Unfortunately, if you don’t happen to fulfill the criteria, this is where we’ll have to draw the line for you.
Moreover, some users have reported that both of these features in question at the moment are locked behind a subscription purchase of Google One. However, this does not seem to be happening to every user. It’s more like a device-to-device scenario that you’ll have to determine manually on your end. Therefore, keep reading about how to apply portrait depth editing and Color Pop on Google Photos if you have a supported device.
Applying the Bokeh and the Color Pop features to portraits
Using the depth editor and the Color Pop features is easy once you know which ones will be the right strings to pull. The steps will guide you on how to proceed with this operation successfully. Let’s get started right away.
1. As discussed earlier, the depth editor and the Color Pop features are both available only on supported mobile devices, so you will need to whip out your smartphone’s Google Photos application to proceed.
2. Once done, open any photo to which you would like to apply these changes, but please be mindful that you will need to select a photo taken in the “Portrait Mode” of your “Camera’ app for the procedure to be successful. If not, the depth editor and the Color Pop features won’t be visible. Once you’ve clicked on a photo, the next step is to click on the “Edit” button, as shown in the screenshot below.

Clicking on the “Edit” button
3. After clicking the “Edit” button, you must select “Adjustments” from the bottom bar. Check out the screenshot below for more detail.

Selecting “Adjustments” from the bottom bar
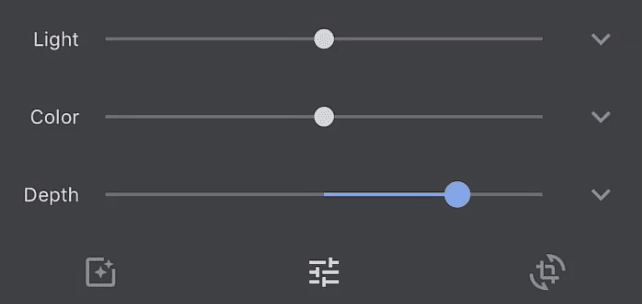
4. After clicking on “Adjustments,” you’ll visualize the “Depth Editor” slider on the screen. From here, adjust the slider as per your preferences until you achieve the right amount of focus. In addition, there’s going to be a circle that will help you spot the exact area you want to focus on and leave the rest of the background to get blurred out.

Using the Depth Editor
5. As soon as you wrap things up with the Depth Editor, click the “Filters” button to make your way to the Color Pop feature.

Clicking on the “Filters” button
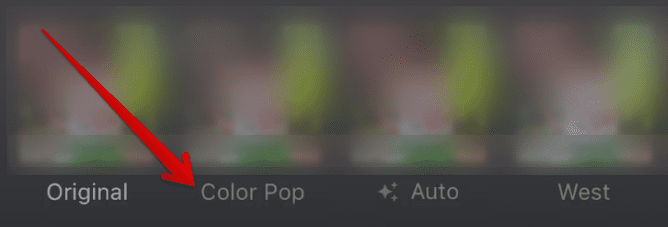
6. Click on “Color Pop,” as shown in the screenshot below, and you’ll painlessly be able to apply the filter on your end. However, you will still need to focus on the part manually that you wish to pluck out and distort the colors with.

Using the Color Pop feature
That’s all there is to know about applying the depth editor and the Color Pop feature on your Android phone. It is now time to summarize things with the following heading.
Conclusion
Google Photos is a cut above the rest in presenting cloud-based storage services. It features a nicely designed user interface that makes short work of any complex graphical element. Instead, it allows the user to navigate the different segments painlessly while presenting everything a user would require from the application in an easy-to-grasp format. Moreover, the platform even allows you to digitize your old Polaroids, which is nothing but the cherry on top.
In this guide, given the features’ eligibility criteria, we have learned how to apply the depth editor and the Color Pop feature to portraits in Google Photos. Do let us know in the comments section whether you were able to get the functionality to work on your end. We would love to read your feedback!
