Just got acquainted with ChromeOS and you’re already looking for ways to multitask like a pro on your Chromebook? We wouldn’t blame you. These sleek devices are designed so that users are primarily attracted to their innate ability to handle multiple things simultaneously.
From presenting a girth of accessibility tools and features to allowing users to download and enjoy the best Play Store apps in the business, Chromebooks are as feature-filled as any computing device, minus the mainstream complexities within their user interface.
As for now, though, keep on reading to discover the best ways you can use to walk and chew gum at the same time on ChromeOS. In the meantime, here are the related 25 tips and hacks to get the most out of your Chromebook.
Multitasking like a pro on a Chromebook
To multitask like a pro on Chromebooks, you need to be aware of a specific set of features of your device’s user interface. But, more importantly, you’ll need to learn and master them all to truly harness the speed of ChromeOS and get things on the go without ever slowing down.
The following subsections will take you through each of these features. By the time you’re done reading, try to implement them as you use your Chromebook for the best results. If you’re a complete newbie, it’ll take some while to get the hang of things, but nothing among that will be any complicated.
Learn time-saving keyboard shortcuts
One of the very first ways that you can start using your Chromebook like never before is only through the effective implementation of Chromebook keyboard shortcuts. The latter is a boon for power users who cannot simply do with traditional ways of navigating the ChromeOS interface i.e., using the trackpad and the keyboard in the most basic manner possible.
People in the habit of multitasking always make sure they’re cutting corners the right way by using keyboard shortcuts. To put them into simple words, a keyboard shortcut is a combination of pressable keys on your device’s keyboard that perform a specific function. For instance, pressing the “Power” and “Refresh” keys reboots the Chromebook.
The following are some of the best keyboard shortcuts that have helped us get by on the Chromebook’s Chrome browser much more quickly than before. Of course, you may as well practice your daily use of the device to get the hang of them properly.
- Ctrl + n: Opens a new Chrome window.
- Ctrl + t: Opens a new Chrome tab.
- Ctrl + r: Refreshes the Chrome page that you’re on.
- Ctrl + w: Shuts down a Chrome tab.
- Shift + Ctrl + w: Shuts down an entire Chrome window.
- Ctrl + l (pronounced el): Takes the text cursor straight to the Chrome browser’s address bar.
- Ctrl + a: Selects everything on the page.
- Ctrl + c: The standard keyboard shortcut for copying an item.
- Ctrl + v: The standard keyboard shortcut for pasting an item.
If you ever want to learn about more of these, here’s an extensive guide that shows you how to see keyboard shortcuts on a Chromebook. The gist of it is that you type in the word “Shortcuts” in the “Search” section of your Chromebook’s interface and click on the subsequently appearing application. Not long afterward, you’re able to visualize all keyboard shortcuts.
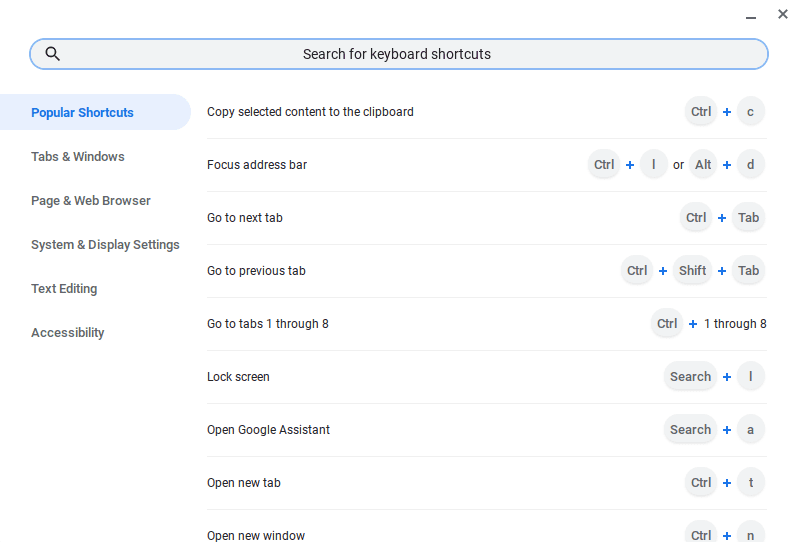
Keyboard shortcuts on ChromeOS
Use the Overview mode
Another fantastic way to start multitasking on your Chromebook without breaking a sweat is by using the Overview mode whenever the situation warrants you. If you press the key present in place of F5 on your Chromebook, you’d be able to pop into your Chromebook’s Overview—a feature that lets you visualize all opened windows on the screen.
Doing so can certainly get you a bird’s eye view of how to take things forward from there on out. Getting a broad picture of all concurrently running processes such as this poses the major benefit of painlessly switching from one window to the next. Take a look at the Overview mode in action below.
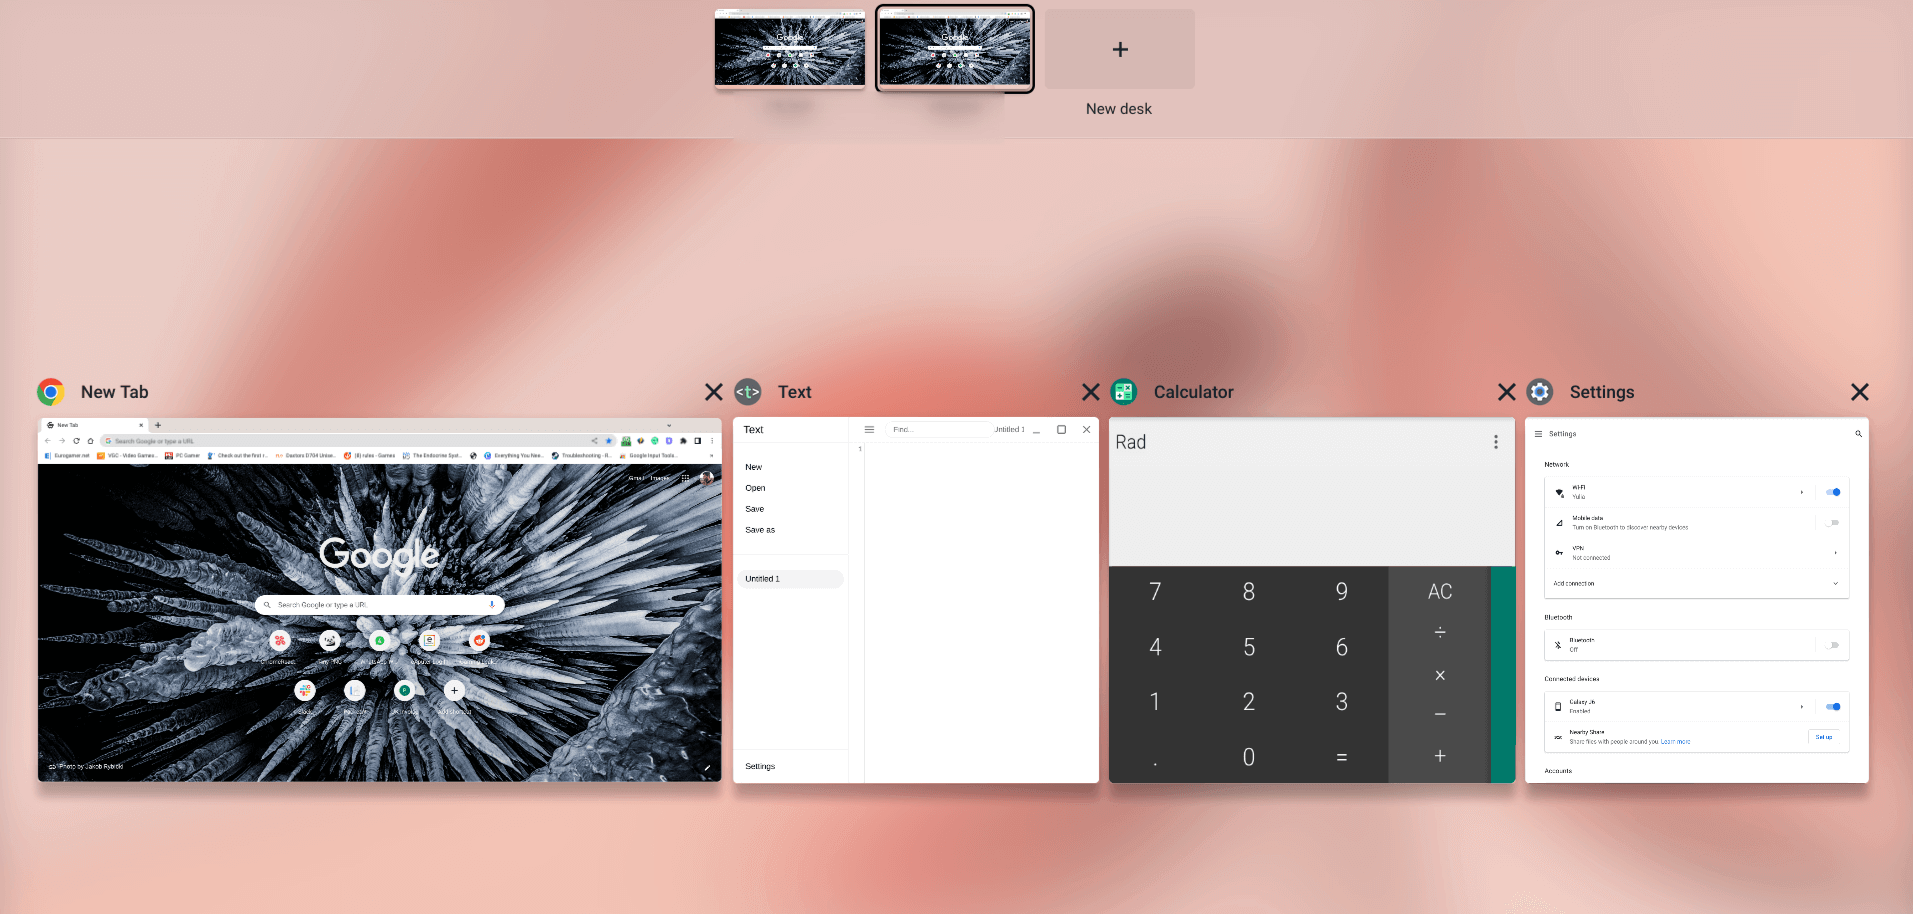
The ChromeOS Overview mode
Now, how do you get the Overview mode to pop up on the screen? It’s straightforward. All you have to do is swipe three fingers up on your Chromebook’s trackpad, which will do the trick instantly. Enjoy multitasking on your Chromebook in this way from here on out.
Oh, and if you do not want to do a finger swipe, you can enable a dedicated Overview button that would sit on the shelf right beside the Status Tray. Our guide on 3 ways you can make the ChromeOS status bar useful will help you get just that.
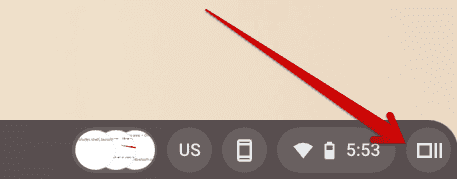
The “Overview” button alongside the ChromeOS status bar
Quickly switch from one Chrome tab to the next
The convenience trackpad gestures have brought to the table for Chromebook users are flat-out superb. You can employ the service of this component to get around your Chromebook faster and much more swiftly than before. Take three fingers and swipe them to the left or right on the trackpad, depending on the position of the tab you want to switch to.
You’ll even notice a brief highlight during the minimal process that allows you to visualize the actual switch from one tab to the next, but only if you look at your tabs while the procedure takes place. This multitasking tip has saved us time and made our working hours more productive.
Painlessly go to the previous or next page
Working in tandem with the trackpad gesture that can take you from one tab to the other, there’s another nifty feature here that can allow you to go to the previous or the next page when you’re on one specific tab. Let us clear this up with the help of an example. Consider that you opened the Chrome browser and are now on the “New tab” home page.
If you type in anything and press the “Enter” key, you’ll get your search results immediately. However, if you wish to go back to the “New tab” home page, you can swipe two fingers to the left on your Chromebook’s trackpad and make an arrow appear from the left side of the screen. Performing the gesture successfully will take you back to the previous page.
Now, if you’d like to go to the “search results” page again, swipe right with two fingers on the trackpad, and the same arrow will appear, but this time from the right side of the screen. Follow through with the whole sequence, and you’ll be on the relevant page in no more than a moment.
Go from one virtual desk to the other swiftly
If we’re to mention one final trackpad gesture in this guide, it can help you get from one virtual desk to the other on short notice. Virtual desks on ChromeOS are practically desktops that you can create independently and separate from each other to enhance productivity.
They allow users to work on several things at once. Each virtual desk can have its Chrome browser alongside the other applications installed on your Chromebook. If you’d like to find out more about this hefty functionality, we suggest reading up on our “Using the updated ChromeOS virtual desks” guide.
For now, though, the trackpad gesture that manages to earn a spot on this list is initiated by a four-finger swipe in either direction, depending on the position of your desk. Try it on your end and experience how the transition flies by so seamlessly.
Grasp your Chromebook’s split screen functionality
What we’re about to delve into now is perhaps a Chromebook’s biggest trick up its mechanical sleeve as far as the topic of multitasking is concerned. Like Microsoft Windows, ChromeOS allows you to split your opened windows into halves so that you can work on two windows at any time. The functionality is barebones at the moment, but not for long.
That is to say, Chrome 105, in relatively recent times, has introduced a brand-new feature to be in the works, and it’s known as “Partial Split.” However, the base ideology is quite similar to the “Snap windows” functionality of Windows 11, so it does seem like Chromebooks are gradually getting there.
For now, though, you’ll have to settle for splitting your screen the old-fashioned way. Now, Chromebooks make it quite effortless to get started with the functionality. A couple of methods can be approached to split your Chromebook screen, but we’ll go through the most convenient one for this guide.
Simply click and hold the “Minimize” button on an open window to get the directional options to appear. Choose left or right and let go of the click accordingly to make the window fill the relevant space and half itself in size. Now, you’re free to open another window and do the same, so the result looks like the following.
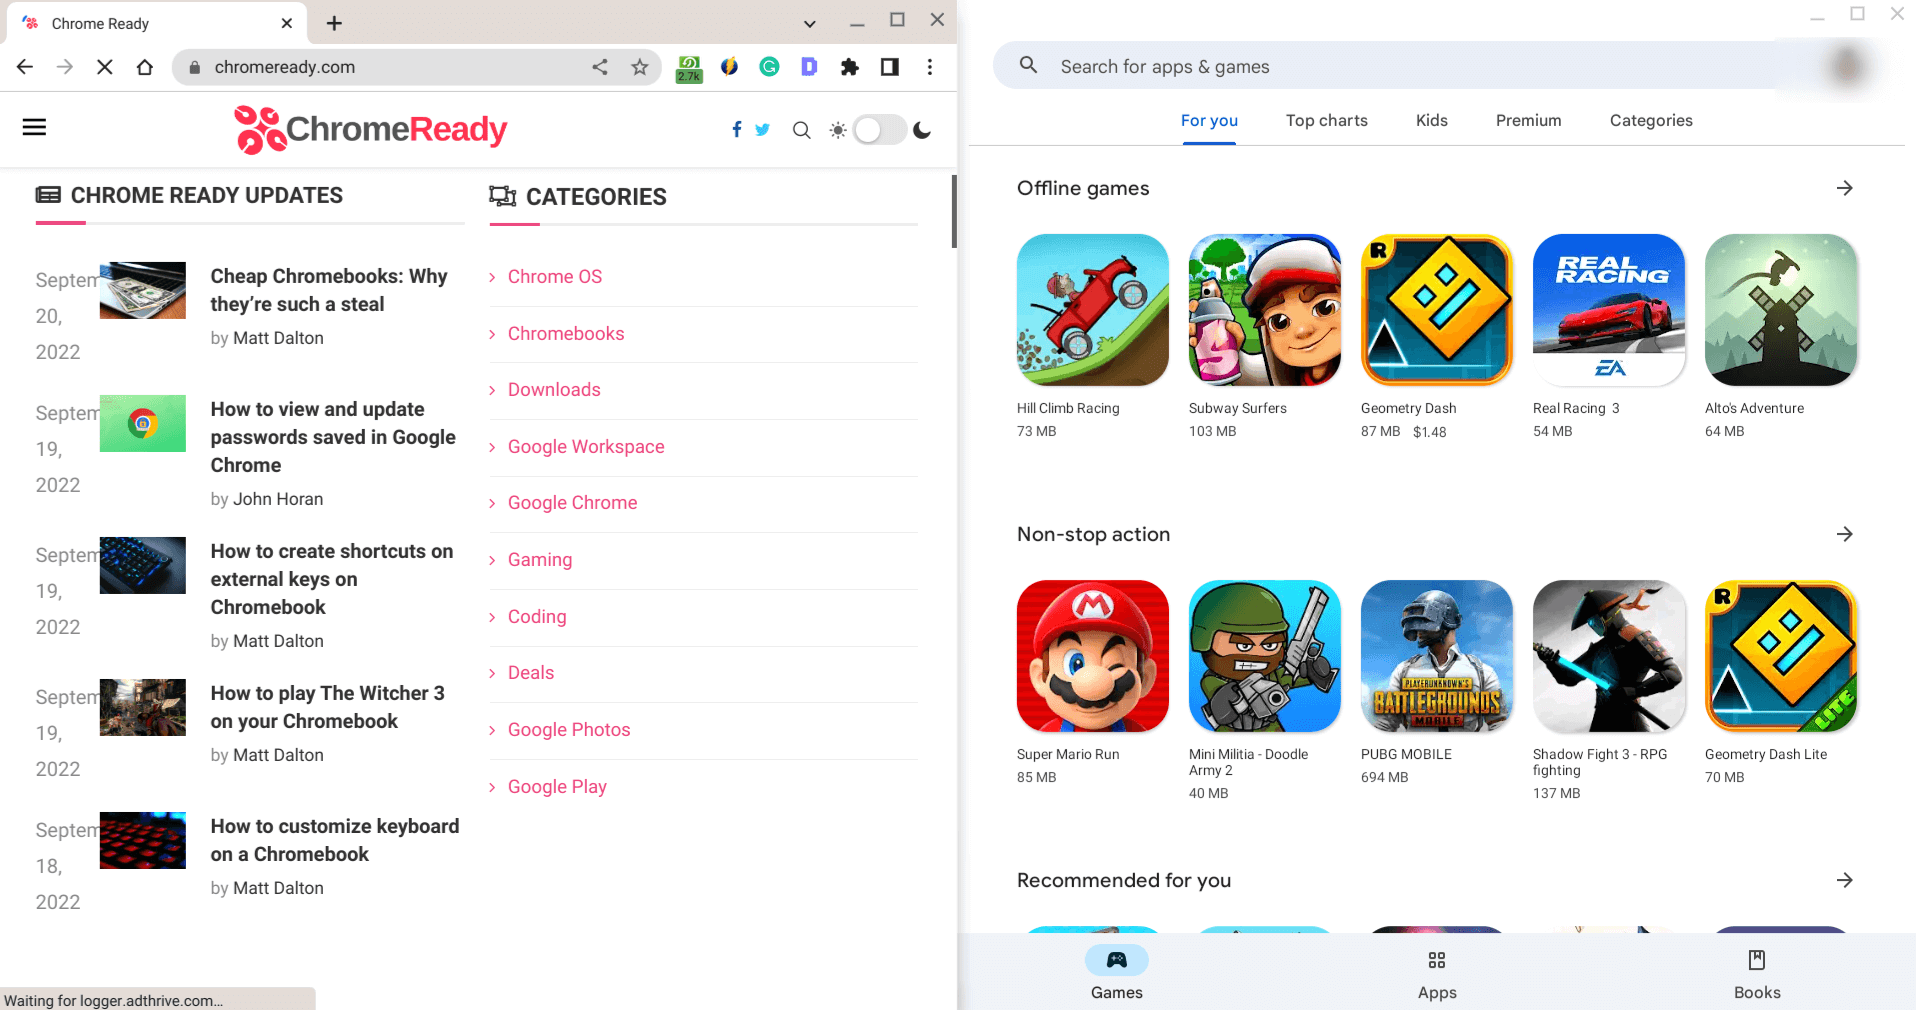
ChromeOS interface with the split screen feature
- Related read: How to split PDF into smaller chunks on Chromebook.
Group your Chrome tabs
Google Chrome is now more advanced than ever. It allows prospective users to create groups for opened tabs, so they can focus on singular pieces of work whenever they’re working on a large-scale project. You must tap on any account with two fingers on your Chromebook’s trackpad to reveal more options.
Once done, a list of tools will appear in a drop-down form. Click “Add a tab to new group” to commence the group creation process. Within the group feature, users are free to mark the group with a distinct color, add more new tabs to the existing group, name the group, or shut the whole thing down instantly.
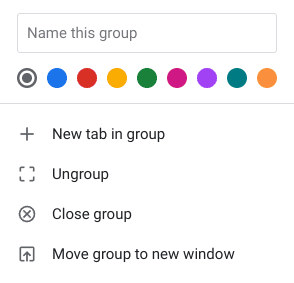
Creating a group of tabs in Google Chrome
Now, proceeding with such a function allows you to take care of multiple instances simultaneously, mainly when your project is centered on a class of other working elements. We highly encourage utilizing the best of this group-creation feature on the Google Chrome browser.
Customize the Chromebook shelf to your liking
The Chromebook shelf’s standard position is excellent, but did you know that it can be switched up as per your preferences? That’s right. Users who want the ChromeOS shelf anywhere but the bottom end of the screen can double-tap on a space on the shelf and hover over the “Shelf position” button.
Doing that will make it possible to take your shelf to the screen’s left or right side—whatever suits your preferences the most. In our opinion, having the shelf on the side, you’re comfortable with can allow one to multitask with different applications at an even greater rate.
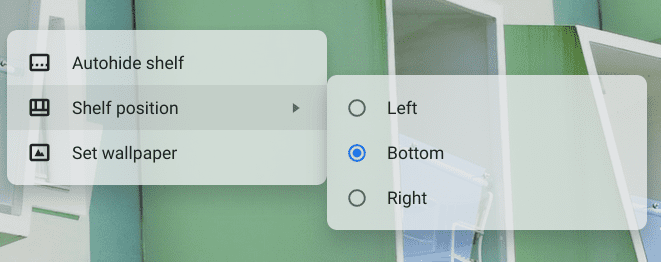
Changing the shelf position
Conclusion
ChromeOS may not pack the same features, tools, and programs as Windows PCs, but don’t let that fool you into thinking of them as any less capable. The operating system is a steal when bought cheaply, not for just one but for many reasons. Chromebooks leave their competition in the dust when it boils down to speed and security.
Now that you know some of the neatest tricks that will help you do multiple things simultaneously let us know in the comments section ahead if we missed anything in particular. Some of these features can genuinely impact your overall productivity and are something we employ daily.
As always, Chrome Ready wishes you good luck!
- Trending read: How to customize keyboard on a Chromebook.
