Since the launch of Google Slides in 2006, it has been regularly updated with many new features and capabilities. In many aspects, it can now be considered at par with the most widely used presentation software, MS PowerPoint. Still, the ability to add audio to your Google Slides is somewhat new. It was part of the popular user demand and was finally released two years ago.
The following article will closely examine how you can add audio to any file on Google Slides. The audio may be a voice-over recording, background music, a song, a sound effect, or anything else. When delivering a finely curated presentation, voice-over and sound effects may significantly improve the overall quality and delivery.
Adding audio to Google Slides
Fortunately, there is no need to add audio separately whenever a video is included in Google Slides. However, you might find yourself in many scenarios where inserting audio is imperative. Adding audio to Google Slides might even seem a blessing for someone who needs to read out plain presentations. A voice-over, narration, or even commentary can complement any such exercise dramatically.
When adding audio to Google Slides, remember that this feature is currently unavailable on the mobile application. Therefore, it can only be done when accessing Google Slides on the web. Moreover, the actual file to be inserted must be in one of the supported file formats, .mp3 or.wav. While adding audio to a file to be presented as your own, respect copyrights and fair usage policies. These can be overlooked quite quickly when it comes to simple audio chunks.
Here, it is essential to note that Google Slides does not let you record an audio clip within the platform. A separate recording application must be installed for those who want to add a voice-over. Google Slides will only support new insertions once they have been pre-formatted into a specific file format and are present in a preferred location. Do they have to work with audio files regularly? Please read our guide on embedding audio in Google Drive.
Saving the audio file to Google Drive
In case you did not already know, the insert audio option in Google Slides is only able to load files that are present on the Drive. There is no such method for uploading them directly from your PC or mobile phone. Therefore, before inserting an audio clip in Google Slides, make sure to have it uploaded to Google Drive. Also, do not forget to attach that file to the same account you will open Google Slides with. We assume you have the audio file ready/recorded on a desktop or local storage for the following steps.
Step 1: Launch your preferred internet browser and go to “Google Drive.” Log in with your account.
Step 2: Make sure that you are on the Google Drive homepage. By default, you will be on the “My Drive” tab. You can view this page’s suggested folders and file sections.
Step 3: There is a menu panel on the far-left side of your screen. Click on the “New” button at its top.
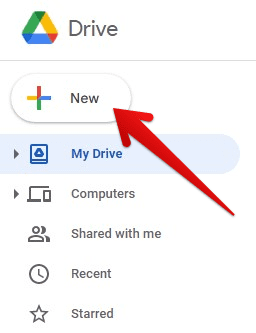
Uploading a new file to Google Drive
Step 4: A small window pops up right next to that button. Click on “File upload” from the drop-down menu.
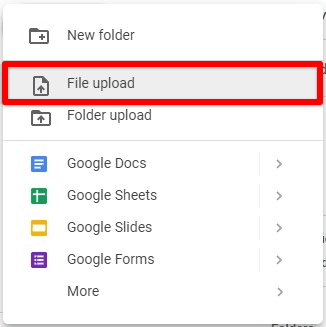
Selecting to upload a file
Step 5: Google Drive will now ask you to select an item to be uploaded. Browse for the audio file you want to add and click on “Open” to complete the process.
Depending upon the size of that file, it might take a few seconds or a couple of minutes for the upload to finish. Once uploaded, move it to an easily accessible folder within Google Drive. The audio file must also be shared if you forward the final presentation. Without this, recipients might see the inserted file but won’t be able to play it on their system.
Adding audio in Google Slides
Now that you have seen the process for uploading audio to Google Drive, the next step is to insert it in Slides. You must open up the “Insert” tab from the Google Slides toolbar whenever a new element is included. It allows you to add images, text boxes, audio, videos, shapes, tables, charts, diagrams, and more.
Step 1: Launch your preferred internet browser and go to “Google Slides.” Log in with your account.
Step 2: Make sure that you are on the Google Slides homepage. By default, you will be on the presentation menu. You can view new templates and recent presentations from this page.
Step 3: Open the file in which audio is to be added. When the file loads, click on the “Insert” tab from the Google Slides toolbar.
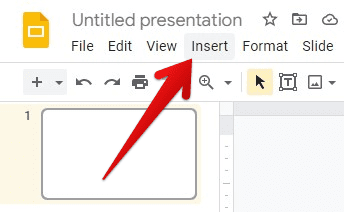
Inserting in Google Slides
Step 4: Doing so opens up a drop-down menu. Click on “Audio.”
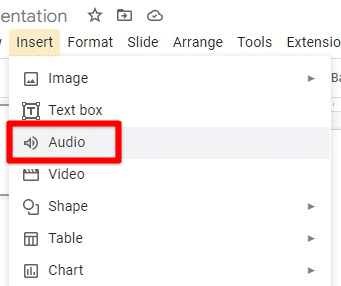
Inserting audio in Google Slides
Step 5: You will now see an “Insert audio” window on your screen. Make sure that you are on the “My Drive” tab. Search for the audio file or scroll down to find it manually.
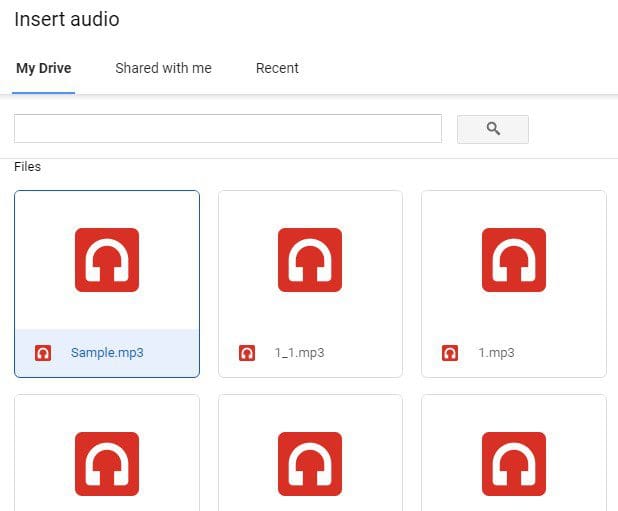
Insert audio window
Step 6: Select the file you want to add and then click on “Select” in the bottom left corner.
That file will be inserted into the presentation at once. It can be seen as a gray speaker icon. The application displays a lot of audio controls and format options as soon as the file is inserted. These are discussed in the following sections.
Adjusting audio playback in Google Slides
Once an audio file has been inserted, several adjustments can be made according to specific preferences. This may vary based on the type of audio, presentation theme, delivery mode, and more. Even better, all these options are in the format menu, which is usually associated with all elements inside Google Slides. It is used to modify the actual appearance of any item and its behavior when someone is presenting. Adjusting audio playback can substantially change how that audio is played inside Google Slides.
Step 1: Launch your preferred internet browser and go to “Google Slides.” Log in with your account.
Step 2: Make sure that you are on the Google Slides homepage. By default, you will be on the presentation menu. You can view new templates and recent presentations from this page.
Step 3: Open the file in which the audio was added. When the file loads, go to that particular slide and click on the speaker icon.
Speaker icon for audio file
Step 4: You will now see a “Format options” button in the toolbar. Clicking on it slides in a new window from the right. It is home to several tabs, including audio playback, size & rotation, position, recolor, and drop shadow.
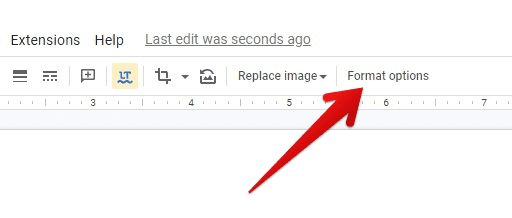
Format options button
Step 5: Open the “Audio playback” tab. Here, you can choose when the audio starts playing, adjust its volume, hide the speaker icon, loop through the audio, or stop it as soon as the slide changes.

Format options for audio playback
Modifying format options for the audio icon
Other than the actual behavior of how audio is played, there are some visual settings for general slide aesthetics. You cannot just put that default speaker icon anywhere on the slide. It can be sized, recolored, and positioned according to what suits best in that presentation.
Step 1: Launch your preferred internet browser and go to “Google Slides.” Log in with your account.
Step 2: Make sure that you are on the Google Slides homepage. By default, you will be on the presentation menu. You can view new templates and recent presentations from this page.
Step 3: Open the file in which the audio was added. When the file loads, go to that particular slide and click on the speaker icon.
Step 4: You will now see a “Format options” button in the toolbar. Clicking on it slides in a new window from the right. It is home to several tabs, including audio playback, size & rotation, position, recolor, and drop shadow.
Step 5: Open the “Size & Rotation” tab. It contains format options for changing icon size, width scale, height scale, locking aspect ratio, and determining orientation.

Size & rotation tab
Step 6: After that, open the “Adjustments” tab. It contains three separate sliders for transparency, brightness, and contrast. Change them based on the sort of background you have on that slide.
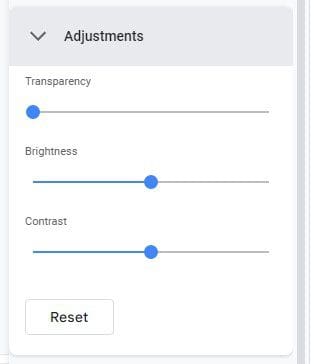
Adjustments tab
Step 7: Lastly, open the “Position” tab. It contains X and Y position coordinates for moving around the speaker icon. Please note that dragging it with your mouse is also possible.
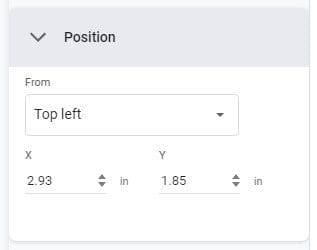
Position tab
Conclusion
Google Slides has gradually come to a point where it can now cater to all possible requirements in a standard presentation. With this comes the capability of handling audio file insertions. Even though one is limited to only adding audio from My Drive, it is still possible to make several adjustments so that the end effect seems pretty personalized. Just make sure to have the audio uploaded to Google Drive beforehand. Does your job or side hustle require you to work with slides? Learn how to make organizational charts using Google Slides.
