Google Photos is considered the most comprehensive and valued cloud storage for photos and videos. Any of its competitors not enjoy its massive user base. When large user bases start to employ any service regularly, some relatively simple but important observations occur. If you have begun using Photos relatively recently, you might have noticed that it displays items in chronological order. Not only that but Photos also writes out the exact date on which that item was created in its current form. This happens without you explicitly telling Google when and where that file originated.
Editing their original date and time remains the only viable solution for those who would like to move around some photos or videos while still presenting items sorted by their timestamp. In the following article, we will look at how you can edit the timestamp of a file uploaded to Google Photos. Do you ever feel some privacy concerns when storing something over the cloud? Here is a detailed guide on making private Google Photos albums.
Timestamp in Google Photos
How many of you remember those old childhood photos when a timestamp used to be part of every single picture an analog camera captured? That orange or white mark became an iconic feature of almost every image of that era. With the advent of smartphones and digital cameras, those timestamps became a thing of the past. Since Google Photos launched, it needed a defined way to sort out the photos and videos uploaded to an account. Since most of us do not usually name a personal media file, sorting them alphabetically was unsuitable.
The only other inherent feature in any file is its time of creation. So that is what Google went with. Since then, any item uploaded to your Photos gallery is automatically put in chronological position. It proved to be an ingenious method for displaying media files. Many people tend to scroll through their old memories from a specific time. Besides, it is always good to have an intuitive measure for when a picture or video is captured. Whenever you upload a new file, the timestamp information from its native file data is extracted on the backend.
Apart from just sequentially sorting files on its basis, Google Photos also displays each timestamp. This can be viewed by hovering your mouse cursor over the far-right side of your screen. It pops up in the gallery timeline and returns to the first uploaded file. Now, if you need a specific photo or video displayed at the top, one option is to edit its timestamp to a more recent date. There can be other reasons to do so as well. Following any method described in subsequent sections can easily modify this information. Are you thinking about moving your photos to some other cloud storage? Take a look at this in-depth comparison between Google Photos and iCloud Photos.
Editing timestamp in Google Photos on web
To edit the timestamp for a file in Google Photos, you must sign in with your account and pin down that particular file. Any details for a specific photo or video can be found in the info icon. This icon is displayed at the top when you open a full-screen file. The time and date in that information window are editable and can be changed at once. You may select a different time zone for that file as well. Please note that you cannot change the filename as you do in the timestamp.
Step 1: Launch your preferred internet browser and go to “Google Photos.” Log in with your account.
Step 2: Make sure that you are on the Google Photos homepage. You will be on the “Photos” tab by default. It displays the entire Google Photos gallery on your screen.
Step 3: Hover your mouse cursor over the far-right side of your screen. A vertical timeline will come into display. Click on the approximate period for the file you want to look for.
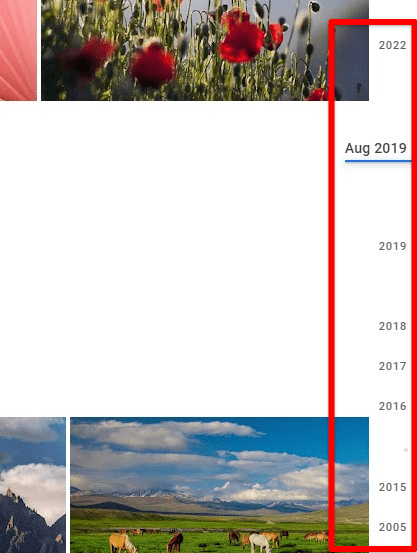
Google Photos timeline
Step 4: Once you find that file in which the timestamp is to be edited, click on its preview. That item will open up on the entire screen. You will notice some options in the top right corner. Click on the info icon.
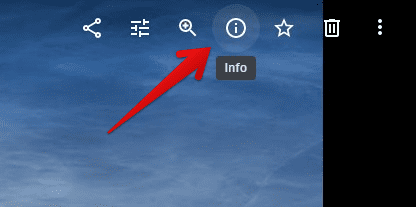
Opening file information
Step 5: Doing so slides in a new window from the right side. It contains the file name, description, associated albums (if any), timestamp, original quality, and more. Click on the edit icon right next to the timestamp details.
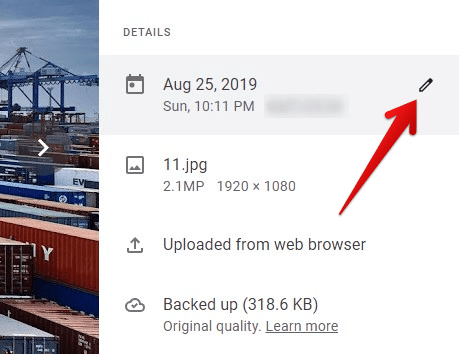
Editing timestamp
Step 6: The “Edit date & time” window will open. Change the exact day and time to whatever you want it to be. There is an option to change the time zone at the bottom. Once all changes have been made, click on the “Save” button in the bottom right corner.
The new timestamp will take effect immediately. When you return to the “Photos” tab, that item will have been moved to this new location on your timeline.
Editing timestamp for multiple files at once
Sometimes, you might have to edit the timestamp for more than one picture or video. In those cases, a quicker method is preferred, which can somehow change the date and time details for the entire set of files simultaneously. Considering this scenario, Google has already included an “Edit date & time” tab in the menu options. It remains enabled even when the user has selected multiple files.
Step 1: Launch your preferred internet browser and go to “Google Photos.” Log in with your account.
Step 2: Make sure that you are on the Google Photos homepage. You will be on the “Photos” tab by default. It displays the entire Google Photos gallery on your screen.
Step 3: Hover your mouse cursor over the far-right side of your screen. A vertical timeline will come into display. Click on the approximate time for the files you want to look for.
Step 4: Select each file for which the timestamp has to be edited. After all, files have been selected, click on the three-dot icon in the top right corner of your screen.
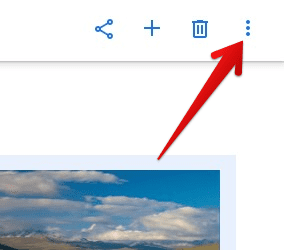
Opening menu options
Step 5: It opens up a drop-down menu. Click on “Edit date & time.”
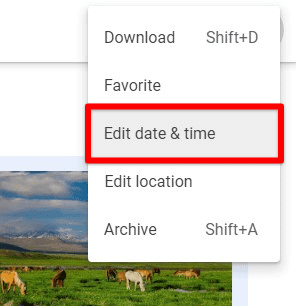
Editing date & time
Step 6: Doing so pops up the “Edit date & time” window. Here, you are presented with two options. Choose whether to keep the relative time difference between those files or move all selected photos to one date.
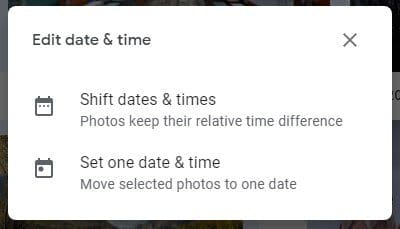
Choosing how to edit timestamp
Step 7: Set the exact date, time, and time zone for these files. Once all changes have been made, click on the “Save” button in the bottom right corner.
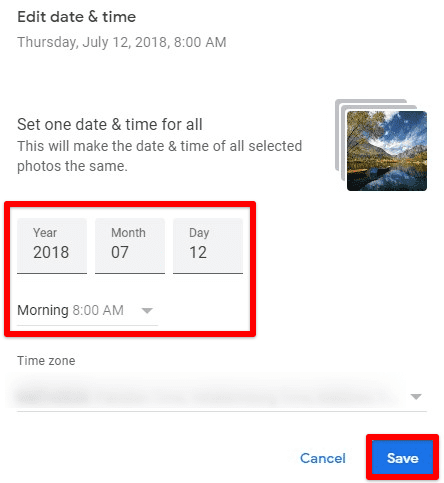
Editing timestamp for multiple files
The new timestamps will take effect immediately. When you return to the “Photos” tab, those items will have been moved to this new location on your timeline.
Editing timestamp from the Google Photos mobile app
Editing timestamp in Google Photos on mobile is a bit different. Firstly, there is no option to make changes for multiple files simultaneously. Moreover, you will not see any setting for the time zone either. To change the timestamp details from the mobile app, you have to slide open the file info window from the bottom. It also contains menu actions, which include adding to the album, moving to the archive, downloading, moving to the locked folder, and more.
Step 1: Open the “Google Photos” mobile application on your phone. Log in with your account.
Step 2: Make sure that you are on the Google Photos homepage. You will be on the “Photos” tab by default. It displays the entire Google Photos gallery on your screen.
Step 3: All photos on this page are arranged chronologically. Scroll down to find the file in which the timestamp is to be edited. Once found, tap on its preview to open it. That item will open up on the whole screen. There is no info icon on this page. Slide up from the bottom of your screen.
Step 4: Doing so displays a range of options for that file. Other than that, there are also some details which include the timestamp. Tap on the edit icon right next to it.
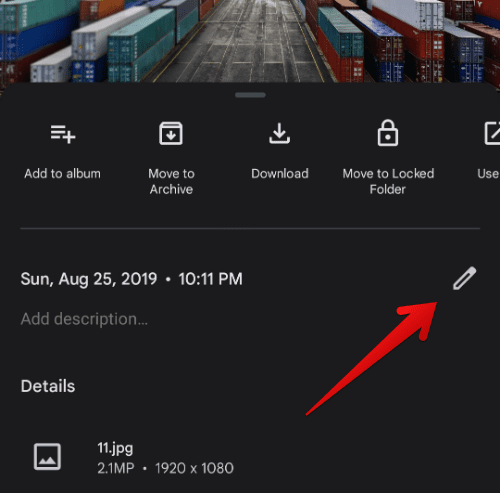
Editing timestamp on mobile
Step 5: You will now see the “Edit Date & Time” window at the bottom. It contains two separate tabs for date and time. Tap on each of these individually and change them to whatever you want. There is no option to change the time zone like that in Google Photos on the web.
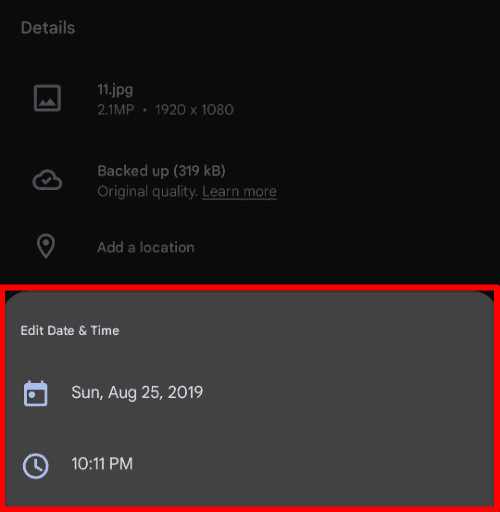
Edit date & time window
Step 6: Once a change has been made, tap on the “OK” button in the bottom right corner.
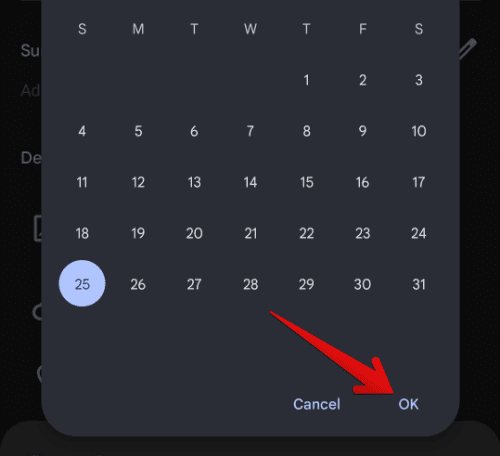
OK button
The new timestamp will take effect immediately. When you return to the “Photos” tab on the app, this item will have been moved to that new location on your timeline.
Conclusion
Google Photos keeps a well-managed timestamp for every file uploaded to its database. This stamp refers to the time when that item was initially created. All photos and videos in Google Photos are sorted about the timestamp. For editing this, the file info tab needs to be accessed. Once there, you can select any item’s date, time, and time zone. Never tried anything other than storage with Google Photos? Learn how to create animated GIFs and movies.
