Since Google launched its Docs Editor suite, more and more people have shifted to it from the MS Office. This suite includes a range of document processors such as Google Docs, Google Sheets, Google Forms, and many more. Docs intended to be a well-versed alternative to MS Word, and that is precisely what it has been over the years. Nowadays, it hosts all word processing features any user would need daily.
The support for adding, processing, and captioning images has always been essential in such software. Google Docs contains a range of image inserting options. You can add an image from your computer, Google Drive, or Google Photos, or directly use the device’s camera. Once an image is imported inside the document, the next step is to caption it. As it turns out, many ways to caption a photo in Google Docs exist. The following article will detail each of these methods for you. Do you commonly process large word documents? Learning to track changes in Google Docs will save you time in the long run.
Captioning images in Google Docs
If you do not already know, Google Docs is based entirely on the cloud. One does not need any local space on the device to use it for word processing. Still, it offers an incredibly easy-to-use interface and genuinely excellent compatibility. That allows its users to add and caption images effortlessly. When you open any document on Google Docs, there is a menu pane at the very top. It contains different tabs such as Edit, View, Insert, Format, Tools, and more. You must go to Insert > Image and choose your preferred method to add an image.
Now, you will have an image inside Google Docs. After that, there are 4 different ways you can caption that image. One easy way to do so is through a Google Docs add-on. These extensions are available on the Google Workspace Marketplace and can be installed directly on the Google Docs menu. Other methods involve using in-line text wrap, a drawing tool, or the default table template.
You might have already noticed that all of these processes are workarounds. There is no inherent feature for image captions as on other leading word programs. Although, this limitation kind of works as a blessing in disguise. With the various methods mentioned above, you can experience increased customization options for the captions. Moreover, it becomes easier for you to carry the caption box throughout the document. Generally, only one of these ways will suit you the best. Therefore, people end up sticking to a single method for consistency across their files.
Adding captions with a Google Docs add-on
In Google Docs, you can go on to add an extension from the Google Workspace Marketplace for adding captions to images. Many different add-ons are available for this purpose, and you can choose whichever seems more appropriate. These add-ons are seamlessly integrated into the Docs menu, and you won’t have to go through any extensive installation process. The extension we are going to recommend comes with the name Caption Maker. It has various options for formatting, numbering, and placing each caption.
Step 1: Launch your preferred internet browser and open “Google Docs.” Log in with your account.
Step 2: Open the document in which you want to add captions.
Step 3: Once the document is opened, click on the “Extensions” tab in the toolbar. Go to Add-ons > Get add-ons. A Google Workspace Marketplace window will pop up on your screen.
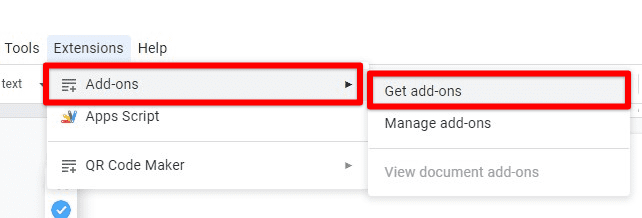
Add-ons tab in Google Docs
Step 4: Search for “Caption Maker.” Open the first result and click on the blue “Install” button in the top right corner. The system will prompt you to grant respective permissions and link your Google account. Click on “Continue” to proceed.
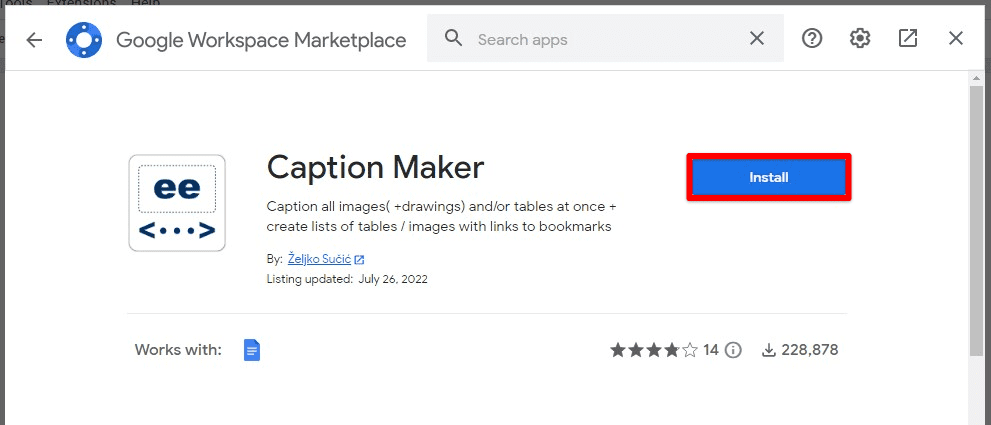
Installing Caption Maker
Step 5: Close the Workspace Marketplace window once the extension is installed. Go to Extensions > Caption Maker > Start. Doing so will activate the add-on in a side menu on the right-hand side.
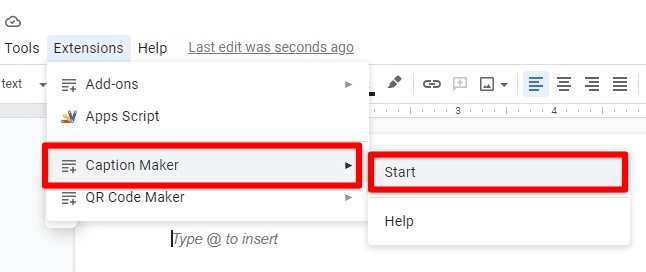
Starting the Caption Maker add-on
Step 6: You can select formats, insert listings, or specify placement and numbering. Click on the “Captionize” button at the bottom of this menu to update.
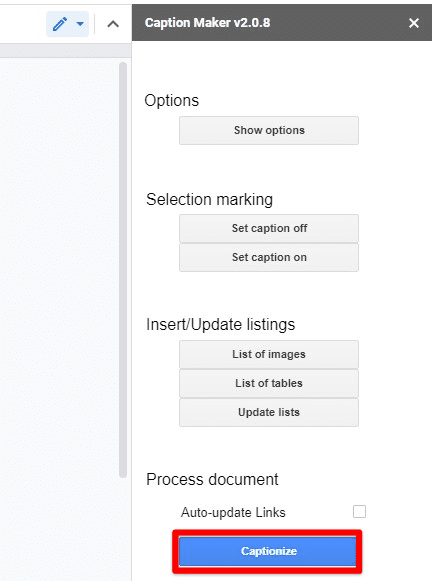
Caption Maker menu
Adding captions with in-line text wrap
The second method involves using an in-line text wrap. When you insert an image in Google Docs, the software presents you with different text wrap options. Once the in-line version is selected, you can place the image within the text that automatically surrounds the borders. Taking advantage of that, we can then set the caption directly underneath the image. You can even adjust the text alignment, size, or style.
Step 1: Launch your preferred internet browser and open “Google Docs.” Log in with your account.
Step 2: Open the document in which you want to add captions.
Step 3: Scroll down to a particular image inside your document. Click on the picture and select in-line text wrap from the side menu.
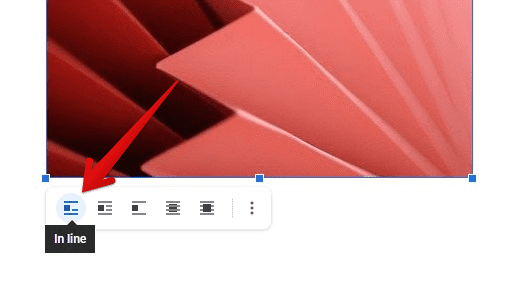
Selecting in-line text wrap
Step 4: Click on the side of that image. You will start seeing the blinking insertion point right next to it. Press the “Enter” key to go on to the next line. In this line, type the caption and then press “Ctrl + Shift + E” for center alignment.

Caption with in-line text wrap
The space before and after the caption can be manually adjusted as well. However, there is one serious drawback to this method. Since the caption and the image are not inherently linked, you will not be able to move them together. If the image is cut from one location to another, these steps will also have to be repeated for the caption. The following two methods allow moving the entire image (along with the caption) as a single unit.
Adding captions with the drawing tool
Google Docs has been host to an innovative drawing tool that enables free-form drawing and other unique insertions. This tool can also enter special characters or shapes directly from the internet. Surprisingly enough, it can add captions to images as well. You must import the respective image inside the tool interface and add the caption in a text box. Once you save and close the drawing, the image and its caption behave as a single element.
Step 1: Launch your preferred internet browser and open “Google Docs.” Log in with your account.
Step 2: Open the document in which you want to add captions.
Step 3: Once the document is opened, click on the “Insert” tab in the toolbar. Go to Drawing > New. The drawing tool window will pop up on your screen.
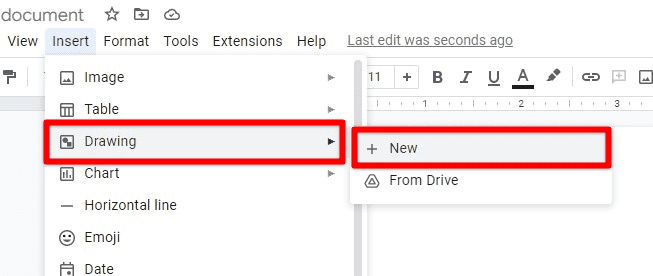
Opening the drawing tool
Step 4: Click on the image icon on its toolbar’s far right side. It will prompt you to select a particular image. You can either upload it directly from your computer or import it from the Drive.
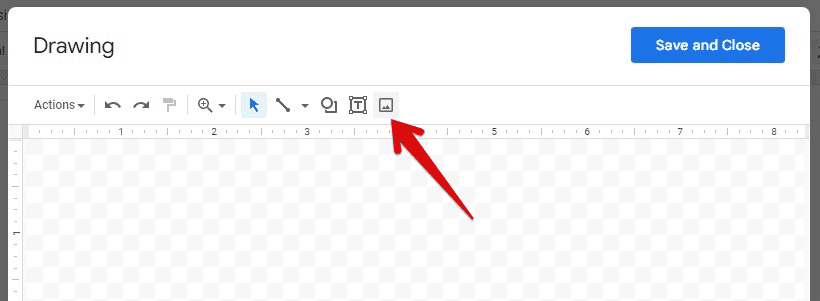
Inserting an image into the drawing board
Note: Images already present inside the document can be imported via image URL.
Step 5: Next, click on the text box icon. Draw the text box inside the drawing board and place it below your image. Type the caption and press “Ctrl + Shift + E” for center alignment. Format the caption, if required.
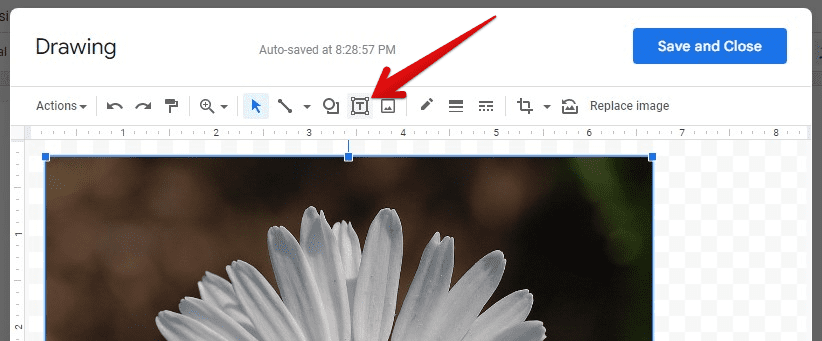
Inserting a text box
Step 6: Once everything looks OK, click on the “Save and Close” button in the top right corner.
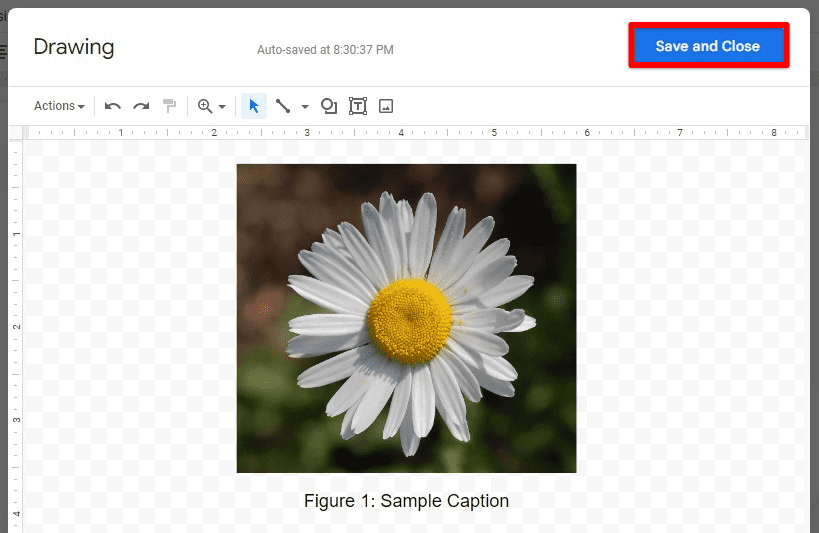
Saving the drawing with the caption inserted
This will paste the drawing inside your document. Now, you can move it wherever you want along with the caption.
Adding captions by inserting a table template
Another cool trick for adding a caption to images in Google Docs uses the default table template. The tables in Docs can be adjusted to take any width or height. By inserting a 1 x 2 table, you can create two rows on top of each other. Just add the image in the top cell and type the caption in the bottom cell. You can then move around the entire table as one if required. Feel free to read our workspace article on customizing tables in Google Docs.
Step 1: Launch your preferred internet browser and open “Google Docs.” Log in with your account.
Step 2: Open the document in which you want to add captions.
Step 3: Once the document is opened, click on the “Insert” tab in the toolbar. Click on “Table.” It opens up a small side window right next to it. Insert a 1 x 2 table in your document.
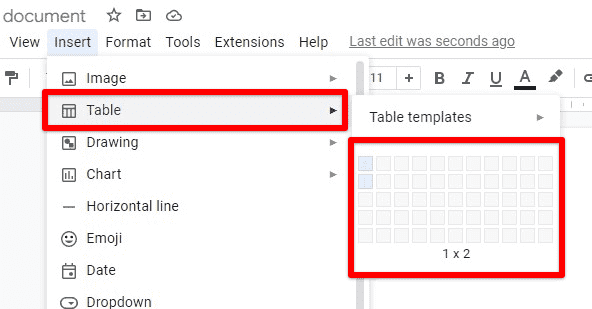
Inserting a 1 x 2 table
Step 4: Copy the image and paste it into the top cell. The cell automatically adjusts to cover the entire picture. If that does not happen, drag the border to resize.
Step 5: Click over the bottom cell. Type the caption and press “Ctrl + Shift + E” for center alignment. Format it, if required.

Caption added using a table
Conclusion
Google Docs is an extensive word processor that contains almost all the tools a regular user would need. Besides, for any missing functionality, existing features can be used as a workaround. You can use any of the above methods to add captions to images. Some work better for individual pictures, while others are more suitable for the entire file. Looking to expand Google Docs functionalities? Here is a detailed article on how to add new fonts.
