When Google Photos discontinued the support for unlimited storage, many users disapproved of it and considered it bad for the service. On the contrary, Google made a huge comeback and rolled out plenty of cool ways in their own Photo Editor. These new tools were integrated with the original Google Photos application so that you would never have to install anything else. This was when Photos was considered more than just a gallery to store backups.
6 cool ways Google Photo Editor can enhance your photos
In the following article, we have listed six cool ways you can use the Google Photos editor to enhance your photos. It includes using suggested edits, cropping and rotating your pictures, adding lighting and color effects, adding filters, and drawing markup or text. There is so much on offer that can completely transform the original picture. Once you get the hang of it, any third-party editing or retouching app will seem redundant. Besides, since you can edit and store all photos in a single application, the storage issues are eliminated. Want to learn more about Google Photos? Here is our detailed article on Photos Archive and how to use it.
1. Using suggested edits
We all need photo edits, but not all of us know how to do so. This is where suggested edits come in. Google Photos has a single-button editing tool that transforms your picture depending on its original lighting, shadows, and highlights. There is an artificially intelligent algorithm that takes care of the filters and colors as well. As soon as you tap on the “Suggestions” tab, you will be given a range of options that produce a remarkable difference in picture quality and appearance. More often than not, they end up doing a better job than manual adjustments. That, by the way, also takes much longer than suggested edits.
Step 1: Open the Google Photos application on your mobile phone and log in to your account.
Step 2: Ensure you are on the “Photos” tab. Here, you can see all pictures stored on your account. Scroll down to find the image you want to edit. Please tap on the photo preview to open it.
Step 3: Once you open the photo, you will see four options at the bottom of your screen. Tap on the “Edit” icon to proceed.
Edit icon
Step 4: You will now see the entire edit menu on your screen. At the bottom, there are multiple tabs for cropping, adjustments, tools, filters, and more. You will already be on the “Suggestions” tab.
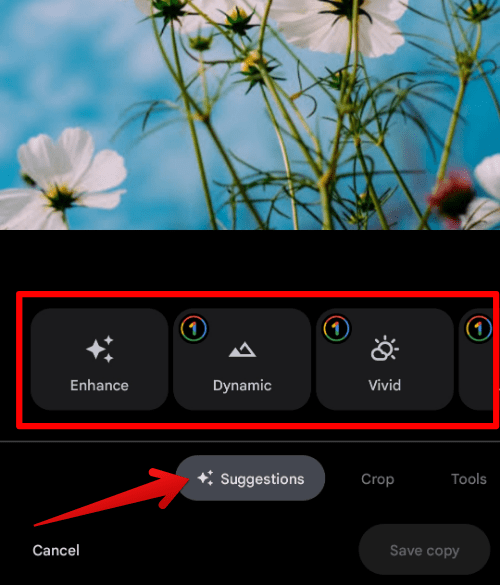
Suggestions tab
Step 5: In this tab, you will see all suggested edits in separate boxes above it. Tap on any box to preview the results.
Note: You can only use one suggested edit at a time. If a particular edit seems good, tap “Save a copy” to proceed.
2. Cropping & rotating your pictures
Now that you have seen what suggested edits can do, let us move on to some manual adjustments. The most basic function of a photo editor has to do with cropping and rotating your pictures. Right next to the “Suggestions” tab, you will find the “Crop” tab. That tab contains the operations for cropping, rotating, and resizing your photos. The rotate tool displays degrees and the resize tool has pre-formatted sizes.
Step 1: Open the Google Photos application on your mobile phone and log in to your account.
Step 2: Ensure you are on the “Photos” tab. Here, you can see all pictures stored on your account. Scroll down to find the picture you want to edit. Tap on the photo preview to open it.
Step 3: Once you open the photo, you will see four options at the bottom of your screen. Tap on the “Edit” icon to proceed.
Step 4: You will now see the entire edit menu on your screen. At the bottom, there are multiple tabs for cropping, adjustments, tools, filters, and more. Make sure that you are on the “Crop” tab.
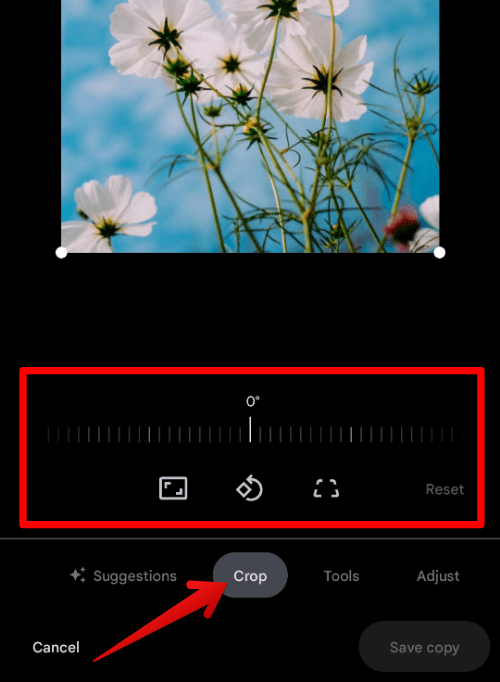
Crop tab
Step 5: In this tab, you will see the options for resizing, cropping, and rotating at the bottom. Tap on any icon to make these edits and preview the results. If a particular edit seems good, tap “Save a copy” to proceed.
3. Adding lighting and color effects
Right next to the “Crop” tab lies the “Adjust” tab. It contains different options for brightness, contrast, HDR, white point, highlights, shadows, saturation, and so much more. These adjustments are for advanced edits and can be explored if you want to transform the picture. You can even think of these settings as custom filters or presets which can be adjusted according to specific needs.
Step 1: Open the Google Photos application on your mobile phone and log in to your account.
Step 2: Ensure you are on the “Photos” tab. Here, you can see all pictures stored on your account. Scroll down to find the picture you want to edit. Tap on the photo preview to open it.
Step 3: Once you open the photo, you will see four options at the bottom of your screen. Tap on the “Edit” icon to proceed.
Step 4: You will now see the entire edit menu on your screen. At the bottom, there are multiple tabs for cropping, adjustments, tools, filters, and more. Make sure that you are on the “Adjust” tab.
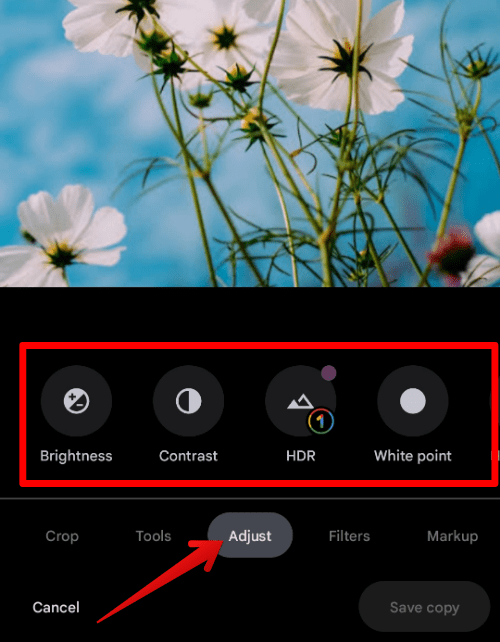
Adjust tab
Step 5: In this tab, you will see the lighting and color effects options at the bottom. Tap on any icon to make these edits and preview the results. If a particular edit seems good, tap on “Done” to proceed.
4. Adding filters
When you think of any photo editor, the first thing that comes to mind is already formatted filters. These filters allow for quick retouches and usually give a completely new outlook to your photos. On Google Photos, there are more than 15 filters divided into different sections based on their saturation and contrast effects. Therefore, you will find all vivid filters at one end while all shadowy filters at the other.
Step 1: Open the Google Photos application on your mobile phone and log in to your account.
Step 2: Ensure you are on the “Photos” tab. Here, you can see all pictures stored on your account. Scroll down to find the picture you want to edit. Tap on the photo preview to open it.
Step 3: Once you open the photo, you will see four options at the bottom of your screen. Tap on the “Edit” icon to proceed.
Step 4: You will now see the entire edit menu on your screen. At the bottom, there are multiple tabs for cropping, adjustments, tools, filters, and more. Make sure that you are on the “Filters” tab.
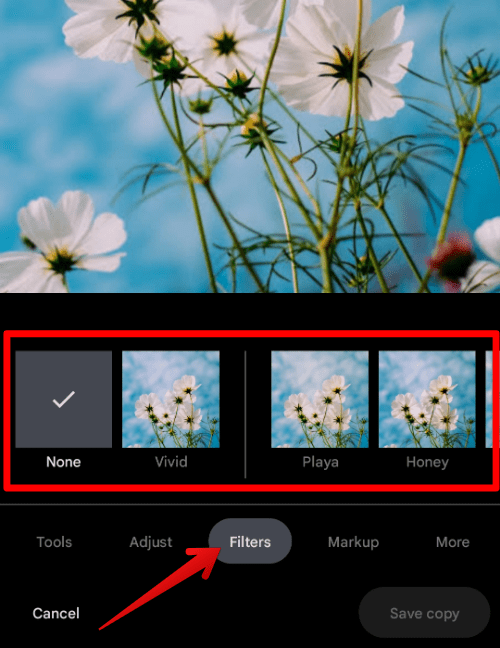
Filters tab
Step 5: In this tab, you will see all filters listed horizontally at the bottom. Swipe through them to see their previews. There is also an option to adjust their opacity which lowers or enhances their effect. If a filter seems good, tap “Save a copy” to proceed.
5. Drawing & adding text on photos
The ability to draw and add text to pictures is another essential part of any photo editor. You will find these tools under the “Markup” tab. It contains different options for pen, highlighter, and text. The pen tool lets you draw on the photo in clear lines. The highlighter tool enables you to create highlighted low-opacity stripes. Lastly, the text tool allows you to write something on your picture. The text is only supported in a single font, but you can change its color, position, and size.
Step 1: Open the Google Photos application on your mobile phone and log in to your account.
Step 2: Ensure you are on the “Photos” tab. Here, you can see all pictures stored on your account. Scroll down to find the picture you want to edit. Tap on the photo preview to open it.
Step 3: Once you open the photo, you will see four options at the bottom of your screen. Tap on the “Edit” icon to proceed.
Step 4: You will now see the entire edit menu on your screen. At the bottom, there are multiple tabs for cropping, adjustments, tools, filters, and more. Make sure that you are on the “Markup” tab.
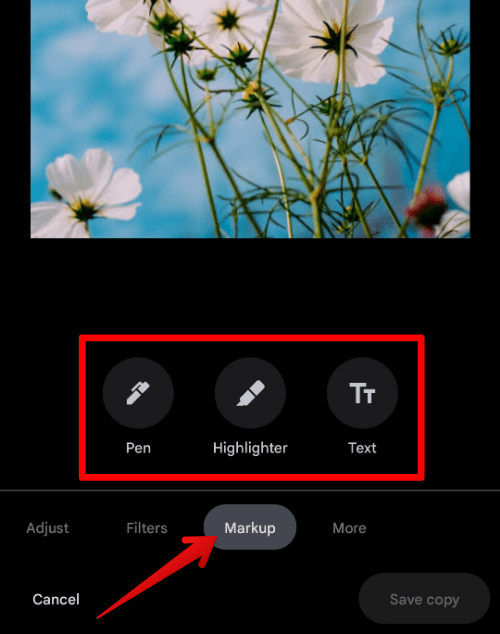
Markup tab
Step 5: In this tab, you will see the pen, highlighter, and text tools at the bottom. Tap on any one of them to make the edits mentioned above. Once a tool is selected, the color options appear on your screen. If a particular edit seems good, tap on “Done” to proceed.
Conclusion
Besides a cloud-based photo gallery, Google Photos also works as an effective photo editor with many features and markup tools. You can use it to crop or resize images, add filters, change lighting, and much more. It also presents suggested edits that allow for quick and easy retouches. If you feel that the options and tools are insufficient, there is a workaround. Google Photos supports in-app edits from other editing applications installed on your phone. They can be accessed in the “More” tab, which is present on the far right. Are you new to using Google Photos? Learn how to set up and use shared libraries on it.
