Google Photos is an all-in-one storage solution for all types of media files. It can be considered an alternative to Google Drive for pictures and videos. Since the time Google Photos first launched on multiple platforms and systems, there has been a recurring problem that troubles a lot of users. When users open their Photos account, they frequently see several duplicate files in their gallery.
In the following article, we will discuss what causes these duplicates and how they can be deleted or prevented in the first place. We have listed down ways to disable Google Drive syncing and other methods to remove these duplicate photos from your account. Do not forget that the best-suited procedure may vary depending on how you initially set up your Google Photos and Google Drive accounts.
The underlying cause behind duplicate photos
Many people do not know that, but Google Photos has a built-in tool solely developed to prevent duplicate uploads on their cloud. However, there is a catch. That tool only seems to work when you manually upload files on Photos. It turns out that all duplicates on Google Photos are caused because of syncing issues across multiple services. These syncing problems may arise from Drive or a third-party cloud management solution.
Besides, Google Photos has been developed for various operating systems such as Windows, macOS, Android, iOS, and others. That essentially means that the end user is allowed to install Photos on several devices and sync all of them up through the cloud. Therefore, if you have the same photos on both desktop and mobile devices, they will automatically be uploaded twice. The prevention tool is not foolproof and may fail to catch every duplicate photo.
Ways to delete duplicate photos from Google Photos
Deleting duplicate photos manually
Sometimes you might get a few duplicate photos in your account, which strikes you as a rare occurrence. In such cases, you are better off deleting those photos manually instead of disabling Drive sync or using a third-party tool. When you disable or even change some syncing preferences in Photos or Drive, that will change future behavior. It might end up causing more problems than before. Thus, if you only see a couple of odd duplicates inside your gallery, delete them manually instead of looking for a major solution.
Step 1: Open Google Photos on your preferred internet browser and log in to your account.
Step 2: Look at the tabs in the menu pane on the left side of your screen. Make sure that you are on the “Photos” tab.
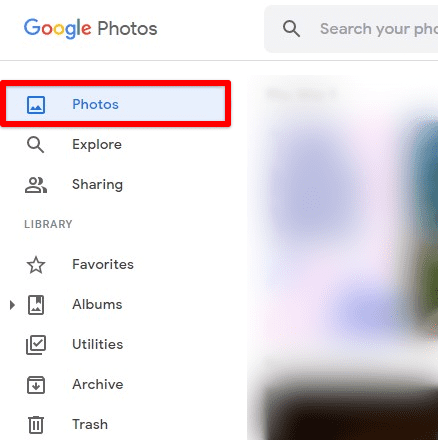
Photos tab
Step 3: Scroll down and browse through all photos. Check to see if there are any duplicates on that page. More often than not, duplicate images will be present right next to each other inside the gallery.
Step 4: If you find a duplicate photo, hover your cursor over one of the image previews. A gray tick icon will appear in the top left corner. Click on it to select that picture. That will also put you into selection mode. Now, you can choose other duplicates, if any.
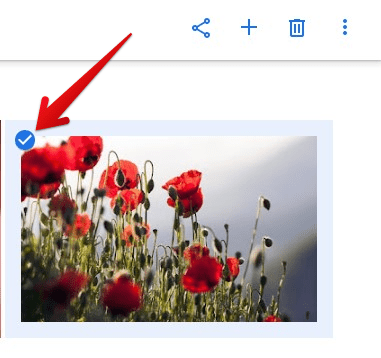
Selecting a duplicate photo
Step 5: Once all duplicate photos have been selected, go to the bin icon in the top right corner and click on “Move to trash.”
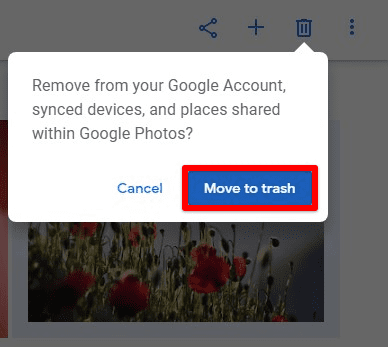
Moving duplicate photos to the trash
Disabling the drive sync from mobile
When you start using Google Photos for the first time, it usually asks for syncing preferences. Setting up these preferences determines whether you will see the files on the drive inside your Photos gallery. Moreover, many people also have the drive for desktop installed on their PCs which automatically syncs all photos within a particular folder on your computer. That leads to additional duplicates on the mobile application and the web rendition of Google Photos.
The most straightforward way to deal with this is to disable the drive sync. It will remove not only existing duplicates but also prevent such future issues.
Step 1: Open the Google Photos mobile application on your phone and log in to your account.
Step 2: From the main page, tap on your profile picture in the top right corner. That opens a pop-up window with different settings for managing your Photos account.
Step 3: Tap on the “Photos settings” tab. It will redirect you to the “Settings” page.

Photos settings tab
Step 4: You can see general settings, sharing options, Google preferences, and the about section. Tap on the “Back up & sync” tab at the very top. It will open up the “Back up & sync page” on your screen.
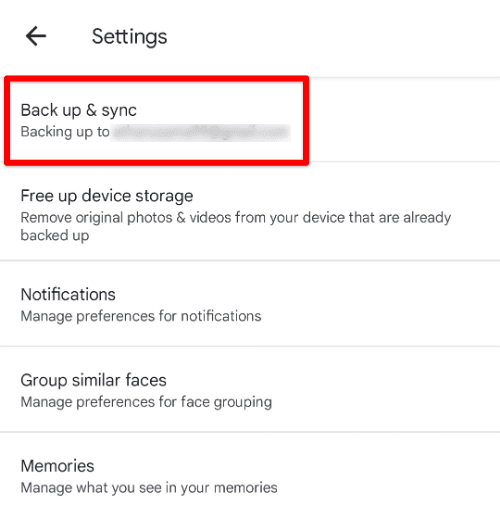
Back up & sync tab
Step 5: Toggle the switch on the right side to a disabled position. Doing so will stop Photos from uploading pictures and videos from your local drive to your Google account.
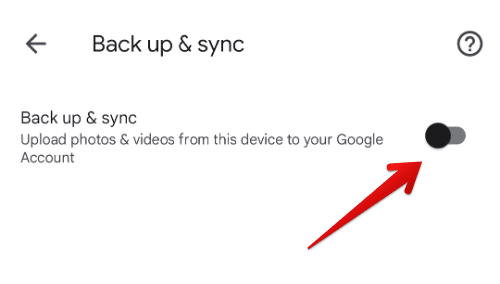
Disabling the drive sync
Step 6: Go back to the “Settings” page and tap on the “Free up device storage” tab. Here, you can remove original items already backed up and might cause duplicates in future syncs.
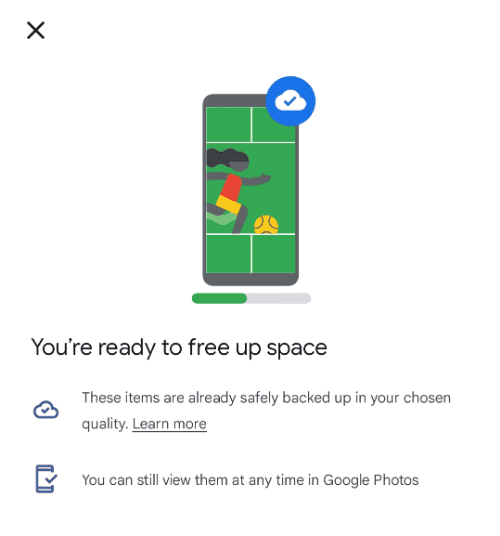
Freeing up device storage
The best approach is to avoid syncing those galleries or devices that contain the same photos. When you need to do so, the sensible idea is to check whether similar photos are more in number than unique ones. If that is the case, copy the distinct pictures and transfer them manually instead of syncing the entire gallery.
Deleting duplicates with Google Photos search
If the duplicates in your Google Photos account were not caused by the drive syncing issues, it would not be easy to find and delete them. Luckily, we have a workaround for that as well. When the actual cause is not faulty syncs, the duplicate photos are usually found together in definite batches inside the Photos gallery. However, you need a special link to access that search view that groups them. The search link maintains the chronological viewing patterns inside Google Photos. That way, you can easily find and delete the duplicate photos that were erroneously uploaded one after the other.
Step 1: Open Google Photos on your preferred internet browser and log in to your account.
Step 2: Go to your browser’s address bar and paste the following link: “https://photos.google.com/search/_tra_.” It will take you to the chronological search view of the entire Google Photos gallery.
Step 3: Scroll down and browse through all photos. Check to see if there are any duplicates on that page. All duplicate photos will be present on this page next to each other. This makes it somewhat easier to find and delete them in batches.
Step 4: If you find a duplicate photo, hover your cursor over one of the image previews. A gray tick icon will appear in the top left corner. Click on it to select that picture. That will also put you into selection mode. Now, you can choose other duplicates, if any.
Note: Hold down the “Shift” key and select the last photo in that range for selecting a range of photos at once.
Step 5: Once all duplicate photos have been selected, go to the bin icon in the top right corner and click on “Move to trash.”
Deleting duplicate photos with a third-party tool
You might have already seen a duplicate detection tool in action. Many modern mobile phones have started integrating it into their local galleries. These tools not only detect duplicates with extreme accuracy but also organize them together so they can be easily removed. Usually, duplicates are deleted to free up more space on the device. That is why such tools were initially rolled out on mobile phones. Nevertheless, these days you can easily find one that also works perfectly well with web browsers.
Conclusion
Even though Photos has a dedicated tool to prevent this, you might still see numerous duplicate photos in your account. These are because of common syncing issues between Drive, Photos, and multiple devices. In this article, we discussed four different ways to delete these duplicates. There is an option to disable the drive sync or remove the replicated pictures with Google Photos search. Whatever method you use, double-check so you do not end up deleting original pictures. Do you have to share pictures and albums quite often? Learn how to set up and use shared libraries in Google Photos.
